background image

Focus In : Press down on the up-arrow button (

) to focus in on the image in 

the closest point from the present camera position.  

Focus Out : Press down on the down-arrow button (

) to focus out on the  

image in the furthest point from the present camera position.  

Iris Open : Press down on the up-arrow button (

) to open the iris. 

Iris Close : : Press down on the down-arrow button (

) to close the iris. 


* If the functions operate in reverse, check the wiring to the PTZ Lens decoder. 


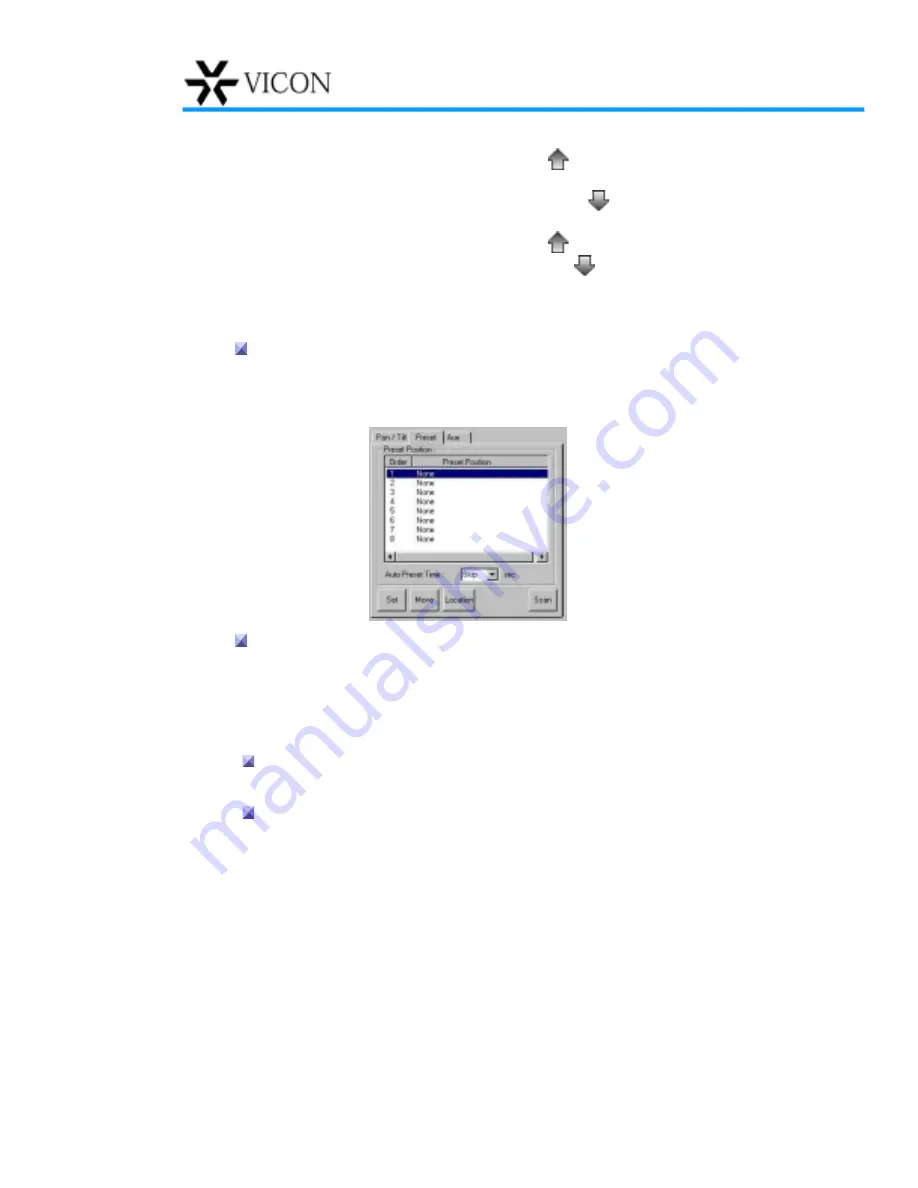
 Auto Preset Function 

Automatically moves the camera to a preset position.  The preset position 
should be first memorized by positioning the camera in a preset position using 
the pan/tilt functions. 


 Setting Automatic Preset Time 

Sets the recording time for each camera preset position when moving the 
camera sequentially from one preset position to another.  If 

Skip

 in 

Auto 

Preset Time

 set up box for a certain camera position is selected, the particular 

position is automatically skipped and the camera will move on to the next 
position. 
 

 Set 

Sets current camera position in memory. 


 Move 

Moves the camera to the currently selected camera position. 

Содержание KOL-4000

Страница 1: ...purpose Copyright 2001 Vicon Industries Inc All rights reserved Product specifications subject to change without notice Vicon and its logo are registered trademarks of Vicon Industries Inc Kollector and its logo are registerted trademarks of Vicon Industries Inc Kollector uses proprietary Hybrid MPEG wavelet technology and is property of Sungjin C C Co Ltd Patents pending Windows is a registered t...

Страница 2: ... ...

Страница 3: ...ment off and on the user is encouraged to try and correct the interference by one or more of the following measures Reorient the receiving antenna Relocate the equipment with respect to the receiver Relocate the equipment away from the receiver Plug the equipment into a different electrical outlet so that the equipment and receiver are on different branch circuits If necessary the user should cons...

Страница 4: ...operating instructions should be retained for future reference 3 Heed Warnings All warnings on the video product and in the operating instructions should be adhered to 4 Follow Instructions All operating and use instructions should be followed 5 Cleaning Step a applies to equipment that can be disconnected from the CCTV system without seriously jeopardizing security Step b applies to equipment tha...

Страница 5: ...consult your Vicon dealer or local power company For video products intended to operate from battery power or other sources refer to the operating instructions 11 Grounding This applies to video products equipped with a 3 wire grounding type plug a plug having a third grounding pin This plug only fits into a grounding type power outlet This is a safety feature If you are unable to insert the plug ...

Страница 6: ... equipment specifically designed for direct exposure to outdoor environments a When the power supply cord or plug is damaged b If liquid has been spilled or objects have fallen into the video product c If the video product has been exposed to rain or water d If the video product does not operate normally by following the operating instructions Adjust only those controls that are covered by the ope...

Страница 7: ... the equipment for damage Save the cartons and packing material If damage is present contact the carrier and file a damage claim immediately If the equipment must be returned to Vicon for repair follow the instructions in the Shipping Information section of this manual Kollector complies with FCC Class A computing device requirements and complies with European Community EMC Directive 89 336 The pr...

Страница 8: ...on Lithium Battery Danger of explosion if battery is incorrectly replaced Replace only with the same or equivalent type recommended by the manufacturer Dispose of used batteries according to the manufacturer s instructions Socket Outlet The socket outlet shall be installed near the equipment and shall be easily accessible ...

Страница 9: ...r 11 Screen Layout 12 Selecting Customized Functions 21 Camera Setting 22 Network 28 Sensor 32 Camera Control 36 Video Input Signal Adjustment 44 Kollector Setup 45 Kollector Upgrade 53 Using Kollector Viewer Basic Operation of Kollector Viewer 55 Screen Layout 57 ...

Страница 10: ...Kollector is a user friendly digital security system that helps businesses and individuals to effectively manage and protect their valuable properties and assets from theft and other artificial and or natural disasters ...

Страница 11: ...the wall outlet 2 Kollector starts operation after a routine start up procedure 3 The recording automatically starts in 3 seconds after a proper execution of Kollector program The recorded files are saved on the hard disk by each channel date and time 4 To stop the recording click on Stop Recording button on the bottom right side of the screen ...

Страница 12: ... Screen Layout The screen layout of Kollector is user friendly to allow even novice users to easily learn and use the system KOL 4000 KOL 4800 2 15 3 5 6 8 10 11 13 14 1 7 4 16 9 12 ...

Страница 13: ...e 2 Transmission Status Indicator Transmission Status Indicator flashes whenever off site users are accessing Kollector system either through a network or phone line connection It also indicates that Kollector LAN Master is connected and is transmitting images Note When Transmission Status Indicator flashes double click the indicator to view information on current users connected to the system via...

Страница 14: ...w the list of occurred events by date and type of event 4 Recording Status Indicator The indicator shows recording status and is animated when Kollector is recording images 5 Time The current time is displayed in hours minutes and seconds format 6 Date Current date is displayed in year month and day format Kollector has an internal clock that maintains the date and time ...

Страница 15: ... show date and time on the Kollector main screen and then enter proper password using the keyboard icon 2 After entering the password the date time setting box appears 3 Select the desired date and time by using down arrow button and then click Modify button ...

Страница 16: ...unctions can be executed by checking on Automatically adjust clock for daylight saving changes Note Kollector stops recording if date time setting has been changed Click Start Recording button to start recording with new date time setting 7 Start Recording Starts recording of live images 8 Stop Recording Stops recording of live images ...

Страница 17: ...ot Kollector system does not show button on the screen Overlay Setup One channel or four channel mode should be selected in order to set up overlay Click on the overlay button on main Kollector screen then the dialogue box will appear on top right Dialogue box of Ovelay Setup Functions of each tab on dialogue box Replace current data on screen display with originally initialized data Real time ima...

Страница 18: ...ge will be enlarged or reduced while the button is pressed down 3 Focus Objects on the screen will be focused while the button is pressed down 4 Iris Adjusts the brightness of image by opening or closing the Iris 5 Preset Instantly moves the camera to a selected preset position 6 Preset name box Displays the title of each preset position 13 Channel Selection KOL 4800 is available only in 8 channel...

Страница 19: ...en mode is selected on a 4 amera system the screens for channel number 5 and 6 will display the VICON logo Note Viewing Enlarged Screen A particular screen on 4 6 9 13 or 16 split screen mode can be instantly enlarged for detailed inspection of the image Click left mouse button on the desired screen for instant enlargement of the image To return to the previous mode click desired mode button again...

Страница 20: ... 16 Kollector Info Double click the VICON logo on the right bottom of main screen to view general information on the Kollector system ...

Страница 21: ...n is comprised of 8 tab windows which appears when the customized function button is clicked on the main screen of the program The number of active tabbed windows for specific configurations may be more or less depending on the features and options purchased ...

Страница 22: ...as shown below Entered information will be displayed on the screen for the selected camera Current Recording View Recordings of images from connected CCTV cameras are displayed on the current recording view Security Screen Mode Background Recording When the checkmark on the Security Screen Mode is turned on the selected camera performs recording as usual but the images being recorded will not be d...

Страница 23: ... through Kollector LAN Master ...

Страница 24: ...mera Motion Detection Range Motion detection range can be selected on the Motion Detection Range screen after the checkmark on the All Ranges selection is turned off To inspect and record the images from specific range of motion turn the checkmark off on All Ranges selection Then select the desired range of motion to be inspected and recorded on the Motion Detection Range screen When the selection...

Страница 25: ...e size is significantly increased If the maximum value is selected during High Quality Mode Accordingly it is highly recommended to use this mode only for short time periods by limiting the time duration in Recording Time setting Movement Sensitivity Motion sensitivity of the images can be adjusted by using the slide selection bar We recommend users to record smaller movements with higher sensitiv...

Страница 26: ...er sensitivity level Adjust the sensitivity value accordingly 4 Camera Noise at Night It is recommended to adjust the Recording Time during night time recording to reduce unnecessary recording at night and save storage space on HDD for later recordings For cameras with excessive noise it is recommended to lower the sensitivity value to avoid unnecessary recording Requested Minimum Sensitivity Valu...

Страница 27: ... maximum storage efficiency please use normal mode for normal daily recording operations Recording Time 1 Selects the recording time of images from the selected camera Example When selected from 0 to 24 hour the recording resumes continuously for 24 hours When selected from 0 to 12 hour images are recorded for the first 12 hours and stops recording for the next 12 hours Note Whenever the installed...

Страница 28: ... turn on the checkmark on the Recording Time 2 and select between 20 to 24 hour Weekend Recording Function Turn the checkmark on SAT or SUN to record even on Saturday and or Sunday If recording is not desired on either Saturday and or Sunday turn off appropriate checkmarks Example To record on Saturday and Sunday set as follow ...

Страница 29: ...heckmark on Connect to Internet to transmit images via Internet Internet Setup Sets the Internet connection settings to transmit images via Internet To set the Internet connection settings follow the instructions below 1 Click the Internet Setup button 2 Internet settings screen will appear Input required information as requested For further assistance please contact your dealer or network adminis...

Страница 30: ...ection and No caller access to limit the modem access Note Check the following setting status when modem connection can not be established properly 1 Press Server Types button and check the server type ppp Internet Window NT Server Windows 98 2 Press Change Password button and type Kollector in old password new password and confirm new password ...

Страница 31: ...ing of split screen mode during remote surveillance Selecting Customized Functions menu on Kollector may not be accessed when the system is remotely controlled by Kollector LAN Master Register Log in Users Registers the Log in users accessing Kollector via LAN Master Only the registered users can transmit and view images using Kollector LAN Master To register new Log in user 1 Select the Network t...

Страница 32: ... box 9 Click OK button to verify the password Delete User Select the desired user name on the list and click Delete button to delete the user name Change Password Select the desired user name on the name list and click Modify button to change the password ...

Страница 33: ...eckmark on the Sensor Enable and then click the sensor number to connect to cameras Sensor Time Selects desired sensor operating time The default time is set at 0 to 24 hour Camera Select the camera to connect to the installed sensor Multiple cameras can be connected to a single sensor To connect cameras 1 3 5 and 7 to sensor 1 1 Click sensor 1 ...

Страница 34: ... the sensor is triggered 1 Click sensor 1 from the sensor menu 2 Click camera 1 from the camera menu and then click camera 2 3 Choose the alarm that you want to connect to the sensor In this case click alarm 1 Then the chosen alarm relay output will turn red 4 Click Close button When the sensor trigger is detected during operation alarm relay output number 1 will be activated for the period of tim...

Страница 35: ...ion for recording time when a sensor is triggered Maximum recording time is 5 minutes When the preset recording time is up the recording of images detected by sensors halts and the system returns to the previous recording mode until the sensor is triggered again Sensor Detected Screen In case a set of four cameras is installed on a system and the images from camera 3 are being recorded with the In...

Страница 36: ...om camera 2 and 4 are displayed on a 16 split screen mode and are recorded simultaneously Display Mode Freeze After Sensor If a sensor corresponding to a selected camera detects any motion the system automatically displays the images from the camera for the duration of the preset Sensor Recording Time regardless of the display mode selected When the recording time is up users can manually select e...

Страница 37: ...ers to control connected devices The following diagram shows the typical configurations for connecting the converter and controller for Kollector A single converter can accommodate multiple controllers and devices Connections vary between manufacturers Contact your sales representative or Kollector technical support for the methods compatible for various CCTV manufacturers If you need any assistan...

Страница 38: ... the pan tilt zoom lighting and other supplementary relay functions of the controller first check on Connect to Controller Types of Controller Click on down arrow button to view camera controller menu and select appropriate camera controller to use Selecting Cameras for the Controller Chose the camera to be connected to the controller The selected cameras will appear dimmed Click it again to desel...

Страница 39: ... connect the selected camera to controller ...

Страница 40: ...ard direction until the desired angle is reached Press down on the left arrow button to swivel the camera left until the desired position is reached Press down on the right arrow button to swivel the camera right until the desired position is reached Press down on the diagnal arrow buttons to swivel the camera in each direction Zoom Focus Iris Zoom In Press down on the up arrow button to gradually...

Страница 41: ...decoder Auto Preset Function Automatically moves the camera to a preset position The preset position should be first memorized by positioning the camera in a preset position using the pan tilt functions Setting Automatic Preset Time Sets the recording time for each camera preset position when moving the camera sequentially from one preset position to another If Skip in Auto Preset Time set up box ...

Страница 42: ...to set preset function from camera control menu 2 Adjust the camera position by using the pan tilt function 3 Select the Order number from preset position menu for new setting 4 Click the Position button and enter the installed location of a selected camera using keyboard screen 5 Set Auto Preset Time by clicking on the down arrow button 6 Click Set to complete the setting ...

Страница 43: ... To use preset function 1 Select the desired preset position 2 Click Move or double click on the selected position ...

Страница 44: ... Click on the accessory s number to view registered information on the accessory Operating Exterior Light Installing an exterior light can help resume surveillance even at night or in any dark areas If an exterior light is installed to a camera choose the number corresponding to the accessory and enter the desired preset operating time Then click on the Light icon The exterior light will be kept o...

Страница 45: ... icon Fan To operate an installed fan press down on the Fan icon Heater To operate an installed heater press down on the Heater icon Note Actual operations of each function may vary significantly from the manual due to different models and manufacturers of accessories used This manual presents the standard model procedures ...

Страница 46: ...ightness Adjusts Brightness of the currently selected camera Contrast Adjusts Contrast of the currently selected camera Chroma U Adjusts Chroma U of the currently selected camera Chroma V Adjusts Chroma V of the currently selected camera Hue Adjusts Hue of the currently selected camera Default Returns the currently selected camera s color tone to default settings NTSC PAL video standards ...

Страница 47: ...he selection Click again to release the selection Note The number of installed cameras that are either not connected to the system or unpowered are shown dimmed on Select Recording Camera on the Recording menu and may not be selected until the camera is properly connected and or powered Automatic Alternation Mode automatic video switching Turn on the checkmark on the Select Automatic Alternation M...

Страница 48: ...d to indicate the selection 4 Select cameras 2 3 4 5 and 6 respectively Each time a camera is selected the camera number appears with an arrow under the camera icon 5 Click Add button 6 Set the second switch sequence mode for 1 3 5 7 9 by clicking camera numbers 1 3 5 7 and 9 respectively 7 Click Add button 8 Following the same steps above select the third set of cameras for 2 4 6 8 10 and 12 and ...

Страница 49: ...nly by preselected camera groups and not by individual camera input 4 screen mode in the system with built in 4 channel overlay board All screen modes except 1 screen mode in the system with built in 16 8 channel overlay board Frames per Second Choose the number of frames to be recorded per second with the slide bar Assigning Password for Encoded File Passwords can be assigned to the encoded image...

Страница 50: ... 4 Click Input button ...

Страница 51: ...ording was started then the new password is encoded from the beginning of the new recording Modify Password Modifies administrator s password Click Modify Password button and then follow the same steps as explained above in the assigning password section If you turn the checkmark on the Save Password you will not be asked again to enter the password next time Same password is used in both Kollecto...

Страница 52: ...ample Select the 4 screen mode and the display order of three sets of 1 2 3 4 9 10 11 12 and 5 6 7 8 on 12 camera system with an automatic alternation mode time of 3 seconds The current recording screen will first display the images from the first set of 4 cameras for 3 seconds Images from the next set of 4 cameras will then appear for 3 seconds and the last set in the next 3 second interval The 3...

Страница 53: ...the order of 1 2 3 4 5 6 7 8 9 only the rest of 3 cameras in the order of 10 11 12 need to be selected for the second set 13 screen mode When the 13 screen mode is selected select a set of 13 cameras to be displayed together on the current recording screen and click Add button Select the next set of 13 cameras to be displayed together and click Add button Example For a 16 camera system with the 13...

Страница 54: ... 4 screen mode in the system with built in 4 channel overlay board All screen modes except 1 screen mode in the system with built in 16 8 channel overlay board ...

Страница 55: ... recording screen Add When Add button is clicked the currently selected display order is added to the display order schedule When added to the schedule the order can be modified at a later time Modify To change the display order selected select the order in the display order schedule to modify the order To change a display order of 6 5 4 2 3 1 to 6 5 1 2 7 8 1 Select the display order to be modifi...

Страница 56: ... 4 Click the camera icons numbered 1 2 3 and 4 to release the selection of those cameras Do not release the number 5 and 6 camera ...

Страница 57: ... 5 Click and select the cameras numbered 1 2 7 and 8 to re select the order of display 6 Click Add button Delete Deletes unwanted display orders Default Returns to the default setting ...

Страница 58: ...he supplier and following the upgrade instruction as shown on the screen To start installation click Start Upgrade button and input your Password System Backup System Backup Program automatically restore damaged HDD booting files during abnormal system failures e g power failure Backup must be selected by clicking on System Backup button each time the system is upgraded ...

Страница 59: ... Using Kollector Viewer Kollector Viewer allows easy and convenient search through the recorded images by date hour and the camera number ...

Страница 60: ...ut the correct password Kollector Viewer cannot be started It s advisable to use simple passwords that you can easily remember After entering the password turn the checkmark on the Save the Password Once done it is not necessary to enter the password again If you forgot the password contact VICON Industries for further help 3 When Kollector Viewer screen appears enter recording date and hour to se...

Страница 61: ...lay button to replay and view the recorded image 7 To pause the replaying of images click the Pause button 8 To end the search function and go back to the Kollector main screen click the Return to Kollector button on the right bottom of the screen Note If you search on currently recording images the searched images may be distorted Those images can be properly viewed once the recording is complete...

Страница 62: ... Screen Layout KOL 4000 KOL 4800 13 5 6 7 4 2 3 1 10 9 8 11 12 13 14 15 16 17 18 19 21 22 23 24 25 26 27 20 28 ...

Страница 63: ...d Search 10 Go to Start Position 11 Go to Last Position 12 Enlarge Condense Screen Size Gradually enlarges or condenses images played back on the Kollector Viewer Note If you position the mouse pointer over the search screen and click the left button the screen around the mouse pointer will be enlarged If you click the right button the screen around the mouse pointer will be reduced 13 Channel Sel...

Страница 64: ...stribution of video images using JPEG which are large files For long term archival use the DVD export which exports video clips to DVD using Kollector wavelet technology To continuously save multiple searched images from the current search screen 1 Click the Save Searched Images button 2 Save Images box then appears 3 To indicate the save path click the Calling button at the right side of file pat...

Страница 65: ...D as a basic backup device To backup the image files just connect your backup device to Kollector and restart the system Press Power Button again on the front panel after shutting down the system To use another backup device install device driver before starting the backup Kollector supports several backup devices including DVD MOD JAZZ and ZIP To use DVD device for backup first turn on DVD and th...

Страница 66: ...e with attached external removable disk 4 Click the Save button Note Backup is an optional function on Kollector system Please request the function to be included in the Kollector system when placing the order for a new Kollector system Kollector Viewer program can be automatically copied onto the backup device with saved image files if the root folder of the backup device is selected as the backu...

Страница 67: ... the ID on the back panel of DVD to 2 Default You can connect up to 7 DVD s with ID from 0 to 6 5 Connect DVD to Kollector system 6 Turn on the DVD power 7 Turn on the Kollector system power B Installation of PC for Backup 1 Open the PC Cover and install SCSI card in an empty slot 2 Install DVD Driver software supplied by the manufacturer on the PC C Data Backup and Review 1 Follow the steps descr...

Страница 68: ...alled in the system 2 Turn off the Kollector system power 3 Connect CD RW to Kollector system 4 Turn on the CD RW power 5 Turn on the Kollector system power B Data Backup and Review 1 Follow the steps described in Operation Manual Page 60 61 2 After the backup remove CD from the drive 3 Insert CD to CD Drive in your PC 4 Using Windows Explorer look for the file D Disstech Bin Dissviewer exe D is C...

Страница 69: ...ed When a empty CD is inserted to CD RW drive the following screen appears The selection screen may not appear if the CD is inserted before system is booted or mouse is clicked before the screen appears Please insert CD again Select first icon Direct CD on the left Then following screen appears ...

Страница 70: ...xt button Then following screen appears Click Next button Then following screen appears Click Next button to finish format Formatting CD during Kollector system is in operation can cause reduction in frame rate ...

Страница 71: ...out printing click Close button 18 Ret urning to Kollector Main screen Stops the search and returns to Kollector main screen 19 Search Previous Hour This function is not available when searching for the first time Search Previous Hour function can be used only after at least one hour recording has been completed Search Previous Hour function automatically opens and displays any recorded images fro...

Страница 72: ...00 the current search screen displays the images recorded after 09 01 98 Tuesday 13 01 each time the Search Next Hour button is clicked 21 Time Position Indication Bar Shows the present search time position as minute Search by minute interval is available by moving slide bar forward or backward 22 Search Condition Date Click the down arrow icon and select the date to start the search on 23 Search ...

Страница 73: ... of sensor detected images 3 Select desired sensor detected events to search on and then click Search button or double click on the sensor detected events 4 Click Replay button on the Kollector Viewer s main screen to replay the images found Note If you run the search by sensor detected events and the occurred time the sensor detected events are shown on the search time indicator bar The camera nu...

Страница 74: ...lector system Changing Password on Kollector Viewer To change the password enter the current password followed by a new password Re enter the new password and press OK Enter new password next time when accessing Kollector Viewer Add Printer Click Add Printer tap to install new printer ...

Страница 75: ...o be used If your printer is directly connected to Kollector click Local Printer 3 Select the printer manufacturer and model from the menu If your printer came with an installation disk click Have Disk 4 Follow the instruction on the screen After your printer is installed print out a test page to confirm that your printer is set up properly ...

Страница 76: ...onfigure the printer outlet to match the resolutions and type of paper being used 28 Display Mode Split Screen Mode KOL 4800 is available with only up to 9 screen mode Splits the current search screen to display 1 4 9 or 16 channels simultaneously on a single screen The number in the picture corresponds to the camera number 1 2 3 4 4 screen mode 1 2 3 4 5 6 7 8 9 10 11 12 13 14 15 16 16 screen mod...

Страница 77: ... screen mode is more than the actual number of connected cameras the vacant screen displays the VICON logo Example When 9 screen mode is selected on a 7 camera system the screen 8 and 9 will display the VICON logo 1 1 screen mode ...

Страница 78: ...particular screen on 4 9 or 16 split screen mode can be instantly enlarged for detailed inspection of the image Click on the desired screen for instant enlargement of the image 3 1 2 3 4 Click left mouse button once on Number 3 screen ...

Страница 79: ...require any scheduled maintenance except for an internal Lithum GELL CELL battery change out approximately every five 5 years If a unit does not operate after reviewing the Q A Section of this manual contact Vicon s Service Department ...

Страница 80: ...ies U K Ltd Brunel Way Fareham PO15 5TX United Kingdom Phone 44 0 1489 566300 Fax 44 0 1489 566322 2 Attach a sheet of paper to the unit with the following information a Name and address of the company returning the unit b Name of the Vicon employee who issued the R A c R A number d Brief description of the installation e Complete description of the problem and circumstances under which it occurs ...

Страница 81: ...electric cable with a heavy exterior insulation in applications subject to moisture Cable Types The most commonly used cable types are RG 59 U and RG 11 U Each is actually a family of cables with widely varying electrical characteristics some of which are not suitable for CCTV applications Choose a cable type by referring to the characteristics and maximum distances listed below The maximum distan...

Страница 82: ...Europe Headquarters Brunel Way Fareham PO15 5TX United Kingdom 44 0 1489 566300 Fax 44 0 1489 566322 Brussels Office Planet II Unit E Leuvensesteenweg 542 B 1930 Zaventem Belgium 322 712 8780 Fax 322 712 8781 Vicon China Unit 5 17 F Metropole Square 8 On Yiu Street Shatin New Territories Hong Kong 852 2145 7118 Fax 852 2145 7117 Internet Address www vicon cctv com ...

Отзывы: