background image

TP-7045 3/18c

30 Section 6 Electrical System

Accidental starting.

Can cause severe injury or death.

Disconnect the battery cables before

working on the generator set.

Remove the negative (--) lead first

when disconnecting the battery.

Reconnect the negative (--) lead last

when reconnecting the battery.

WARNING

Disabling the generator set. Accidental starting can

cause severe injury or death.

Before working on the

generator set or equipment connected to the set, disable the

generator set as follows: (1) Press the generator set off/reset

button to shut down the generator set. (2) Disconnect the

power to the battery charger, if equipped. (3) Remove the

battery cables, negative (--) lead first. Reconnect the negative

(--) lead last when reconnecting the battery. Follow these

precautions to prevent the starting of the generator set by the

remote start/stop switch.

Hazardous voltage. Moving parts.

Will cause severe injury or death.

Operate the generator set only when

all guards and electrical enclosures

are in place.

DANGER

Grounding electrical equipment. Hazardous voltage will

cause severe injury or death.

Electrocution is possible

whenever electricity is present. Ensure you comply with all

applicable codes and standards. Electrically ground the

generator set, transfer switch, and related equipment and

electrical circuits. Turn off the main circuit breakers of all

power sources before servicing the equipment. Never contact

electrical leads or appliances when standing in water or on wet

ground because these conditions increase the risk of

electrocution.

Short circuits. Hazardous voltage/current will cause

severe injury or death.

Short circuits can cause bodily injury

and/or equipment damage

.

Do not contact electrical

connections with tools or jewelry while making adjustments or

repairs. Remove all jewelry before servicing the equipment.

Electrical backfeed to the utility. Hazardous backfeed
voltage can cause severe injury or death.

Connect the

generator set to the building/marina electrical system only
through an approved device and after the building/marina
main switch is turned off. Backfeed connections can cause
severe injury or death to utility personnel working on power
lines and/or personnel near the work area. Some states and
localities prohibit unauthorized connection to the utility
electrical system. Install a ship-to-shore transfer switch to
prevent interconnection of the generator set power and shore
power.

6.2.2

Circuit Breaker Installation

1. Press the generator set OFF/RESET button to shut

down the generator set.

2. Disconnect the generator set engine starting

battery, negative (--) lead first.

3. Remove the six screws from the right side junction

box panel and remove the panel.

4. Install the circuit breaker on the new panel with the

screws and washers. Position the ON side of the

circuit breaker toward the rear of the junction box.
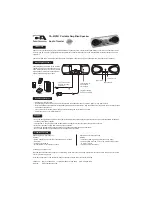
See Figure 6-2.

5. Attach stator leads L1, L2, and L3 to the extension

leads (if supplied) or to the line side of the circuit

breaker. See Figure 8-3.

Note:

Kohler

r

marine diesel generator sets are

fully frequency adjustable and voltage

reconnectable. To determine reconnection

options, check the model’s specification

sheet.

Note:

Insulate leads with electrical tape after

connecting extension leads to stator leads.

6. Connect the neutral connection stator leads to the

L0 stud.

Note:

Verify that terminal positions and previously

made line lead connections allow room for

load connections to load studs.

7. Connect the load side of the circuit breaker to

customer-supplied craft wiring.

Connect the

neutral lead to the L0 stud. See Figure 8-3.

Содержание 12EFKOZD

Страница 1: ...Marine Generator Sets TP 7045 3 18c Installation Models 14 16 21 24 32 40EKOZD 12 13 5 17 18 20 5 28 35EFKOZD Controller Decision Makerr 3500...

Страница 2: ...TP 7045 3 18c 2...

Страница 3: ...ing and Installation 18 4 3 1 Above Waterline Installation 19 4 3 2 Mid Below Waterline Installation 20 Section 5 Fuel System 25 5 1 Fuel Tank 25 5 2 Fuel Lines 26 5 2 1 Fuel Line Selection and Applic...

Страница 4: ...reaker Does Not Close to Bus 63 9 4 1 Faults Not Shown 63 9 4 2 Faults Shown 64 9 5 Troubleshooting When Breaker Does Close to Bus 66 9 5 1 Faults Shown 66 9 6 Troubleshooting When Running in AUTO 70...

Страница 5: ...ath Before working on the generator set or equipment connected to the set disable the generator set as follows 1 Press the generator set off reset button to shut down the generator set 2 Disconnect th...

Страница 6: ...fuel vapors can cause severe injury or death Vaporized fuels are highly explosive Use extreme care when handling and storing fuels Store fuels in a well ventilated area away from spark producing equip...

Страница 7: ...h to prevent interconnection of the generator set power and shore power Testing live electrical circuits Hazardous voltage or current will cause severe injury or death Have trained and qualified perso...

Страница 8: ...TP 7045 3 18c 8 Safety Precautions and Instructions Notes...

Страница 9: ...anning your installation Use current dimension drawings and wiring diagrams 1 2 5 6 3 7 8 9 11 12 14 10 15 16 17 18 ADV8558 1 Exhaust mixer elbow exhaust water outlet non service side 2 Heat exchanger...

Страница 10: ...p Note If the personality disk is NOT available request a replacement from Kohler Co using the generator set serial number or order number D User parameters unique to an installation include timer val...

Страница 11: ...ent is often the ideal location for the generator set if the propulsion engine s does not obstruct access to the generator set and controller Allow clearance for vibration and cooling during operation...

Страница 12: ...TP 7045 3 18c 12 Section 2 Location Lifting and Mounting Notes...

Страница 13: ...or allowable intake restriction Note ISO 3046 derates apply See Appendix C Model Allowable Intake Restriction kPa in H2O 14EKOZD 1 and 3 Phase 16EKOZD 1 and 3 Phase 2 4 9 6 12EFKOZD 1 and 3 Phase 13 5...

Страница 14: ...tconfigurationappliespositivepressuresimilar to a scoop type through hull strainer 3 2 2 Seacock Mount the seacock to the hull assemble it to the intake and ensure that it is accessible for operation...

Страница 15: ...of its connection to the flexible section Keep the seawater hose as straight and short as possible If the hose is too long usually over 4 6 m 15 ft water suction problems may occur See Section 7 for t...

Страница 16: ...water Freshwater Coolant Antifreeze 1 2 8 10 9 11 12 7 6 5 4 3 1 Engine block 2 Thermostat 3 Engine driven water pump 4 Engine driven seawater pump 5 Seawater strainer customer supplied 6 Seacock cust...

Страница 17: ...carbon monoxide detector Inspect the detector before each generator set use Operating the generator set Carbon monoxide can cause severe nausea fainting or death Be especially careful if operating th...

Страница 18: ...rd A lift in the exhaust piping before the piping exits the craft prevents backwash See Figure 4 3 item 1 Support the exhaust lines to prevent the formation of water pockets Exhaust system installatio...

Страница 19: ...anger locations vary by model 6 Coolant recovery tank located on the unit on some models 7 Maximum seawater pump lift of 1 m 3 ft 8 Seawater strainer 9 Seacock 10 Intake strainer 11 Engine driven seaw...

Страница 20: ...the siphon break s cap is tight before operating the generator set 1 Heat exchanger located inside the manifold 2 Exhaust mixer 3 Cut hose and connect siphon break and hardware rotate the fitting on...

Страница 21: ...of 1 3 cm per 30 5 cm 0 5 in per ft 16 Maximum distance between silencer and exhaust mixer elbow of 3 m 10 ft 17 Maximum distance between silencer and exhaust outlet of 1 5 m 5 ft 18 Silencer custome...

Страница 22: ...tween silencer and exhaust mixer elbow of 3 m 10 ft 17 Maximum distance between silencer and exhaust outlet of 1 5 m 5 ft 18 Silencer customer supplied 19 Minimum exhaust hose pitch of 1 3 cm per 30 5...

Страница 23: ...in outlet from silencer must be equal to or greater than water drain item 17 to be greater than 30 5 cm 1 ft 20 Exhaust outlet to be diameter appropriate so exhaust back pressure does not exceed limit...

Страница 24: ...TP 7045 3 18c 24 Section 4 Exhaust System Notes...

Страница 25: ...rine generator sets drawfuel fromthe same fuel tank as the craft s propulsion engine s If the tank s fuel pickup opening allows a multiple dip tube use a multiple dip tube arrangement See Figure 5 1 T...

Страница 26: ...failure or hard starting of the generator set The dip tube depth should be at least as deep as the main engine fuel pick up dip tube Under no circumstances should the propulsion engine and generator s...

Страница 27: ...ilure Use of such materials may affect fuel system warranty Note The KDI TCR engines require that the above metals are not present in the fuel system components 5 3 Fuel Filters Conform to USCG Regula...

Страница 28: ...TP 7045 3 18c 28 Section 5 Fuel System Notes...

Страница 29: ...r at sea The wiring then connects to a main circuit breaker box panel board that distributes branch circuits throughout the craft See Section 8 for reconnection of the generator set 6 2 Circuit Protec...

Страница 30: ...ct electrical connections with tools or jewelry while making adjustments or repairs Remove all jewelry before servicing the equipment Electrical backfeed to the utility Hazardous backfeed voltage can...

Страница 31: ...able ties as necessary to protect and secure wiring from sharp objects the exhaust system and any moving parts 8 Attach the new panel to the junction box using the original six screws 9 Check that the...

Страница 32: ...ore information The scope of these topics is too extensive to be fully discussed here Consult your local marine authority for more information Before installing the generator set check the available w...

Страница 33: ...he spec requires to start the generator See Figure 6 4 for minimum cold cranking amps CCA recommendations 12 Volt Starting Battery Size CCA at 15 C 5 F or 100 Amp Hr Models CCA 14EKOZD 12EFKOZD 1 and...

Страница 34: ...TP 7045 3 18c 34 Section 6 Electrical System Notes...

Страница 35: ...gure 7 1 for installation drawing identification Model No Drawing Page 14EKOZD 12EFKOZD 16EKOZD 13 5EFKOZD 1 and 3 phase ADV 8880A ADV 8880B 36 37 with sound shield ADV 8881A A ADV 8881B A 40 41 acces...

Страница 36: ...TP 7045 3 18c 36 Section 7 Installation Drawings ADV 8880A NOTE Dimensions are shown in mm in Figure 7 2 Dimension Drawing 14 16EKOZD and 12 13 5EFKOZD Sheet 1 of 2...

Страница 37: ...TP 7045 3 18c 37 Section 7 Installation Drawings ADV 8880B NOTE Dimensions are shown in mm in Figure 7 3 Dimension Drawing 14 16EKOZD and 12 13 5EFKOZD Sheet 2 of 2...

Страница 38: ...TP 7045 3 18c 38 Section 7 Installation Drawings ADV 8883A NOTE Dimensions are shown in mm in Figure 7 4 Dimension Drawing 21 24EKOZD and 17 20 5EFKOZD Sheet 1 of 2...

Страница 39: ...TP 7045 3 18c 39 Section 7 Installation Drawings ADV 8883B NOTE Dimensions are shown in mm in Figure 7 5 Dimension Drawing 21 24EKOZD and 17 20 5EFKOZD Sheet 2 of 2...

Страница 40: ...TP 7045 3 18c 40 Section 7 Installation Drawings ADV 8881A A NOTE Dimensions are shown in mm in Figure 7 6 Dimension Drawing Sound Shield 14 24EKOZD and 12 20 5EFKOZD Sheet 1 of 2...

Страница 41: ...TP 7045 3 18c 41 Section 7 Installation Drawings ADV 8881B A NOTE Dimensions are shown in mm in Figure 7 7 Dimension Drawing Sound Shield 14 24EKOZD and 12 20 5EFKOZD Sheet 2 of 2...

Страница 42: ...TP 7045 3 18c 42 Section 7 Installation Drawings ADV 8882A NOTE Dimensions are shown in mm in Figure 7 8 Dimension Drawing Accessories 14 24EKOZD and 12 20 5EFKOZD Sheet 1 of 2...

Страница 43: ...TP 7045 3 18c 43 Section 7 Installation Drawings ADV 8882B NOTE Dimensions are shown in mm in Figure 7 9 Dimension Drawing Accessories 14 24EKOZD and 12 20 5EFKOZD Sheet 2 of 2...

Страница 44: ...TP 7045 3 18c 44 Section 7 Installation Drawings ADV 8857A B NOTE Dimensions are shown in mm in Figure 7 10 Dimension Drawing 32 40EKOZD and 28 35EFKOZD Sheet 1 of 2...

Страница 45: ...TP 7045 3 18c 45 Section 7 Installation Drawings ADV 8857B B NOTE Dimensions are shown in mm in Figure 7 11 Dimension Drawing 32 40EKOZD and 28 35EFKOZD Sheet 2 of 2...

Страница 46: ...TP 7045 3 18c 46 Section 7 Installation Drawings ADV 8858 B NOTE Dimensions are shown in mm in Figure 7 12 Dimension Drawing Sound Shield 32 40EKOZD and 28 35EFKOZD Sheet 1 of 2...

Страница 47: ...TP 7045 3 18c 47 Section 7 Installation Drawings ADV 8858 B NOTE Dimensions are shown in mm in Figure 7 13 Dimension Drawing Sound Shield 32 40EKOZD and 28 35EFKOZD Sheet 2 of 2...

Страница 48: ...TP 7045 3 18c 48 Section 7 Installation Drawings ADV 8859A A NOTE Dimensions are shown in mm in Figure 7 14 Accessory Drawing Keel Cooling with Dry Exhaust 32 40EKOZD and 28 35EFKOZD Sheet 1 of 2...

Страница 49: ...TP 7045 3 18c 49 Section 7 Installation Drawings ADV 8859B A NOTE Dimensions are shown in mm in Figure 7 15 Accessory Drawing Siphon Break Connection 32 40EKOZD and 28 35EFKOZD Sheet 2 of 2...

Страница 50: ...TP 7045 3 18c 50 Section 7 Installation Drawings Notes...

Страница 51: ...injury or death Before working on the generator set or equipment connected to the set disable the generator set as follows 1 Press the generator set off reset button to shut down the generator set 2 D...

Страница 52: ...rican Solenoid Newer Round Design 2 1 3 4 6 5 7 8 1 2 6 5 3 4 8 7 L1 L2 To Generator Set To Shore Power To Load 3 2 4 1 7 6 8 5 L1 L2 To Generator Set To Shore Power To Load 3 Wire Generator Sets 2 1...

Страница 53: ...ow allsafety precautions at the front of this manual and in the text during the reconnection procedure NOTICE Voltage reconnection Affix a notice to the generator set after reconnecting the set to a v...

Страница 54: ...TP 7045 3 18c 54 Section 8 Reconnection Figure 8 3 Generator Reconnection ADV 5875F U...

Страница 55: ...luded in this manual Pay attention to the decals on the equipment and follow the instructions below D All personnel involved in handling site preparation installation testing operation and maintenance...

Страница 56: ...prime power applications 9 1 2 Paralleling Functions There are two methods of paralleling 1 PGEN The Decision Makerr 3500 is a full featured paralleling controller It offers integrated control for sy...

Страница 57: ...nerator Info Paralleling Operation Sharing Setup Menus Note Non ECM engines will require an electronic governor Woodward APECs and an appropriate Kohler governor calibration in order to permit speed a...

Страница 58: ...rotation ofthe busdoesn tmatch thatof the generator set For PGEN paralleling the synchronizing is handled within the Decision Makerr 3500 controller For Remote Speed and Voltage Bias paralleling the s...

Страница 59: ...olts 5 values supplied outside of this range will default the setting to nominal Note Some engines may limit this speed adjust to no more than approx 3 5 Voltage Regulator The voltage regulator is int...

Страница 60: ...d pair communication cable Connect the shield to ground at one end only Tighten the connections to 0 5 Nm 4 4 in lbs The PGEN connection between the generator sets is always required when the generato...

Страница 61: ...llers are shown in SiteTecht under the Manage Parallel Devices mode located at the top of the SiteTecht screen Note For more information on SiteTecht see TP 6701 SiteTecht Software Operation Manual If...

Страница 62: ...output leads to the paralleling bus Consult the wiring diagrams provided in the operation manual Connect PGEN communication wiring See Section 9 3 1 in this manual If the engine does not start consult...

Страница 63: ...that there are no unintentional or loose connections 4 Baud rate misconfigured One of the controllers on the network is attempting to communicate at a different baud rate than the other controllers Th...

Страница 64: ...generator Fault Close Attempt Fault Fail to Close 1 Breaker is unable to close The controller is attempting to close the circuit breaker but the breaker is not closing Watch the ready flag on the moto...

Страница 65: ...ing is not connected correctly on any generators on the network Verify the wiring on the circuit breaker to ensure that it is connected correctly Verify bus wiring for all nodes Verify the generator o...

Страница 66: ...sed when it was triggered to close but it did not indicate that it was open when the breaker opened This fault will only occur if the bus sensing is connected correctly the controller sees the voltage...

Страница 67: ...not connected to the output of the generator Verify the generator metering is sensed at the output of the generators A common mistake is to connect the metering to the center tap voltages V7 V8 V9 Fa...

Страница 68: ...and bus rotation is backwards Verify metering connections on the generator L1 should connect to the phase A output lead L2 to phase B L3 to phase C L0 to neutral Fault Bus Sensing Phases C and A are...

Страница 69: ...when the breaker contacts indicate that the breaker is open Verify the paralleling breaker control wiring is connected correctly and the status feedback is connected to an A contact Fault Failure to...

Страница 70: ...generator should be started and closed to a dead bus again to validate the changes Fault Dead Bus Sensed When Live Bus Expected 1 The wiring was not connected between the load side of the paralleling...

Страница 71: ...ect calibration it may see this voltage as a much higher level than the other generators resulting in a protective relay trip Verify the controller is measuring voltage accurately If not re calibrate...

Страница 72: ...ll trip to protect the generator from damage due to excessive loads Ensure that the load is low enough for a single generator to support it Fault Generator Total Real Power Low Warning 1 Loss of fuel...

Страница 73: ...ating on the network have different Order Selection modes Generator management will not operate if any generators on the PGEN network have different Order Selection modes Adjust the Order Selection mo...

Страница 74: ...remain essentially identical D Prime power applications where the generators are all of similar size Typical Applications for Fuel Level Order Selection Mode D Prime power applications where the gene...

Страница 75: ...tor Start Percentage The Generator Start Percentage is the percent load on the running generators above which this generator will begin timing for the Generator Start Delay The default setting is 80 t...

Страница 76: ...ies are events which can be assigned to programmable IO Priorities 1 and 2 are defaulted to RDO outputs 3 and 4 The priorities can be configured to outputs on the 14 relay dry contact kit or each cont...

Страница 77: ...requirements than a 10 000 Btu unit of another variety When using only one unit there is usually no starting problem provided the lighting and appliance load is not too high when starting the unit Si...

Страница 78: ...oled cyl cylinder D A digital to analog DAC digital to analog converter dB decibel dBA decibel A weighted DC direct current DCR direct current resistance deg degree dept department dia diameter DI EO...

Страница 79: ...OS oversize overspeed OSHA Occupational Safety and Health Administration OV overvoltage oz ounce p pp page pages PC personal computer PCB printed circuit board pF picofarad PF power factor ph phase P...

Страница 80: ...F 1 175 29 2 Dry Barometer in Hg 1 Temperature _F 460 537 75 175 x Alternator Efficiency Reference Alternator Efficiency Observed 2 For turbocharged compression ignition engines C F 1 175 29 2 Baromet...

Страница 81: ...TP 7045 3 18c 81...

Страница 82: ...TP 7045 3 18c 82...

Страница 83: ...TP 7045 3 18c 83...

Страница 84: ...Co All rights reserved TP 7045 3 18c Original Instructions English KOHLER CO Kohler Wisconsin 53044 Phone 920 457 4441 Fax 920 459 1646 For the nearest sales service outlet in the US and Canada phone...

Отзывы: