background image

21

INSTALLATION INTRODUCTION

Please read these instructions COMPLETELY
AND CAREFULLY. They will save you time
and effort and help to ensure optimum oven
performance. Be sure to observe all
WARNINGS.

These installation instructions are intended for
use by a qualified installer. In addition to these
instructions the oven must be installed in
compliance with the current Australian
Standard.

TOOLS YOU WILL NEED

The following tools are needed to install your
new oven:


Tape measure and straightedge or ruler


Pencil


Phillips screwdriver


Level


Wire cutters and wire stripper


1" hole saw


Hand or saber saw.

POWER REQUIREMENTS

The oven must be supplied with the proper
voltage and frequency. The oven is
manufactured to be connected to a three wire,
single phase, 240 volt, 50 Hz AC electrical
supply on a separate circuit.

A circuit breaker or time-delay fuse sized not
to exceed the circuit rating of the appliance
specified on the rating plate located on the
frame behind the door of the oven is
recommended.
The oven must be supplied with copper wires
ONLY.
A qualified electrician must perform the
electrical wiring and hook-up of your oven.

After installation is complete have the
electrician show you where the main
disconnection is and which of the circuit
breakers/fuses are for the oven.

CHOOSING OVEN LOCATION

Carefully select the location where the oven
will be placed.
The oven should be located for convenient
use in the kitchen, but away from strong
drafts.
Strong drafts may be caused by open doors
or windows, or by heating and/or air
conditioning vents or fans.
Make sure that electrical power can be
provided to the location selected.

STEPS FOR INSTALLATION

The following pages provide the necessary
information for proper installation of the oven
arranged as follows:


Technical Data


Installation Cutout Dimensions, Required
Clearances and Mounting instructions for:

-  Wall Installation, Single Oven

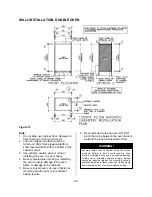
-  Wall Installation, Double Oven


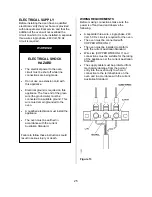
Electrical Supply and Wiring
Requirements


Electrical Connections for 3-Wire Circuit.


Final Checklist.

Содержание TO900X

Страница 1: ...r Use and Warranty Details TO900X Multi Function Single Pyrolytic Oven Stainless Steel TO950X Multi Function Double Pyrolytic Oven Stainless Steel C o o k i n g C o o k i n g c o l l e c t i o n c o l...

Страница 2: ...ions on how to install your new appliance Correct installation will avoid delays and unnecessary service calls Once installation is complete read this booklet carefully and get to know the controls an...

Страница 3: ...ation End Time 12 Delayed Start Automatic Shut Off 12 Roast Probe 12 Pyrolytic Cleaning 13 Manual Mode 13 Cancelling or Changing Operations 13 Roast Probe Temperature Chart 14 Using the Oven Controls...

Страница 4: ...of the appliance unless specifically recommended in the manual All other service should be referred to a qualified technician 10 Storage in or on the Appliance Flammable materials should not be store...

Страница 5: ...he sidewalls on each side of the oven cavity The rack should be positioned within the paired supports Each oven is provided with the following parts and utensils TO900X single oven TO950X both upper a...

Страница 6: ...Ovens the European Convection system the 3 elements fan and venting panel circulates even heated air throughout the oven This process Seals in juices and flavour Provides even baking and browning Sav...

Страница 7: ...m is well ventilated Oven Control Panel All the ovens have the following controls as shown in Figure 3 Page 7 and Figure 4 Page 9 Programmer push buttons Interval Time Button Duration Button Operation...

Страница 8: ...the oven cycles to maintain the set temperature Door Lock Light The door lock light will be illuminated whenever the oven is in the self clean mode and the door is locked Temperature Control Knob The...

Страница 9: ...g Fan operates Convection Grill Use for fish and grilling thick cuts of meat The door must be closed when Convection Grilling When set on Convection Grill top elements operate whenever heating Fan ope...

Страница 10: ...Jelly roll 3 180 190 3 160 170 15 25 Fruit flan 3 160 170 3 150 160 25 35 Plait bun 2 180 200 3 160 170 35 50 Christmas cake 2 170 180 3 150 160 45 70 Apple pie 2 180 200 3 170 180 40 60 Puff pastry...

Страница 11: ...40 Meat roll 1500 2 200 220 120 140 Pork cutlet 1500 2 180 200 100 120 Minced meat roast 1500 2 210 220 60 70 Veal Veal roll 1500 2 180 200 90 120 Veal knuckle 1700 2 180 200 120 130 Lamb Lamb prime r...

Страница 12: ...rts precisely to the second The display reverts to time of day and the indicator is illuminated steadily Once the interval time has elapsed the alarm sounds max 2min The indicator flashes Press any bu...

Страница 13: ...the operation end indicator will disappear and the duration will run down At the end of the cooking time the alarm sounds max 2min The operation end indicator and the temperature display flash altern...

Страница 14: ...gget 70 minutes per kg 170 200 75 85 Well done Pork 90 minutes per kg 170 200 80 85 Well done Veal 90 minutes per kg 170 200 65 75 Well done Whole Chicken 90 minutes per kg 170 200 75 85 Well done Not...

Страница 15: ...lock will operate to lock the door of the oven that is in Self Clean The Door Lock indicator light will become illuminated to show that the door is locked The door will remain locked and the indicato...

Страница 16: ...r knob for the oven to the cooking mode desired Refer to Figure 3 and Table 1 if you are not sure which of the knobs on your oven is the selector knob or which function you wish the oven to perform No...

Страница 17: ...Follow manufacture instructions DO NOT USE ABRASIVE MATERIALS SUCH AS STEEL WOOL OR ROUGH SPONGES THEY WILL SCRATCH THE SURFACE Front of Oven Door s and Handle s Use warm soapy water or spray glass c...

Страница 18: ...well as a light socket housing that is fixed in place see Figure 7 Light bulb replacement is considered to be a routine maintenance item To replace a light bulb 1 Read WARNING on this page 2 Turn off...

Страница 19: ...on both sides using both hands and pull the door straight out of the hinge slots pressing it in the direction of closing Hold firmly the door is heavy 5 Place the door in a convenient location for cl...

Страница 20: ...en The calibration of your old oven may have drifted gradually over time while your new oven is more exact Adjust oven temperature settings as needed The oven was not preheated before baking Preheat o...

Страница 21: ...13 13 08 or Authorised Kleenmaid Service Agent in your area on 1300 652 100 Do not attempt to repair the appliance yourself Any work performed by unauthorised personnel may void the warranty You will...

Страница 22: ...d on the rating plate located on the frame behind the door of the oven is recommended The oven must be supplied with copper wires ONLY A qualified electrician must perform the electrical wiring and ho...

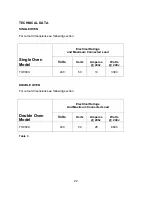
Страница 23: ...s and Maximum Connected Load Single Oven Model Volts Hertz Amperes 240v Watts 240v TO900X 240 50 14 3300 DOUBLE OVEN For cutout dimensions see following section Electrical Ratings And Maximum Connecte...

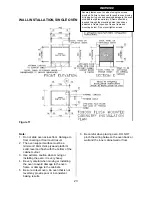
Страница 24: ...the oven frame or damage to the cabinets 5 Be sure to level oven An oven that is not level may provide poor or inconsistent baking results 6 Be careful when placing oven DO NOT pinch the wiring betwee...

Страница 25: ...oven frame or damage to the cabinets 5 Be sure to level oven An oven that is not level may provide poor or inconsistent baking results 6 Be careful when placing oven DO NOT pinch the wiring between th...

Страница 26: ...must be suitable for the rating of the appliance per the current Australian Standard The supply cable must be protected from mechanical damage from the point of entry into the oven cavity to where it...

Страница 27: ...ading between the brown and black wires Line to Line should be 220 to 240 volts 5 To set the time of day refer to Page 9 Manual for instructions on how to set the electronic programmer 6 Turn the Mode...

Страница 28: ...of the above the Purchaser must pay for the cost of transporting the appliance to and from the Agent or the Agent s travelling cost to and from the Purchaser s home WHAT THESE WARRANTIES DO NOT COVER...

Страница 29: ...the above the Purchaser must pay for the cost of transporting the appliance to and from the Agent or the Agent s travelling cost to and from the Purchaser s home WHAT THESE WARRANTIES DO NOT COVER We...

Страница 30: ...s Ovens Cooktops Outdoor Cooking Centres Built In Espresso Coffee Machines Rangehoods Freestanding Ranges Sinks Waste Disposals Taps Cookware Refrigerators Freezers Wine Cellars Vacuum Cleaners For sa...

Отзывы: