KITCHENAID
Stand Mixer Service Manual LIT4177310-C 2005 KitchenAid
K.
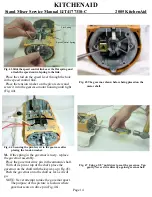
If the mixer base feet are worn, replace them.
To replace the mixer base feet, pull them out,
using pliers and a twisting motion. Older models
require the removal of four # 8-32 x 1/2” round
head screws to remove the feet (Fig. 93).
Fig. 93 Remove the four round head screws to remove the
feet from older models.
Install new feet by pushing the tapered end into the
foot supports with a twisting motion (Fig. 94).
Older models place the screws in the new feet and
screw the feet to the base. Do not tighten so much
as to push the screw through the rubber (Fig. 93).
Fig. 94 Push tapered end of foot into foot support with
twisting motion until seated.
L.
The bowl spring latch must be removed from
the old bowl support and placed on the new bowl
support to complete the bowl support repair.
To remove the bowl spring latch, unscrew the two
#10-24 x 1/4” screws.
Replace with new if rusted or broken.
The function of the bowl spring latch is to hold
down the rear of the bowl.
Hold the bowl spring latch on the bowl support
and insert the two #10-24 x 1/4” round head screws
into the bowl support and tighten (Fig. 87).
Fig. 95 Two #10-24 x 1/4” screws hold the bowl spring
latch in place.
M.
Place the column on the bottom cover
(Fig. 85) and screw in the four 5/16”-18 x 3/4”
round head screws (Fig. 86).
These screws must be tightened to 70 to 90 in. lbs.
of torque. The mixer is now ready for operation.
N.
To attach the bowl to the support, place the
bowl support tabs on the bowl over the locating
pins (Fig. 96). Press down on back of bowl, until
bowl pin on back of bowl snaps into spring latch.
Fig. 96 Method used to attach bowl to bowl support.
O.
To adjust beater to bowl clearance, attach the
beater to the beater shaft and raise the bowl into the
mixing position.
Beater should be with in 1/16” from bottom of
bowl.
Page 27
Bowl Locating Pin


