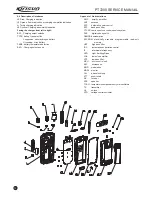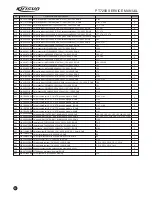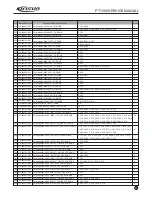
Chapter 5 Service, Assembly and Disassembly
The radio is a precision communication equipment. Please be
careful when assemble or disassemble the radio during service.
Instructions for assembly and disassembly are as follows:
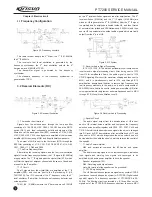
To install the battery, match the
tow bulges at the bottom of the
battery with the corresponding
grooves at the radio aluminum alloy
frame and insert it in. Then press the
upper end of the battery till the latch
secure. (See figure 5.2 and figure
5.3)
5. 2 Removing and Installing
the Belt Clip
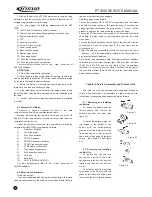
To remove the belt clip, use
your nail or a tool to lift the metal
spring piece in the belt clip from the
topside, and then pull the belt out
wards.
To install the belt clip, match the
upper head of the belt clip with the
glides on the rear of the battery, and
then press the belt clip downwards
5. 1 Removing and Installing
the Battery
To remove the battery, push the
latch upwards and remove the
battery away from the radio. (See
figure 5.1)
Figure5.1
Figure5.2
Figure5.3
Figure 5.4
f. Click on [Read] in the KSP7200 main menu to read the radio
parameters into the computer; click on [Write] to transfer the PC
programming parameters into the radio.
g. You can program the following parameters with the KSP
7200:
1) The RX and TX frequency of each channel;
2) The receiving and transmitting signaling of each channel;
3) Busy channel lockout option;
4) TOT;
5) Squelch level option;
6) 5-tone or 2-tone settings
7) Power saving option.
8) Alarm function setting.
9) Monitor mode option.
10) Scan mode option.
11) Scan the reverting channel option.
12) Scan the priority channel selection.
For more details, please refer to the
Help
document of
KSP7200 software.
ATTENTION:
1. Turn off the radio before connection.
2. When the data is read on the radio, the indicator light turn red
and it's prohibited to press the PTT button; when the data is written
on the radio, the indicator light turns green.
3. Before the first time of editing, you should read data on the
radio firstly and then and backup the data.
4. If the radio cannot work normally after being written in with
the editing data, open the data backup and rewrite the backup into
the radio.
5.
Model
information is important radio data and is prohibited
to modify.
4.3 Computer Test Mode:
As shown in figure 4-1,connect the radio to the radio
communication port with the specified testing cable.
Warning: Before enter the computer test mode, connect a HF
load of 50 to the radio antenna connector or connect the radio to a
comprehensive test device.
Under the computer test mode, you can modify the following
parameters with KSP7200 programming software:
1)
Frequency Stability
2)
Low/High power
3)
Max. Tone deviation
4)
DCTCSS balance
5)
DCTCSS frequency deviation
6)
CTCSS frequency deviation
7)
DTMF frequency deviation
8)
Tone frequency deviation
9)
MSK frequency deviation
10)
VOX plus
11)
Sensitivity
12)
SQL 1/9 (OPEN/SQUELCH)
For mort details,please refer to the
Help
document of
ksp7200 software.
4.4 Wired Clone Parameters
Wired clone mode:
It can be enabled/disabled by programming software, this mode
can only be entered when the wired clone functions of both the host
radio and the client radio are enabled.
Operating steps are as follows:
1.Press the side keys SK1 and SK2 of the primary, and then press
and hold the power switch of the radio for about 2 seconds, the
orange light flashes twice and the beep sound of
Clone
will be
produced, and then the radio enters the wired clone mode.
2.Press the PTT button on the host radio, the host radio will start to
send data, the client radio for receiving data will enter the wired
clone mode.
3.During the data duplication, the red light of the host radio will be
continuously on and the green light of the client radio will be
continuously on.
4.After the data are successfully cloned, the host radio will report
Success
and be automatically restarted; the client radio will
also be automatically restarted.
Note: During the duplication of data, if the radio models or software
versions are not consistent, the red light of the host radio will flash
(0.25s On 0.25s Off) and the sub radio will be automatically
restarted; if no data was received within 3 seconds, the red light of
the host radio will flash (0.5s On 0.5s Off) and the client radio will be
automatically restarted.
PT7200 SERVICE MANUAL
8
Содержание PT7200-01
Страница 1: ...PROFESSIONAL TWO WAY RADIO PT7200 V071215 FM PORTABLE RADIO SERVICE MANUAL ...
Страница 29: ...Figure 1 PT7200 Top Board Position Mark Diagram 136 174 ...
Страница 30: ......
Страница 31: ...Figure 1 PT7200 Top Board Position Mark Diagram 400 470 ...
Страница 32: ......
Страница 35: ...Figure 7 Schematic Circuit Pane Diagram PT7200 SERVICE MANUAL 26 33 ...


