background image

11

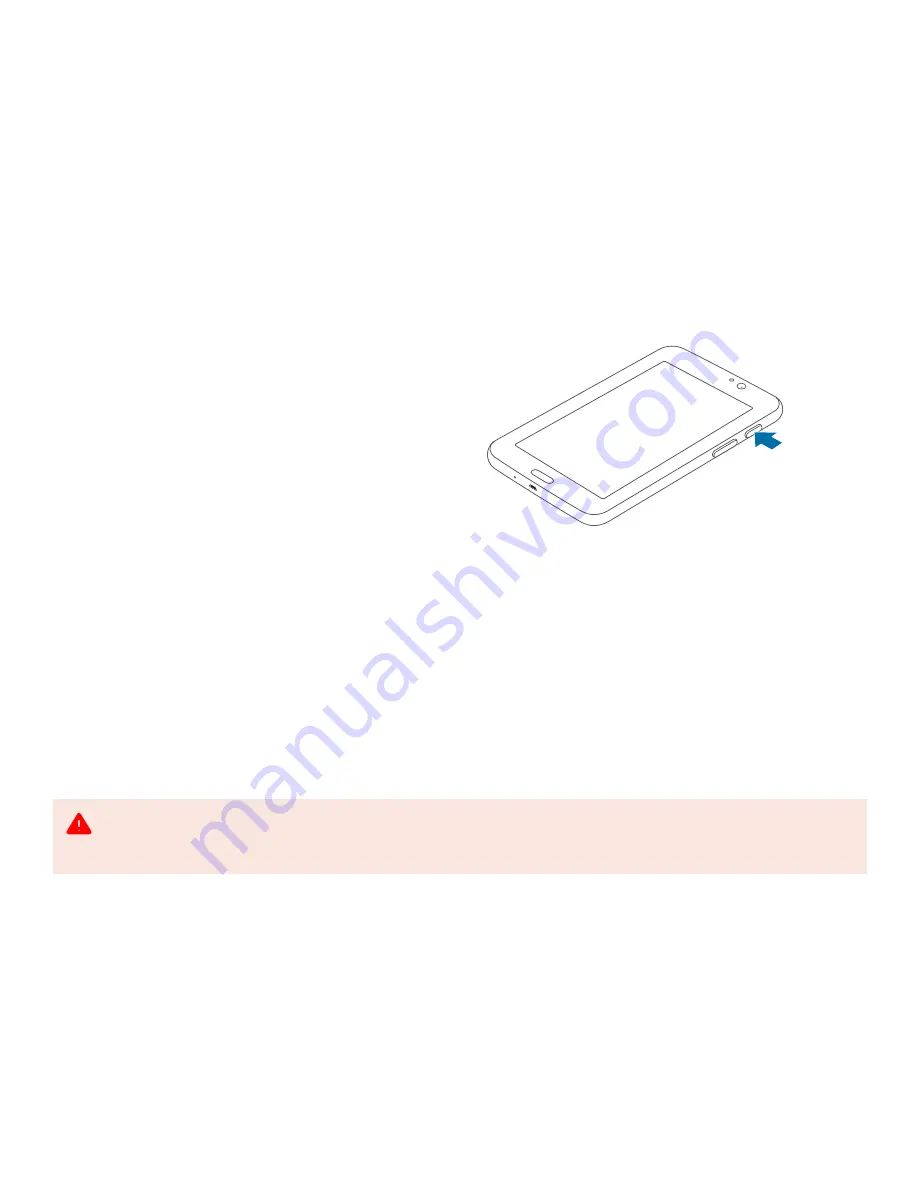
2.3  Turning the tablet on and off

To turn on the tablet, press and hold the POWER button 
for a few seconds until you see the Samsung logo. Wait 
a moment for the tablet to boot up.

If the tablet’s screen turns off to sleep mode, briefly 
press the POWER button or tap once on the screen to 
wake it up.

To turn off the tablet, press and hold the POWER 
button, and then tap Power off and confirm the shut 
down.

2.4  Use of third party applications

The tablet provided should ONLY be used with the 
QTUG application. Installing third party applications 
on the dedicated tablet may interfere with the correct 
operation of the QTUG application.

press and hold 

POWER button

The tablet provided is intended to be dedicated for exclusive use with the QTUG application. Installing third party applications onto 
the tablet may interfere with the correct operation of QTUG application and interfere with the correct calculation of the results. 
Please restrict your use of the tablet to QTUG ONLY.

Содержание QTUG

Страница 1: ...User Guide Health Technologies QTUG USER GUIDE v1 0 Kinesis Health Technologies 2014 All Rights Reserved...

Страница 2: ...Address NovaUCD Belfield Innovation Park Belfield Dublin 4 Ireland Internet address http www kinesis ie Email address info kinesis ie 2014 Kinesis Health Technologies Ltd All Rights Reserved 2...

Страница 3: ...m the tablet to a PC or microSD card for organizing your QTUG patient files and using all of the QTUG features Intended Use QTUG is intended to measure gait and mobility parameters for automated quant...

Страница 4: ...s are designed to provide reasonable protection against harmful interference in a typical medical installation The equipment generates uses and can radiate radio frequency energy and if not installed...

Страница 5: ...er or the user of the product to determine compliance with the requirements of IEC 60601 1 2 when using this item CAUTION It is prudent to separate all electrical equipment that is very close in dista...

Страница 6: ...tandard mobility assessment commonly used to assess mobility and risk of falls Longer completion times are thought to indicate higher risk of falling Safety instructions in this user guide Note contai...

Страница 7: ...dock layout 13 3 3 Charging the sensor 14 3 4 Turning the sensor on and off 14 3 5 Resetting the sensor 15 4 Set up the QTUG test 16 4 1 QTUG test requirements 16 4 2 Physical set up 17 4 3 Set up QT...

Страница 8: ...through Innovation QTUG Quantitative Timed Up and Go NovaUCD Belfield Innovation Park Belfield Dublin 4 Ireland www kinesis ie info kinesis ie Health Technologies QTUG WARRANTY AND SAFETY Kinesis Heal...

Страница 9: ...1 Chapter 9 2 1 Tablet layout 2 Getting started with the tablet HOME button memory card slot VOLUME button POWER button BACK button multipurpose jack MENU button light sensor...

Страница 10: ...eted battery to charge for a few minutes before running on the tablet Charging with the charger Connect the large end of the USB cable to the USB power adaptor and then plug the end of the USB cable i...

Страница 11: ...m the shut down 2 4 Use of third party applications The tablet provided should ONLY be used with the QTUG application Installing third party applications on the dedicated tablet may interfere with the...

Страница 12: ...6514A RN42 MEDICAL EQUIPMENT INTERMITTENT OPERATION WITH RESPECT TO ELECTRIC SHOCK FIRE AND MECHANICAL HAZARDS ONLY IN ACCORDANCE WITH UL60601 1 IEC EC60601 IEC60601 1 2 Made In Ireland 06 14 activit...

Страница 13: ...layout micro USB power connector Kinesis Model QTUG Charger Revision 1 0 0 Use only supplied power adapter Approved for use only with Kinesis QTUG system For indoor use only RESET button socket power...

Страница 14: ...or in the sensor dock If either of the two sensors do not turn on just reinsert into the dock The activity LED on the sensor turns orange Wait a moment for the sensor to boot up When it is ready the a...

Страница 15: ...until the activity LED turns off 3 5 Resetting the sensor Use a paper clip or a pen to reset the sensor Press the restart pin once and the activity LED turns orange When it is ready the activity LED...

Страница 16: ...alking shoe You will require the following to complete a QTUG test 4 Set up the QTUG test 4m 13 1 of linear floor space One standard chair with seat approx 46 cm 18 high and total chair height approx...

Страница 17: ...urn points on the floor placed exactly 3m 9 10 apart measured from patient s toes when seated 3m 9 10 3m 9 10 end turn point start point Ensure the 3m 9 10 distance is accurately measured from the cha...

Страница 18: ...en turn on the tablet and tap the QTUG icon to launch the QTUG application 4 Tap the HELP button on the action bar to open a popup window with help information Tap the SETTINGS button to change the pa...

Страница 19: ...the MALE or FEMALE button Tap New Test to proceed 5 Type in a new patient ID to create a new patient profile and tap the SUBMIT button to proceed to the patient profile page Do not use a patients Per...

Страница 20: ...20 7 If the sensors are not connected yet the application will take approx 5 seconds to automatically connect to the sensors 8 When sensors have connected successfully the QTUG test screen will appear...

Страница 21: ...an invalid test or adversely affect algorithm operation 1 Seat the patient on the chair in order to explain the test 2 Secure the sensors firmly on the shins mid point of the anterior shank using an...

Страница 22: ...eg QTUG QTUG user s point of view socket socket QTUG R UP R UP QTUG L UP L UP 4 When the patient is ready say Go and tap the START button on the QTUG application When START is tapped the activity LED...

Страница 23: ...int walk back to the chair and sit down 3m 9 10 3m 9 10 The patient has to walk exactly 6m 19 7 The test is calibrated to give valid results based on accurate measurement of the 3m 19 7 distance from...

Страница 24: ...data is displayed on the screen 7 On the application tap the ACCEPT button to confirm that the test is valid i e the patient performed the test correctly and to save data Tap RETEST if the test is in...

Страница 25: ...ref data Comparison of each patients mobility as measured by QTUG when compared to average values for the population Parameters deemed out of the normal range are shown here if no parameters are deeme...

Страница 26: ...G test results When the results are displayed options are available to generate a PDF report for an individual test or to export all patient results from the database Generate PDF report The results f...

Страница 27: ...e retrieved from the tablet by connecting the tablet to a PC or laptop via the USB cable supplied and browsing to the My Files Kinesis Data directory In the Data folder you can find the database file...

Страница 28: ...the Kinesis folder On top of the screen tap on the bin icon and confirm with Yes to delete the Kinesis folder Permanently erased data cannot be recovered Erase patient data from microSD card only if a...

Страница 29: ...tablet to the USB power adaptor for charging Before cleaning it is essential to remove the connecting USB cable for the tablet from the power inlet socket of the device Storage and handling condition...

Страница 30: ...hat sensor is switched on The sensor does not turn on The battery is flat Check that sensor is fully charged If problem persists close down the tablet and reboot The test keeps failing Sensors are not...

Страница 31: ...f gait cycles in total test Number of steps Number of steps in TUG test Cadence steps min Average number of steps taken per minute during test Walk time s Time from first to last heel strike or toe of...

Страница 32: ...g TUG test Stride time variability Coefficient of variability in stride time during TUG test Step time variability Coefficient of variability in step time during TUG test Single support variability Co...

Страница 33: ...the time taken to turn Angular velocity parameters Parameter Description Forward rotation speed at turn time deg s Angular velocity in sagittal plane at median gait event of TUG test Range of peak fo...

Страница 34: ...to side rotation speed Coefficient of variation in angular velocity in the side to side direction during the assessment Minimum horizontal rotation speed deg s Minimum angular velocity in the transve...

Страница 35: ...e rotation speed x Height deg m s Related to maximum linear velocity of shank in side to side direction Average side to side rotation speed x Height deg m s Related to average linear velocity of shank...

Страница 36: ...nd Operating Conditions 5 C 40 C 20 95 Relative Humidity Storage Transport Conditions 20 C 60 C 20 95 Relative Humidity Bluetooth Radio Transmit Band 2 4Ghz Modulation GFSK DQPSK and 8DPSK Frequency R...

Страница 37: ...tentional RF receiver Interference may occur in the vicinity of equipment Correct disposal of this product Waste Electrical Electronic Equipment This marking shown on the product accessories or litera...

Страница 38: ...THE USER GUIDE OR FOR USE IN ANY CIRCUMSTANCE IN WHICH THE FAILURE OF QTUG WOULD PRESENT AN UNREASONABLE RISK OF ILLNESS OR INJURY TO THE USER Medical Device Regulatory Compliance QTUG is intended to...

Страница 39: ...nesis will perform its obligations in compliance with all applicable laws and regulations By purchasing QTUG the customer acknowledges that it has been informed by Kinesis and is aware and understands...

Страница 40: ...tions This warranty does not cover the Product if it has been resold or used for rental purposes This warranty does not cover defects in the Product that are caused by accidental damage your and or an...

Страница 41: ...QTUG Kinesis Health Technologies All Rights Reserved...

Отзывы: