


7
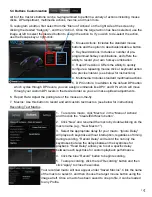
5.4 Buttons Customization
All 6 of the Vektor’s buttons can be re-programmed to perform a variety of actions including mouse
clicks, DPI adjustment, multimedia actions, macros, and much more.
To reprogram a button, first select from the “Menu of Actions” on the right side of the screen by
clicking the desired “Category”, and then “Action”. Once the target action has been selected, use the
image at left to select the desired button to assign the action to. If you wish to de-select the action,
use the Escape key or right-click.
1. Mouse Actions: Includes the standard mouse
buttons and the option to deactivate/disable a button.
2. Keyboard Actions: Includes a number of pre-
programmed hotkey combinations, and offers the
ability to record your own hotkey combination.
3. Rapid Fire Action: Offers the ability to quickly
configure a repeating mouse click or keyboard action
at a precise interval. (see below for instructions)
4. Multimedia: Includes standard multimedia actions.
5. DPI Controls: In addition to the default DPI button
which cycles through DPI levels, you can assign commands like DPI+ and DPI- which will move
through your custom DPI levels in the desired order so you can make up/down adjustments .
6. Report Rate: Adjust the polling rate of the mouse on-the-fly.
7. Macros: Use this button to record and edit custom text macros. (see below for instructions)
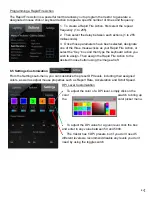
Recording Text Macros
1. To record a macro, click “Macros” in the “Menu of Actions”
and the click the “Create/Edit Macro button”.
2. Click “New” and renamed the macro by double-clicking on the
macro name (e.g., “New Macro 1”).
3. Select the appropriate delay for your macro. “Ignore Delay”
will play each keystroke without interruption, regardless of timing
during recording. “Record Delay” will record the not only the
keystrokes but also the delays between the keystrokes for
playback. “Fixed Delay” allows you to set a specific delay
between each keystroke for custom playback performance.
4. Click the blue “Record” button to begin recording.
5. To stop recording, click the red “Recording” button and then
click “Apply” to close the window.
Your recorded macro will now appear under “Saved Macros”. Click the name
of the macro to select it, and then choose the target mouse button using the
image at left. Once a macro has been saved to one profile, it can be loaded
to any Profile.


