


KD GEMINI – INSTALLATION/OPERATION MANUAL
KD Gemini
May-06
6
DRAFT CONTROL
Use approved draft control supplied for 5” pipe. Use two draft
controls on strong draft chimneys. Set specified draft pressure to
-0.04” wc.
Not applicable to Direct Vent installations
.
3.6 ASSEMBLE & INSTALL BURNER
ASSEMBLE
Check burner model is correct for furnace rating required.
BURNER
Assemble as per burner manufacturer’s instructions.
SET END CONE
Riello – Set turbulator as per furnace operating decal.
Beckett – See Burner Manufactures Instructions.
SELECT NOZZLE
Select oil input, nozzle required and burner configuration as shown
on furnace operating decal.
INSTALL NOZZLE
Install selected nozzle, check for clean seating and tighten in
nozzle adaptor.
CHECK
See burner manufacturer’s instructions for correct setting.
ELECTRODES
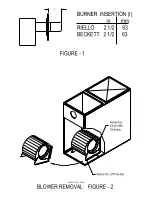
INSERTION
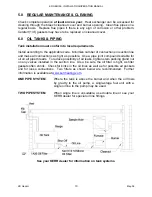
See “GENERAL SPECIFICATIONS” or diagram (Figure – 1).
LENGTH
MOUNT BURNER
Tighten top nut first so burner tips down slightly. The burner is
always installed in an upright position by four nuts.
PUMP BY-PASS
For one pipe system factory setting (no plug).
PLUG
WIRING
Refer to wiring diagram or wiring decal for correct burner
connections.
Riello series burners use the Riello LT-1 thermostat
relay or Honeywell R8038 relay.
THERMOSTAT
Connect thermostat terminals.
DO NOT
start the oil burner until installation is complete and all cleanout covers are
secured in place.
3.7 CHANGING NOZZLE
NOZZLE
If a new nozzle of a different size is installed, change the heating
CHANGE
blower speed according to the “BURNER SPECIFICATIONS” or
operating decal.