background image

2

 EN

Units are designed for operation as follows.

Before applying power

  Caution : Read this page carefully to ensure safe operation.

U.S.A. and Canada ........................................... AC 120 V only
Australia ........................................................... AC 240 V only
Europe ............................................................... AC 230 V only

THE EXCLAMATION POINT WITHIN AN EQUILATERAL TRIANGLE IS INTENDED TO ALERT THE USER TO
THE PRESENCE OF IMPORTANT OPERATING AND MAINTENANCE (SERVICING) INSTRUCTIONS IN THE
LITERATURE ACCOMPANYING THE APPLIANCE.

THE LIGHTNING FLASH WITH ARROWHEAD SYMBOL, WITHIN AN EQUILATERAL TRIANGLE, IS INTENDED
TO ALERT THE USER TO THE PRESENCE OF UNINSULATED “DANGEROUS VOLTAGE” WITHIN THE PROD-
UCT’S ENCLOSURE THAT MAY BE OF SUFFICIENT MAGNITUDE TO CONSTITUTE A RISK OF ELECTRIC
SHOCK TO PERSONS.

CAUTION: TO REDUCE THE RISK OF ELECTRIC SHOCK, DO
NOT REMOVE COVER (OR BACK). NO USER-SERVICEABLE
PARTS INSIDE. REFER SERVICING TO QUALIFIED SERVICE
PERSONNEL.

Safety precautions

WARNING:

TO PREVENT FIRE OR ELECTRIC SHOCK, DO NOT EXPOSE THIS
APPLIANCE TO RAIN OR MOISTURE.

CAUTION

RISK OF ELECTRIC SHOCK

DO NOT OPEN

Other countries ............................ AC 110 - 120 / 220 - 240 V

switchable*

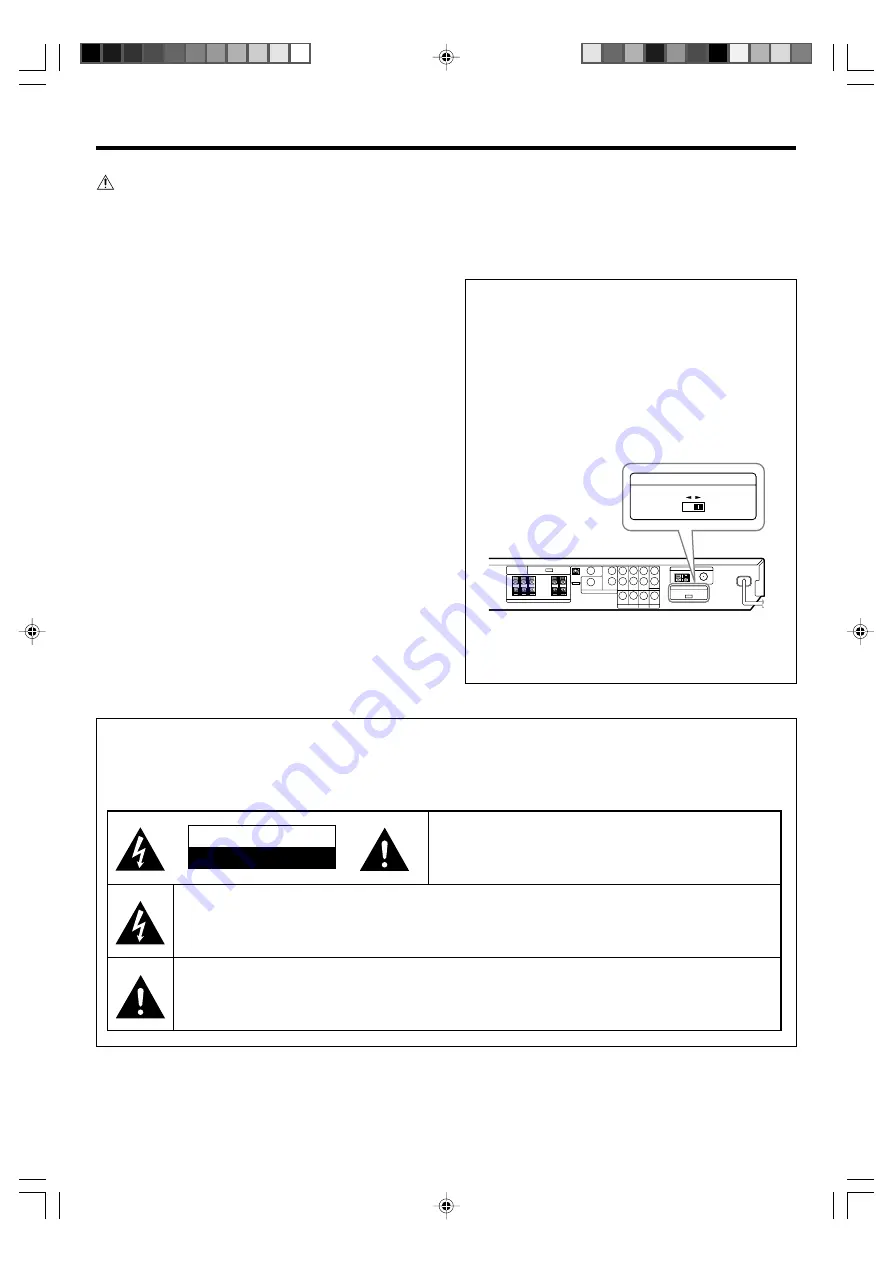
* AC voltage selection

The AC voltage selector switches on the rear panel are
set to the voltage that prevails in the area to which the
unit is shipped.  Before connecting the power cord to
your AC outlet, make sure that the setting positions of
these switches match your line voltage. If not, they must
be set to your voltage in accordance with the following
direction.

Note: Our warranty does not cover damage caused by
excessive line voltage due to improper setting of the AC
voltage selector switch.

VOLTAGE SELECTOR

AC 110-120V

~

AC 220-240V

~

Move switch lever to
match your line voltage
with a small screwdriver or
other pointed tool.

AC voltage selector switch

Содержание VRS-6200

Страница 1: ...control it is important to read the operating instructions and obtain a proper understanding of the remote control and how to switch its operation modes etc Using the remote control without completely understanding its design and how to switch the operation modes may result in incorrect operations Quick Start Reference Please read the following pages so that you can enjoy the surround sound at the...

Страница 2: ...R OR BACK NO USER SERVICEABLE PARTS INSIDE REFER SERVICING TO QUALIFIED SERVICE PERSONNEL Safety precautions WARNING TO PREVENT FIRE OR ELECTRIC SHOCK DO NOT EXPOSE THIS APPLIANCE TO RAIN OR MOISTURE CAUTION RISK OF ELECTRIC SHOCK DO NOT OPEN Other countries AC 110 120 220 240 V switchable AC voltage selection The AC voltage selector switches on the rear panel are set to the voltage that prevails ...

Страница 3: ...t or the software you are going to play and enjoy Dolby Digital EX Dolby PRO LOGIC IIx Dolby PRO LOGIC II Dolby Digital DTS ES DTS NEO 6 DTS DSP Mode ACTIVE EQ ACTIVE EQ mode will produce a more dynamic sound quality in any condition You can enjoy a more impressive sound effect when ACTIVE EQ is turned on during Dolby Digital and DTS playback Remote control In addition to the basic receiver the re...

Страница 4: ...ns 24 Presetting radio stations 24 Receiving preset stations 25 Receiving preset stations in order P CALL 25 Using RDS Radio Data System For Europe and Australia 26 Presetting RDS stations RDS AUTO MEMORY 26 Using the RDS DISP Display key 26 Tuning by Program TYpe PTY search 27 Ambience effects 28 Surround modes 28 Surround play 30 Convenient functions 32 Adjusting the SOUND 32 Display dimmer adju...

Страница 5: ...r volume INPUT SELECTOR key Use to select input sources Display Speaker selection indicators Input channel indicators The Input channel indicators lights up to indicate the channels contained in the input signal The S indicator lights when the surround component consists of a single channel ACTIVE EQ indicator 96 kHz fs indicator Frequency display Input display Preset channel display Listen mode d...

Страница 6: ...e AUDIO key Use to operate the DVD component SUBTITLE key Use to operate the DVD component DVD key Use to turn the DVD component ON OFF RECEIVER key Use to turn the receiver ON STANDBY INPUT MODE key Usetoswitchbetweenthefullauto digitaland analog input 7 SETUP key Use to select the speakers settings etc Use to operate the DVD component TONE key Use to switch the status of TONE control SOUND key U...

Страница 7: ...o In case of difficulty fi Notes 1 Be sure to turn off the system components before connecting them 2 Be sure to insert every connection cable completely into the jack Incomplete connection may result in absence of audio output or production of noise 3 Be sure to disconnect the power cord from the AC wall outlet before inserting or removing a connection cable 4 Installation of outdoor antenna is a ...

Страница 8: ...UT Audio cord DVD player COMPOSITE VIDEO IN Yellow RCA pin cord Monitor TV To AC wall outlet If you have connected a DVD player to the receiver with digital connection be sure to read the Input mode settings section carefully 7 Digital audio connections are required when playing multi channel signals such as the Dolby Digital and DTS signals To play the DVD player connected in this page select the...

Страница 9: ...dio components OPTICAL DIGITAL OUT AUDIO Optical fiber cord Component with DTS Dolby Digital or PCM OPTICAL DIGITAL OUT CD player Digital connections The digital in jacks can accept DTS Dolby Digital or PCM signals Connect components capable of outputting DTS Dolby Digital or PCM CD digital signals If you have connected components with the digital audio output to the receiver with digital connecti...

Страница 10: ... Step 5 Adjust the speaker volume level CAUTION Make sure that the power cord plug is disconnected from the AC wall outlet before proceeding to speaker cord connections If the conductor wires on the extremity of speaker cord are untwisted there is a risk of short circuiting Be sure to twist them well before connecting the speaker cord For the U S A Canada Europe and Australia Except for the U S A ...

Страница 11: ...ough the ideal surround system consists of all the speakers listed above if you don t have a center speaker or a subwoofer you can divide those signals between the available speakers in the speaker settings steps to obtain the best possible surround reproduction from the speakers you have available Setting up the system Speaker impedance After confirming the speaker impedance indications printed o...

Страница 12: ...ONT AUX jack section can be used for connection of digital audio input This is convenientforplayingavideogamethroughthereceiver PRE OUT jacks connections R L SURROUND BACK PRE OUT R L SUB WOOFER Power amplifier Power amplifier Powered subwoofer Subwoofer Surround Back speakers L R The receiver has additional PRE OUT jacks Note that the output from the PRE OUT jacks needs to be connected to an exte...

Страница 13: ...dcast reception cannot be made unless the antennas are connected Connect the antennas correctly as instructed below FM indoor antenna FM indoor antenna When pressing more than one remote control key successively press the keys securely by leaving an interval of 1 second or more between keys Notes 1 The supplied batteries may have shorter lives than ordinary batteries due to use during operation ch...

Страница 14: ... DOLBY DIGITAL EX listen modes cannot be selected 2 When TEST TONE is displayed press the MULTI CONTROL button to select EXIT and then press the SETUP key More detailed settings such as the volume level of each speaker and distance to each speaker are also available If you connect KENWOOD speaker system KS 2200HT KS 3200HT KS 5200HT KS 7200HT or KS 8200HT Connection of speakers Connection of TV mo...

Страница 15: ...FRNT LRG Center speaker CNTR NML Surround speakers SURR NML Back Surround speakers BS OFF Subwoofer re mix setting REMIX ON STEP 3 Play a disc on the DVD player 1Press the INPUT SELECTOR key to select DVD 2Start playback of the DVD player For the operation also refer to the instruction manual for your DVD player You can select various listen modes to enjoy surround playback of various kinds of vid...

Страница 16: ...TROL button or the MULTI CONTROL fi keys to select the speaker system setting 1 HTB1 Select HTB1 ifyouusespeakersystemKS 2200HT 2 HTB2 Select HTB2 ifyouusespeakersystemKS 3200HT KS 5200HT KS 7200HT 3 HTB3 Select HTB3 ifyouusespeakersystemKS 8200HT 4 CUSTOM Select to set up the speakers according to the speaker system in use Speaker setup is required every time after the speaker system is changed Mo...

Страница 17: ...iver 3 SURR OFF When no surround speakers are connected SURR LRG cannot be selected when the center speaker have been set to CNTR NML or CNTR OFF When SURR OFF is selected and the selection is estab lished by pressing the SETUP in step below the procedure jumps to step However if the subwoofer setting is SUBW OFF you can complete the speaker setup and proceed to the speaker volume level adjustment...

Страница 18: ...ess the SETUP key each time to select the speaker channel and use theMULTI CONTROLbutton or the MULTI CONTROL fi keys to adjust the volume level 3 Press the SETUP key to accept the setting The test tone is turned off This model enters the mode for inputting the distance to the speakers 6Input the distance to the speakers This setting allows the signals output from different speakers to reach the li...

Страница 19: ...put level for each input selector 3 Press the SOUND key again to return to the input indication 7Adjust the LFE LEVEL Low Frequency Effects level Adjust the level of the low frequency fields effect LFE signal which is the signal used exclusively for giving the field effect of bass tone in the Dolby Digital or DTS signal 1 Use the MULTI CONTROL button or the MULTI CONTROL fi keys to select LFE LEVEL...

Страница 20: ...ME In addition the ACTIVE EQ function is switched to EQ GAME and the listen mode is switched to the appropriate mode for games 2 FRONT AUX The game mode is switched OFF The game mode is not activated if no video signal is input to the VIDEO jack in the GAME FRONT AUX jack section Normal playback Listening to a source component Some preparatory steps are needed before starting playback VOLUME CONTR...

Страница 21: ...s model is in the PCM stereo and analog stereo modes Press the BASS BOOST key Press the key once to select the maximum 10 low fre quency emphasis setting TONE mode will automatically be turned ON The BASS BOOST key is defeated during tone adjustment in the SOUND mode or when the listen mode is switched to a mode other than the stereo mode Switching back to the previous setting Press the BASS BOOST...

Страница 22: ...TE key To cancel Press the MUTE key again so that the MUTE indicator goes off MUTE ON can also be deactivated by turning the VOLUME CONTROL knob or pressing the VOLUME fi keys Listening with headphones 1 Connect headphones to the PHONES jack 2 Use the VOLUME CONTROL knob or the VOLUME fi keys to adjust the volume Blinks ...

Страница 23: ...interrupted momentarily Recording music in REC mode When a multi channel source such as the Dolby Digital or DTS input signal is recorded in REC mode the multi channel signal in the current surround mode can be recorded down mixed to 2 channel INPUT SELECTOR F AUX MODE 1 Use the INPUT SELECTOR key or the input selector keys to select the source DVD VIDEO GAME or FRONT AUX you want to record 2 Put ...

Страница 24: ...LTI CONTROL button or the MULTI CONTROL fi keys to select the desired station AUTO indicator lights up in the display TUNED indicator is displayed when a station is received ST indicator lights when a broadcast is being received in stereo Presetting radio stations AUTO MONO BAND MEMORY INPUT SELECTOR MULTI CONTROL Collective presetting of stations Except for Europe and Australia 1Use the INPUT SELE...

Страница 25: ...turn to the original display and start again Receiving preset stations Numeric keys INPUT SELECTOR TUNER P CALL 4 Receiving preset stations in order P CALL 1Use the INPUT SELECTOR key or the TUNER key to select tune as the source 2Use the P CALL 4 keys to select the desired station Each time you press the key another preset station is received in order Pressing the P CALL key does the following Pr...

Страница 26: ...resetting RDS stations RDS AUTO MEMORY Using the RDS DISP Display key Pressing the RDS DISP key changes the contents of the display Each press switches the display mode as follows 1 PS Program Service name display 2 RT Radio Text display 3 Frequency display 1 PS Program Service name display The station name is displayed automatically when an RDS broadcast is received If no PS data was sent NO PS i...

Страница 27: ...ATE National Music NATION M Drama DRAMA Oldies Music OLDIES Culture CULTURE Folk Music FOLK M Science SCIENCE Documentary DOCUMENT Varied Speech VARIED Using RDS Radio Data System For Europe and Australia Lights up PTY BAND MULTI CONTROL fi Tuning by Program TYpe PTY search This function lets you set the tuner to automatically search for stations which are currently broadcasting the type of program...

Страница 28: ...Dolby PRO LOGIC IIx Dolby PRO LOGIC II Dolby Pro Logic IIx was designed specifically to provide a new sense of spatiality directionality and articulation of sounds from Dolby Surround encoded sources Thisisachievedwithanintelligent built infeedbacklogicdesign amatrix surround decoding and the decoding of stereo full bandwidth surround outputs The PRO LOGIC IIx modes programmed into this receiver a...

Страница 29: ...us places The DSP modes produce the feeling of presence by using the DSP to create reverberation without spoiling the sound quality of the original signal LFE Low Frequency Effects This channel delivers separate non directional bass signals to the subwoofer for more dynamic deep bass sound effects When there is a LFE channel input in the DOLBY DIGITAL or DTS format the LFE indicator lights on the ...

Страница 30: ...f medium Multi channel digital source such as DVD 1 DOLBY D DOLBY DIGITAL surround 2 DOLBY D EX DOLBY DIGITAL EX surround 3 DOLBY D PLIIx MOVIE DOLBY DIGITAL surround DOLBY PRO LOGIC IIx surround MOVIE mode 4 DOLBY D PLIIx MUSIC DOLBY DIGITAL surround DOLBY PRO LOGIC IIx surround MUSIC mode 5 STEREO Stereo playback When the speaker setting is set to BS OFF the DOLBY DIGITAL EX and DOLBY DIGITAL DO...

Страница 31: ...cted 2 The sound field can be adjusted as desired using the PANORAMA DIMENSION and CENTER WIDTH modes The listen mode is fixed to stereo when the 96 kHz linear PCM signal is input Listen modes available with analog or PCM playback 3Adjust the volume Dolby Digital Surround EX compliant disc Dolby Digital Surround EX compliant disc contains identification signals When you choose FULL AUTO during Inp...

Страница 32: ...theMULTICONTROL fi keys to adjust the setting as desired The adjustment item is displayed for approximately 20 seconds 3 Press the SOUND key to advance to the next setting item You can make further adjustments to the sound while listening to playback in the surround mode Adjusting the SOUND Panorama mode Only when the input signal is a 2 channel signal in the DOLBY PRO LOGIC IIx MUSIC or DOLBY PRO ...

Страница 33: ... selected only if DVD VIDEO or GAME FRONT AUX is selected as the source and the listen mode is set to DOLBY DIGITAL or DTS 2 UsetheMULTICONTROLbutton ortheMULTICONTROL fi keys to select the NIGHT ON or NIGHT OFF setting 1 NIGHT ON 2 NIGHT OFF The adjustment item is displayed for approximately 20 sec onds Some DOLBY DIGITAL or DTS software may not be compat ible with the Midnight mode Display dimmer...

Страница 34: ... operate the functions of the DVD players 3 Press each key for each operation as explained in the DVD operation pages To turn the receiver operation mode press the other input selector key DVD player operation keys You can perform these basic operations using the keys described below when connected to KENWOOD DVD player RECEIVER Numeric keys 10 Select tracks Cursor fi Cursor Cursor Cursor ENTER 1 S...

Страница 35: ...elect to full auto mode 7 Connect them properly referring to Connecting the speakers 0 See Speaker settings and check if the setting for all of the speakers is correct Select a surround mode Adjust the speaker levels using the test tone Speaker cords are short circuited Disconnect the power cord from the AC wall outlet switch the receiver OFF remove the short circuiting and turn the receiver ON ag...

Страница 36: ...terference unless the modifications are expressly approved in the instruction manual The user could lose the authority to operate this equipment if an unauthorized change or modification is made NOTE This equipment has been tested and found to comply with the limits for a Class B digital device pursuant to Part 15 of the FCC Rules These limits are designed to provide reasonable protection against ...

Страница 37: ...VIDEO GAME or FRONT AUX 15 dBm 21 dBm 660 nm 30 nm Coaxial DVD 0 5 Vp p 75 Ω VIDEO section Input sensitivity impedance Composite DVD VIDEO GAME or FRONT AUX 1 Vp p 75 Ω Output level impedance Composite VIDEO MONITOR OUT 1 Vp p 75 Ω FM tuner section Tuning frequency range 87 5 MHz 108 MHz Usable sensitivity MONO 1 3 µV 75 Ω 13 2 dBf 75 kHz dev SINAD 30 dB 50 dB quieting sensitivity STEREO 28 µV 75 ...

Страница 38: ...el impedance REC OUT 500 mV 1 kΩ PRE OUT SURROUND BACK 700 mV 2 2 kΩ PRE OUT SUBWOOFER 1 5 V 2 2 kΩ Tone control BASS 10 dB at 100 Hz TREBLE 10 dB at 10 kHz Loudness control VOLUME at 30dB level 8 dB at 100 Hz DIGITAL AUDIO section Sampling frequency 32 kHz 44 1 kHz 48 kHz 96 kHz Input level impedance wave length Optical VIDEO GAME or FRONT AUX 15 dBm 21 dBm 660 nm 30 nm Coaxial DVD 0 5 Vp p 75 Ω ...

Страница 39: ...level impedance wave length Optical VIDEO GAME or FRONT AUX 15 dBm 21 dBm 660 nm 30 nm Coaxial DVD 0 5 Vp p 75 Ω VIDEO section Input sensitivity impedance Composite DVD VIDEO GAME or FRONT AUX 1 Vp p 75 Ω Output level impedance Composite VIDEO MONITOR OUT 1 Vp p 75 Ω FM tuner section Tuning frequency range 87 5 MHz 108 MHz Usable sensitivity MONO 1 3 µV 75 Ω 13 2 dBf 75 kHz dev SINAD 30 dB 50 dB q...

Страница 40: ...the unit in the spaces designated on the warranty card and in the space provided below Refer to the model and serial numbers whenever you call upon your dealer for information or service on this product Model__________________ Serial Number________________________ ...

Отзывы: