TKR-740
18
APPLICATION NOTE
R83
R84
R87
R88
R320
R319
D36
D32
R312
R313
$Q12
$R153
$Q13
$Q14
$R154
$Q15
Rear
Component Side
CN5
CN6
Rear
Front
Front
Remove D32 [D36]
DA204U
Remote I/O
AUX I/O 6 [7]
Sub-CPU [IC18]
Add $Q14 [$Q12]
DTD114EKA
Remove
R84 [R83]; 0
Remove
R88 [R87]; 0
Add $Q15 [$Q13]
DTD114EKA
R313 [R312]
47k
Add $R154 [$R153]
3.9k
5V
5V
R320 [R319]
Change 1k to 0
Foil Side
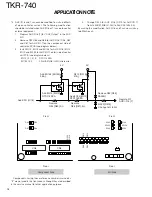
*4 AUX I/O 6 and 7 can each be modified to sink up 600mA
of open collector current. The following modification
should be installed when AUX I/O 6 or 7 is used to control
external equipment.
1.
Program AUX I/O 6 [7] for
“
AUX Output
”
in the KGP-
47D.
2.
Remove D32,R84 and R88 for AUX I/O 6 [ D36, R83
and R87 for AUX I/O 7] on the component side of
control unit PCB (see diagram below).
3.
Install $Q14, $Q15 and $R154 for AUX I/O 6 [$Q12,
$Q13 and $R153 for AUX I/O 7] on foil side of control
unit PCB (see diagram below).
$Q12,13,14,15
DTD114EKA
$R153,154
3.9k
Ω
(RK73GB1J392J) chip resistor
4.
Change R320 for AUX I/O 6 [R319 for AUX I/O 7]
from 1k
Ω
(RK73GB1J102J) to
0
Ω
(R92-1252-05).
By making this modification, AUX I/O 6 and 7 can now sink up
to 600mA each.
Components having those reference numbers marked as
“
$
”
are not used in this transceiver, although they are described
in this service manual for other application purpose.
Содержание TKR-740
Страница 97: ...TKR 740 TKR 740 BLOCKDIAGRAM 121 122 ...
Страница 99: ...TKR 740 TKR 740 INTERCONNECTION DIAGRAM 125 126 ...
Страница 101: ...MEMO 129 ...

