background image

10

K-531

While the STANDBY/TIMER LED on the main unit lights up, the System is using very weak current to 


z

maintain the built-in memory (Standby mode). While in Standby mode you can turn the System on 
using the remote control.
When the headphones are connected, no sound is emitted from the speakers.


z

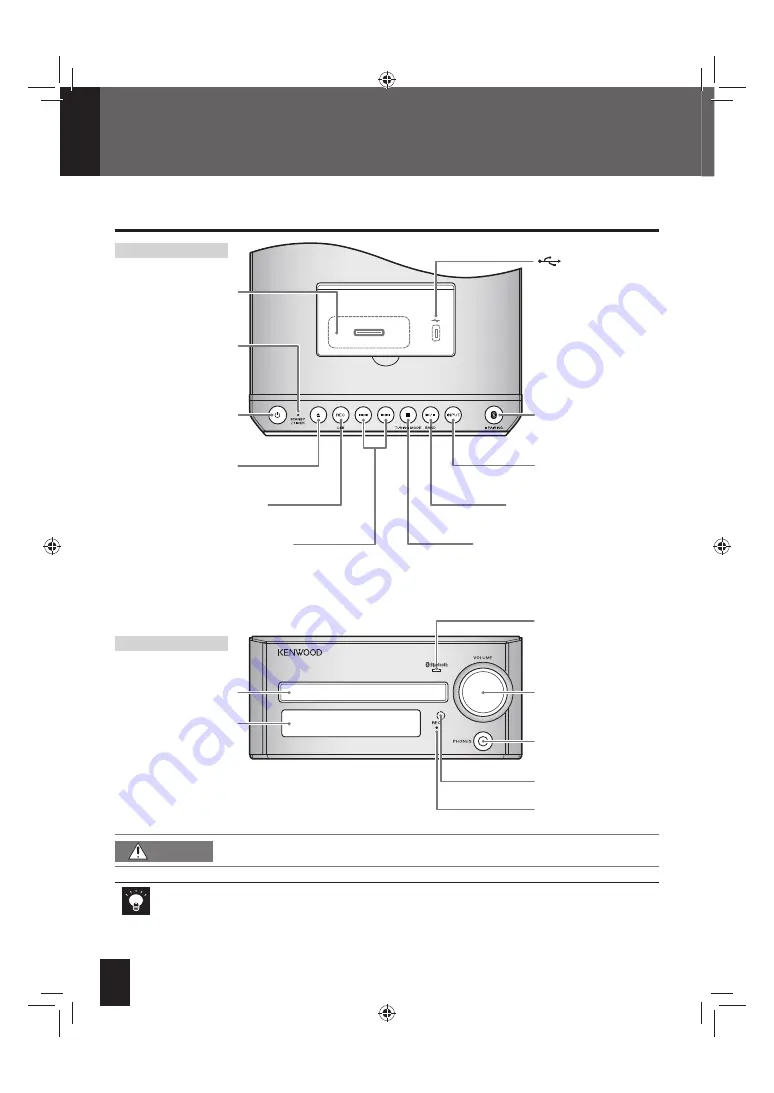
Main unit

Part names and functions

Top view

Front view

Connector for iPod/

iPhone (P.28)

 terminal (P.30)

Starts playback / Pauses / 
Selects the tuner band (P.18, 
19, 22, 28 – 31)

Stops playback / Selects automatic/
manual tuning (P.19, 22, 26, 31)

Flashes during pairing 
process of BLUETOOTH 
device / Lights when 
BLUETOOTH connection 
is established (P.25)

Adjusts the volume level

Remote sensor (P.13)

Plug headphones with 
3.5 mm stereo mini-
plug

Switches to 
“BLUETOOTH” / Enters 
BLUETOOTH pairing 
mode if pressed and 
held / Disconnects if 
pressed and held when 
BLUETOOTH connection 
is established

Selects input source 
(P.18, 22, 28, 30, 32, 
33)

Turns the System on 

or off (standby)

Opens/closes the CD 

tray (P.18)

CD tray (P.18)

Display

Records to a USB device (P.34)

Selects track or radio station / 

Fast-forwards/reverses track if 

pressed and held (P.19, 22, 26, 29, 

31)

Red: Lights in normal 
standby mode
Orange: Lights in timer 
standby mode (P.40)

Lights in recording 
mode (p.34)

 CAUTION

Excessive sound pressure from headphones can cause hearing loss.

K-531[E_X].indb   10

K-531[E_X].indb   10

12.8.1   11:40:05 AM

12.8.1   11:40:05 AM

Содержание K-531-B

Страница 1: ...K 531 COMPACT HI FI COMPONENT SYSTEM INSTRUCTION MANUAL GVT0353 002A E X K 531 E_X indb 1 K 531 E_X indb 1 12 8 1 11 40 02 AM 12 8 1 11 40 02 AM ...

Страница 2: ...TERAL TRIANGLE IS INTENDED TO ALERT THE USER TO THE PRESENCE OF IMPORTANT OPERATING AND MAINTENANCE SERVICING INSTRUCTIONS IN THE LITERATURE ACCOMPANYING THE APPLIANCE Before Applying Power Units are designed for operation as follows Australia AC 240 V only Europe AC 230 V only WARNING TO PREVENT FIRE OR ELECTRIC SHOCK DO NOT EXPOSE THIS APPLIANCE TO RAIN OR MOISTURE CAUTION TO REDUCE THE RISK OF ...

Страница 3: ...There are no user serviceable parts inside the unit leave all servicing to qualified service personnel Information on Disposal of Old Electrical and Electronic Equipment and Batteries applicable for EU countries that have adopted separate waste collection systems Products and batteries with the symbol crossed out wheeled bin cannot be disposed as household waste Old electrical and electronic equip...

Страница 4: ... exigences essentielles et aux autres dispositions pertinentes de la Directive 1999 5 CE Deutsch KENWOOD erklärt hiermit dass dieses Gerät R K531 den wesentlichen Anforderungen und anderen relevanten Bestimmungen der Richtlinie 1999 5 EG entspricht Nederlands Hierbij verklaart KENWOOD dat dit apparaat R K531 voldoet aan de essentiële vereisten en andere relevante bepalingen van richtlijn 1999 5 EG...

Страница 5: ...back 31 External components Starts playback 32 Adjusting the input level for AUX source 32 Digital audio players etc Starts playback 33 Adjusting the input level 33 USB recording Recording all tracks of a CD 34 Recording a single track of a CD 34 Recording desired tracks in desired order 34 Recording from TUNER AUDIO IN AUX source 34 Selecting the recording sound quality 35 Dividing the recorded f...

Страница 6: ...immediately We recommend that you retain the original carton and packing materials in case you need to move or ship the unit in the future AM loop antenna 1 Remote control 1 RC RP0503E Speaker cords 2 m 2 FM indoor antenna 1 Batteries for remote control R03 AAA 2 Transporting or moving the System Before transporting or moving the System 1 Remove any disc from the main unit P 18 Press CD 8 to make ...

Страница 7: ...el 10 cm or more Power supply Install the System so the power outlet is easily accessible and unplug the power z cord from the power outlet immediately in case of any trouble The power supply to the System is not shut down completely by simply setting the z power switch to OFF To shut down the power supply completely unplug the power cord Installing the speakers The sound will vary depending on th...

Страница 8: ...ix using tape etc Speaker cord supplied Without stripe Striped Connecting the AM antenna cord Preparing the ends of the speaker cords Connecting the speaker cords to the speaker Connecting the speaker cords to the main unit Rear view AM loop antenna supplied Keep the AM loop antenna cable wrapped around the AM loop antenna frame otherwise the effectiveness and sensitivity of the AM loop antenna ma...

Страница 9: ...gnals from the souce played are output as analog signals Other connections commercially available accessories Connection Ensure that all the cords are securely connected Loose or incomplete connections may result in noise interference or no sound at all 3 5 mm stereo mini plug cable commercially available Audio cord commercially available To SUB WOOFER PRE OUT To AUX REC OUT To DIGITAL OUT To DIGI...

Страница 10: ...hen BLUETOOTH connection is established P 25 Adjusts the volume level Remote sensor P 13 Plug headphones with 3 5 mm stereo mini plug Switches to BLUETOOTH Enters BLUETOOTH pairing mode if pressed and held Disconnects if pressed and held when BLUETOOTH connection is established Selects input source P 18 22 28 30 32 33 Turns the System on or off standby Opens closes the CD tray P 18 CD tray P 18 Di...

Страница 11: ... PTY search mode P 24 q Lights when a track is displayed w Lights during stop of CD DA disc playback while the total time is displayed e Lights while iPod iPhone is connected P 28 r Lights when there is a disc in the CD tray P 18 t Lights during playback P 18 26 28 30 y Flashes when the sound is muted u Lights when playback is paused P 19 26 29 31 i Shows numbers and text o kHz Lights when the AM ...

Страница 12: ...ack Searches for the radio frequency manually P 19 22 26 31 34 Fast forwards reverses tracks and selects radio stations P 19 22 26 31 Sets the sound quality P 36 Selects input source Starts playback Pauses P 18 19 28 31 Selects input source Starts playback P 22 32 33 Fixes a setting Selects a setting Starts USB recording P 34 Enters a setting mode Adjusts the display brightness P 41 Sets the shuff...

Страница 13: ...t from a high frequency fluorescent lamp such as an inverter type is shining on the remote sensor If this happens move the System to a different location to avoid this type of malfunction Loading the batteries The batteries supplied with the System are for z operational testing and may last only for a short time When replacing the batteries always load 2 new z batteries CAUTION Do not leave the ba...

Страница 14: ...t compatible iPod iPhone Made for iPod classic z iPod nano 2nd 3rd 4th 5th and 6th generation z iPod touch 1st 2nd 3rd and 4th generation z iPhone 4S z iPhone 4 z iPhone 3GS z iPhone 3G z Compatible with software newer than version 3 1 3 If iPod iPhone does not play correctly update iPod software to the z latest version For details about updating iPod iPhone check on the Apple web site z http www ...

Страница 15: ...be played WMA Pro WMA Lossless WMA Voice files cannot z be played Audio files encoded using VBR Variable Bit Rate z may use bit rates that fall outside the supported range Audio files with bit rates outside the supported range cannot be played Be aware to back up audio files to be used in the z System Certain conditions while using a USB device can cause contents stored on the USB device to be los...

Страница 16: ...of audio files Files without file extensions z will not play Also do not use audio file extensions mp3 wma wav for files that are not audio files For more information on file extensions see Supported audio files P 15 Playback sequence for folders and files MP3 WMA WAV When you play a disc containing recorded audio files the track files on the disc are played sequentially beginning with the files i...

Страница 17: ...mperature and air temperature can cause water droplets condensation to form on the System The System will not operate properly while condensation is present If condensation forms do not use the System for a few hours to allow the condensation to dry Take special care against condensation when the System is moved between two locations of very different temperatures or into a room where high humidit...

Страница 18: ...again to close the CD tray READING flashes on the display while the System is reading the information on the disc 3 Press CD 8 to start playback You can also start playback on the main unit by pressing z INPUT to change the input source to CD and then pressing 8 To change the display information Press DISPLAY repeatedly Each time you press the button the display changes as Audio CD or CD R CD RW r...

Страница 19: ...ack number Press 3 to play the 3rd track Press 10 1 and then 7 to play the 17th track Press 10 2 and then 0 to play the 20th track Press 10 10 1 2 and then 3 to play the 123rd track To fast forward or reverse Press and hold to fast forward Press and hold 1 to reverse To skip tracks Press to skip to the next track Press 4 to skip to the beginning of a track Press 4 repeatedly to skip to a previous ...

Страница 20: ...l indicator lights up 2 Press CD 8 to start playback To cancel random play Press 7 to stop playback then press P MODE repeatedly until indicator goes off Repeat play You can play desired track s repeatedly 1 Press CD 8 to play the track you want to repeat 2 Press REPEAT repeatedly to select repeat play Each time you press the button the mode changes as Single track repeat playback indicator lights...

Страница 21: ...press ENTER 2 Press the number buttons to select the file you want to listen to For Audio CD Press the number buttons to select the track you want to listen to P 13 3 Repeat step 2 to select more tracks If you attempt to select more than 50 tracks PGM FULL appears on the display 4 Press CD 8 to start the program playback To cancel program playback Press 7 to stop playback then press P MODE repeate...

Страница 22: ...matic search is selected in step z 2 the System automatically tunes in to the next station Repeat this procedure until you are tuned in to your preferred station If manual search is selected in step z 2 press and hold the button until you reach your desired frequency When a station is tuned in TUNED indicator lights up ST indicator also lights up when receiving a stereo signal only for FM stations...

Страница 23: ...ally AUTO MEMORY You can preset up to 40 FM stations Preparation Press TUNER BAND to select FM 1 Press MODE 2 Press 2 or 3 to select AUTO MEMORY then press ENTER AUTO MEMORY flashes on the display and the receivable stations are preset automatically Presetting stations manually You can preset up to 40 in total FM AM stations 1 Tune in to a station you want to preset P 22 then press ENTER 2 Press 5...

Страница 24: ...is received the program type is z shown on the display If no PTY data is available or if the station is not a Radio Data System station None appears on the display 2 Press 5 or to select the desired program type then press ENTER PTY indicator flashes z If a program of the desired type is found that program is received z and the program type name display changes to the station name display If a pro...

Страница 25: ...ess BLUETOOH SETUP 4 Press 2 or 3 to select PAIRING then press ENTER The System enters pairing mode If no operation is done for about 5 minutes pairing mode is z cancelled 5 Operate the BLUETOOTH device to perform the pairing operation SUCCESS appears on the display when pairing is completed When searching for this System with the BLUETOOTH device this z System appears as K 531 BLUETOOTH LED on th...

Страница 26: ...ward Press and hold 1 to reverse To skip tracks Press to skip to the next track Press 4 to skip to the beginning of a track Press 4 repeatedly to skip to a previous track To improve the sound of the BLUETOOTH device BLUETOOH sound enhancer BLUETOOTH sound enhancer function allows natural listening of the music from the BLUETOOTH device by correcting the unnatural sound range 1 Press BLUETOOTH SOUN...

Страница 27: ...ed BLUETOOTH device you want to connect DEL DEVICE z 1 Deletes the registered BLUETOOTH device SYS INFO z Shows the System name K 531 and the BLUETOOTH address 3 Use 2 3 5 or ENTER to change the setting if necessary 1 You can select the item when no BLUETOOTH device is connected when the BLUETOOTH LED on the main unit is turned off 2 You can select the item when a BLUETOOTH device is connected whe...

Страница 28: ...o start playback You can also start playback on the main unit by pressing z INPUT to change the input source to iPod and then pressing 8 To change the display information Press DISPLAY repeatedly Each time you press the button the display changes as Elapsed playing time Title TAG Artist name TAG Album name TAG Day Clock back to the beginning To remove the dock adapter When detaching the dock adapt...

Страница 29: ... changes To select an item from the menu Press 2 to go back to the previous layer Press 5 or to select an item Press ENTER to confirm the selection Press 3 to play currently selected item To put the iPod iPhone in sleep mode Press and hold iPod 8 iPod iPhone You cannot record tracks onto iPod iPhone from the System z Refer also to the instruction manual that comes with the iPod iPhone z Update the...

Страница 30: ...ressing z INPUT to change the input source to USB and then pressing 8 To change the display information Press DISPLAY repeatedly Each time you press the button the display changes as Elapsed playing time Folder number Track number File name Folder name Title TAG Artist name TAG Album name TAG Day Clock back to the beginning Deleting the audio files from the USB device Be aware that you cannot rest...

Страница 31: ...ress 4 to skip to the beginning of a track Press 4 repeatedly to skip to a previous track To play the files in the selected folder Folder playback Press 7 to stop playback then press P MODE repeatedly until indicator lights up To select random play Press 7 to stop playback press P MODE repeatedly until indicator lights up then press USB 8 to start playback Each time you press P MODE the mode chang...

Страница 32: ... change the input source to D IN When z D IN is selected the input signal sampling frequency is displayed 2 Operate the connected external component to start playback Adjusting the input level for AUX source Use this adjustment when the volume from an external component is z noticeably higher or lower than other input sources at the same volume setting 1 Press AUX You can also start playback on th...

Страница 33: ...gital z audio player is noticeably higher or lower than other input sources at the same volume setting 1 Press AUDIO IN You can also start playback by pressing z INPUT to change the input source to AUDIO IN on the main unit 2 Operate the component such as a digital audio player to start playback 3 Press MODE 4 Press 2 or 3 to select INPUT LEVEL then press ENTER 5 Press 5 or to adjust the input lev...

Страница 34: ...d order 1 Program the tracks and playback order for recording Step 1 to 3 P 21 2 Press USB REC to start recording Playback and recording stops when all the programmed tracks have been recorded Recording from TUNER AUDIO IN AUX source 1 Press TUNER BAND AUDIO IN or AUX to select the desired source you want to record 2 For TUNER Tune in to the station you want to record P 22 For AUDIO IN and AUX Sta...

Страница 35: ...TO DIVIDE then press ENTER 4 Press 5 or to select the interval for dividing the file then press ENTER OFF z Divide the file manually The file is divided at the point you press ENTER 15 min z The file is divided every 15 minutes 30 min z The file is divided every 30 minutes You can divide the file manually by pressing ENTER even though 15 min or 30 min is selected Recording sound quality setting af...

Страница 36: ...o the beginning 2 Press 2 or 3 to select the frequency BASS z 100 Hz 150 Hz 200 Hz MID z 1 kHz 2 kHz 3 kHz TREBLE z 5 kHz 7 kHz 10 kHz You can adjust 1 frequency for each range tone 3 Press 5 or to adjust the level 8 to 8 4 Repeat steps 1 to 3 to adjust the other range tones if acquired 5 Press ENTER to confirm TONE indicator lights up except if the level is set to 0 z To cancel super bass tones o...

Страница 37: ...nt technology and is used for playing CDs and audio files or for playback using components connected to the DIGITAL IN terminal Supreme EX works when CD D IN iPod or USB is selected z Supreme EX does not work when the sampling frequency of the wav file is more than 48 kHz or when the input frequency for D IN is 96 kHz 88 2 kHz or 48 kHz SPRM EX indicator goes off 1 Press MODE 2 Press 2 or 3 to sel...

Страница 38: ...to turn off the System Each time you press the button the timer minutes changes as 10 20 30 40 50 60 70 80 90 Canceled indicator goes off back to the beginning To check the remaining time when sleep timer is activated Press SLEEP To cancel the sleep timer Press B to turn off the System Standby or press SLEEP repeatedly until indicator goes off Timer settings K 531 E_X indb 38 K 531 E_X indb 38 12 ...

Страница 39: ...en press ENTER Continued to next page For AUX or AUDIO IN connect a component equipped with a timer function You cannot z activate or deactivate the timer function of the connected component by operating on the System When recording with a timer the System is turned on and paused 2 minutes before the start time z of the recording When you activate two programs make sure the times for each program ...

Страница 40: ...rce other than TUNER press ENTER to complete the settings If you select TUNER press 5 or to select a preset number then press ENTER to complete the settings If you select REC in step TUNER source is automatically selected Press 5 or to select a preset number press ENTER then press 5 or to select the recording sound quality SQ or HQ and press ENTER to complete the settings When the settings are com...

Страница 41: ... on the display and uneven display brightness 1 Press MODE 2 Press 2 or 3 to select DISP SAVER then press ENTER 3 Press 5 or to select ON or OFF then press ENTER ON z Activates the display saver if the System is not in used at all for about 10 minutes after playback stops or a button is pressed OFF z Deactivates the display saver Setting the System clock 1 Press MODE 2 Press 2 or 3 to select TIME ...

Страница 42: ...lect A P S SET then press ENTER 3 Press 5 or to select ON or OFF then press ENTER ON Activates the auto power save if no operation is performed for 15 minutes in the following conditions The volume is set to 0 VOLUME 0 or sound is muted z Disc or USB device is not played with the target input source z CD or USB selected BLUETOOTH device is not connected with BLUETOOTH z source selected iPod iPhone...

Страница 43: ... as described in Setting the System clock P 41 z The timer does not work Set the clock as described in Setting the System clock P 41 z Set a start time and end time for the program timer P 39 z CD A disc does not play back when loaded Load the disc correctly with the label side facing upward P 18 z Clean the disc See Care and storage P 17 z Allow any condensation to evaporate See Care and storage ...

Страница 44: ...registered information and pair the device again P 25 27 z The sound skips or fluctuates or the connection is lost Reduce the distance between the System and the BLUETOOTH device z Make sure there is no obstacle between the System and the z BLUETOOTH device Turn down the volume of the connected BLUETOOTH device z iPod iPhone The iPod iPhone cannot be attached firmly Check to see whether the correc...

Страница 45: ...ugged while the System was turned on Follow the procedure below to reset the microcomputer Unplug the power cord from the AC wall outlet ŸPlug the power cord back in while holding down B on the main unit Press and hold the button until the display below is shown Resetting of the microcomputer starts When resetting is complete the main unit returns to Standby Mode Bear in mind that resetting will e...

Страница 46: ... kΩ AUDIO IN 250 mV 47 kΩ Output terminals Level Impedance SUB WOOFER PRE OUT 2 V 160 Ω AUX REC OUT 500 mV 160 Ω Digital unit Sampling frequencies 32 kHz 44 1 kHz 48 kHz 88 2 kHz 96 kHz Supreme EX CD D IN iPod USB Playable frequencies 1 Hz to 24 kHz Input terminals Sensitivity Wave length Optical 15 dBm to 24 dBm 660 nm 30 nm Output terminals Level Wave length Optical 21 dBm to 15 dBm 660 nm USB U...

Страница 47: ...sumption 0 5 W or less Power consumption 45 W Dimensions Width Height Depth 200 mm 95 mm 299 mm Weight net 2 3 kg Speaker Enclosure Bass reflex Speaker unit Woofer 110 mm Cone type Tweeter 25 mm Dome type Rated impedance 4 Ω Max input power 40 W Dimensions Width Height Depth 140 mm 237 mm 236 mm Weight net 3 4 kg each Notes JVC KENWOOD follows a policy of continuous advancements in development For...

Страница 48: ...spaces designated on the warranty card and in the space provided below Refer to the model and serial numbers whenever you call upon your dealer for information or service on this product Model Serial Number K 531 E_X indb 48 K 531 E_X indb 48 12 8 1 11 40 15 AM 12 8 1 11 40 15 AM ...

Отзывы: