background image

54

ENGLISH

REVERSE

PRK SW

D23

D22

D21

STEERING WHEEL

REMOTE INPUT

P.CONT

MUTE

¥

Installation and Connection

Installation and Connection

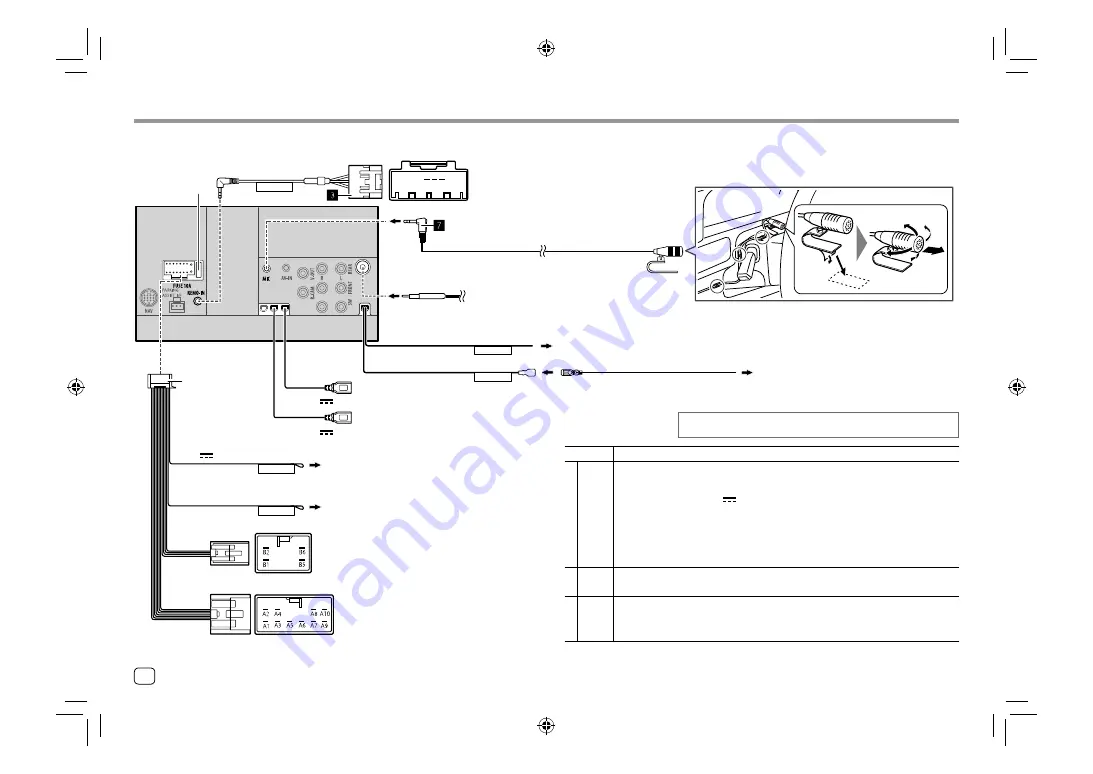
 For DMX719WBT (except for Indonesian models)/DMX719WBTM

10 A fuse

Connector D: To the car’s steering remote harness
•  Depending on the type of vehicle, it cannot be 

connected

USB1 input terminal (1 m)

Purple with white stripe

Not used.

Connector B: To the car’s harness

To the control terminal of the motor antenna or to the power 
terminal for the booster amplifier of film-type antenna

Connector A: To the car’s harness

Light green

Connect the antenna cord from the power cord (

A

to the antenna terminal.

To the car’s reverse lamp harness when using the optional rear view camera

To the car’s parking brake detection switch harness
(For best safety, be sure to connect the parking 
sensor.)

Extension parking cable ( 

ø

 )

Brown

Blue with white stripe
(12 V 

 200 mA)

Pin

Color and Function

A

A1

Orange/White: Dimmer

A2

Yellow: Battery

A3/A5

Blue: Antenna control (12 V        300 mA)

A4

Red: Ignition (ACC)

A6

Black: Ground connection

A7/A8

White with black stripe 

[

 / White 

]

: Left speakers /mid range speakers* (front)

A9/A10 Gray with black stripe 

[

 / Gray 

]

: Right speakers /mid range speakers* (front)

B

B1/B2

Green with black stripe 

[

 / Green 

]

: Left speakers /tweeter speakers* (rear)

B5/B6

Purple with black stripe 

[

 / Purple 

]

: Right speakers /tweeter speakers* (rear)

D

D21

White: Input 1

D22

Red: Input 2

D23

Black: Ground

*  For 3-way speaker system connection, see also page 55.

(USB1) 5 V 

 1.5 A

(USB2) 5 V 

 1.5 A

USB2 input terminal (1 m)

04_DDX7019BT_TC_M_Body02.indd   54

04_DDX7019BT_TC_M_Body02.indd   54

18/6/2019   9:54:42 AM

18/6/2019   9:54:42 AM

Содержание DDX7019BT

Страница 1: ...DMX7019BT For Australia and New Zealand DMX7019BTM DMX719WBT DMX719WBT For Australia and New Zealand DMX719WBTM INSTRUCTION MANUAL MONITOR WITH DVD RECEIVER MONITOR WITH RECEIVER This instruction manual is used to describe the models listed above Model availability and features functions may differ depending on the country and sales area 01_DDX7019BT_TC_M_COVER indd 1 01_DDX7019BT_TC_M_COVER indd ...

Страница 2: ... monitor built into this unit has been produced with high precision but it may have some ineffective dots This is inevitable and is not considered defective Do not expose the monitor to direct sunlight Do not operate the touch panel using a ball point pen or similar tool with a sharp tip Touch the keys on the touch panel with your finger directly if you are wearing a glove take it off When the tem...

Страница 3: ...S Directive 2011 65 EU Manufacturer JVCKENWOOD Corporation 3 12 Moriya cho Kanagawa ku Yokohama shi Kanagawa 221 0022 Japan EU Representative JVCKENWOOD Europe B V Amsterdamseweg 37 1422 AC UITHOORN THE NETHERLANDS English Hereby JVCKENWOOD declares that the radio equipment DDX7019BTM DMX7019BTM DDX719WBTM DMX719WBTM is in compliance with Directive 2014 53 EU The full text of the EU declaration of...

Страница 4: ...5 Getting Started 6 Initial settings 6 Setting the security code 6 Calendar clock settings 7 Various Screens and Operations 8 Touch screen operations 8 Home screen 8 Source control screen 9 List setting screen 11 Disc 12 Video 14 USB 15 iPod iPhone 17 Mirroring 18 Radio 20 Spotify 23 Other External Components 25 View camera 25 AV IN 26 Using the external navigation unit 26 Bluetooth 26 Information...

Страница 5: ...he smartphone while listening to the other playback source 2 VOICE Hold Activates the voice dialing 8 DDX7019BT DDX7019BTM M button Press Displays the Angle Adjust screen Page 5 DMX7019BT DMX7019BTM CAM button Press Displays the picture from the connected rear view camera 9 DDX7019BT DMX7019BT Built in Bluetooth microphone Not available for DDX7019BTM DMX7019BT Australian New Zealand models DMX701...

Страница 6: ...e monitor panel or touch the screen Hold Hold 2 VOLUME J K buttons 3 HOME button Press Turns on the power Press Displays the Home screen while the power is on Hold Turns off the power or AV source 1 4 MENU button Press Pops up the short cut menu Hold Turns off the screen 5 CAM button Press Displays the picture from the connected rear view camera Hold Attenuates the sound 6 Monitor panel 7 Screen t...

Страница 7: ...9BT DMX7019BTM DDX719WBT DDX719WBTM DMX719WBT DMX719WBTM Press MENU on the monitor panel to display the pop up short cut menu then touch Angle 2 Perform the adjustment or operation E g Angle adjust screen for DDX7019BT Hold Hold 0 6 Selects a monitor angle The monitor panel will stay in this angle when you turn on the unit Off Position Sets the angle of the monitor when the ignition switch of the ...

Страница 8: ...ngs screen Once completed a warning message appears Touch Agree to display the Home screen Language 1 Select the text language used for on screen information Touch Language select then select the language American English en British English en Initial Nederlands nl Français fr Deutsch de Italiano it Español es ar Ελληνικά el Português pt Čeština cs Polski pl Magyar hu Руccĸий ru th Türkçe tr zh zh...

Страница 9: ...ck with the FM Radio Data System Manual Sets the date and clock manually For Indonesian models Manual is selected initially Time Zone Select the time zone for your area Clock Adjust Set the date and clock manually when Clock is set to Manual Touch J K to adjust the date year month date then clock hour minute To finish setting touch Set Selectable when Clock is set to Manual Calendar clock settings...

Страница 10: ...on the monitor panel to display the Home screen from other screens E g Home screen Touching the operation keys performs the following actions 1 Displays the current playing source control screen 2 Clock date 3 Current source information 4 Displays all playback sources and options 5 Short cut playback source keys 6 Displays the phone control screen Available playback sources and options Touch on th...

Страница 11: ... playback 3 For video Hides the operation keys on the screen while video is played Touch the screen to restore the operation keys For audio File format 4 Repeat random playback mode keys 1 5 Signal strength and battery level of the connected Bluetooth device only when the information is acquired from the device Customizing the source option selection screen You can arrange the items to display on ...

Страница 12: ...cted device etc Using the pop up short cut menu While displaying the source control screen you can jump to another screen by touching the operation keys on the pop up short cut menu 1 Display the pop up short cut menu DDX7019BT DDX719WBT DDX7019BTM DDX719WBTM DMX7019BT DMX719WBT DMX7019BTM DMX719WBTM 6 Track file song video information Touching scrolls the text if not all of the text is shown 7 Cl...

Страница 13: ...ous chapter track 4 Goes to the next chapter track Not available for video from an external component AV IN List setting screen The followings are the common operation keys which appear on the list setting screen The appearance of the operation keys may differ however the similar operation keys have the same operations Available operation keys differ depending on the setting screens Not all the fo...

Страница 14: ...touch Angle to open the monitor panel then insert a disc E g Inserting a disc for DDX719WBT After the disc is loaded the monitor panel closes automatically The source changes to DISC and playback starts The IN indicator lights up while a disc is inserted Ejecting a disc DDX7019BT DDX7019BTM Then on the Angle Adjust screen touch M DISC EJECT DDX719WBT DDX719WBTM Then on the pop up short cut menu to...

Страница 15: ...2 Make the settings Menu Language Select the initial disc menu language Initial English Subtitle Language Select the initial subtitle language or turn subtitles off OFF Initial English Audio Language Select the initial audio language Initial English Dynamic Range Control You can change the dynamic range while playing Dolby Audio encoded discs Wide Reproduces powerful sound at a low volume level wi...

Страница 16: ...arget item to select The menu screen disappears when no operation is done for 5 seconds Returns to the playback screen Angle Selects the view angle Subtitle Selects the subtitle type Audio Selects the audio type J K H I Selects an item Playback operations Video playback information on the source control screen E g Video playback source control screen for DDX7019BT 1 Media type 2 Hides the operatio...

Страница 17: ...yed in the aspect ratio of Full setting Video of 4 3 ratio is displayed in the aspect ratio of Normal setting For USB Displays the video fully on vertical or horizontal with no ratio change Adjustable items are different depending on the current source USB USB You can connect a USB mass storage class device such as a USB memory digital audio player etc to the unit For playable file types and other...

Страница 18: ...e Performing the above operations will also change the drive of the following devices Selected internal or external memory of a smartphone Mass Storage Class Selected drive of a multiple drive device Playback operations Playback information and key operation For playback information see Source control screen on page 9 For key operations on the touch panel see Common operation keys on source contro...

Страница 19: ...he another iPod at first and try reconnect this iPod again Bluetooth connection Pair the iPod iPhone with this unit via Bluetooth Page 27 Playback operations Playback information and key operation For playback information see Source control screen on page 9 For key operations on the touch panel see Common operation keys on source control screen on page 10 Selecting an audio file from the menu 1 Di...

Страница 20: ...he PRK SW lead during installation page 51 page 54 Installing the application Install the latest version of the Mirroring for KENWOOD application and activate the application on your smartphone For Android devices Search for Mirroring for KENWOOD in Google Play to find and install the most recent version For iPhone Search for Mirroring for KENWOOD in Apple App Store to find and install the most re...

Страница 21: ... switch to Mirroring source or No to remain at current playback source Note OSD clock is not shown on the mirroring screen of this unit regardless of the setting made for OSD Clock Page 39 Depending on the connected Android device you may need to enable virtual keyboard setting on your smartphone to display software keyboard on the screen of this unit and on your smartphone Mirroring for KENWOOD a...

Страница 22: ...r KENWOOD application you can also select one of the following as the current playback source to listen to without going to the Home screen STANDBY Initial Mirroring Radio DISC AV IN Touch Close to confirm the selection and return to Mirroring Setup screen 1 These keys differ depending on the connected device and may differ from the function operated from the device These keys can be displayed eve...

Страница 23: ...System features Activates TI standby reception mode When TI is activated the unit is ready to switch to traffic information if available The TI indicator lights up in white If the TI indicator lights up in orange tune into a station providing Radio Data System signals The volume adjustment for traffic information is automatically memorized The next time the unit switches to traffic information the...

Страница 24: ...ta System station of the same program with stronger signals Network Tracking Reception Regional ON Switches to another station broadcasting the same program 2 OFF Initial Deactivates the function LO S You can tune in FM stations only with strong signals Local Seek ON Tunes in only for FM stations with sufficient signal strength The LOS indicator lights up OFF Initial Deactivates the function Prese...

Страница 25: ... the Android device with this unit via Bluetooth Page 27 For iPhone iPod touch Wired connection Connect the iPhone iPod touch to the USB input terminal with USB Audio cable KCA iP103 optional accessory Page 17 Bluetooth connection Pair the iPhone iPod touch with this unit Page 27 Auto TP Seek When traffic information station reception is poor the unit automatically searches for another station tha...

Страница 26: ...utomatically You can personalize your station using thumb up or thumb down Personalizing stations may not be available depending on the track Selecting a track 1 Display the Spotify menu screen On the source control screen touch as follows 2 Select the list type then select a desired item The list types displayed differ depending on the information sent from Spotify Playback operations Playback in...

Страница 27: ...ra screen Page 42 A caution message appears on the screen To remove the caution message touch the screen To display rear view camera screen manually You can display the picture from the rear view camera manually without shifting the gear to the reverse R position Make sure Front Camera is set to OFF Page 42 On the monitor panel DDX7019BT DDX719WBT DDX7019BTM DDX719WBTM DMX7019BT DMX719WBT DMX7019B...

Страница 28: ...19BT DDX719WBT DDX7019BTM DDX719WBTM DMX7019BT DMX719WBT DMX7019BTM DMX719WBTM Bluetooth Bluetooth Information Bluetooth is a short range wireless radio communication technology for mobile devices such as mobile phones portable PCs and other devices Bluetooth devices can be connected without cables and communicate with each other Note While driving do not perform complicated operations such as dia...

Страница 29: ...uilt in microphone is equipped with this unit You can also connect an external microphone to the unit If you are looking for an external Bluetooth microphone please contact the store where you purchased this unit Select a microphone to use built in or external via MIC SETUP on the Bluetooth Setup screen beforehand Page 44 Set Bluetooth to ON on the Bluetooth Setup screen Page 44 Connection When yo...

Страница 30: ...cting a registered Bluetooth device 1 Display the Select Device screen On the Home screen touch as follows Then on the SET UP screen touch Bluetooth On the Bluetooth Setup screen touch Select Device 2 Select the device you want to connect disconnect Bluetooth Bluetooth 2 When your Bluetooth device is compatible with HFP Determine usage of the connected device 1 then touch Close 2 Hands Free1 Hands...

Страница 31: ...e screen touch as follows Then on the SET UP screen touch Bluetooth On the Bluetooth Setup screen touch Device Name 2 Enter the device name 1 then confirm the entry 2 To clear the last entry touch BS To move the entry position touch H I Bluetooth mobile phone When a call comes in Touching the operation keys performs the following actions Answers a call Rejects a call Speech Quality Displays the Sp...

Страница 32: ... preset list Page 31 4 Use direct number entry 5 Use voice dialing Applicable only for mobile phone compatible with PBAP Phone Book Access Profile 3 Select a contact to make a call A When item 1 2 or 3 is selected in step 2 If the selected contact has several phone numbers the phone number list is displayed Select a phone number to make a call During a call Touching the operation keys performs the...

Страница 33: ...eset up to eight phone numbers 1 Display the Edit Preset Dial screen On the Home screen touch as follows Then on the phone control screen touch as follows Edit 2 Select a position to store into 3 Select a method to add a phone number to preset list and register the number to the preset list 1 then touch Close 2 Add number from phonebook Select a phone number from the phonebook Add number direct En...

Страница 34: ...is compatible with Phone Book Access Profile PBAP you can transfer the phonebook of the mobile phone to the unit 1 Display the phone control screen On the Home screen touch as follows 2 Start phonebook data transmission To delete contact from the phonebook Touch in step 2 2 select devices to delete then touch Delete A confirmation message appears Touch OK To select all devices touch All To deselec...

Страница 35: ...as follows Then on the SET UP screen touch Bluetooth On the Bluetooth Setup screen touch TEL SET UP 2 Make the settings A Device used as usual Bluetooth audio device and at the same time being able to used as device for KENWOOD Music Mix Touch to go to Select Device screen Page 28 Device used for KENWOOD Music Mix white Not connected purple Connected B Status of playback device purple Current play...

Страница 36: ...der of last name Selectable only when X over Network is set to 2way Settings Settings Audio settings 1 Display the Audio screen On the Home screen touch as follows 2 Select a setting to change E g Audio settings screen You cannot change the Audio screen in the following situations When the AV source is turned off When the Bluetooth phone is used making or receiving a call during a call or while vo...

Страница 37: ...then adjust the crossover frequency 2 of the selected speaker X over 100Hz HPF FREQ 6dB Oct Slope 0dB Gain 1dB TW Gain Subwoofer Rear Front E g When X over Network is set to 2way Adjustable items vary depending on the selected speaker type speaker size crossover settings Speaker types shown on the screen differ depending on the X over Network setting Settings Settings HPF FREQ Adjusts the crossove...

Страница 38: ...Listening Position Front L Front All Front R All Adjust Position DTA Front All is selectable only when X over Network is set to 2way Page 34 Adjusting the Digital Time Alignment DTA Make fine adjustments to the delay time of the speaker output to create a more suitable environment for your car Speaker types shown on the screen differ depending on the X over Network setting Page 34 1 Touch Adjust o...

Страница 39: ...ork is set to 2way When you are sitting on the Front All front seats or All front and rear seats position select left Priority L or right Priority R to specify the position to localize the sound image 2 Touch Delay 1 then adjust the sound image 2 precisely Initialise Sound Image LR Front Sound Image LR Rear Size of the Virtual Sound Field Subwoofer Delay Level Delay Front Focus Adjust 0 00ms 0 00m...

Страница 40: ... Initial 0 To initialize the setting value Touch Initialise Sound Effect Adjust the sound effect Bass Boost Selects the bass boost level OFF Initial 1 2 3 Loudness Adjusts loudness The LOUD indicator lights up when the loudness is adjusted OFF Initial Low High Drive Equalizer Reduces the driving noise by raising the bandwidth OFF Initial ON Space Enhancer Virtually enhances the sound space using t...

Страница 41: ...very speaker the delay time will be automatically computed and set 1 Determine the center of the currently set listening position as the reference point 2 Measure the distances from the reference point to the speakers 3 Calculate the differences between the distance of the furthest speaker and other speakers 4 Set the DTA value calculated in step 3 for individual speakers 5 Adjust gain for individ...

Страница 42: ... A confirmation message appears Touch Enter to store the new image The existing image is replaced with the new one Viewing Angle Select the viewing angle in relation to the monitor to make the image on the screen easier to see 0 Initial 1 2 3 To change the background color Touch Background Colour then select the color on the Background Colour screen You can select same color selected in Key Colour...

Страница 43: ...nitial settings on page 6 Touch Panel Adjust Only for DDX7019BT DDX7019BTM DMX7019BT DMX7019BTM Adjust the touch positions of the keys on the screen Touch and hold the center of the marks at the lower left 1 then the upper right 2 as instructed Hold Hold To reset the touch position touch Reset To cancel the current operation touch Cancel Clock Select the method to set the date and clock For detail...

Страница 44: ...the front view camera when you shift the gear from reverse R position to any other positions OFF 5 sec 10 sec 15 sec Initial 20 sec After the selected time the screen returns to the previous screen Selectable only when Front Camera and R CAM Interruption are set to ON Front Camera Mirror Image ON Displays the picture from the front view camera horizontally reversed OFF Initial Displays the picture...

Страница 45: ... the following audio settings Fader Balance Speaker X over Equalizer Adjustment on user preset User1 User4 Subwoofer level adjustment Position DTA Sound Effect A confirmation message appears Touch Yes Selectable only when SET UP Memory is set to Unlock Audio SETUP Recall Recall the settings memorized by Audio SETUP Memory A confirmation message appears Touch Yes Selectable only when SET UP Memory ...

Страница 46: ... using the external microphone connected to the MIC terminal Security settings Display the Security screen On the Home screen touch as follows Then on the SET UP screen touch Security Security Code Set Register the security code for the unit Page 6 Settings Settings Bluetooth settings Display the Bluetooth Setup screen On the Home screen touch as follows Then on the SET UP screen touch Bluetooth B...

Страница 47: ...719WBT DDX719WBTM DMX719WBT DMX719WBTM Remote sensor DO NOT expose the remote sensor to bright light direct sunlight or artificial lighting Point the remote controller directly at the remote sensor on the monitor panel CAUTION Put the remote controller in a place where it will not move during braking or other operations A dangerous situation could result if the remote controller falls down and get...

Страница 48: ...reen Displays the Mirroring for KENWOOD application screen from the connected smartphone ENTER Enters options Answers incoming calls FNC PBC MENU Switches to the control screen MODE TOP MENU Changes the aspect ratio The aspect ratio changes each time you press this key OPEN Adjusts the panel angle The panel angle changes each time you press this key DVD SETUP Not used for this unit RETURN Not used...

Страница 49: ... AUTO1 AUTO2 MANUAL 0 9 Specifies the frequency of the station to receive or to search for in direct search DIRECT Enters direct search mode The search method differs according to the selected seek mode iPod AUD mode S T Selects music videos I W Starts pauses playback USB AUD mode AM FM Selects a folder S T Selects a file I W Starts pauses playback Searching for an item directly While listening to...

Страница 50: ...OSITION IW Starts pauses playback USB AUD mode J FM K AM Selects a folder H S T I Selects a file POSITION IW Starts pauses playback Searching for a station frequency directly While listening to the radio you can search for a station frequency directly using the number buttons 1 Press BS DIRECT to enter the search mode 2 Press a number button to select a desired station frequency To erase a misentr...

Страница 51: ...nting angle is 30 or less Make sure to ground the unit to a negative 12 V DC power supply Do not install the unit in a location exposed to direct sunlight or excessive heat or humidity Also avoid places with too much dust or the possibility of water splashing Do not use your own screws Use only the screws provided If you use the wrong screws you could damage the unit After the unit is installed ch...

Страница 52: ... the ignition and disconnect the battery 2 Make the proper input and output wire connections for each unit 3 Connect the speaker wires of the wiring harness 4 Connect the wires of the wiring harness in the following order ground battery ignition 5 Connect the wiring harness to the unit 6 Install the unit in your car Make sure that the unit is installed securely in place If the unit is unstable it ...

Страница 53: ...or the booster amplifier of film type antenna Not used Extension parking cable ø To the car s parking brake detection switch harness For best safety be sure to connect the parking sensor Brown Black Ground wire Blue with white stripe 12 V 350 mA Orange with white stripe Purple Purple with black stripe Green Green with black stripe Gray Gray with black stripe White White with black stripe To the ca...

Страница 54: ...To the car s parking brake detection switch harness For best safety be sure to connect the parking sensor Brown For DMX7019BT DMX7019BTM DMX719WBT Indonesian models Black Ground wire Blue with white stripe 12 V 350 mA Orange with white stripe Purple Purple with black stripe Green Green with black stripe Gray Gray with black stripe White White with black stripe To the car light control switch To re...

Страница 55: ...etection switch harness For best safety be sure to connect the parking sensor Extension parking cable ø For 3 way speaker system connection see also page 55 Brown For DDX719WBT except for Indonesian models DDX719WBTM Blue with white stripe 12 V 200 mA Pin Color and Function A A1 Orange White Dimmer A2 Yellow Battery A3 A5 Blue Antenna control 12 V 300 mA A4 Red Ignition ACC A6 Black Ground connect...

Страница 56: ...amera To the car s parking brake detection switch harness For best safety be sure to connect the parking sensor Extension parking cable ø Brown Blue with white stripe 12 V 200 mA Pin Color and Function A A1 Orange White Dimmer A2 Yellow Battery A3 A5 Blue Antenna control 12 V 300 mA A4 Red Ignition ACC A6 Black Ground connection A7 A8 White with black stripe White Left speakers mid range speakers ...

Страница 57: ...tallation and Connection Installation and Connection References References 8 Front view camera input FRONT VIEW CAMERA 4 1 Except for Indonesian models 2 Ready for the Around View Monitoring System separately purchased 3 When connecting an external amplifier connect its ground wire to the chassis of the car otherwise the unit may be damaged 4 Cable position differs according to the models Connecti...

Страница 58: ...ng Frequency For disc MP3 AAC 32 kHz 44 1 kHz 48 kHz WMA 8 kHz 11 025 kHz 16 kHz 22 05 kHz 32 kHz 44 1 kHz 48 kHz WAV 44 1 kHz For USB MP3 WMA AAC 16 kHz 48 kHz WAV FLAC 16 kHz 96 kHz Files recorded in VBR variable bit rate and have a discrepancy in elapsed time indication This unit can show or display the following Tag MP3 ID3 Tag version 1 0 1 1 2 2 2 3 2 4 WMA Tag WAV Tag AAC Tag FLAC Tag Jacke...

Страница 59: ...lgarian IE Interlingue BH Bihari IK Inupiak BI Bislama IN Indonesian BN Bengali Bangla IS Icelandic BO Tibetan IW Hebrew BR Breton JA Japanese CA Catalan JI Yiddish CO Corsican JW Javanese CS Czech KA Georgian CY Welsh KK Kazakh DZ Bhutani KL Greenlandic EL Greek KM Cambodian EO Esperanto KN Kannada ET Estonian KO Korean KOR EU Basque KS Kashmiri FA Persian KU Kurdish FI Finnish KY Kirghiz FJ Fiji...

Страница 60: ... the car or expose to direct sunlight or high temperatures to prevent deformation or damage to the device Unplayable USB device This unit may not play back files in a USB device properly when using a USB extension cable USB devices equipped with special functions such as data security functions cannot be used with the unit Do not use a USB device with 2 or more partitions Depending on the shape of...

Страница 61: ... be played back Insert a finalized disc Finalize the discs with the component which you used for recording Tracks on the Recordable Rewritable discs cannot be skipped Insert a finalized disc Finalize the discs with the component which you used for recording Playback does not start The format of files is not supported by the unit No picture appears on the external monitor Connect the video cord cor...

Страница 62: ...g function after you disconnect from mirroring operations Cannot operate Mirroring for KENWOOD application with touch panel operation Available functions may differ from the ones operated on the smartphone Depending on the connected smartphone some functions do not work on this unit Depending on the operating system OS of the connected smartphone some functions do not work on this unit The unit do...

Страница 63: ...tions try 0000 or 1234 Turn off then turn on the Bluetooth device Echo or noise occurs Adjust the microphone unit position Adjust the echo volume level or noise reduction level Page 30 The unit does not respond when you try to copy the phonebook to the unit You may have tried to copy the same entries as stored to the unit Connection Error appears The device is registered but the connection has fai...

Страница 64: ... dBm MAX Power Class 2 Maximum Communication Range Line of sight approx 10 m 32 8 ft Audio Codec SBC AAC Profile HFP Hands Free Profile 1 7 A2DP Advanced Audio Distribution Profile 1 3 AVRCP Audio Video Remote Control Profile 1 6 GAP Generic Access Profile PBAP PhoneBook Access Profile 1 2 SDP Service Discovery Profile SPP Serial Port Profile 1 2 Monitor section Picture Size W H 6 95 inches diagon...

Страница 65: ... DDX7019BTM DDX719WBTM DMX7019BTM DMX719WBTM 531 kHz to 1 602 kHz 9 kHz Usable Sensitivity 28 5 μV Video section Color System of External Video Input NTSC PAL External Video Input Level mini jack 1 Vp p 75 Ω External Audio Max Input Level mini jack 2 V 25 kΩ Video Input Level for Rear Camera RCA jack 1 Vp p 75 Ω Video Input Level for Front Camera RCA jack 1 Vp p 75 Ω Video Output Level RCA jacks 1...

Страница 66: ...62 mm Weight Main Unit DDX7019BT DDX7019BTM DDX719WBT DDX719WBTM 2 4 kg DMX7019BT except for Australian New Zealand models DMX7019BTM DMX719WBT DMX719WBTM 2 0 kg DMX7019BT Australian New Zealand models 2 0 kg including trim plate Design and specifications are subject to change without notice Mid Range HPF Frequency Hz Through 30 40 50 60 70 80 90 100 120 150 180 220 250 Slope dB Oct 6 12 Mid Range...

Страница 67: ...CONSUMER ENGAGED IN A PERSONAL ACTIVITY AND OR WAS OBTAINED FROM A VIDEO PROVIDER LICENSED TO PROVIDE AVC VIDEO NO LICENSE IS GRANTED OR SHALL BE IMPLIED FOR ANY OTHER USE ADDITIONAL INFORMATION MAY BE OBTAINED FROM MPEG LA L L C SEE HTTP WWW MPEGLA COM SPOTIFY and the Spotify logo are among the registered trademarks of Spotify AB libFLAC Copyright C 2000 2009 Josh Coalson Copyright C 2011 2013 Xi...

Страница 68: ... the latest Instruction Manual system updates new functions etc please visit the following website www kenwood com cs ce 05_DDX7019BT_TC_M_REAR indd 1 05_DDX7019BT_TC_M_REAR indd 1 18 6 2019 10 06 07 AM 18 6 2019 10 06 07 AM ...

Отзывы: