background image

24

Setting Oven Controls

Meat Probe 

(cont’d)

To Set Meat Probe:

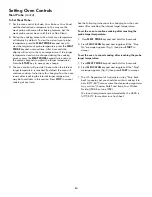
7.  Set the oven control for Bake, Conv Bake or Conv Roast 

and the desired oven temperature. You may use the 
meat probe with some other baking features, but the 
meat probe cannot be set with Broil or Flex-Clean.

8.  During the cooking process the actual oven temperature 

will display by default. To view the actual meat probe 

temperature press the 

meat proBe

 keypad once. To 

view the target meat probe temperature press the 

meat 

PROBE

 keypad a second time. After 6 seconds the 

display will revert to the oven temperature. If the target 
temperature needs to be changed during the cooking 
process, press the 

meat proBe

 keypad twice and use 

the numeric keypads to adjust the target temperature. 

Press the 

Start

 key to accept any change.

9.  The oven control will provide 3 beeps when the internal 

target temperature is reached. By default the oven will 
continue cooking. Instructions for changing how the oven 
reacts after reaching the internal target temperature 
may be found later in this section. Press 

STOP

 to cancel 

cooking at any time.

See the following instructions for changing how the oven 
reacts after reaching the internal target temperature.

†    The U.S. Department of Agriculture states, “Rare fresh 

beef is popular, but you should know that cooking it to 
only 140ºF/60ºC means some food poisoning organisms 
may survive.” (Source: Safe Food Book, Your Kitchen 
Guide, USDA Rev. June 1958.)

   The lowest temperature recommended by the USDA is 

145ºF/63ºC for medium rare fresh beef.

To set the oven to continue cooking after reaching the 
probe target temperature:

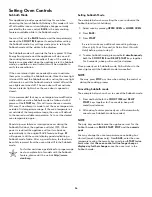
1.  Press 

meat proBe

 keypad and hold for 6 seconds.

2.  Press 

fLeX cLean

 keypad and toggle until the “Stay 

On” message appears (Fig. 1) then press 

Start

 to 

accept.

To set the oven to cancel cooking after reaching the probe 
target temperature:

1.  Press 

meat proBe

 keypad and hold for 6 seconds.

2.  Press 

fLeX cLean

 keypad and toggle until the “Stop” 

message appears (Fig. 2) then press 

Start

 to accept.

Содержание 790.4111

Страница 1: ... 318205842B 1208 Sears Brands Management Corporation Hoffman Estates IL 60179 U S A www kenmore com www sears com Kenmore Elite Double Oven Slide in Electric Range Estufa Eléctrica Deslizable con Horno Doble Color number número de color Models Modelos 790 4111 ...

Страница 2: ...urchase if this appliance is ever used for other than private family purposes This warranty covers only defects in material and workmanship Sears will NOT pay for 1 Cracks in a ceramic glass cooktop that are not a result of thermal shock 2 Stains and scratches on a ceramic glass cooktop resulting from accident or improper operation or maintenance 3 Expendable items that can wear out from normal us...

Страница 3: ...w children to climb or play around the appliance Storage on appliance flammable materials should not be stored near surface units This includes paper plastic and cloth items such as cookbooks plasticware and towels as well as flammable liquids Do not store explosives such as aerosol cans on or near the appliance Flammable materials may explode and result in fire or property damage Do not use the ov...

Страница 4: ...liance is equipped with one or more surface units of different sizes Select utensils having flat bottoms large enough to cover the surface unit The use of undersized utensils will expose a portion of the surface heating unit to direct contact and may result in ignition of clothing Proper relationship of utensil to the surface unit will also improve efficiency Utensil handles should be turned inwar...

Страница 5: ...r around any part of the appliance The health of some birds is extremely sensitive to the fumes given off during the self clean cycle of any oven Move birds to another well ventilated room Important InStructIonS for cLeanInG your oVen Clean the appliance regularly to keep all parts free of grease that could catch fire Exhaust fan ventilation hoods and grease filters should be kept clean Do not all...

Страница 6: ...electronic display 6 Right front element control and electronic display 7 Right front element size selector 8 Lower oven self clean door latch 9 Broil element 10 Self cleaning convection oven interior 11 Meat probe receptacle 12 Halogen light 13 Lower oven convection bake cooking system 14 Adjustable interior porcelain oven rack s 15 Large 1 piece oven door handle 16 Full width oven door with wind...

Страница 7: ...e oven walls Tilt the front of the rack upward and slide the rack back into place air circulation in the oven If using 1 rack place in center of oven If using multiple racks stagger cookware as shown For best air circulation and baking results allow 2 4 5 10 cm around the cookware for proper air circulation and be sure pans and cookware do not touch each other the oven door sides or back of the ov...

Страница 8: ... heat conductor however will retain heat very well Cooks evenly once cooking temperature is reached Not recommended for use on ceramic cooktops porceLaIn enameL on metaL Heating characteristics will vary depending on base material Porcelain enamel coating must be smooth to avoid scratching ceramic cooktops GLaSS Slow heat conductor Not recommended for ceramic cooktop surfaces because it may scratc...

Страница 9: ...ad only activates or deactivates the element but will not start the heating process Activat ing and powering any surface cooking element requires pressing two keys the on off keypad first and then a power level section must be added before the element will begin heating Be sure to read the detailed instructions for ceramic glass cooktop cleaning in the Care Cleaning and Before You Call checklist s...

Страница 10: ...dows will show the Sb message whenever the Sabbath feature is active Figure 10 When activated the Sabbath feature works for both the oven and cooktop together Once the Sabbath feature is active changes to the heat levels for the cooktop heating elements will not show in the displays The cooktop will react slower to heat level changes See Sabbath feature section for complete instructions Fig 12 Fig...

Страница 11: ...s spoon holders or plastic wrappings on top of the range when it is in use These items could melt or ignite Potholders towels or wooden spoons could catch fire if placed too close to the surface elements Single Radiant Element The cooktop provides single radiant element located as illustrated Use the following instructions when operating these elements The suggested power level settings shown in F...

Страница 12: ...itors the temperature of the cooktop and displays the message HE hot element warning when the cooktop is still too hot to touch If the HE message appears in the window the control can still be turned on again for use Radiant surface elements may appear to have cooled after they have been turned off The glass surface may still be hot and burns may occur if the glass surface is touched before it has...

Страница 13: ...eat cold food with the warmer zone Always start with hot food All cookware placed on the warmer zone should be covered with a lid to maintain food quality Setting warmer zone control 1 Place cookware with hot food on warmer zone 2 To activate press and hold warmer zone keypad until acceptance tone sounds The warmer zone indicator light will turn on 3 To set heat level press Hi or Lo keypad and if ...

Страница 14: ... Lockout Used to lock oven functions and doors 0 thru 9 number Used to enter temperature and times For satisfactory use of your oven become familiar with the various features and functions of the oven Minimum Maximum Control Settings All of the features listed below have minimum and maximum time or temperature settings that may be entered into the control An ENTRY acceptance beep will sound each t...

Страница 15: ...he interior oven lights The ovens can be locked individually See example below to lock the oven DOOR LOCKED will flash in the display until the door has finished locking Once the door has been locked the door lock indicator will turn on DOOR LOCKED will then stay displayed Do not attempt to open the oven door while the door lock indicator is flashing To lock select the oven by pressing UPPER OVEN ...

Страница 16: ...at distribution See example below to set a bake to start immediately at the default temperature Once START is pressed the oven will begin heating The oven display shows the temperature rising After the oven reaches set temperature a beep will indicate the oven is ready The oven will continue to maintain this temperature until the cooking feature is canceled NOTE To cancel the function you may pres...

Страница 17: ...ll pans absorb more heat than shiny bakeware resulting in dark or overbrowning of foods It may be necessary to reduce the oven temperature or cook time to prevent overbrowning of some foods Dark pans are recommended for pies Shiny pans are recommended for cakes cookies or muffins When the Cook Time finishes 1 End and the time of day will show in display The oven will shut off automatically 2 The c...

Страница 18: ...ting 350 F 177 C Min bake setting 170 F 77 C Max bake setting 550 F 288 C As much as possible use only one rack on position 2 or 3 and center the pans If using two racks place the offset oven rack in position 1 and the flat rack in position 2 or 3 Cookies and biscuits should be baked on pans with no sides or very low side to allow heated air to circulate around the food Food baked on pans with a d...

Страница 19: ...od baked on pans with a dark finish will cook faster When placing multiple food items in the oven allow 2 4 5 10cm of space between the food items for proper air circulation For best results Pressing CONV CONVERT will automatically lower the set temperature by 25 F to adjust the bake recipe to a conv bake temperature and the oven will start baking After the oven reaches the converted set temperatu...

Страница 20: ... needed use numeric keypads to enter a different oven temperature 3 Press START For beef med rare 145 F med 160 F well done 170 F Stuffed turkey requires additional roasting time Shield legs and breast with foil to prevent overbrowning and drying of the skin Roasting rack instructions The broil pan its insert and the roasting rack are available via the mail order card When preparing meats for conv...

Страница 21: ... the exposed grease could ignite To prevent food from contacting the broil element and to prevent grease splattering do not use the roasting rack when broiling Use the recommended pans and oven rack positions for the type of meat being prepared For optimum browning results allow the oven to preheat 5 6 minutes before placing the food in the oven For best results See example below to set broil star...

Страница 22: ...akes or cookies using 2 oven racks place cookware on rack in position 1 and 3 For best results when baking cakes or cookies using a single oven rack place rack in position 2 or 3 For best results Warm HoldTM See example below to set Warm Hold for the oven to start immediately See example below to set Warm Hold to start after a Cook Time or Delay Start 1 Select oven by pressing UPPER OVEN or LOWER ...

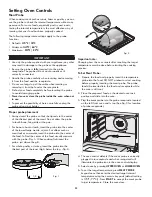
Страница 23: ...eheat or start cooking before properly inserting the meat probe The probe should be inserted into the food and receptacle while the oven is still cool 2 Place the prepared food on the desired oven rack position and slide into the oven 3 Plug the meat probe into the probe receptacle located on the left front oven cavity top See Fig 3 for location of probe receptacle IMPORTANT Use only the probe sup...

Страница 24: ...ven will continue cooking Instructions for changing how the oven reacts after reaching the internal target temperature may be found later in this section Press STOP to cancel cooking at any time See the following instructions for changing how the oven reacts after reaching the internal target temperature The U S Department of Agriculture states Rare fresh beef is popular but you should know that c...

Страница 25: ...e Lo option Fig 2 4 Press START NOTE You may press STOP any time when setting the control or during the cooking process Recipe Recall The Recipe Recall feature may be used to record and recall your favorite recipe settings This feature may store 1 setting for each of the basic cooking pads The keypads that a recipe may be stored with are Bake Conv Bake Conv Roast Cakes Breads Preheat and Slow Cook...

Страница 26: ...nd a complete list of models with the Sabbath feature please visit the web at http www star k org It is recommended that any oven temperature modification made within an active Sabbath mode be followed with 2 presses of the START key This will insure the oven remains ON even if an attempt is made to set the oven temperature outside of its temperature range If the oven temperature is set outside of...

Страница 27: ...he user may make changes to these default settings The following features or functions have user options or adjustments that may have been changed from the factory default settings 12 or 24 hour display mode Continuous bake or 12 Hour Energy Savings mode Silent or audible control Oven temperature display Fahrenheit or Celsius Oven temperature adjustments All stored recipes Please be aware before r...

Страница 28: ...celain oven racks which can remain in the oven during the self clean cycle Do not clean this vegetable oil lubrication off the racks It is important that the sides of the oven racks always have a light coating of vegetable oil To maintain optimal rack performance re apply a thin layer of vegetable oil to the sides of the rack after every self clean cycle or when the rack becomes difficult to slide...

Страница 29: ... soil light medium or heavy See above 4 Press START As soon as the control is set the motor driven oven door lock will begin to close automatically Once the door has been locked the DOOR LOCKED indicator light will stop flashing and remain on Note Allow about 15 seconds for the oven door lock to close Note If the optional delay Self Clean feature is needed finish steps 5 7 5 Press DELAY START 6 En...

Страница 30: ...oils from oven frame and door liner outside the oven door gasket For very important cleaning precautions be sure to read all the instructions in the Flex Clean section Porcelain coated oven racks This oven comes with lubricated porcelain oven racks which can remain in the oven during the self clean cycle Do not clean this vegetable oil lubrication off the racks It is important that the sides of th...

Страница 31: ...he cooktop is COOL DO NOT use a cooktop cleaner on a hot cooktop The fumes can be hazardous to your health and can chemically damage the ceramic glass surface for light to moderate soil Apply a few drops of CookTop Cleaning Creme directly to the cooktop Use a paper towel or use a non abrasive plas tic type no scratch cleaning pad to clean the entire cooktop surface Make sure the cooktop is cleaned...

Страница 32: ...r a leather faced glove for protection against possible broken glass 3 To remove the glass shield lift up on side and use force to pull shield out 4 Replace halogen light appliance bulb taking care not to touch the bulb with your bare fingers Touching bulb with your skin can leave a film on the bulb that causes it to burn out quickly 5 Replace glass shield in opposite order and manner of removal S...

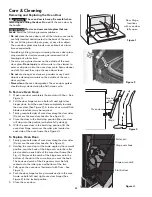
Страница 33: ...loor See Figure 1 2 Pull the door hinge locks on both left and right door hinges down from the oven frame completely towards the oven door See Figure 2 A tool such as a small flat blade screwdriver may be required 3 Firmly grasp both sides of oven door along the door sides Do not use the oven door handle See Figure 3 4 Close the door to the broil stop position the oven door will stop into this pos...

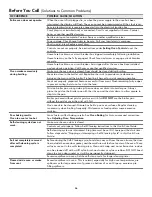
Страница 34: ...placing food in the oven Use proper rack position for baking needs Set oven temperature 25 F 12 C lower than recommended Cakes not done in the center Oven too hot Incorrect pan size Pan not centered in oven Set oven temperature 25 F 12 C lower than recommended Use pan size suggested in recipe Use proper rack position and place pan so there is 5 1cm to 10 2cm 2 to 4 of space on all sides of pan Cak...

Страница 35: ...nt call 1 800 4 my Home for service See back cover Lightweight or warped pans were used Be sure to use proper cookware Use only flat bottom evenly balanced medium or heavyweight cookware Heavy and medium weight pans heat evenly Because lightweight pans heat unevenly foods may burn easily Surface element turns off by itself This is normal The element temperature rises gradually and evenly As the te...

Страница 36: ...de up Grease does not drain into broiler pan Always place the grid on the broiler pan with the ribs up and the slots down to allow grease to drip into the pan Broiler pan used without grid or grid cover with foil DO NOT use the broiler pan without the grid or cover the grid with foil Oven needs to be cleaned Grease has built up on oven surfaces Regular cleaning is necessary when broiling frequentl...

Страница 37: ... la durabilidad de su nuevo producto El acuerdo incluye lo siguiente Piezas y mano de obra necesarias para contribuir a mantener el funcionamiento adecuado de los productos utilizados en condiciones normales de uso no sólo en caso de defectos de los productos Nuestra cobertura va mucho más allá que la garantía del producto No se aplican deducibles ni exclusiones por fallas del funcionamiento es de...

Страница 38: ... owner s manuals that you need to do it yourself For Sears professional installation of home appliances and items like garage door openers and water heaters 1 800 4 MY HOME 1 800 469 4663 Call anytime day or night U S A and Canada www sears com www sears ca Our Home For repair of carry in items like vacuums lawn equipment and electronics call anytime for the location of your nearest Sears Parts Re...

Страница 39: ...Double Oven Slide in Electric Range Número de color Color number Manual de Uso y Cuidado Use Care Guide Español English Modelos Models 790 4111 P N 318205842B 1208 Sears Brands Management Corporation Hoffman Estates IL 60179 U S A www kenmore com www sears com ...

Страница 40: ...o Después del primer año el cliente deberá pagar los gastos de mano de obra de la instalación Si este electrodoméstico se utiliza para otros fines que no sean el uso familiar privado esta garantía rige únicamente durante 90 días a partir de la fecha de compra Esta garantía cubre únicamente defectos de material y de fabricación Sears NO pagará 1 Grietas en la cubierta de vidrio cerámico que no sean...

Страница 41: ...e su aparato a menos que se lo recomiende los manuales específicamente Cualquier tipo de servicio debe ser hecho por un técnico calificado Esto reducirá el riesgo de heridas personales o de daños al aparato nunca modifique o altere la constitución de una estufa moviendo la patas niveladoras ni el alambrado ni las fijaciones de anti inclinación u otra parte del aparato retire la puerta del horno de...

Страница 42: ...iales inflamables y los derrames ocasionados de casualidad Nunca deje los quemadores con alta temperatura sin cuidado Los derrames ocasionan humo y derrames grasosos que pueden encenderse o una sartén que ha calentado por mucho tiempo puede derretirse Utensilios de cocina en vidriados Sólo algunos tipos de utensilios de vidrio de vidrio cerámica de cerámica pueden resistir la temperatura del quema...

Страница 43: ...se y causar un incendio Cuando caliente comida bajo la cubierta encienda el ventilador Consulte las instrucciones del fabricante para la limpieza Limpie con frecuencia las campanas de ventilación no deje que se acumule grasaen la campana o en el filtro Siga las instrucciones del fabricante para la limpieza para pLancHas de cocInar VIdrIo soLamente no limpie o utilice una plancha de cocinar que est...

Страница 44: ...recho 6 Selector de tamaño del elemento delantero derecho 7 Gancho de la puerta del horno autolimpiante 8 Elemento de asado 9 Interior del horno de convección con auto limpieza 10 Receptáculo de la sonda para carne 11 Halógeno Bombilla 12 Ventilador de convección del horno y cubierta 13 Parrillas ajustables de porcelana para el horno 14 Manija grande de una sola pieza 15 Puerta del horno con venta...

Страница 45: ...n del Respiradero del Horno El horno se ventila en la moldura trasera de la superficie de cocción Cuando el horno está encendido el aire caliente se libera a través de la ventilación Esta ventilación es necesaria para que el aire circule en el horno y para que el horneado sea correcto ATENCION Algunos modelos vienen equipado con un ventilador que trabaja bajo el ciclo de horneado y auto limpieza p...

Страница 46: ...achas HIerro FundIdo Mal conductor de calor pero lo retiene muy bien Cocina de manera uniforme una vez que alcanza la temperatura de cocción No se recomienda su uso en cubiertas de vidrio cerámico porceLana esmaLtada en metaL Las características de calentamiento variarán de acuerdo con el material base La porcelana esmaltada debe ser lisa para evitar rayar las cubiertas de vidrio cerámico VIdrIo C...

Страница 47: ...ido utilizados a agrande intensidad Este fenómeno es normal y el vidrio volverá a su color blanco inicial después de haberse completamente enfriado Enlatado de conservas Asegúrese de leer y seguir todas las siguientes pautas cuando enlate conservas con su electrodoméstico Consulte la página web de la USDA Departamento de Agricultura de los EE UU y lea toda la información disponible además de segui...

Страница 48: ...n Una vez que dicha función esté activa no aparecerán en la pantalla los cambios de los niveles de calor de los elementos de la superficie de cocción La superficie de cocción reaccionará más lentamente a los cambios del nivel de calor Consulte la sección Modo sabático para obtener instrucciones completas Fig 12 Fig 11 Bloqueo de la cubierta Use el bloqueo de la cubierta para bloquear todos los ele...

Страница 49: ... y estofados Bajo Lo 2 0 Para mantener caliente derretir o cocinar a fuego lento Fig 1 Mensaje por Elemento Caliente Después de usar cualquiera de las posiciones con elementos radiantes la cubierta se calentara bastante Después de APAGAR cualquiera de estos elementos la cubierta permanecerá CALIENTE por un tiempo El mensaje HE Hot Element aparecerá en la pantalla asociada con cualquier posición de...

Страница 50: ...empo El mensaje HE Hot Element aparecerá en la pantalla asociada con cualquier posición de elemento que continúe CALIENTE y que el elemento ya haya sido APAGADO El Mensaje por Elemento Caliente permanecerá ENCENDIDO mientras esté caliente y se APAGARA una vez que la cubierta se enfrié lo suficiente ATENCION Los elementos irradiantes parecieran haberse enfriado una vez que se han apagado La superfi...

Страница 51: ...utensilios que se coloquen en la zona calentadora deben cubrirse con una tapa para mantener la calidad del alimento Ajuste del control del área calentadora 1 Coloque el utensilio con comida caliente en la zona calentadora 2 Para activar la zona de cocción mantenga oprimida la tecla de la zona calentadora hasta escuchar el tono audible La luz indicadora del área calentadora se encenderá 3 Para ajus...

Страница 52: ...onv Roast o Flex Clean para programar la hora de inicio de la cocción Slow Cook Horneo Lento 5 Se usa para programar un horneado lento Warm Hold 6 Calentar y Mantener Se usa para la función Calentar y Mantener Preheat Precalentar 7 Se usa para precalentar el horno Cakes o Breads 8 tortas o pan Se usa para seleccionar tortas y pan Conv Convert Converso de Convección 9 Utilizado para escoger el modo...

Страница 53: ...a anular el temporizador después de programarlo oprima la tecla TIMER SET OFF Temporizador nuevamente 1 Oprima TIMER SET OFF Temporizador 2 Programe 5 minutos 3 Oprima START Encendido El temporizador proporcionados con el control del horno sirven a modo de alerta adiciónale en la cocina Cuando el tiempo acabe el temporizador activo emitirá una señal sonora y End se desplegará en la pantalla Los si...

Страница 54: ...prima START Encendido Una vez oprimida la tecla START el horno comenzará a calentarse La pantalla mostrará la temperatura actual del horno Escuchará un tono que le indicará cuándo colocar la comida en el horno una vez que haya terminado de precalentarse Bake Horneado NOTA Para cancelar la función oprima STOP Terminar en cualquier momento durante la programación del control o durante el proceso de ...

Страница 55: ...a tecla START el horno comenzará la cocción y se apagará automáticamente a los 30 minutos 1 Seleccione oprimiendo UPPER OVEN horno de arriba o LOWER OVEN horno de abajo 2 Oprima BAKE Horneado 3 Oprima START Encendido 4 Oprima COOK TIME Tiempo de cocción 5 Programe 30 minutos 6 Oprima START Encendido Cuando haya expirado el tiempo de cocción 1 End y la hora del día aparecerá en el indicador y el ho...

Страница 56: ...tura aplican a la función de horneado por convección Ajuste sugerido predeterminado 350 F 176 C Ajuste mínimo del horneado 170 F 76 C Ajuste máximo del horneado 550 F 288 C Cuando hornee con una sola parrilla use la posición 2 o 3 Cuando use 2 parrillas colóquelas en las posiciones 2 y 4 Cuando use 3 parrillas colóquelas en las posiciones 1 3 y 4 Las galletas y bizcochos deben hornearse en bandeja...

Страница 57: ...os con acabado oscuro se cocinarán más rápidamente Cuando coloque varios alimentos en el horno deje entre 2 y 4 5 a 10 cm de espacio entre los alimentos para asegurar la circulación adecuada del aire Para obtener los mejores resultados Después de que el horno alcance la temperatura programada convertida el horno emitirá una señal sonora para indicarle que está listo La opción adicional de conversi...

Страница 58: ...de res Asado de costilla 4 a 6 lbs 350 F 25 30 Asado de filete de res 4 a 6 lbs 350 F 25 30 Asado de solomillo 2 a 3 lbs 400 F 15 25 Aves Pavo entero 12 a 16 lbs 325 F 180 F 8 10 Pavo entero 16 a 20 lbs 325 F 180 F 10 15 Pavo entero 20 a 24 lbs 325 F 180 F 12 16 Pollo 3 a 4 lbs 350 F 375 F 180 F 12 16 Carne de cerdo Asado de jamón fresco 4 a 6 lbs 325 F 160 F 30 40 Asado de paleta 4 a 6 lbs 325 F ...

Страница 59: ... Bien cocido Pollo con hueso 2 450 F 20 10 Bien cocido Pollo deshuesado 2 450 F 8 6 Bien cocido Pescado 2 500 F 13 0 Bien cocido Camarones 3 550 F 5 0 Bien cocido Hamburguesas de 1 2 5 cm de grueso 2 550 F 9 7 Término medio 3 550 F 10 8 Bien cocido ADVERTENCIA Si ocurre un incendio dentro del horno cierre la puerta del mismo Si el fuego persiste vierta bicarbonato de sodio en el fuego o use un ext...

Страница 60: ...los mejores resultados cuando use una parrilla colóquelas en las posiciones 2 o 3 asegurar la circulación adecuada del aire Para obtener los mejores resultados NOTA Puede oprimir STOP Terminar en cualquier momento durante la programación del control o durante la cocción Warm HoldTM Calentar y Mantener Caliente Consulte el ejemplo siguiente para usar la función de calentar y mantener caliente Consu...

Страница 61: ... receptáculo No use pinzas para tirar del cable cuando inserte o retire la sonda de los alimentos o del receptáculo Descongele los alimentos completamente antes de insertar la sonda para evitar daños a la misma Nunca deje o almacene la sonda en el interior del horno cuando no esté en uso Para evitar quemaduras después de cocinar los alimentos desenchufe cuidadosamente la sonda usando un tomaollas ...

Страница 62: ...ada más adelante en esta sección Oprima la tecla para anular la cocción en cualquier momento Consulte las siguientes instrucciones para cambiar la manera en la que el horno reacciona después de alcanzar la temperatura interna programada Para programar el horno para que siga cocinando después de alcanzar la temperatura programada para la sonda 1 Oprima y mantenga oprimida la tecla MEAT PROBE sonda ...

Страница 63: ...enta nuevamente para seleccionar la opción Lo bajo figura 2 4 Oprima START Encendido Recipe Recall Memoria de Receta NOTA El presionar el botón de START inmediatamente después de haber introducido las temperaturas y el tiempo de cocción hará que el horno comience a hornear con la programación que usted introdujo Si usted desea guardar las recetas pero no desea que el horno comience a trabajar pres...

Страница 64: ...rno cuando se abra o se cierre Para obtener más asistencia instrucciones para el uso adecuado y una lista completa de modelos con modo sabático visite el siguiente sitio en Internet http www star k org Se recomienda que cualquier cambio de temperatura que se realice cuando el modo sabático esté activado se confirme oprimiendo la tecla START iniciar 2 veces Esto asegurará que el horno permanezca EN...

Страница 65: ...brica para restablecer las configuraciones predeterminadas de fábrica Su electrodoméstico sale de la fábrica con ajustes predeterminados para el control del horno Con el pasar del tiempo el usuario puede cambiar estos ajustes predeterminados Las siguientes funciones o características tienen opciones configurables por el usuario o ajustes de fábrica que pueden ser modificados Ajuste del formato de ...

Страница 66: ...s grandes pueden causar humo denso o un incendio cuando se exponen a altas temperaturas Limpie con agua y jabón toda la suciedad pegada al marco del horno al revestimiento de la puerta fuera de la junta de la puerta del horno y al área pequeña en la parte delantera central de la parte inferior del horno Estas áreas se calientan lo suficiente como para quemar la suciedad acumulada sobre la superfic...

Страница 67: ...tante Ver arriba 4 Oprima START Tan pronto como el control sea programado el cierre mecánico de la puerta comenzará a cerrarse automáticamente Una vez que la puerta se ha cerrado la luz indicadora DOOR LOCKED dejará de destellar y permanecerá encendida Nota La puerta del horno demora aproximadamente 15 segundos en cerrarse Nota Si se necesita la función opcional de autolimpieza diferida complete l...

Страница 68: ... de la cavidad del horno antes de iniciar la autolimpieza Limpie todas las manchas del marco del horno y del forro de la puerta por fuera de la junta de la puerta del horno Para conocer precauciones muy importantes para la limpieza asegúrese de leer todas las instrucciones de la sección sobre la autolimpieza Parrillas recubiertas de porcelana Elhornotieneparrillasesmaltadaslubricadas quepuedenperm...

Страница 69: ...controles estén en la posición oFF y que la cubierta esté FRIA NO use limpiadores para la cubierta cuando esté caliente Los vapores pueden ser perjudiciales para su salud y pueden dañar químicamente la superficie de vidrio cerámico Para suciedad leve y moderada Para aplicar la crema de limpieza sobre la superficie de la cubierta Use una toalla de papel o una esponja de limpieza antirayaduras de pl...

Страница 70: ...luminio ligero y no permita que el papel de aluminio entre en contacto con los elementos superiores bajo NINGUNA circunstancia Cambio de las Bombillas Las bombillas están ubicadas en la parte trasera del interior del horno y están cubiertas con un protector de vidrio El protector de vidrio debe estar en su lugar cada vez que se use el horno Para reemplazar las bombillas 1 Desconecte el suministro ...

Страница 71: ...rta del horno 1 Abra completamente la puerta del horno dejándola horizontal en relación con el piso Fig 1 2 Tire de los bloqueos de ambas bisagras izquierda y derecha hacia abajo desde el marco del horno completamente hacia la puerta del horno Fig 2 Es posible que necesite una herramienta como un destornillador pequeño de cabeza plana 3 Sostenga firmemente ambos lados de la puerta del horno en sus...

Страница 72: ...l horno precaliente antes de colocar la comida Posicione bien la rejilla del horno Ajuste la temperatura a 25 F 12 C menos que lo recomendado Los pasteles no están bien horneados en el centro El horno muy caliente Recipiente de talla incorrecta Recipiente no está en el centro del horno Ajuste la temperatura a 25 F 12 C menos que lo recomendado Use la talla del recipiente recomendada en la receta P...

Страница 73: ...lamente cacerolas a base plana y de peso medio a robusto Las cacerolas de peso mediano a robusto calientan más uniformemente Puesto que las cacerolas de peso ligero no calientan uniformemente los alimentos pueden quemarse fácilmente Marcas de metal Deslizando o rosando los utensilios de metal sobre la superficie de la plancha de cocinar No deslize los utensilios de metal sobre la superficie de la ...

Страница 74: ... espacio para permitir al aire de circular Precaliente el horno a la temperatura deseada antes de colocar la comida Trate de ajustar las temperaturas recomendadas y el tiempo de horneo de sus recetas Si cree que el horno está muy caliente o muy frío vea Ajuste de la temperatura del horno en el Manual del usuario El ciclo de auto limpieza no funciona Asegurar que la puerta del horno esté cerrada Lo...

Страница 75: ... la durabilidad de su nuevo producto El acuerdo incluye lo siguiente Piezas y mano de obra necesarias para contribuir a mantener el funcionamiento adecuado de los productos utilizados en condiciones normales de uso no sólo en caso de defectos de los productos Nuestra cobertura va mucho más allá que la garantía del producto No se aplican deducibles ni exclusiones por fallas del funcionamiento es de...

Страница 76: ... owner s manuals that you need to do it yourself For Sears professional installation of home appliances and items like garage door openers and water heaters 1 800 4 MY HOME 1 800 469 4663 Call anytime day or night U S A and Canada www sears com www sears ca Our Home For repair of carry in items like vacuums lawn equipment and electronics call anytime for the location of your nearest Sears Parts Re...

Отзывы: