background image

ENGLISH

3

• Remove all tape and packaging before using the

range.

 Destroy the carton and plastic bags after

unpacking the range. Never allow children to play with
packaging material.

• Proper Installation—Be sure your appliance is

properly installed and grounded by a qualified
technician in accordance with Canadian Standards
CAN/CGA B149.1, and CAN/CGA B149.2 and Canadian
Electrical Code, part 1, and local requirements. 

Install

only per installation instructions provided in the literature
package for this appliance.

• In case of an emergency, know how to disconnect the

electrical power to the appliance at the circuit breaker
or fuse box and how to turn off the gas supply at the
main shutoff valve.


• User Servicing—Do not repair or replace any part of

the appliance unless specifically recommended in
the manuals. 

All other servicing should be done only by

a qualified technician to reduce the risk of personal injury
and damage to the cooktop. Sears Parts & Repair is the
recommended repair service for this appliance.

• Never modify or alter the construction of a range by

removing leveling legs, panels, wire covers, anti-tip
brackets/screws, or any other part of the product.


Stepping, leaning or sitting on the door of

this range can result in serious injuries and also cause
damage to the range. 

 Do not allow children to climb or play

around the range.  The weight of a child on an open door may
cause the range to tip, resulting in serious burns or other injury.

 Do not use the oven for storage.

 Do not store items of interest to children

in the cabinets above a range.

  Children climbing on the

range to reach items could be seriously injured.

 NEVER use this appliance as a space heater

to heat or warm the room. 

Doing so may result in carbon

monoxide poisoning and overheating of the oven.

• Storage in or on Appliance—Flammable materials should

not be stored in an oven or near surface burners. 

This

includes paper, plastic and cloth items, such as cookbooks,
plasticware and towels, as well as flammable liquids. Do not
store explosives, such as aerosol cans, on or near the appliance.
Flammable materials may explode and result in fire or property
damage.

• Do not leave children alone—Children should not be

left alone or unattended in the area where appliance is
in use.

  They should never be allowed to sit or stand on

any part of the appliance.

• DO NOT TOUCH SURFACE BURNERS, AREAS NEAR

THESE BURNERS, OVEN HEATING ELEMENTS OR
INTERIOR SURFACES OF THE OVEN.

  Both surface

burners and oven heating elements may be hot even
though they are dark in color. Areas near surface burners
may become hot enough to cause burns. During and after
use, do not touch, or let clothing or other flammable
materials touch these areas until they have had sufficient
time to cool. Among these areas are the cooktop,
surfaces facing the cooktop, the oven vent openings and

  If the information in this manual is not followed

exactly, a fire or explosion may result causing property
damage, personal injury or death.

FOR YOUR SAFETY:

— Do not store or use gasoline or other flammable vapors

and liquids in the vicinity of this or any other appliance.

— WHAT TO DO IF YOU SMELL GAS:

Do not try to light any appliance.

Do not touch any electrical switch; do not use any  phone
in your building.

Immediately call your gas supplier from a neighbor's
phone. Follow the gas supplier's instructions.

If you cannot reach your gas supplier, call the fire
department.

— Installation and service must be performed by a qualified

installer, servicer or the gas supplier.

All ranges can tip.

Injury to persons could result.

Install anti-tip device packed
with range.

See Installation Instructions.

 To reduce the risk of

tipping, the range must be secured by
properly installed anti-tip bracket(s)
provided with the range. To check if the
bracket(s) is installed properly, remove the
lower panel or storage drawer and verify
that the anti-tip bracket(s) is engaged.
Refer to the Installation Instructions for
proper anti-tip bracket(s) installation.

Important Safety Instructions

Read all instructions before using this appliance.

Save these instructions for future reference.

This manual contains many important safety messages.  Always read and obey all safety messages.

 Indicates an imminently hazardous situation which, if not avoided may result in death or

serious injury.

 Indicates an imminently hazardous situation which, if not avoided may result in minor or

moderate injury, or product damage.

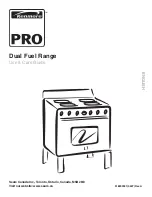
Содержание 30" DUAL FUEL RANGE

Страница 1: ...ENGLISH Sears Canada Inc Toronto Ontario Canada M5B 2B8 Visit our website www sears ca 318203951 0607 Rev A Dual Fuel Range Use Care Guide TM ...

Страница 2: ...roduct if it is not installed operated or maintained according to all instructions supplied with the product 5 Damage to or failure of this product resulting from accident abuse misuse or use for other than its intended purpose 6 Damage to or failure of this product caused by the use of detergents cleaners chemicals or utensils other than those recommended in all instructions supplied with the pro...

Страница 3: ...nfireorproperty damage Do not leave children alone Children should not be left alone or unattended in the area where appliance is in use They should never be allowed to sit or stand on any part of the appliance DO NOT TOUCH SURFACE BURNERS AREAS NEAR THESE BURNERS OVEN HEATING ELEMENTS OR INTERIOR SURFACES OF THE OVEN Both surface burners and oven heating elements may be hot even though they are d...

Страница 4: ...ls will expose a portion of the surface burner to direct contact and may result in ignition of clothing Proper relationship of utensil to the surface burner will also improve efficiency Utensil handles should be turned inward and not extendoveradjacentsurfaceburners Toreducetherisk of burns ignition of flammable materials and spillage due to unintentional contact with the utensil The handle of the...

Страница 5: ...et is essential for a good seal Care should be taken not to rub damage or move the gasket Remove oven racks Oven racks color will change if left in the oven during a self cleaning cycle The health of some birds is extremely sensitive to the fumes given off during the self cleaning cycle of the range Move the birds to another well ventilated room Serial Plate Location Product Record In this space b...

Страница 6: ...er 12 000 professional repair specialists who have access to over 4 5 million quality parts and accessories That s the kind of professionalism you can count on to help prolong the life of your new purchase for years to come Purchase your Master Protection Agreement today Some limitations and exclusions apply For prices and additional information call 1 800 827 6655 Sears Installation Service For S...

Страница 7: ...ar Burner Knob Oven Vent 9 000 BTU Burner 9 000 BTU Burner 9 000 BTU Burner 27 000 BTU when used with all 3 burners combined as a Bridge Burner Broil Pan Searing Grill Broil Pan Insert Griddle Convection Rack Left Front Burner Knob Left Rear Bridge Burner Knob 2 0 0 2 5 0 3 0 0 3 5 0 4 0 0 4 5 0 5 0 0 5 5 0 Off Bread W a r m B r o i l Clean Proof H o l d Off Clean Broil Warm Hold 350 400 450 500 3...

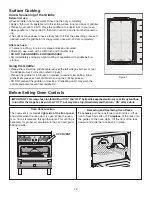
Страница 8: ...sition Burner Grates on cooktop and check that all the Burner Grate legs lie on the glass surface 7 Place Center Burner Grate between the end Burner Grates REMEMBER DO NOT ALLOW SPILLS FOOD CLEANING AGENTS OR ANY OTHER MATERIAL TO ENTER THE GAS ORIFICE HOLDER OPENING Always keep the Burner Caps and Burner Heads in place whenever the surface burners are in use Locations of the Gas Surface Burners S...

Страница 9: ... start on the highest control setting and then turn to a lower one to complete the process Use the recommendations below as a guide for determining proper flame size for various types of cooking The size and type of utensil used and the amount of food being cooked will influence the setting needed for cooking Flame Size Type of Cooking High Flame Start most foods bring water to a boil pan broiling...

Страница 10: ...ronic surface ignitors will spark at the same time However only the left rear Burner will ignite 4 Visually check that the left rear burner has lit Adjust the flame size by turning the control knob between the first HI and LO settings See Figure 3 DO NOT cook with the surface control knob in the LITE position The electronic ignitor will continue to spark if the knob is left in the LITE position Op...

Страница 11: ...s Weight of handle does not tilt pan Pan is well balanced Pan sizes match the amount of food to be prepared Made of material that conducts heat well Easy to clean INCORRECT Curved and warped pan bottoms Pan overhangs burner grate by more than 2 5 cm 1 Heavy handle tilts pan Flame extends beyond pan Figure 2 Figure 1 DO NOT use a wok if it is equipped with a metal ring that extends beyond the burne...

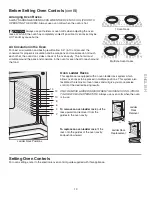
Страница 12: ...res even heat distribution during the cooking process DO NOT preheat the griddle on HI setting Preheating on HI may warp the griddle and prevent even heat distribution Figure 1 Before Setting Oven Controls 2 0 0 2 5 0 3 0 0 3 5 0 4 0 0 4 5 0 5 0 0 5 5 0 Off Bread W a r m B r o i l Clean Proof H o l d Off Clean Broil Warm Hold 350 400 450 500 300 250 200 F Right Front Right Rear Left Rear Left Fron...

Страница 13: ...e pans and cookware in the oven for even heat to reach around the food Oven Ladder Racks This appliance is equipped with an oven ladder rack system which allows oven racks to be placed in multiple positions This system also facilitates the removal of oven racks and will give you more precise control of the desired baking results 1 2 3 4 5 6 7 8 9 10 11 12 13 Ladder Rack Positions ONLY REMOVE LADDE...

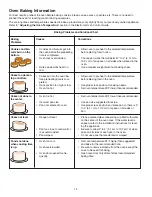
Страница 14: ...n temperature 25 F lower than recommended Set oven temperature 25 F lower than recommended Use pan size suggested in recipe Use proper rack position and place pan so there is 2 to 4 5 1 cm to 10 2 cm of space on all sides of pan Place a marked glass measuring cup filled with water on the center of the oven rack If the water level is uneven refer to the installation instructions for level ing the a...

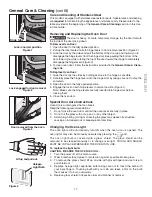
Страница 15: ...hem to discolor and make them difficult to slide If this occurs coat the racks with cooking oil to make them easier to slide again Remove any excessive spillovers in the oven cavity before starting the Self Cleaning cycle To clean use hot soapy water and a cloth Large spillovers can cause heavy smoke or fire when subjected to high temperatures DO NOT allow food spills with a high sugar or acid con...

Страница 16: ...t then push the knob into place Clean stainless steel with hot soapy water and a dishcloth Rinse with clean water and a cloth Do not use cleaners with high concentrations of chlorides or chlorines Always clean on the same direction as the stainless steel grain Do not use harsh scrubbing cleaners Only use kitchen cleaners that are especially made for cleaning stainless steel Always be sure to rinse...

Страница 17: ...he fully opened position 4 Engage the lock on both hinge levers to normal position Figure 1 Note Make sure the hinge levers are fully inserted into hinge slots before locking them 5 Close the oven door Special Door Care Instructions Oven doors contain glass that can break Readthefollowingrecommendations 1 Do not close the oven door until all the oven racks are fully in place 2 Do not hit the glass...

Страница 18: ... TO ENTER THE GAS ORIFICE HOLDER OPENING ALWAYS keep the surface Burner Caps and Burner Heads in place whenever the gas Burners are in use To Clean the Burner Grates The Burner Grates are dishwasher safe and may be cleaned in the dishwasher Remove any excessive soils before placing in the dishwasher To Clean the Ceramic Glass Cooktop See Ceramic Glass Cooktop Cleaning Maintenance on next page Clea...

Страница 19: ...OL DO NOT use a cooktop cleaner on a hot cooktop The fumes can be hazardous to your health and can chemically damage the ceramic glass surface For light to moderate soil Apply a few drops of CookTop Cleaning Creme directly to the cooktop Use a paper towel or use a non abrasive plastic type no scratch cleaning pad to clean the entire cooktop surface Make sure the cooktop is cleaned thoroughly leavi...

Страница 20: ...arsh cleaners such as chlorine bleach ammonia or oven cleaners as they may etch or discolor the cooktop Do not use dirty sponges cloths or paper towels as they can leave soil or lint on the cooktop which can burn and cause discoloration Special Caution for Aluminum Foil and Aluminum Cooking Utensils 1 Aluminum foil Use of aluminum foil will damage the cooktop Do not use under any circum stances 2 ...

Страница 21: ...cer 5 Power outage Check house lights to be sure Call your local electric company 6 Short in cord plug Replace cord plug 7 Controls are not set properly See instructions under Setting Oven Controls to set the controls 8 House fuse has blown or circuit breaker has tripped immediately following installation House fuse may not be fully engaged Check fuse and screw or engage circuit breaker securely 9...

Страница 22: ... the burner off clean ports and slots with a small gauge wire or needle 2 Moisture is present after cleaning To avoid this occurrence dry the burners thoroughly following instructions under General Care Cleaning 1 Dust particles in main line Allow the burner to operate a few minutes until flame turns blue 2 In coastal areas a slightly orange flame is unavoidable due to salt air 1 Coarse particles ...

Страница 23: ...FRANÇAIS Sears Canada Inc Toronto Ontario Canada M5B 2B8 Visitez notre site internet www sears ca 318203951 0607 Rev A Cuisinière à alimentation mixte Manuel d utilisation et d entretien TM ...

Страница 24: ...quelle il a été conçu 6 Aux dommages ou pannes causés par l utilisation de détergents nettoyants produits chimiques ou accessoires autres que ceux recommandés dans toutes les instructions fournies avec ce produit 7 Aux dommages affectant les pièces ou les systèmes ou aux pannes causés par des modifications du produit non autorisées Exonération de garanties implicites limitations des recours L uniq...

Страница 25: ...comme une bombe aérosol Les produits inflammables pourraient exploser et allumer un feu ou causer des dommages matériels Ne laissez pas les enfants seuls ou sans surveillance dans un lieu où un appareil fonctionne Ne les laissez jamais s asseoir ou se tenir debout sur une pièce quelconquedel appareil NE TOUCHEZ PAS LES BRÛLEURS DE SURFACE LES GRILLES LES ZONES PRÈS DE CES BRÛLEURS LES ÉLÉMENTSCHAU...

Страница 26: ...LISATION DE LA SURFACE DE CUISSON Sachez quel bouton correspond à chaque brûleur de surface Réglez toujours le bouton tout d abord à LITE pour allumer le brûleur Vérifiez que le brûleur est bien allumé Réglezensuitelaflammepourqu ellen excèdepaslefondde l ustensile de cuisine Utilisezlagrosseurdecasseroleappropriée Cetappareil est équipé d un ou de plusieurs brûleurs de surface de différentes gros...

Страница 27: ...sur le nettoyage de la hotte FOURS AUTONETTOYANTS Nenettoyezdanslecycleautonettoyantquelespartiesdu four énumérées dans le présent Guide de l utilisateur Avant d utiliser le cycle autonettoyant enlevez la lèchefrite et tout ustensile se trouvant dans le four N utilisezpasdenettoyantcommercialpourfour Vousne devezutiliseraucunnettoyantcommercialpourfour niaucun enduit protecteur à l intérieur ou su...

Страница 28: ...r ou de la nuit ou fixer un rendez vous en ligne Sears dispose d une équipe de 12 000 professionnels spécialistes des réparations qui ont accès à plus de 4 5 millions d accessoires et de pièces de qualité C est le genre de professionnalisme sur lequel vous pouvez compter et qui vous aidera à maximiser la longévité de votre nouvel appareil Souscrivez sans attendre à votre contrat de protection Cert...

Страница 29: ...ille pour saisir Grille de la lèchefrite Plaque chauffante Grille pour la cuisson à convection 2 0 0 2 5 0 3 0 0 3 5 0 4 0 0 4 5 0 5 0 0 5 5 0 Off Bread W a r m B r o i l Clean Proof H o l d Off Clean Broil Warm Hold 350 400 450 500 300 250 200 F Right Front Right Rear Left Rear Left Front Off Li te Hi Hi Lo M ult i L o Off Li te Hi Med Lo Off Li te Hi Med Lo Off Li te Hi Med Lo Couvercle du venti...

Страница 30: ... surface de cuisson Le brûleur de PUISSANCE est le plus gros Il est utilisé pour faire bouillir une grosse quantité de liquide rapidement ou lorsqu il y a beaucoup de nourriture à préparer Le brûleur de puissance est situé à l avant à droite sur la surface de cuisson Le brûleur PONT est idéal lorsque des ustensiles de forme oblongue ou rectangulaire sont utilisés Les portions arrière et centrale d...

Страница 31: ...son électrode risque d êtreendommagée Réglage de la dimension de la flamme Pour presque tous les types de cuisson commencez par le réglage le plus élevé et tournez ensuite la commande sur un réglage plus bas pour terminer la cuisson Suivez le tableau ci dessous pour déterminer la bonne dimension de la flamme correspondant aux différents types de cuisson La dimension et le type d ustensiles utilisé...

Страница 32: ... mais seul le brûleur sélectionnés allumera 4 Vérifiez visuellement si la portion arrière du brûleur est bien allumée Ajustez la dimension de la flamme en tournant le bouton de commande entre les premiers réglages HI et LO Figures 2 3 NE CUISINEZ PAS avec le bouton de commande à la position LITE les allumeurs continueront d émettre des déclics si le bouton de commande est laissé à cette position R...

Страница 33: ...ilibrée La grosseur de la casserole est en fonction de la quantité de nourriture à préparer et de la taille du brûleur Fabriqué avec un matériau qui est un bon conducteur de la chaleur Facile à nettoyer MAUVAIS Casseroles dont le fond est incurvé et déformé La casserole dépasse l extérieur du brûleur par plus de 25 mm 1 pouce Le poids élevé de la poignée fait basculer la casserole La casserole est...

Страница 34: ... Lo Évent du four Surface de Cuisson suite Utilisation de la plaque chauffante Placez la plaque d un côté ou de l autre et centrez la sur les brûleurs de gauche Pour l emplacement reportez vous à la figure plus haut Préchauffez la plaque pendant cinq minutes à feu moyen à doux Un préchauffage lent assure une distribution de chaleur égale durant le procédé de cuisson NE préchauffez PAS la plaque ch...

Страница 35: ...rilles dans les guides situés dans la cavité du four et poussez ces derniers vers le bas Pour replacer un support de grilles Installation des grilles DISPOSEZ TOUJOURS LES GRILLES LORSQUE LE FOUR EST FROID AVANT DE L ALLUMER Portez toujours des gants isolants lorsque le four est chaud Portez toujours des gants isolants lorsque vous ajustez les grilles du four Si possible attendez que le four soit ...

Страница 36: ...latempératuredufourà25 F 12 C demoinsque suggéré Réglezlatempératuredufourà25 F 12 C demoinsque prévu Utilisez la taille de moule suggérée dans la recette Utilisez la position de grille appropriée et placez le moule pour qu il y ait 5 1 à 10 2 cm 2 à 4 d espace tout autour Placez une tasse à mesurer en verre remplie d eau au centre de la grille du four Si le niveau d eau est inégal veuillezconsult...

Страница 37: ...es ombragées sur l illustration Ces surfaces deviennent suffisamment chaudes pendant le cycle autonettoyant pour cuire les éclaboussures sur la surface Nettoyez avec de l eau et du savon NOTE Avant de programmer un cycle autonettoyant enlevez toute saleté de la sole du four Ce qui peut survenir durant le cycle autonettoyant Lorsque le four fonctionne sa température devient beaucoup plus élevée que...

Страница 38: ...x permet d enlever la plupart des taches Rincez à l aide d une solution contenant des parts égales d eau claire et d ammoniaque Au besoin couvrez les taches tenaces d un essuie tout imbibé d ammoniaque pendant 30 à 40 minutes Rincez avec de l eau claire et un chiffon puis frottez délicatement avec un tampon à récurer savonneux Rincez et séchez à l aide d un chiffon propre Retirez toute trace de ne...

Страница 39: ...1 Note Assurez vous que les leviers de charnières sont complètement insérés dans les fentes des charnières avant de les placer en position normale 5 Fermez la porte Instructions spéciales pour l entretien de la porte Certaines portes de four en verre peuvent se briser Lire les recommandations suivantes 1 Ne fermez pas la porte du four si les grilles ne sont pas complètement repoussées 2 Ne frappez...

Страница 40: ...t les grilles des brûleurs Ne procédez à l enlèvement d aucun composant de la table de cuisson avant qu il n ait refroidi complètement et qu ils puisse être manipulé en toute sécurité Ne faites pas fonctionner un brûleur de surface sans que le couvercle et la base du brûleur ne soient correctement en place Nettoyage du couvercle et de la tête de brûleur Utilisez un tampon à récurer rempli de savon...

Страница 41: ... détergent sur une surface de cuisson en vitrocéramique avant qu elle ne soit complètement froide Les vapeurs nocives qui seraient générées peuvent nuire à votre santé et la réaction chimique pourrait endommager la surface de cuisson Saleté légère à modérée Appliquez quelques gouttes de crème de nettoyage pour table de cuisson directement sur la table de cuisson Utilisez un essuie tout ou un tampo...

Страница 42: ...toyer Produits de nettoyage agressifs comme des agents de blanchissage de l ammoniaque ou des nettoyants chimiques pour le four car ils peuvent marquer ou décolorer la surface de cuisson N utilisez pas des tampons des éponges des linges ou des papiers essuie tout sales ils peuvent laisser de la saleté ou de la charpie sur la surface de cuisson et causer des brûlures ou de la décoloration Précautio...

Страница 43: ...la maison a fondu ou le coupe circuit s est déclenché après que le four ait été installé et ait servi Appelez Sears ou un réparateur autorisé 1 Remplacez l ampoule Voirlesinstructionspourleremplacementdel ampouledufourdans ce guide de l utilisateur Si l ampoule est brisée la remplacer 1 Une soufflerie peut automatiquement se mettre en marche et en arrêt pour refroidir les pièces internes C est nor...

Страница 44: ... voyez la section Nettoyage Général 1 Des particules de poussière se trouvent dans la conduite principale Laissez le brûleur fonctionner quelques minutes jusqu à ce que la flamme devienne bleue 2 Air salin des zones côtières Une flamme légèrement orange est inévitable 1 Des particules grossières comme sel ou sable se trouvent entre la surface et l ustensile Assurez vous que la surface de la table ...

Отзывы: