background image

Section 5: Measuring DC voltage with high accuracy 

DMM6500 6½ Digit Multimeter User's Manual 


5-2 

DMM6500-900-01Rev. A / April 2018 


Device connections 

This example uses the DMM6500 to measure DC voltage using either the front or rear input 
terminals. Both the front and rear-panel input terminals are safety banana jacks. 

You must use either the front or the rear terminals. You cannot mix the front and rear connections. 

Make sure that the front-panel 

TERMINALS

 switch is set to the terminals you are using. The light for 

FRONT or REAR is illuminated indicating which terminals are being used. 

Connecting devices to the instrument: 

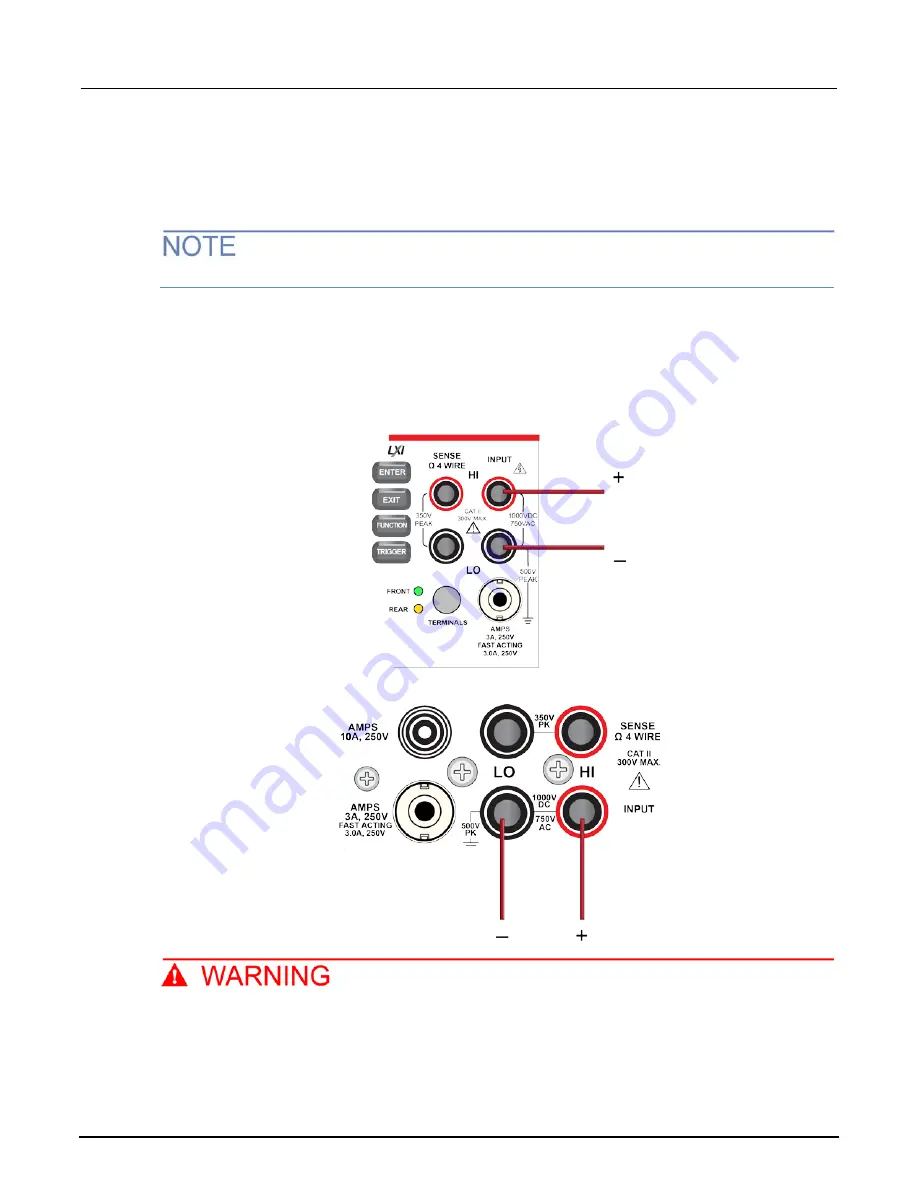
1.  Connect the test leads to the INPUT HI and LO terminals. 

2.  Connect the INPUT HI and INPUT LO to the leads. 

Figure 31: Front-panel connections 


Figure 32: Rear-panel connections 


To prevent electric shock, test connections must be configured such that the user cannot 
come in contact with test leads or any device under test (DUT) that is in contact with the 
conductors. It is good practice to disconnect DUTs from the instrument before powering the 
instrument. Safe installation requires proper shields, barriers, and grounding to prevent 
contact with test leads.  

Содержание DMM6500

Страница 1: ...User s Manual DMM6500 900 01 Rev A April 2018 PDMM6500 900 01A DMM6500 900 01A tek com keithley Model DMM6500 6 Digit Bench System Multimeter...

Страница 2: ...uments product names are trademarks or registered trademarks of Keithley Instruments LLC Other brand names are trademarks or registered trademarks of their respective holders The Lua 5 0 software and...

Страница 3: ......

Страница 4: ...d to mains These instruments will be marked as category II or higher Unless explicitly allowed in the specifications operating manual and instrument labels do not connect any instrument to mains Exerc...

Страница 5: ...lains hazards that could damage the instrument Such damage may invalidate the warranty The CAUTION heading with the symbol in the user documentation explains hazards that could result in moderate or m...

Страница 6: ......

Страница 7: ...ht brightness and dimmer 2 6 Review event messages 2 7 Interactive swipe screens 2 7 Swipe screen heading bar 2 7 FUNCTIONS swipe screen 2 9 SETTINGS swipe screen 2 9 STATISTICS swipe screen 2 10 SECO...

Страница 8: ...instrument 3 17 Determining the command set you will use 3 18 Making basic front panel measurements 4 1 Introduction 4 1 Equipment required for this example 4 1 Device connections 4 2 Basic front pane...

Страница 9: ...ing SCPI commands 8 5 Using TSP commands 8 6 Measuring power using digitizing and TSP Link 9 1 Introduction 9 1 Equipment required 9 2 Device connections 9 2 Measuring power using digitizing and TSP L...

Страница 10: ...Table of contents DMM6500 6 Digit Multimeter User s Manual Next steps 11 1 Additional DMM6500 information 11 1 Index I 1...

Страница 11: ...rs to gain deeper insight into their measurements The DMM6500 provides superior measurement accuracy and the speed necessary for a broad range of applications from system applications and production t...

Страница 12: ...re the instrument is operational User s Manual Provides application examples that you can use as a starting point to create your own applications Reference Manual Includes advanced operation topics ma...

Страница 13: ...ke a high accuracy DC voltage measurement Measuring 4 wire resistance with offset compensation on page 6 1 Shows how to use the DMM6500 to accurately measure a resistance device Scanning temperature a...

Страница 14: ......

Страница 15: ...criptions of the controls on the front panel follow the figure Figure 1 DMM6500 front panel POWER switch Turns the instrument on or off To turn the instrument on press and hold the power switch To tur...

Страница 16: ...e must be formatted as a FAT or FAT32 drive Touchscreen The DMM6500 has a high resolution five inch color touchscreen display The touchscreen accesses swipe screens and menu options You can access add...

Страница 17: ...e front panel terminals are active the green LED is visible When the rear panel terminals are active the amber LED is visible Instrument power Follow the steps below to connect the DMM6500 to line pow...

Страница 18: ...n all output and guard terminals To prevent electrical shock that could cause injury or death remove power from the instrument or test system and discharge any energy storage components for example ca...

Страница 19: ...rs or screwdrivers or pointed objects such as pens or pencils to touch the touchscreen It is strongly recommended that you use only fingers to operate the instrument Use of clean room gloves to operat...

Страница 20: ...ed the screen Adjust the backlight brightness and dimmer You can adjust the brightness of the DMM6500 touchscreen display and buttons from the front panel or over a remote interface You can also set t...

Страница 21: ...yed Messages are either information warning or error notifications For information on event messages refer to Using the event log in the Model DMM6500 Reference Manual Figure 4 Example front panel eve...

Страница 22: ...en without swiping 3 Calculations shortcut Select to open the CALCULATION SETTINGS menu Only available when TERMINALS is set to FRONT 4 Measure Settings shortcut Select to open the MEASURE SETTINGS me...

Страница 23: ...re 6 FUNCTIONS swipe screen SETTINGS swipe screen The SETTINGS swipe screen gives you front panel access to some instrument settings for the selected measure function It shows you the present settings...

Страница 24: ...ta with new data the buffer statistics include the data that was overwritten To get statistics that do not include data that has been overwritten define a large buffer size that will accommodate the n...

Страница 25: ...elect Secondary Measure Secondary measurements are only available in Continuous Measurement Mode and Manual Trigger Mode This feature is only available from the front panel of the instrument Refer to...

Страница 26: ...an program the DMM6500 to show that a test is in process This swipe screen is only displayed if custom text has been displayed Refer to Customizing a message for the USER swipe screen in the Model DMM...

Страница 27: ...l DMM6500 Reference Manual SCAN swipe screen The SCAN swipe screen gives you front panel access to build a scan edit a scan start a scan step through a scan and display scan results You can also save...

Страница 28: ...can until Resume Scan is selected Resume Scan Resumes a paused scan Save to USB Saves the data in the scan reading buffer to a CSV file on the USB flash drive Start Scan Runs a scan Step Scan Incremen...

Страница 29: ...sure Menu The Measure menus allow you to select configure and perform measure operations from the front panel The QuickSet menu allows you to change the function and adjust performance The Measure Set...

Страница 30: ...een The Histogram menu allows you to graph the distribution of measurement data in the selected reading buffer It also contains tabs that you use to customize the histogram The Reading Table menu allo...

Страница 31: ...tore them in a macro script The script can be run and managed like any other script using the options in the Scripts menu or remote commands Note that only settings are stored no key presses or front...

Страница 32: ...overview DMM6500 6 Digit Multimeter User s Manual 2 18 DMM6500 900 01Rev A April 2018 The Info Manage menu gives you access to version and serial number information and settings for instrument firmwar...

Страница 33: ...port on the rear panel of the instrument The GPIB RS 232 and TSP Link options require an optional accessory card In most cases you do not need to configure anything on the instrument In addition you d...

Страница 34: ...m Expansion Interface in the Model DMM6500 Reference Manual The rear panel connections for the remote communication interfaces are shown in the following figure Figure 15 DMM6500 remote interface conn...

Страница 35: ...S window opens 3 Select LAN to see the settings for that interface 4 Press the EXIT key to leave the SYSTEM COMMUNICATION window without making any changes Set up automatic LAN configuration If you ar...

Страница 36: ...r Do not change your IP address without consulting your system administrator If you enter an incorrect IP address it can prevent your computer from connecting to your corporate network or it may cause...

Страница 37: ...computer the VISA driver automatically detects the device Note that the VISA driver only automatically recognizes USBTMC and USBTMC USB488 devices It does not recognize other USB devices such as print...

Страница 38: ...r is also on the rear panel INSTR Use the USBTMC protocol To determine these parameters you can run the Keithley Configuration Panel which automatically detects all instruments connected to the comput...

Страница 39: ...ect Communication Bus dialog box 4 Select USB 5 Click Next The Select Instrument Driver dialog box is displayed Figure 18 Select Instrument Driver dialog box 6 Select Auto detect Instrument Driver Mod...

Страница 40: ...strument 10 Select Finish 11 Select Cancel to close the Wizard 12 Save the configuration From the Keithley Configuration Panel select File Save Verify the instrument through the Keithley Communicator...

Страница 41: ...a GPIB card Check the documentation for your GPIB controller for installation information and where to acquire drivers Install the KTTI GPIB accessory card Figure 21 KTTI GPIB connector view Unpack a...

Страница 42: ...w Tighten these two screws either by hand or with a Phillips head screwdriver to secure the card in the case Do not overtighten 6 Reconnect the power line cable and any other cables to the rear panel...

Страница 43: ...s Manual Section 3 Using a remote interface DMM6500 900 01Rev A April 2018 3 11 Figure 23 DMM6500 Instrument GPIB connections Additional information Additional information is available in the KTTI GP...

Страница 44: ...ress 5 Select OK You can also set the GPIB address using remote commands Set the GPIB address with the SCPI command SYSTem GPIB ADDRess or the TSP command gpib address RS 232 Install the KTTI RS232 ac...

Страница 45: ...w Tighten these two screws either by hand or with a Phillips head screwdriver to secure the card in the case Do not overtighten 6 Reconnect the power line cable and any other cables to the rear panel...

Страница 46: ...installed on unused slots to prevent personal contact with high voltage circuits Failure to recognize and observe standard safety precautions could result in personal injury or death due to electric...

Страница 47: ...panel and command interface that you can use to control the instrument Download access to a CSV file that contains reading buffer data Administrative options and LXI information The instrument web pa...

Страница 48: ...card The network card of the computer is enabled The IP address of the instrument is compatible with the IP address on the computer The subnet mask address of the instrument is the same as the subnet...

Страница 49: ...ID button which allows you to identify the instrument Refer to Identify the instrument on page 3 17 Identify the instrument If you have a bank of instruments you can select the ID button to determine...

Страница 50: ...nstruments If you change the command set reboot the instrument You cannot combine the command sets As delivered from Keithley Instruments the DMM6500 is set to work with the DMM6500 SCPI command set I...

Страница 51: ...8 3 19 To verify which command set is selected from a remote interface Send the command LANG To change to the SCPI command set from a remote interface Send the command LANG SCPI Reboot the instrument...

Страница 52: ......

Страница 53: ...t Set the function before making other instrument settings Many of the settings are related to a specific measure function The applications in this manual use the order of operations to produce the be...

Страница 54: ...a 2 wire local sense configuration In this configuration the device is connected between the INPUT HI and INPUT LO terminals To make the connections 1 Power off the DMM6500 2 Connect the test leads to...

Страница 55: ...ront panel 1 Press the POWER switch on the front panel to turn on the instrument 2 Make sure the terminals switch is set to FRONT 3 From the Functions swipe screen select 2W Measurements begin to disp...

Страница 56: ...the reading table To save the data select the menu in the upper left and select Save to USB For information on the options refer to Options when saving buffer data to a USB flash drive When TERMINALS...

Страница 57: ...s Rear If you are using a card the Channel column displays the channel number 3 To display data for a different reading buffer select the buffer 4 To view details for a specific data point swipe the t...

Страница 58: ......

Страница 59: ...DMM6500 to make high accuracy DC voltage measurements This type of test is often done in metrology laboratories where high accuracy is required for calibration and verification Equipment required One...

Страница 60: ...u are using The light for FRONT or REAR is illuminated indicating which terminals are being used Connecting devices to the instrument 1 Connect the test leads to the INPUT HI and LO terminals 2 Connec...

Страница 61: ...nals ground to the rear panel LO terminal Failure to follow these guidelines can result in injury death or instrument damage Measuring DCV with high accuracy This application demonstrates how to use t...

Страница 62: ...10 Press the MENU key 11 Under Measure select Calculations 12 Set Filter to On 13 Select the Settings icon 14 Set the Type to Repeat 15 Set the Count to 100 16 Select OK 17 Press the HOME key If meas...

Страница 63: ...nt to 100 SENS VOLT AVER ON Enable the filter READ Read the voltage value it is a few seconds before the reading is returned Using TSP commands The following TSP code is designed to be run from Keithl...

Страница 64: ...measurement range to 10 V dmm measure range 10 Set the number of power line cycles to 10 dmm measure nplc 10 Set the input impedance to auto so it selects 10 Gohm for the 10 V range dmm measure inputi...

Страница 65: ...NPLC averaging filter and autozero settings The first row of data is measured using the setup documented in this example The other rows show the results as the integration rate filter and autozero set...

Страница 66: ......

Страница 67: ...urrent is sourced through the DUT using one set of test leads while a second set of SENSE leads measures the voltage across the DUT Connect the voltage sensing leads as close to the DUT as possible to...

Страница 68: ...nals You must use either the front or the rear terminals You cannot mix the front and rear connections Make sure that the front panel TERMINALS switch is set to the terminals you are using The light f...

Страница 69: ...revent hazardous voltage from appearing on the LO terminals connect the LO terminal to protective earth safety ground if your application allows it You can connect the LO terminal to the chassis groun...

Страница 70: ...elect Offset Compensation and select On 7 Press the HOME key The measurement readings are displayed in the top area of the Home screen Using SCPI commands This sequence of SCPI commands measures the r...

Страница 71: ...e SCPI command set You must select the TSP command set before sending TSP commands to the instrument To enable TSP commands 1 Press the MENU key 2 Under System select Settings 3 Set the Command Set to...

Страница 72: ...sults of a low resistance measurement test using a 20 resistor are shown in the table below For example if the resistor specification has a tolerance of 0 1 and a temperature coefficient of 15 ppm C a...

Страница 73: ...nvironment can be important You can use the DMM6500 to monitor temperature at a fixed time interval for an extended period This application requires a Keithley Instruments 2001 TCSCAN card The 2001 TC...

Страница 74: ...erature measurements For this example each channel of the card is connected to a Type K thermocouple The card is then inserted into the rear of the DMM6500 as shown in the next figure The instrument m...

Страница 75: ...nd grounding to prevent contact with test leads There is no internal connection between protective earth safety ground and the LO terminals of the DMM6500 Therefore hazardous voltages more than 30 VRM...

Страница 76: ...panel To set up the application through the front panel 1 Press the POWER button on the front panel to turn on the instrument 2 Select the REAR terminals 3 Swipe to the SCAN screen then select Build S...

Страница 77: ...mands Descriptions RST Reset the DMM6500 TRAC CLEar defbuffer1 Clear the data buffer TRAC POIN totalRdgs defbuffer1 Set the scan count to 12 960 FUNC TEMP 1 10 Set the function to temperature TEMP UNI...

Страница 78: ...uilder Make sure the TERMINALS switch is set to REAR Send the following commands for this example application Reset the instrument to the default settings reset Establish variables to make a measureme...

Страница 79: ...N buffer COL_ALL Enable scan restart on power loss scan restart scan ON Start the scan trigger model initiate waitcomplete Get the data printbuffer 1 defbuffer1 n defbuffer1 Test results The following...

Страница 80: ...Section 7 Scanning temperature at a set time interval DMM6500 6 Digit Multimeter User s Manual 7 8 DMM6500 900 01Rev A April 2018...

Страница 81: ...or fail testing as well as grading and sorting Grading resistors is a common application that is done by monitoring multiple limits until the first failure Binning resistors is also common but unlike...

Страница 82: ...he conductors It is good practice to disconnect DUTs from the instrument before powering the instrument Safe installation requires proper shields barriers and grounding to prevent contact with test le...

Страница 83: ...ttern which causes the component handler to place the resistor in the Limit 1 fail bin 20 fail bin If a resistor passes the 20 limit test the resistance value is checked against Limit 2 which is the 1...

Страница 84: ...rtDelay endDelay limit1High limit1Low limit1Pattern allPattern limit2High limit2Low limit2Pattern limit3High limit3Low limit3Pattern limit4High limit4Low limit4Pattern bufferName Parameter list compon...

Страница 85: ...ODE DIG OUT Configure digital I O lines 1 through 4 as digital outputs these are used to output binning code to the component handler DIG LINE1 STAT 0 DIG LINE2 STAT 0 DIG LINE3 STAT 0 DIG LINE4 STAT...

Страница 86: ...e application Reset the instrument to default settings reset Create a user defined reading buffer that can store up to 1 million readings bufferVar buffer make 1000000 bufferVar clear Set the measure...

Страница 87: ...r digout 6 pulsewidth 10e 6 Trigger pulse is output when the Notify Block generates an event trigger digout 6 stimulus trigger EVENT_NOTIFY2 Load Component Binning trigger model template trigger model...

Страница 88: ......

Страница 89: ...ints This application example calculates power at each point along the waveform by multiplying corresponding currents and voltages adding them together and dividing them by the total number of data po...

Страница 90: ...n with the instrument One ethernet crossover cable Several insulated banana cables One device or component to be tested Device connections This application requires two KTTI TSP communication and digi...

Страница 91: ...g to prevent contact with test leads There is no internal connection between protective earth safety ground and the LO terminals of the DMM6500 Therefore hazardous voltages more than 30 VRMS can appea...

Страница 92: ...ch as digital I O or external trigger I O to replace TSP Link and achieve similar operation Setting up the nodes for TSP code Before executing the TSP code you must set up the nodes on the instruments...

Страница 93: ...ds for this example application Initiate the tsp link network tsplink initialize Set a delay of 0 5 seconds delay 0 5 Reset master instrument at node 1 node 1 reset Set up TSP link trigger line 1 to t...

Страница 94: ...t Volts current_buffer node 2 defbuffer1 current_stats node 2 buffer getstats current_buffer avgCurr current_stats mean print avgCurr Amps Print results to the USER swipe screen node 1 display changes...

Страница 95: ...eforms captured on the DMM6500 show the power consumption resulting from the use of the DUT You can identify the transmission state of the device by the areas of high current consumption and the visib...

Страница 96: ...Measuring power using digitizing and TSP Link DMM6500 6 Digit Multimeter User s Manual 9 8 DMM6500 900 01Rev A April 2018 Figure 46 Subordinate node measuring current Figure 47 Subordinate node curren...

Страница 97: ...s to the most common questions encountered with the DMM6500 Where can I find updated drivers For the latest drivers and additional support information see the Keithley Instruments support website To s...

Страница 98: ...be the only firmware file in that location You can upgrade or downgrade the firmware from the front panel or from the virtual front panel From the front panel 1 Copy the firmware file upg file to a US...

Страница 99: ...truments Series 2000 instruments SCPI34401 An instrument specific language that allows you to run code developed for Keysight Model 34401 instruments If you change the command set reboot the instrumen...

Страница 100: ...From the front panel 1 Configure the DMM6500 to the settings that you want to save 2 Press the MENU key 3 Under Scripts select Save Setup The SAVE SETUP window is displayed 4 Select Create A keyboard...

Страница 101: ...ou set them For example assume you have the measure function set to current and you set a value for display digits When you change the measure function to voltage the display digits value changes to t...

Страница 102: ......

Страница 103: ...l information about the instrument From the website you can access The Knowledge Center which contains the following handbooks The Low Level Measurements Handbook Precision DC Current Voltage and Resi...

Страница 104: ......

Страница 105: ...panel overview 1 3 2 1 FUNCTIONS swipe screen 2 9 G GPIB Install 3 9 GPIB communications 3 9 Grading and binning resistors 1 3 8 1 GRAPH swipe screen 2 12 H How do I change the command set 10 3 How do...

Страница 106: ...s for TSP code 9 4 SETTINGS swipe screen 2 9 STATISTICS swipe screen 2 10 Supported remote interfaces 3 2 Swipe screen heading bar 2 7 System menu 2 17 T Test results 5 7 6 6 7 7 Touchscreen display 2...

Страница 107: ...names are the property of Keithley Instruments All other trademarks and trade names are the property of their respective companies Keithley Instruments Corporate Headquarters 28775 Aurora Road Clevela...

Отзывы: