


Keiser M3 Indoor Cycle Warranty Terms
The Keiser M3 Indoor Cycle is warranted to the original purchaser, to be free from defects in materials and workmanship.
Not Covered Under Warranty
- Loss caused by accident, abuse, improper use or neglect.
- Improper maintenance.
- Improper assembly by the purchaser.
- Failure to follow instructions as stated in any of the manuals provided with the
Keiser M3 Indoor Cycle.
The warranty terms begin with the date of original delivery to be evidenced by appropriate shipping documents. Any
alteration of the equipment so listed without express written consent of Keiser shall constitute a waiver by the buyer of
this warranty. This warranty does not cover other brand name products distributed, but not manufactured by Keiser, which
are subject to their respective manufacturers warranties. During the warranty period, warranted defects will be repaired at
Keiser, Fresno California, or the defective part will be replaced, at the option of the manufacturer, without charge for either
parts or labor to repair the defective part.
This warranty does not cover the removal of the defective part and installation of the repaired part. All claims under the
warranty must be in writing and authorization obtained from the manufacturer, Keiser, to return the defective parts for
exchange. Defective parts must be returned to Keiser. The customer is responsible for all transportation costs on returned
items to and from the point of manufacture.
Users, agents, or anyone directing the use of said equipment shall determine the suitability of the product for its intended
use, and said parties are specifically put on notice that they shall assume all risk and liability in connection herewith. The
foregoing warranties are in lieu of and exclude all other warranties not expressly set forth herein, whether expressed or
implied by operation of law or otherwise, including but not limited to any implied warranties of merchantability or fitness.
Keiser shall in no event be liable for incidental or consequential losses, damages or expenses in connection with exercise
products. Keiser’s liability hereunder is expressly limited to the replacement of parts not complying with this warranty or,
at Keiser’s election, to the repayment of an amount equal to the purchase price of the parts in question. Keiser is not
responsible for labor charges incurred in the replacement of defective parts. Keiser may, at its discretion, require the
return of all defective parts. The customer is responsible for all transportation costs on warranted items to and from the
point of manufacture. Replacement products are warranted for the balance of the original warranty period.
All Keiser equipment sold by Keiser distributors, dealers, or salespeople must be registered for warranty purposes. The
warranty registration form must be filed within 7 days of the sale or installation. Keiser equipment exported out of the US
or Canada will be void of warranty unless purchased directly through a Keiser international distributor or dealer in the
country of installation, or direct from Keiser’s international division.
22
Содержание M3
Страница 1: ...M3 User and Service Manual...
Страница 5: ...Computer Installation 3 Tools needed for assembly 1 Phillips screwdriver 2 Phillips screwdriver...
Страница 6: ...12 Calibrate The Computer See Next Section 4...
Страница 7: ...5...
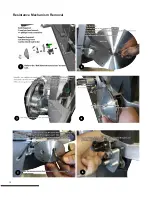
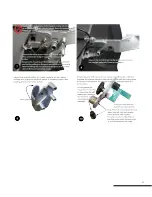
Страница 12: ...Resistance Mechanism Removal 10...
Страница 13: ...11...
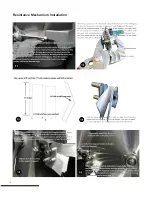
Страница 14: ...Resistance Mechanism Installation 12...
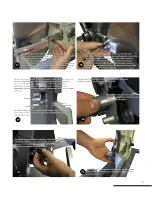
Страница 15: ...13...
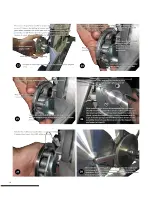
Страница 16: ...14...
Страница 17: ...Steps For Belt Removal 15...
Страница 18: ...Steps for Belt Installation 16...
Страница 19: ...Crank Arm and Axle Removal and Installation 17...
Страница 20: ...18...
Страница 21: ...19...
Страница 25: ...23...
Страница 26: ...24...
Страница 27: ...25...


