Page 43
Copyright © 2012 Kato Engineering, Inc. All rights reserved
NOTICE: Make sure all components are
clean before assembly.
NOTICE: Torque fasteners to the values
specifi ed in Table 3 unless otherwise speci-
fi ed.
NOTICE: Do not pound on the rectifi er or
armature windings. Component damage
may result.
Assembly
Bearing installation (done prior to installing the rotor)
1. Heat the bearing to 220º F (104
o
C) - 250º F (121
o
C) in a clean oven
or with an induction heater.
2. Start the heated bearing on the shaft. Then use a fi ber or soft metal
tube to tap the bearing into place.
3. Ensuring that pressure is applied only to the bearing inner ring,
press the bearing onto the shaft until the inner ring seats against the
bearing shoulder on the shaft. Assemble the rest of the generator after
the bearing has cooled.
Overall assembly
1. Float in the rotor until the rotor and stator laminations line up.
Position the rotor such that a full pole face is at the bottom.
2. Install the endbrackets. Support the rotor during installation. Put an
corrosion inhibitor on the bare mating surfaces to prevent rust.
3. Install the exciter armature and optional PMG as described below.
4. Install the covers.
5. Install the coupling or drive plates.
6. Reconnect the load leads and exciter leads.
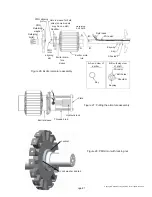
Exciter armature and PMG installation (see Figure 26)
1. Clean the shaft and inside of the exciter sleeve.
2. Place the key in the slot in the shaft.
3. Lay the generator fi eld wires fl at in the wireway with the wire ends
protruding past the end of the shaft.
4. Position the exciter armature assembly in line with the shaft, and turn
the assembly to the position where the keyway in the exciter sleeve is
in line with the key in the generator shaft.
5. With hand force, push the exciter armature assembly over the shaft,
so the end of the sleeve is against the shoulder on the shaft. When
it is part of the way onto the shaft, start the fi eld lead wires through
the wire hole or slot in the exciter sleeve. It may be necessary to tap
lightly on the exciter sleeve in order to move the assembly over the
key. Use a fi ber or rubber mallet. If installation is still a problem, use
a heat gun to expand the exciter sleeve.


