background image

31

Basic Functions

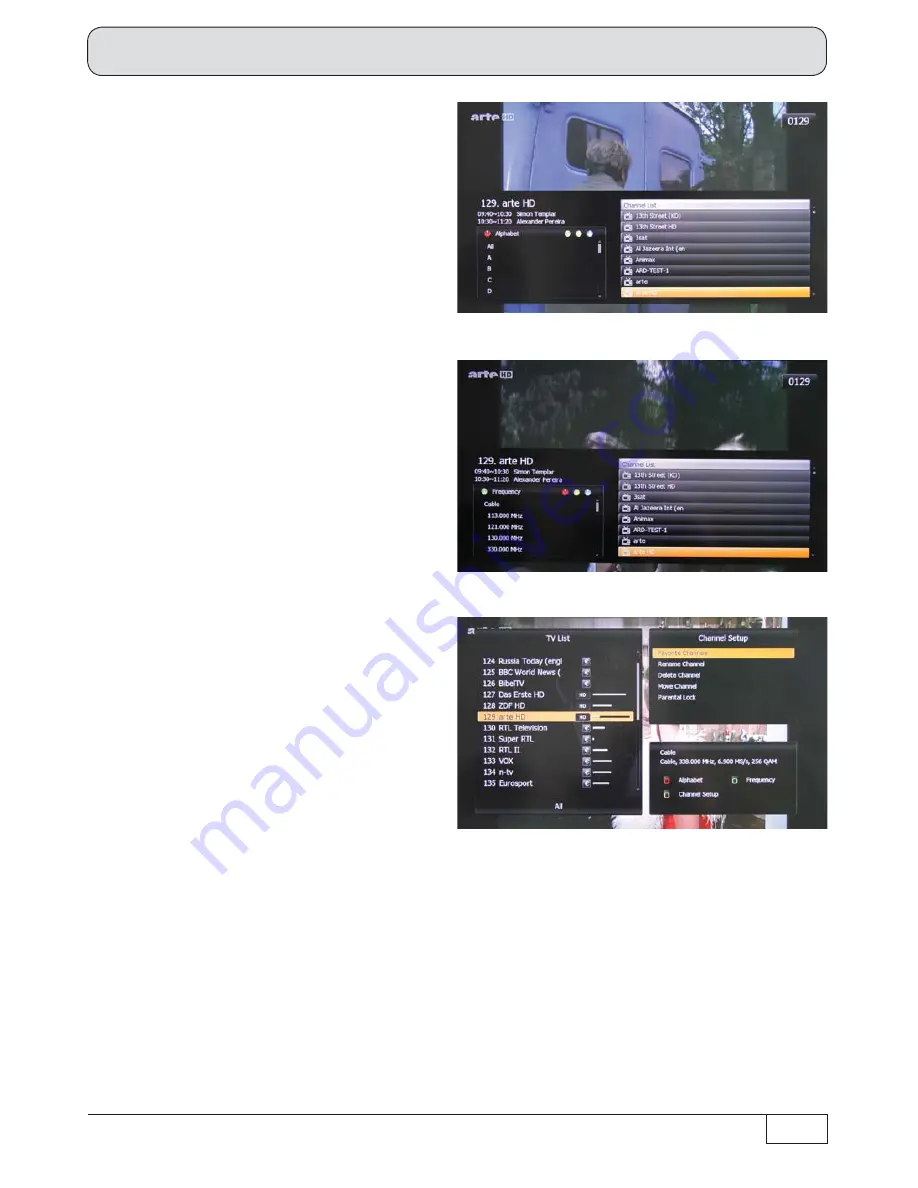
 (red) button: Call up "Alphabet".

The channel list is displayed sorted 
alphabetically.

 (green) button: Call up "Frequency"

The channel list is displayed sorted by 
frequency.

 (yellow) button: Channel Setup

You can make the following changes in this 
setting:

- Favourites (create)

- Rename channel

- Delete channel

- Move channels

- Parental lock

Use the 

 buttons to scroll through the currently available channel lists. If you wish to see an overview 

of the currently available channel lists, you must once again press the respective coloured button for the 
selected category; you will then obtain the following display (for example the favourites lists):

Содержание UFC 965si

Страница 1: ...Operating manual UFC 965 English Receiver Order no Operating manual valid as of software version UFC 965si 20210187 1 00 UFC 965sw 20210186 HDTV Cable Receiver ...

Страница 2: ...nnot be translated we have added a short glossary at the end of the manual The power switch is an environmentally friendly feature If you will not be using your receiver for an extended period you should use the on off switch to disconnect it from the power supply and save energy For shorter breaks you can use the remote control to switch the receiver to standby which uses only a minimal amount of...

Страница 3: ...invalidate the warranty You will have to bear the costs yourself for shipping and repairing any receiver that requires attention due to modifications to the software and use of applications other than those provided by Kathrein Therefore use only software and applications provided by Kathrein for your receiver These are available for download from our website www kathrein de Kathrein assumes no li...

Страница 4: ... radio operation 30 Adjusting the volume 30 Channel selection 30 direct 30 from channel list 30 Channel banners information 32 Audio selection 34 Subtitle selection 34 Teletext 35 One Touch Recording OTR recording direct to hard disk 36 Picture in picture 37 Electronic Programme Guide EPG 38 General information on the programme guide 38 Calling up the EPG 39 Navigation remote control buttons in th...

Страница 5: ...nel Setup 74 Calling up the menu 74 Delete Channels 74 Delete All Channels 75 Favourite Channels 75 Edit Channels 76 Main Menu Parental Lock 78 Calling up the menu 78 Channel Lock 78 Lock Control 79 Change PIN Code 80 Main Menu Software Manager 81 Calling up the menu 81 System Recovery 81 Main Menu Multimedia 82 Calling up the menu 82 Reservation Setting 82 PVR Setting optional 84 Player Setting 8...

Страница 6: ...he cable network and PC If the mains voltage is too high there is a risk of fire Moisture direct sunlight heat naked flames Protect the unit against moisture dripping and splashed water do not place any filled objects such as vases on top of the unit Do not place the unit close to a heater or expose it to direct sunlight and do not operate it in damp locations Only use the unit in a moderate clima...

Страница 7: ...ace the unit on a suitable stable and flat base Repairs Ensure that any repairs to your unit are carried out by qualified personnel Opening the unit and attempting to repair it yourself will void all warranty claims Improper work on the unit may jeopardise the electrical safety of the unit The manufacturer accepts no liability for accidents caused by the user opening the unit casing Connections In...

Страница 8: ...he standby mode by pressing the standby button on off on the remote control In standby mode any changed or new data that are broadcast will be saved by the receiver As soon as the receiver is in the standby mode it can be disconnected from the mains at any time Ventilation slots on the unit Switching the receiver off Warning Channel assignment The channels available on the cable network are subjec...

Страница 9: ...ilable new operating instructions for download at www kathrein de Make a note of the receiver s basic settings these are set during first installation so you can restore them if necessary Please be aware of your responsibility towards your fellow human beings Keep this manual for any questions that arise later and if the receiver passes to another owner pass it on to the new owner For compliance w...

Страница 10: ... decoding Pay TV channels Via the optical audio output the receiver can output the Dolby Digital data stream AC 3 to a Dolby Digital system The integrated EPG is not only a clearly laid out electronic TV guide but also enables programmes to be copied directly from the related EPG view to the timer The USB port on the unit s rear panel permits the connection of external storage media USB stick hard...

Страница 11: ...rogramming Compatible with the UFO compact signal processing system Automatic channel list sorting 3 Reception of digital cable TV and radio channels Video decoding of MPEG 2 and MPEG 4 H 264 signals HDTV Up scaler for scaling up the PAL signal to 1080p Nine favourite channel lists Language selection for multilingual broadcasts On screen display OSD in more than 20 languages 5 000 channel memory p...

Страница 12: ...onnections for component outputs labelled Y Pb Pr 4 Scart socket for TV connection 5 Optical digital data stream output 6 Audio outputs R L cinch sockets 7 Video output CVBS 8 USB 2 0 port USB A connector 9 HDMI connection 10 Mains power cable 11 Power switch Front view flap open 1 On Off button operation standby 2 Channel selection button down 3 Channel selection button up 4 4 digit LED display 5...

Страница 13: ...tteries supplied into the remote control Ensure correct polarity of the batteries the and markings are indicated inside the battery compartment Slide the cover back onto the housing until it locks in place Inserting batteries into the remote control To open Gently press here and pull backwards ...

Страница 14: ...on Connection and Set Up Connect the RF IN input of the receiver to the antenna socket Use a coaxial cable with a standard IEC connector If the IEC connector is not yet fitted to the cable strip the insulation from the cable as shown in the following illustration and carefully fit the connector to the end of the cable so that it is securely fitted When fitting the connector make sure that no stran...

Страница 15: ...the receiver TV Scart socket to the video recorder PVR using a Scart cable necessary only if the TV set and receiver are not already connected using a Scart cable For system reasons the same video signals are present at both the TV Scart socket and also the video cinch output Audio connection Digital Analogue If you are recording to an external video recorder DVD remember not to operate the receiv...

Страница 16: ...s setting call up the submenus Select change individual menu parameters navigation Cancel entry go back First switch your TV set on and select the AV HDMI input you have used to connect the receiver to your TV set Switch on the receiver at the power switch on the rear of the unit Now perform the first installation If you have any questions or encounter problems contact your specialist dealer The f...

Страница 17: ...aly Portugal Spain Poland Czech Sweden Norway Finland Greece Serbia Hungary and Switzerland The following on screen display appears Select the line you want to change using the buttons Make the settings using the buttons Daylight Saving Select the currently applicable setting daylight saving either On or Off for winter Time Zone Select your time zone here e g for Germany select Berlin Rome Local T...

Страница 18: ...he receiver automatically starts a channel search The channel search may take a few minutes The following on screen display then appears example Press the button First installation is then complete The receiver automatically shows the TV picture for the first channel ...

Страница 19: ... s most important functions with all the required buttons on the remote control The explanations in the sections I would like to merely demonstrate the most simple use of the relevant receiver functions without going into any great detail For more detailed explanations of the functions refer to the relevant sections ...

Страница 20: ...channel information info banner and detailed information yellow Call up other settings Options menu blue Switch between TV radio mode Call up EPG Electronic Programme Guide Call up recording archive Navigation channelor options channel change Call up channel list confirmation call up selection Call up recording list Pause start time shift Start recording OTR Stop playback Time shift Record Fast re...

Страница 21: ...ch channels Press to display and hide additional channel information Press to mute sound Press to enter the channel number directly Press to open the selection box to select the channel list and call up using Press to select a channel Press twice to call up a channel and close the channel list ...

Страница 22: ...rmation Press to mute sound Press to enter the channel number directly Press to open the selection box to select the channel list and call up using Press to select a channel Press twice to call up a channel and close the channel list Press blue to change to radio mode Using blue change back to the TV mode I want to listen to the radio ...

Страница 23: ...s I want to access teletext Press to enter the required page directly or Press browse forward backward page by page Press to call up teletext Press or to return to TV Press to select available teletext and call up using ...

Страница 24: ...eed Press to pause playback Press to cancel time shift and return to normal live TV To watch timeshift TV using the UFC 965 you must connect an external hard disk to the USB port on the rear of the receiver and prior to using it for the first time format it as described in the section Main menu Multimedia Storage Only tested with hard disks from the Kathrein product range See also www kathrein de ...

Страница 25: ...recording must be stopped manually Made a mistake Press the red dot button or to close the window without recording select Yes using and press to stop recording To record using the UFC 965 you must connect an external hard disk to the USB port on the rear of the receiver and prior to using it for the first time format it as described in the section Main menu Multimedia Storage Only tested with har...

Страница 26: ...o return to TV Press yellow button to call up channel preview Select required channel using and press to change To record using the UFC 965 you must connect an external hard disk to the USB port on the rear of the receiver and prior to using it for the first time format it as described in the section Main menu Multimedia Storage Only tested with hard disks from the Kathrein product range See also ...

Страница 27: ... as described in the section Main menu Multimedia Storage Only tested with hard disks from the Kathrein product range See also www kathrein de Press to select a recording Press to start playback and exit the recording archive Press to open the recording archive Press during playback to fast forward and rewind Press to return to normal playback speed Press to pause playback Press to abort playback ...

Страница 28: ...ss to open the recording archive Select recording using and press the button Edit file to confirm Press to exit the recording archive and return to normal live TV Press the red button to delete a recording Press to select the Yes option then to confirm ...

Страница 29: ...isplay Press the button to close the table Use the cursor buttons to select the desired character Press the button to transfer the character to the input line at the top of the display Press the red button to delete the character last entered green button to change to upper case yellow button to change to the table with all available characters blue button to confirm load the expression that has b...

Страница 30: ...r pad on the remote control e g ARTE HD is at channel slot 135 in the currently selected channel list to call it up successively press the buttons on the remote control from channel list Press the button to open the channel list The following on screen display appears example Calling this up displays the channel favourites list from which you selected the last channel Select required channel using...

Страница 31: ...ke the following changes in this setting Favourites create Rename channel Delete channel Move channels Parental lock Use the buttons to scroll through the currently available channel lists If you wish to see an overview of the currently available channel lists you must once again press the respective coloured button for the selected category you will then obtain the following display for example t...

Страница 32: ...ourites list using the buttons by pressing the button to confirm Basic Functions Channel banners information Channel information is shown for a few seconds each time the channel is changed this can be changed on the main menu in System Setup OSD Setting Banner Time or displayed by pressing the button ...

Страница 33: ...amme top and next programme bottom each with the start and end time Current date with time Aspect ratio and HDTV format for the current programme Teletext available The symbol is displayed here for encrypted channels HD indication for HDTV programmes ...

Страница 34: ...d sound track option and press the button to confirm Audio selection Open the selection box for the subtitles press the button twice Use the buttons to select the desired subtitles and confirm by pressing the button The receiver will automatically return to the TV picture Subtitle selection The Subtitles function can also be switched off completely main menu System Setup OSD Setting Subtitle setti...

Страница 35: ...e signal is encrypted During the search the page which is being searched for is displayed in the top left hand corner with the time and date displayed at the top right When the search is finished the teletext broadcast by the relevant channel provider appears Teletext There are several options for opening the desired pages Entry using the number pad Scroll backwards and forwards using the buttons ...

Страница 36: ... on the rear of the receiver and prior to using it for the first time format it as described in the section Main menu Multimedia Storage Press the button to start the recording stop time is taken from the EPG data If you select No and confirm the recording will continue for as long as is set on the menu Main Menu Multimedia PVR Setting Recording Limit Time To abort the recording after it has start...

Страница 37: ...ng The PIP window is however only small since it is intended for monitoring purposes and not for viewing programmes in the normal way When you press the green button the first time a window opens up in the top right hand corner Channel selection in the main picture You can switch the channel in the main picture as normal using the buttons Pressing the green button a second time hides the PIP again...

Страница 38: ...advance However this programme information must be broadcast by the related channel provider If no EPG data are available the receiver instead of showing information on the current program shows the message No EPG EPG data update The EPG data for the currently selected channel is updated automatically in the background while you are watching a TV channel The EPG data is not available immediately a...

Страница 39: ... Other Settings EPG Mode is displayed automatically The following on screen display appears example Current day of the week and date Current picture for the selected channel If you selected a channel from a favourites list before calling up the EPG only the data for the channels included in this favourites list will be visible in the EPG Channel name current programme with progression bar ...

Страница 40: ... Search for a particular programme or programme content e g key word search from the detail information or other programme times enter the search expression using the number pad on the remote control see also the section Operating instructions Alphanumeric entries Browse page by page through the channels Show any available further information on the selected programme Show the scheduled recordings...

Страница 41: ...ailable on the selected programme If you want to view the programme currently being shown on a channel you need not exit the EPG just select the desired channel and press the button On the screen you will see the current TV picture for the selected channel The picture however only appears once the button has been pressed Prior to this the picture from the old channel that had previously been selec...

Страница 42: ... the receiver displays the programme lists for one day in advance You can use the buttons to select the desired programme and if available you can use the button to display further information on the desired programme You can use the buttons to scroll through the channels in the order of the complete channel list you remain however in the Preview view The blue button allows you to scroll forward a...

Страница 43: ...e EPG Timer recording The button allows you to set a programme for recording at any time The programme to be recorded can be selected from any EPG view Press the green button to open the Timer list menu You can set an automatic lead in time and run on time for your recordings on the menu Multimedia PVR Setting To record using the UFC 965 you must connect an external hard disk to the USB port on th...

Страница 44: ...rogramme not present in the EPG Select any programme on the channel on which the desired programme is to be broadcast at a later date and press the green button The following on screen display appears example As there are no EPG data you need to enter the data recording mode date on time off time manually Enter the data using the cursor buttons or the number pad ...

Страница 45: ...splay appears example If you want to create a new subdirectory folder for your recording press the red button The following on screen display appears You can use the buttons to select the desired recording mode Specifying a recording mode Once The recording will only be made once Using the keypad enter the required folder name subdirectory ...

Страница 46: ...d programme is loaded in the timer recording schedule and you can make no further manual corrections to it Therefore before pressing the button select the programme on the day of the week that in future you will wish to make the recording Changing the file name Change to the Filename line using the buttons and press the red button A keyboard then appears as shown in the example on the left using w...

Страница 47: ...ual scheduled recordings by pressing the green button and you can delete all scheduled recordings by pressing the yellow button Editing a scheduled recording You can change all the parameters for a scheduled recording except for the Target Device Make the changes using the cursor buttons and the number pad Press the button to confirm your changes and return to the Recording list view If you press ...

Страница 48: ...erlap If a clash occurs between any of your scheduled recordings your receiver will display the following error message see example below You now have the option of deleting one of the recordings or rescheduling so there is no longer an overlap ...

Страница 49: ... search programmes using specific keywords categories e g sport documentary etc for specific titles or e g for specific actors Search expressions are entered using the number pad as described in Operating instructions Alphanumeric entries Pressing the button starts the search for this search term You will then see a listing of all programmes that contain this search term in their detailed informat...

Страница 50: ...lected above and the folders created A recording marked with R is currently in progress Calling up the recording archive My recordings The recording archive is called up by pressing the button Each time the EPG is opened you will automatically see the view you had selected the last time you exited the archive The following on screen display appears example To record and then replay using the UFC 9...

Страница 51: ...elete all recordings Edit recording and select on the Edit menu Sort the recordings Scroll up and down through recording details Navigation within each view of the recording archive is always performed using the cursor buttons The buttons allow you to select individual recordings and the buttons allow you to scroll from page to page in the list currently selected Pressing the button exits the reco...

Страница 52: ...ess by date You can select an individual recording by pressing the buttons To browse through the recordings page by page use the buttons To select a recording in a folder change to the required folder and then press the button You will then see the recordings in the selected folder If all the detailed information in the window on the right from the EPG for a recording cannot be displayed you can s...

Страница 53: ...e button Playback starts from the last playback position If the playback of the recording has been interrupted earlier the following message appears Use the buttons to select whether you want to continue playback from where it was interrupted select Yes or you want to start playback of the recording from the beginning select No Confirm your entry using the button ...

Страница 54: ...ward speeds 2 4 8 16 32 and 64 times Each time the fast forward button is pressed the fast forward speed increases another of the above steps Pressing the button reverts to playback at normal speed Rewind button Available rewind speeds 2 4 8 16 32 and 64 times Each time the fast rewind button is pressed the fast rewind speed increases another of the above steps Pressing the button reverts to playb...

Страница 55: ...kground Record button Add screenshot for the recording in the overview Number pad 1 to 9 Using the number pad you can jump forward the desired number of minutes in your recording during playback For a 9 minute jump for instance press the number key 9 For a 15 minute jump you could press 7 and 8 buttons in quick succession You will see this on screen display after starting playback of the recording...

Страница 56: ...hive Playing Back Editing Recordings Editing recordings Press the button The following display appears see right Use the buttons to change to the required window and use the buttons to select the recording to be edited ...

Страница 57: ...is deleted Deleted recordings are irrevocably deleted and can only be restored by re recording the programme Rename Use the green button to select Rename You can now rename your selected recording The following on screen display appears see example screenshot on the right The entry procedure is as described under Basic Functions Alphanumeric entries Confirm the name you have entered by pressing th...

Страница 58: ...ve Playing Back Editing Recordings Select the first recording you want to edit and press the button Use the buttons to change to the next recording and press the button to confirm Repeat the steps until you have selected all the recordings required ...

Страница 59: ...ice and add recordings to them Create new folder Press the blue button The following on screen display appears see screenshot on the right You can then give the folder to be created a new name as described under Operating instructions Alphanumeric entries To create a subfolder in a folder you have already created first open the main folder using the button Now follow the process described under Cr...

Страница 60: ... screenshot on the right You can then give the folder a new name as described under Operating instructions Alphanumeric entries Delete The folder must be empty to use this function If the folder to be deleted still contains recordings you must first delete these as described under Editing recordings Delete Press the button to confirm deletion of the selected folder Create new folder See Create new...

Страница 61: ...sing the buttons and called up using the button Use the buttons to select the submenu items Settings of the various parameters in the individual items are defined using the buttons or the number pad The main menu and submenus can be exited step by step using the button Press the button to return directly from one of the menus to the TV picture In addition in some cases you can display further info...

Страница 62: ...elete Channels Channel Lock System Recovery Reservation Setting Manual Scanning Country Setting Delete All Channels Lock Control PVR Setting Blind Scanning OSD Setting Favourite Channels Change PIN Code Player Setting Default Setting Video Setting Edit Channels Storage Audio Setting Game Time Setting Other Setting System Information Overview of the main menu submenus Main Menu ...

Страница 63: ...en display appears Auto Scanning Use the buttons to select Auto Scanning Press the button to start the search The following on screen display appears You can cancel the search at any time by pressing the button The following on screen display appears at the end of the search example Press the button The data is saved The receiver automatically returns to the Installation menu Tip ...

Страница 64: ...splay appears Select the line to be changed using the buttons Make the settings using the buttons or the number pad Then press the button to start the search The following on screen display appears at the end of the search example Press the button The data is saved The receiver automatically returns to the Manual Scanning menu ...

Страница 65: ...splay appears Select the line to be changed using the buttons Make the settings using the buttons or the number pad Then press the button to start the search The following on screen display appears at the end of the search example Press the button The data is saved The receiver automatically returns to the Blind Scanning menu ...

Страница 66: ...nu System Defaults Reset the receiver without deleting the current channel list Factory Defaults Reset to the delivery status All channels are deleted Receiver starts in the main menu on re starting Installation Guide Complete reset to the delivery status All channels are deleted Receiver starts with the installation guide on re starting see First Installation STB Reboot The receiver is re started...

Страница 67: ...ears Language Setting Use the buttons to select Language Setting and press the button to open the menu The following on screen display appears Select the line to be changed using the buttons Make the settings using the buttons or the number pad Language Setting Set the language Country Setting Setting for the country OSD Setting Settings for your menu Video Setting Settings for the video format ...

Страница 68: ...age selection and country setting Use the buttons to select Language Setting or Country Setting and press the button to open the menu Make the settings using the buttons Set your language and the country in which the receiver will be operated OSD Setting Use the buttons to select OSD Setting and press the button to open the menu The following on screen display appears Select the line to be changed...

Страница 69: ...subtitles if available from the channel provider Animation Activate deactivate the animated display of the banner on changing channel Press the button to save the changes Press the button to exit the menu again Video Setting Use the buttons to select Video Setting and press the button to open the menu The following on screen display appears Select the line to be changed using the buttons Make the ...

Страница 70: ...ture is hidden during the channel changing phase Press the button to save the changes Press the button to exit the menu again Audio Setting Use the buttons to select Audio Setting and press the button to open the menu The following on screen display appears Select the line to be changed using the buttons Make the settings using the buttons Dolby Digital On Receiver automatically switches to the AC...

Страница 71: ...his option should be activated Lipsync Lip Sync Should you find that on connection via the optical digital audio output the movement of the lips is not synchronised with the words spoken you can make a fine adjustment here Press the button to save the changes Press the button to exit the menu again Main Menu System Setup Time Setting Use the buttons to select Time Setting and press the button to o...

Страница 72: ...control The 180 minutes then will start again from the beginning To deactivate this function select Off This is a function that protects the environment Press the button to save the changes Press the button to exit the menu again Other Setting Use the buttons to select Other Setting and press the button to open the menu The following on screen display appears Select the line to be changed using th...

Страница 73: ...e buttons to select System Information and press the button to open the menu The following on screen display appears Have these data at hand if you contact the hotline Press the button to exit the menu again Main Menu System Setup ...

Страница 74: ...s the button to select the channel You can now select further channels in the same manner if required Press the button with a selected channel to clear the selection of the channel Press the buttons to switch between the TV and radio list If you are not sure whether you want to delete the selected channel you can switch to the channel by pressing the blue button Then press the red button to delete...

Страница 75: ...entries Press the button to page between the favourites lists Press the buttons to change between the current favourites lists and the TV list To add a channel to a favourites list select this channel in the TV List in the table on the right and press the button The channel is immediately listed in the current favourites list If you want to remove a channel from a favourites list select the channe...

Страница 76: ...ars You can move and rename TV channels and radio channels in a list We will explain how to move a channel using an example Move the TV channel Das Erste from position 100 to position 103 Das Erste is at position 100 in the TV list Select Das Erste in the TV list Now press the button Use the buttons to change to the required position and press the button ...

Страница 77: ...el Setup You can move several channels at once by selecting several channels using the yellow button To rename a channel select the channel and press the green button The virtual keyboard appears Enter the required name as described under Basic Functions Alphanumeric entries Then press the Enter key on the virtual keyboard Tip ...

Страница 78: ...ock Use the buttons to select Channel Lock and press the button to open the menu The following on screen display appears Use the buttons to select the channel or channels to be locked Press the button to lock the channel The lock symbol appears The channel is locked To unlock press the button again To save press the red button Changes to this menu item require the entry of the current PIN from the...

Страница 79: ...e settings using the buttons System Lock System Lock Lock unlock the complete receiver with a PIN check Menu Lock Menu Lock Lock unlock the menu items with a PIN check Lock Mode Affects the Channel Lock menu item Once It is only necessary to enter the current PIN once to view a locked channel Immer Always Enter the current PIN every time a locked channel is opened Main Menu Parental Lock ...

Страница 80: ...Code Use the buttons to select Change PIN Code and press the button to open the menu The following on screen display appears PIN from the factory 0000 A new PIN can be saved here Please make a note of the new PIN and keep it in a safe place ...

Страница 81: ... buttons Make the settings using the buttons System Setup System Setup Save the actual receiver status Channel List Channel List Save current channel list Recommended prior to a software update Timer Timer Save timers currently programmed You need a USB storage medium on which it is possible to save the data If you want to restore one of these three items from a USB storage medium select the item ...

Страница 82: ...the buttons to select the Multimedia option The following on screen display appears Reservation Setting Use the buttons to select Reservation Setting and press the button to open the menu The following on screen display appears Timers can be programmed and changed here Press the button to display further commands ...

Страница 83: ... be programmed here Standby Status after recording On Receiver goes into standby after the end of the recording Off Receiver goes into normal operation after the end of the recording Channel TV or radio channel Filename Press the red button to display the virtual keyboard You can enter the file name for the recording here Target Device Name of the data carrier fixed Sub Folder Define destination d...

Страница 84: ...n hours max 24 hours Timeshift Manual manual starting of the time shift function Permanent continuous time shift function Padding Time Set the amount of time by which the recording should be extended over the actual time programmed using the timer 0 60 minutes In this way annoying omissions from recordings can be avoided Auto Delete On Off Player Setting Use the buttons to select Player Setting an...

Страница 85: ...mat the USB storage medium connected You will find the commands that can be used on the tabs red button Delete a selected file green button Rename a selected file yellow button Lock a selected file blue button Format the USB storage medium connected using the FAT 32 format On formatting a hard disk all data on the hard disk will be deleted Deleted data cannot be restored it is irrevocably deleted ...

Страница 86: ...imes to open the folder USB 1 kathrein and ufc965 Use the buttons to select the new software in the above mentioned folder and press the button to confirm A system message is displayed with a prompt as to whether you want to update the software Use the buttons to select Yes and press the button to confirm your selection if you want to continue Once the update is complete the receiver is re initial...

Страница 87: ...buttons to select Game and press the button to open the menu The following on screen display appears Note After selecting a game follow the on screen instructions Games are controlled using the buttons Two games are pre installed Have fun ...

Страница 88: ...he Common Interface slot on the front of the receiver Next carefully guide the module into the Common Interface slot to the stop The button on the right side of the Common Interface slot appears If you insert the module or the smartcard incorrectly the receiver the module or the smartcard may be damaged Please follow the instructions from the manufacturer provider channel provider cable network op...

Страница 89: ...ng to the standby mode or switching off the receiver at the power switch on the rear of the receiver the module can be left with or without the smartcard in the Common Interface slot To remove the module from the Common Interface slot open the flap and press the button on the right side of the Common Interface slot You can now remove the CI module with the smartcard fitted Tip Tip ...

Страница 90: ...ff button allows the receiver to be switched On operation and Off again standby mode Channel down The channel down button switches to the next channel down in the currently selected channel list Channel up The channel up button switches to the next channel up in the currently selected channel list After the receiver has been switched off and on again the last function to be selected is active Beca...

Страница 91: ...ion MPEG 2 MPEG 4 H 264 TV system audio Audio decoding AC 3 MPEG 1 layers 1 and 2 Sampling rate kHz 32 44 1 48 S N dB 65 Power supply Power supply voltage V Hz 230 10 50 60 Power consumption max typ operation standby W 18 10 0 5 Connections RF input output loop through IEC socket pin TV connection 1 x Scart socket Video output analogue 3 x Cinch sockets YPbPr 1 x Cinch socket Video audio output di...

Страница 92: ...92 Technical Appendix Data interface USB 1 x 2 0 General information Ambient temperature C Max 5 to 40 Unit dimensions W x H x D mm 280 x 45 x 175 Weight kg 2 ...

Страница 93: ...ion is normally possible FEC FEC is the abbreviation for Forward Error Correction A technique for reducing the error rate of data transmission Additional bits are inserted into the data stream so that error correction algorithms can be used on reception The FEC error rate corresponds to the Viterbi rate HD Ready This is a label created by the EICTA European Information Communications and Consumer ...

Страница 94: ...number from the data stream and assigns it to the video signal PIN Personal Identification Number For this unit the PIN is a four digit numeric code which must be entered to unlock the unit to allow access to certain functions and channels PIP Picture in Picture function QAM Quadrature Amplitude Modulation Digital modulation process with phase shift keying which is used for transmissions in cable ...

Страница 95: ...been unintentionally changed Set infrared code 1 check batteries Wrong time is displayed The Daylight Saving setting is wrong An incorrect time was imported from the reception signal Check the daylight setting on the System Setup Time Setting menu and change it if necessary Use the power switch to switch the receiver off from the current channel e g DAS Erste or ZDF wait 10 seconds and then switch...

Страница 96: ...Internet www kathrein de KATHREIN Werke KG Anton Kathrein Straße 1 3 P O Box 100 444 83004 Rosenheim GERMANY phone 49 8031 184 0 Fax 49 8031 184 385 936 4319 ZWT 0912 e Technical data subject to change ...

Отзывы: