background image

73 / 123

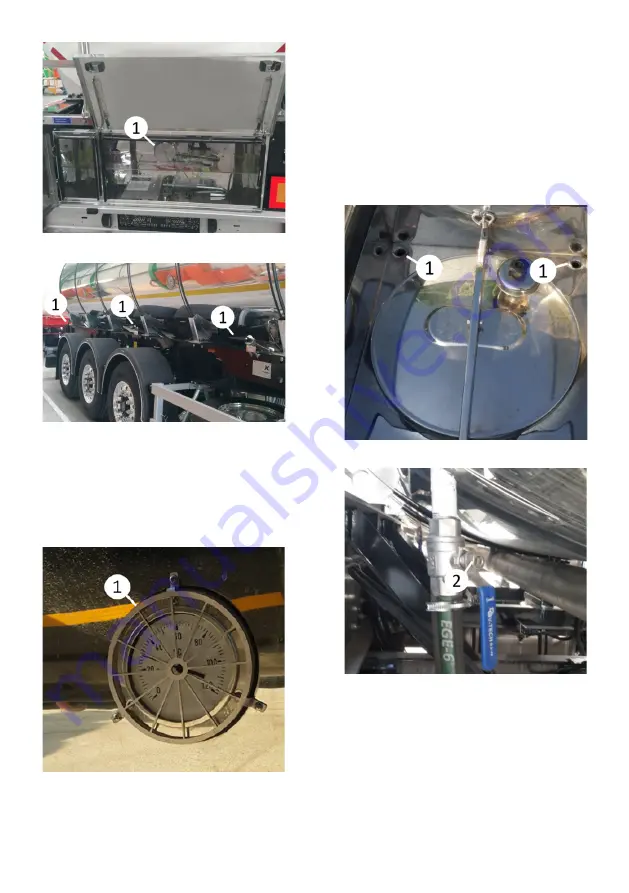
Rear discharge valve

Side discharge valves

4.3.9. Thermometer

In order to measure the temperature of
the material in the tank, there are a total
of three thermometers (1), one in each
compartment of the tank.

Thermometer

4.3.10. Drain Valves

Two discharge valves are located on spill
box (1) around manhole cover. They are
used for discharge of rain water, clean-
ing water or any remaining material.
Drain holes are located behind the spill
box on the right and left, and the water
drained from here is discharged to the
ground through the valves (2) at the bot-
tom of the tank.

Drain holes

Bottom drain valve

Содержание TANKER Series

Страница 1: ......

Страница 2: ...USAGE INSTRUCTIONS 3 1 Brake System 16 3 1 1 Air Couplings 16 3 1 2 Compressed Air Tanks 19 3 1 3 EBS Socket 19 3 1 4 Rollover Stability Support RSS 20 3 1 5 PREV Park Release Emergency Valve 20 3 1...

Страница 3: ...Box 38 3 12 7 Fuel Tank 38 3 12 8 Armature Box 38 3 12 9 Armature Box Cover 39 3 12 10 Hose Carriers and Hose Holders 39 3 12 11 Working Lamp 40 3 12 12 Rear Bumper Rear Protection Equipment 41 3 12 1...

Страница 4: ...e 63 4 2 8 Jet Air Line 63 4 2 9 Top Air Line 63 4 2 10 Bottom Valve 64 4 2 11 Safety Valve 65 4 2 12 Sampling Valve 66 4 2 13 Thermometer 66 4 2 14 Manometer 66 4 2 15 Drain Valves 66 4 2 16 Heating...

Страница 5: ...Line 79 4 4 20 Tank Mixing Pump Outlet Line 79 4 4 21 Sampling Valve 79 4 4 22 Perrot Coupling Cover 80 4 4 23 Hydraulic Control Lever 80 4 4 24 Hydraulic Pressure Gauge 80 4 4 25 Pneumatic Valve 80 4...

Страница 6: ...5 Discharge 94 7 2 Loading and Discharging of Chemical Tanker 97 7 2 1 Safety Instructions 97 7 2 2 Load Distribution and Load Limits of Tractor Semi trailer Combination 99 7 2 3 Loading Preparation 9...

Страница 7: ...ding and Unloading 118 8 INSPECTION AND MAINTENANCE 8 1 Safety Instructions 119 8 2 Main Principles 119 8 3 Checks to Be Performed Of The Time of the Delivery 119 8 4 Manhole Covers 119 8 5 Cataphores...

Страница 8: ...rding to the vehicle specs Important information on how you can use your vehicle is explained in this user manual please be sure that you review and understand the content We suggest keeping this user...

Страница 9: ...car ried according to special instruc tions e g dangerous good transportations Transportation of unsecured goods Transportation of materials that are dangerous due to their properties or that need to...

Страница 10: ...a rule gloves and work shoes are always used It is obligatory to use approp riate personal protective equipment during the operations Long hair is particularly dan gerous when working on the vehicle r...

Страница 11: ...e of any dangerous condition in the operation of safety stop your vehicle immediately and inform the authorized people or institutions Do not modify anything on the ve hicle without a written manufac...

Страница 12: ...tering into the tank Risk of fatal injury Entering into the tank after the journey for cleaning inspection and maintenance purposes will lead to serious health risks Do not enter into the tank when no...

Страница 13: ...ker vehicle In some cases not connected tanker can suddenly fall down and injure people For this reason never stay around the tank er not connected to tractor Tanker should be in safe condition for ma...

Страница 14: ...ed an axle capacity 10 Nationally approved total axle capacity 11 Vehicle Type Vehicle identification plate In addition since the Stainless Chemical and Bitumen Tar tankers are pressur ized non pressu...

Страница 15: ...by authorized service shall assure the client s warranty rights This warranty is based upon the usage and maintenance conditions de scribed herein and in the warranty book Thus it is important to read...

Страница 16: ...s of air cou plings are used in the trailers These 3 types of air couplings have the same function but with different shapes and connections There are 2 different air supply lines in the system Brake...

Страница 17: ...s rubber protection parts and push the points you can check the air pres sure on the brake lines Test point Palm coupling with a test point 3 1 1 1 Mounting of Standard Palm Couplings Couplings Slight...

Страница 18: ...he air coupling First mount service line yellow 1 Mount supply line red 2 Be sure that couplings are matched correctly 3 1 1 4 Demounting of C UK Couplings Push the latch from front to back side on th...

Страница 19: ...in the compressed air tank can cause corrosion problems and affect the func tionality of the brake system The frozen water in the pneu matic lines can cause the fai lure of the brake system The water...

Страница 20: ...7638 1996 connectors ABS CAN or ISO 7638 7 pin with CAN data line EBS Truck If you drive without EBS con nectors or if there is a prob lem on the EBS system the brake system will not be wor ked proper...

Страница 21: ...tically disabled The service brake is not sui table for braking of the semi trailer permanently During longer waiting periods the se mi trailer must be secured with a spring loaded park bra ke and wit...

Страница 22: ...e trailer air tube pres sure drops below 2 5 Bar the spring brake will not be activated due to this operation On some brake chambers used in vehicles the emer gency release screw is lo ca ted in its s...

Страница 23: ...set the button in position 2 you may use your semi trailer in a higher fifth wheel height Lower driving height Higher driving height 3 2 2 Auto Reset The auto reset lever can be controlled by the sam...

Страница 24: ...that the truck and trailer are suitable for the norms standard about electri cal systems Otherwise elec trical problems will occur 3 3 1 15 Pin Socket This system provides electricity for the electri...

Страница 25: ...connections are made suitable for 24S ISO 3731 and 24N ISO 1185 norm Open the protection cover and mount the sockets regularly You may find extra information about the pins function in below ISO3731...

Страница 26: ...et on the truck will be connected to the white socket on the trailer 3 3 3 Light System The vehicle is equipped with a light system which is suitable for the regulations 1 Electrical Sockets 2 Stop La...

Страница 27: ...atch the truck and trai ler with a different diameter king pin injuries may occur The flanged king pin is used on the ve hicle That s why king pin can be re placed easily Kingpin If the wearing on the...

Страница 28: ...ration is performed while se mi trailer is not paired with the tractor the front or rear of the vehicle may raise Serious ac cident and damaged may oc cur For this reason the semi trailer must be pai...

Страница 29: ...is lowered and properly secured Pin Removing Underrun Protection After opening the protection release pins 2 on both sides the underrun protection is removed and taken out If the underrun protection...

Страница 30: ...there will be differen ces in the maneuverability of the vehicle in cases where the self steering axle is locked or unlocked Please be careful about the self steering axles 3 7 1 1 Locking The Steeri...

Страница 31: ...wer than 30 km h and the technical capacity of the axles must not exceed 30 When the vehicle is stationary it is possi ble to activate the traction help by press ing the tractor brake pedal 3 times i...

Страница 32: ...ld be preferred for breaking ability and fuel efficiency on wet roads You can access the EU tire la bel values of the tire used in your vehicle on our website On vehicles with double twin row wheels t...

Страница 33: ...ving with insufficiently se cured spare tire s can occur accidents The tires are heavy parts Be careful about ergonomics and occupational health and sa fety rules during the tire repla cement There is...

Страница 34: ...3 will be removed The tire should be slightly moved to wards outside of the vehicle Placing the spare wheel The tire will be slided slightly into spare wheel holder The fixation cane 1 and pin 3 will...

Страница 35: ...After use fit the chock onto the chock holder pin and fix it by replacing the cotter pin 3 11 2 Pocket Type Wheel Chock Holder Pocket Type Wheel Chock Holder Removing The Wheel Chock from Its Seat Re...

Страница 36: ...king the Food box Insert the key into the lock and switch it to the unlocked position Pull the lock arm back and open the cover by turning it Steel food box Unlocking steel food box Some boxes may hav...

Страница 37: ...nal environment Fire extinguishers should be maintained regularly and their expiration dates should be observed Fire extinguisher cabinet Opening The Cover Open the 2 plastic latches 1 hold ing the co...

Страница 38: ...ocument box may be opened Keep the locking pin and the document box door neatly 3 12 7 Fuel Tank A diesel tank in various volumes such as 60 80 liters which supplies the heater unit is optionally offe...

Страница 39: ...t out lift the box cover by the handles 2 on both sides Closing the box Lower the cover and place into the lock Pull the lock handle forward and lock it At last lock the cover with key Armature box 3...

Страница 40: ...t so that the lamp can be used more comfortably and in a wider area The lamp can be turned on and off with the switch 2 on the back Working lamp Working lamp switch Putting the lamp into use Remove th...

Страница 41: ...tems on STS STC and STL tanker vehicles In chemical STC tank ers the ladder is generally placed at the rear of the vehicle 1 and the bottom of the ladder is foldable for convenience and safety In food...

Страница 42: ...essary to enter the tank unscrew the plastic nut take the step ladder from its place and hang it on the manhole neck of the compartment to be entered 3 After the process in the compartment is finishe...

Страница 43: ...ough pneu matic system The handrail is opened and closed by activating the pneumatic piston 4 mounted on a bracket 3 connected with the handrail with the pneumatic control buttons 5 6 positioned on th...

Страница 44: ...filling or discharging proc esses of the vehicle there are grounding pins 1 on the vehicle according to DIN 75013 in order to prevent the static elec tricity charges on the vehicle to be grounded and...

Страница 45: ...coating It prevents the transported material from freezing due to heat loss Manhole cover It is used to fill from the top and enter the tank Pressure safety valve It prevents the formation of pressure...

Страница 46: ...ted with fiberglass and coated with aluminium or stainless steel Generally tank is manu factured with single compartment since one type of material is transported Breakwaters inside the tank prevent f...

Страница 47: ...thread of the hatch clamp cannot withstand inner pressure of tank and will be broken Consider the following subjects dur ing opening or closing manhole cover Check the contact surfaces of man hole co...

Страница 48: ...2 after each filling and discharging against the risk of sticking 4 1 8 Side Air Line Side air line It is the air line 1 that supplies air to the system by connecting to the compressor On the side ai...

Страница 49: ...easy and complete discharge of material A manual valve 2 is located on the inlet of top air line air entering to tank is controlled on this location Top air line 4 1 11 Bottom Valve It is used for ope...

Страница 50: ...Safety Valve Gate Valve The gate valve 1 is used to manually open and stop the flow Opening Remove the pin 2 on the valve exten sion lever push the lever 3 forward to open the valve Closing Close the...

Страница 51: ...of the top air line bottom valve and safety valve to be done with the remote control or the panel on the vehicle Remote control Turning on the remote control Rotate the emergency button 1 on the right...

Страница 52: ...p continuously in red Opening and closing of the bottom valve When the button that says Boden ventil 1 is pressed the pneumatic bottom valve which is the first closing element of the discharge line on...

Страница 53: ...g and closing the safety valve When the button that says Schnellschlussschieber 2 is pressed the pneumatic safety valve which is the second closing element of the discharge line on the rear side of ta...

Страница 54: ...t different times Turning off the remote control Press the emergency button 1 on the remote control to turn off the control Thus all valves that has been opened earlier top air line valve pneumatic bo...

Страница 55: ...to right to open the top air line valve Control panel Opening bottom valve By turning the bottom valve button 5 on the panel to the right the bot tom valve is opened The bottom valve will not open un...

Страница 56: ...re of the system is lower than 6 5 bar the air tube of the trailer may be empty Check the air tubes 4 1 14 Sampling Valve It is used to take samples from the dis charge outlet Open by rotating the lev...

Страница 57: ...es sure Necessary measures should be taken immediately in case of pressure rise and fall Manometer 4 1 16 1 Drain Valves Two discharge valves are located on spill box 1 around manhole cover and one on...

Страница 58: ...he man ometer 5 on the heating line Heating line Heating with liquid Closed circuit heating system is used for heating with hot liquid The heater and the pump are usually placed inside the heater cabi...

Страница 59: ...of the vehicle during this period 4 1 18 Warning Signs On the Tank There are warning labels and plates 1 at various places on the tank especially at the back of the tank The purpose of these is to inf...

Страница 60: ...k and allows the transported product to be discharged from the tank Safety valve It is the second valve between the bottom valve and the discharge outlet Sampling valve It is used to take samples from...

Страница 61: ...Chemical tanker 4 2 3 Isolation Coating Exterior of the tankers are insulated with glass wool and then coated with alumi nium or stainless steel sheet to keep the material inside the tank at the requi...

Страница 62: ...fore closing After closing manhole covers tight en hatch clamps crosswise and manually Never tighten the hatch clamps with your foot with a pipe hammer or any other tool Never retighten or loosen the...

Страница 63: ...position remove the compressor connection and install the coupling to the end of the jet air line again As an option pneumatic blowing mecha nism is also provided Opening jet air pneumatic blowing me...

Страница 64: ...button 5 placed on the pneu matic control box of the pneumatic top air line valve 4 Top air line Top air line Top air line valve Pneumatic control box The feature for controlling the pneumatic actuat...

Страница 65: ...valve 1 is used for turning on or off flow manually Opening Bring the lever of the valve 2 to OPEN position in order to turn on the flow Closing Bring the lever of the valve 2 to CLOSED position in o...

Страница 66: ...line to measure the pressure in the system Monitoring of the pressure is important when there is pressurized air inside the system The required countermeasures must be taken immediately when the pres...

Страница 67: ...in the system shall be connected to the heating line outlet 2 Bring the ball valve 3 to closed po sition and perform the heating oper ation by supplying hot steam to the system Heating line is design...

Страница 68: ...ing operation and restarts automati cally at 72 C Open the ball valve 2 at the inlet of the heating duct located at the back of the tank Ball valve The heater system has been tested in our factory and...

Страница 69: ...top and enter the tank Breather valve It allows the tank to breathe Cleaning line It is the line that allows the inside of the tank to be cleaned by means of cleaning balls Bottom valve It is located...

Страница 70: ...n is to pre serve heat Walk on the walkway when you climb up the tank Do not step on the coating sheet to prevent damage to the coating sheet on the exterior surface of the tank 4 3 4 Manhole Cover Ma...

Страница 71: ...2 on the breather cover should be removed and the top cover should be re moved and the inside of the breather should be cleaned regularly Breather valve 4 3 6 Cleaning Line It is the line 1 that allow...

Страница 72: ...ing control 2 is used to open and close the bottom valve The valve is opened by turning the handwheel counterclockwise and closed by turning it clockwise Handwheel bottom valve opening control 4 3 8 D...

Страница 73: ...the tank Thermometer 4 3 10 Drain Valves Two discharge valves are located on spill box 1 around manhole cover They are used for discharge of rain water clean ing water or any remaining material Drain...

Страница 74: ...Pneumatic overfill protection for stop the pump Indicates the filling level pneumatically controlled Filling funnel It is used to fill the tank Filling funnel 8 pneumatic control gate valve It is a p...

Страница 75: ...pressure gauge It is the indicator showing the pressure in the hydraulic line Pneumatic valve It is the valve that operates the product pump for 10 seconds Filling funnel valve Filling funnel valve on...

Страница 76: ...er the tank Filling manhole 4 4 4 6 Pneumatic Control Gate Valve For Ventilation It is the valve 3 used for tank ventilation Pneumatically controlled ventilation valve 4 4 5 Safety Valve It is the val...

Страница 77: ...The Pump Float 7 indicates the filling level pneu matically controlled Float 4 4 9 Filling Funnel Filling funnel 8 is used to fill the tank Filling funnel 4 4 10 Filling Funnel 8 Pneumatic Control Gat...

Страница 78: ...s connec tion for discharge Perrot coupling 4 4 14 Turning Joint Turning joint 13 serves to turn the dis charge pipe for right and left discharge Turning joint 4 4 15 Pump It is the component 14 that...

Страница 79: ...ides the pump inlet for the tank mixture Tank mixing pump inlet line 4 4 19 Discharge Pump Inlet Line It is the pipeline 18 that provides the pump inlet Discharge pump inlet line 4 4 20 Tank Mixing Pu...

Страница 80: ...23 Hydraulic Control Lever It is the component 22 used for the commissioning of the hydraulic installation Hydraulic control lever 4 4 24 Hydraulic Pressure Gauge It is the indicator 23 showing the p...

Страница 81: ...27 Pneumatic Manometer It is the indicator 26 showing the pres sure in the pneumatic line Pneumatic manometer 4 4 28 Pneumatic Valve for Tank Ventilation It is a tank ventilation on off pneumatic valv...

Страница 82: ...rake is pressed 100 times Central lubrication electronic counter system 4 4 31 Central Lubrication On Off Button It is the button 30 for central lubrication on off operation Central lubrication on off...

Страница 83: ...ctor Check that kingpin and its couplings are normal Make sure that there is an adequate amount of grease oil on the fifth wheel top connection plate and kingpin that will prevent damage when coupling...

Страница 84: ...ler about 500 mm by slowly moving the tractor forward Lower the level of the rear suspension airbags of the tractor and leave the semi trailer s bottom To ensure that that the king pin is locked prope...

Страница 85: ...tive gloves Fire Extinguisher Box 5 5 2 Wheel Chocks Keep the wheel chocks in their place and place them under the wheels during parking Do not forget to remove the wheel chocks before setting off 5...

Страница 86: ...o dispose of the battery follow lo cal regulations If you do not know how to dispose of it take it to the most appro priate service point The symbol on the battery indicates that this product should n...

Страница 87: ...rform a gas measure ment according to the appli cable regulations Make sure the tanker vehicle is clean by checking it on a daily basis These controls should be applied espe cially to couplings and to...

Страница 88: ...ama ge the paint Wash the external of the tank only with water at a temperature below 60 C Do not use abrasive cleaning detergents Maintain the minimum distance re quired when using high pressure wate...

Страница 89: ...cture and options For this reason make sure that the loads that comply with the regulations and your vehicle type are carried 6 2 Transportation Compliant with ATP Legislation Our vehicles may have be...

Страница 90: ...breakwaters prevent the product from being displaced during sudden braking or starting up preventing the vehicle s center of gravity from shifting to a large extent A change in the vehicle s center o...

Страница 91: ...accidents Perform the following checks after loading and unloading Check that the tanker is properly filled filling level load distribution etc All valves and manhole covers are closed and secured Al...

Страница 92: ...he permitted tanker and axle loads Pay attention to the minimum and maximum filling levels 7 1 3 Loading Preparation Keep available and wear the appropriate protective equipment depending on the mater...

Страница 93: ...der and close the handrails carefully 11 Remove the groundings lines 12 Vehicle is ready to drive If the grounding pin is not connected statical load may cause sparks and explosions Connect the ground...

Страница 94: ...l the manhole cover and connections are closed Connect the air battery to the com pressor via the side air line 1 For using instructions of the compressor see the manufac turer s user s manual 1 Draw...

Страница 95: ...s and when necessary you can stop the material flow using rapid shut off valve 6 Jet air system provides supplying and stopping of jet air For the operation of both sys tems see section Components and...

Страница 96: ...ened before starting the discharge 1 Draw near the filling station Stop the vehicle 2 Provide necessary safety on the sur roundings before starting the discharging process 3 Connect the discharge hose...

Страница 97: ...ear clothes that may cause static elec tricity during operation Do not attempt to thaw frozen man hole covers with open flames Check if all connections are in place and secure before any filling and d...

Страница 98: ...ger signs are in place and visible In addition to these checks some of the equipment in the vehicle must also be checked in their manufactur er s manual Loading and unloading the tanker vehicle that i...

Страница 99: ...only when the vehicle is connected to the tractor Follow the correct order du ring the filling and unloading operations This is especially important if several loading sections are being filled at th...

Страница 100: ...ion Stop the vehicle Engage the tractor handbrake 2 Provide necessary safety on the sur roundings before starting the filling process 3 Perform grounding process with the help of grounding pins 1 on t...

Страница 101: ...y buttons are push type When pressed it stops filling or discharging in an emergency 7 2 5 Discharge 7 2 5 1 Compressed Air Discharge Compressed air discharge Emptying the tanker vehicle with the help...

Страница 102: ...ort 6 After making the necessary controls system pressure material temperature etc open the valve on the top air line and supply air to the top air line 4 See section Components and Use of Upperstruct...

Страница 103: ...station and the vehicle The vehicle is ready for drive The pressure discharge met hod is not suitable for dischar ging flammable liquids with a flash point below 61 C Becau se the compressed air is ho...

Страница 104: ...lines the vehicle is ready for drive 7 2 5 3 Free Discharge Keep available and wear the appropriate protective equipment depending on the material to be discharged Follow ADR regulations and material...

Страница 105: ...is ready for drive The material transported in the tanker may be hot During the filling and discharging processes care must be taken against the danger of burning Avoid direct contact with the transp...

Страница 106: ...and regulations Check the loading limits total weight and axle load capacities Do not exceed the weight limits which are defined in the user manual and identification plate Comply with all national i...

Страница 107: ...the vehicle is connected to the tractor Follow the correct order du ring the fil ling and unloading operations This is especially important if several loading sections are being filled at the same ti...

Страница 108: ...dder and close the handrails carefully 10 Vehicle is ready to drive 7 3 5 Discharge 7 3 5 1 Free Discharge Keep available and wear the appropriate protective equipment depending on the material to be...

Страница 109: ...ed the vehicle is ready for drive 7 3 5 2 Compressed Air Discharge Compressed air discharge Emptying the tanker vehicle with the help of com pressed air The compressed air is sup plied from an externa...

Страница 110: ...firstly 2 TW coupling 2 check valve DN50 stainless line starts from the right front rises from the back of the 1st manhole to the top of the tank and enters the tank in the 1st manhole area The other...

Страница 111: ...on etc All valves and manhole covers are closed and secured All material hoses are safely removed All danger signs are in place and visible In addition to these controls some of the equipment in the v...

Страница 112: ...g limits total weight and axle load capacities into the account Ensure that you have performed the loading in compliance with the laws and regulations of all countries where you drive the vehicle The...

Страница 113: ...tation Stop the vehicle Engage the tractor handbrake 2 Fix the vehicle with the help of wheel chocks 3 Remove the perrot coupling cover 21 4 Connect the perrot coupling to fill dis charge hose Connect...

Страница 114: ...e the product pump for 10 seconds and bring the hydraulic control lever to the filling position This process should be done in max 10 seconds so that the tank is completely filled 15 After the filling...

Страница 115: ...lever 22 to the discharge position manually 8 In this way the product in the tank is mixed 7 4 4 2 Gravity Discharge Keep available and wear the appropriate protective equipment depending on the mater...

Страница 116: ...ventilation 27 6 Open the 6 manual control gate valve 11 2 on the pump inlet line Manual control gate valve 7 Open the 6 manual control gate valve 11 1 on the pump outlet line 8 Perform discharge ope...

Страница 117: ...vate the tractor PTO and pump oil into the system 10 Move the hydraulic control lever 22 to the filling position manually 11 Perform discharge operation 7 4 4 4 Vacuum Discharge From Tank Rear Upper F...

Страница 118: ...cell phones and auxiliary heaters Headlamps of the vehicle are un necessary too Avoid conducting shoes and hard hats wear additional protective clothes too if required Do not carry items that may caus...

Страница 119: ...appropriate pla ce and contact the nearest authorized service 8 2 Main Principles The purpose of the maintenance opera tions on the vehicle is to provide the following Always maintain the operating s...

Страница 120: ...ess periodi cally If the lining thickness has fall en below half more frequent checks must be made and the lining must be changed by applying to the au thorized service before the lining is finished I...

Страница 121: ...l Please refer to the pump manufacturer s manual for pump usage and warranty conditions Please refer to the compres sor manufacturer s manual for compressor usage and war ranty conditions If the EBS w...

Страница 122: ...the order shown in the picture Lower the jack and tighten the wheel nuts in the same sequence with the required torque Repeat this process after the first 80 km and dai ly for the first week Check th...

Страница 123: ......

Отзывы: