


Lei
si
è
deciso
per
una
casetta
di
giardino
di
legno.
La
struttura
del
legno
con
i suoi
rami,
cuore
e
nuclei
di
resina,
che
sorgono
con
la
crescit
a
dell`
albero,
of
frono
alla
sua
casetta di giardino un fascino naturale.
Qui
abbiamo
riassunto
per
Lei
alcuni
consigli
sul
montaggio
e
il
ricevimento
del
prodotto,
così
come
alcune
spiegazioni
di concetti.
Prima del monta
ggio:
Lei
ha
comprato
un
prodotto
per
il
quale
abbiamo
processato
legno
di
pini
dei
boschi
del
nord
dell`
Europa.
Come
lì
i pini
crescono
più
lentamente
e
per
quel
motivo
forma
anelli
sottili
annuali di crescita, è più resistente.
Il
legno
ha
una
reazione
davanti
alle
influenze
ambientali.
Così
si
arriva,
secondo
il
clima,
al
gonfiamento
e
alla
contrattura
del
legn
o.
Per
quel
motivo
si
producono
dif
ferenze
di
misure,
fenditure, rami difettose, ecc.Questo è inevitabile.
Non
si
dovrà
esporre
il
legno
, durante
il
montaggio,
né
al
sole
diretto
né
all´umidità.
Se
si
produce
saturazione
del
suolo
con
l`
acqua
o
questo
prodotto
non
si
trova
ben
arioso
a
causa
di
piante,
pareti,
ecc.,
possono
originar
si
putrefazione,
muf
fa,
funghi.
La
putrefazione
rappresenta
soltanto
un
pregiudizio
estetico.Per
piantagioni
con
un
altezza
di
circa
10
cm,
si
deve
rispettare
una
distanza minima di 2 m intorno alle nostre casette.
Questo
serve
per
la
ventilazione
delle
pareti.
Se
il legno
lasciato
nel
suo
stato
naturale
viene
sposto
al
sole,
si
decolora
e
anche
si può annerire.
Che cosa sono i nuc
lei di r
esina?
Cavità
piene
di
resina
nel
torso
dell`
albero
dei
diversi
tipi
di
legno
ricche
in
resina(picea,
pino,
larice
).
Se
queste
cavità
sono
aperte
durante
il
processo
tra
segatrice
e
pialla,
la
resina
appiccante
si
scioglierà.
Lei
potrà
pulirla
con
un
brandello
impregnato con acetone.
Che cos´è un ca
pr
ug
gine aspr
o?
„aspro“
vuol
dire
tabelle
non
piallate
ma
sì
intaccate
(capruggine
:
una
tabella
che
ha
una
incanalatura
e
una
linguetta).
Il
capruggine
aspro
è
un
legno
di
costruzione
ideale
per
soffitte,
impalcature
di
tegole
o
pavimenti
e
soffitti
delle
casette
del
giardino.
Oggi
il
capruggine
aspro
si
of
fre
pillato
dalla
parte
visibile.Nel
capruggine
che
noi
utilizziamo
c´è
sempre
un
lato
bello
e
grosso
e
un
lato
brutto
e
sottile.
Un
grande
numero
di
rami
delle
tabelle
risalta
la
naturalità
del
legno
e
non
è
una
riduzione
della
qualità.
Per
favore,
soltanto
unisca
le
tabelle
ma
non le comprima.
Non
si
dovrà
esporre
il
legno,
né
prima
né
durante
il
montaggio,
al sole diretto ne all´umidità costante.
sopr
a
inc
anala
tur
a
linguetta
Il
legno
è
sottoposto
a
una
condotta
naturale
di
gonfiamento
e
contrattura.
Per
ciò
si
possono
produrre
piccole
dif
ferenze
di
misure.
Se
Lei
ha
acquistato
una
casetta
di
panconi
massicci
(invio
senza
pareti
prefabbricate)
osservi
la
seguente
indicazione:
Per
garantire
la
“crescita”
e
“acchiocciolatura”
uniforme,
i
panconi
non
si
dovranno
unire
fortemente
attraverso
i
vari
panconi
massicci(per
es.
per
scaf
fali).
Se
questo
non
si
rispetta
si
possono
formare
crepe,
ecc.
Questo
si
dovrà
anche
rispettare
all`
inserire
finestre
e
porte.
Gli
assi
delle
porte
e
finestre
soltanto
si
devono
unire
con
la
porta
e
la
finestra,
mai
con
i
panconi massicci.
Il monta
ggio:
Per
favore,
prima
legga
le
istruzioni
del
montaggio
complete.
I
grafici
in
questa
istruzione
di
montaggio
non
sono
uguali
a
quelli
originali,
soltanto
servono
per
osservare.Si
possono
realizzare
cambi estetici e tecnici.
Tenga
in
considerazione
se
le
viti
si
devono
avvitare
di
dentro
o
di
fuori.
Le
viti
che
non
si
vedono
da
fuori
of
frono
alla
sua
casetta un migliore aspetto.
Il
legno
non
si
dovrà
esporre,
prima
e
durante
il
montaggio,
né
al
sole
diretto
né
all`
umidità
costante.
A
volte,
il
legno
è
un
materiale
particolare,
per
ciò
si
raccomanda
forare
prima
di
avvitare
con
un´argine
di
3,5mm.(
vedere
il
dettaglio
).
In
modo
contrario,
il
legno
potrà
lacerarsi
e
scheggiarsi
di
forma
longitudinale.
par
te 1
par
te 2
buc
car
e
Pr
epar
azione della base:
Come
base
raccomandiamo
una
placca
di
fondazione.
Questa
dovrebbe
finire
alla
superficie
dei
puntelli.
Anche
questa
placca
deve
essere
al
meno
10cm.
più
alta
che
il
resto
del
pavimento.
Questo serve per proteggere dalle schizzi.
I
puntelli
si
devono
collocare
formando
un
rettangolo.
Ogni
puntello
si
deve
unire
fortemente
con
la
base,
questo
servirà
per
proteggere
dal
vento.
Tagli
il
foglio
dell´imballaggio
della
sua
casetta
in
strisce
al
in
circa
65mm.
e
le
metta
sotto
i puntelli
come protezione contro l´umidità ascendente.
Per
altre
domande
sulla
preparazione
della
base,
per
favore
si
rivolga a uno specialista di fiducia.
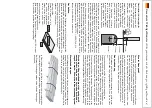
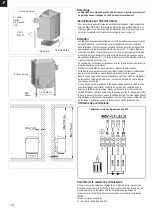
Attenzione!
Quando
l‘installa
zione
aggiuntiva
di
piano
di
cal
-
pestio,
la
casa
è
stata
completamente
ristrutturata
40
millime
-
tri superiore.
la
to
tab
ella di pa
vimen
to
lamina
base
10
cm
pa
vimen
to
pun
tello
Importante:
Uno
dei
requisiti
per
ottenere
precision
e
al
momento
di
unire
gli
elementi
è
avere
un
fondo
preparato
con
molta
cura.
Se
si
commettono
errori,
ci
saranno
delle
difficoltà
nel
montaggio
che
possono
provocare
inconvenienti
nella
stabilità e l´estetica della casetta.
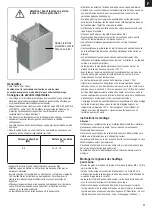
Indicazioni generali •
Attenzione, per favor
e non buttar
e!
Indicazioni generali •
Attenzione, per favor
e non buttar
e!
Indicazioni generali •
Attenzione, per favor
e non buttar
e!
Содержание Sauna 330
Страница 1: ...Sauna 330...
Страница 5: ...Sauna 330 1 6xM 6xM 3 xDET 1 2x DET A 3x DET 1 2xDET A 2800 1600 950 mm mm mm mm...
Страница 6: ...Sauna 330 2 I 1x DET 2 II 2 3a 3b 4 x DET 3a 4 x DET 3b X W Y Z mm mm 100mm 100 mm 3x M...
Страница 7: ...Sauna 330 3 I II 24x M...
Страница 8: ...Sauna 330 90 2x DET P 3A Bohren Sie 4 L cher in DET 2 10 mm...
Страница 11: ...6 I II 11x DET 5b 10x DET 5a 8x DET 3a 8x DET 3b 16xH 16xH 20xH Siehe Seite 6A Sauna 330...
Страница 17: ...Sauna 330 9 2xDET F 1xDET G 1xDET F 3x K 3x K 3x K 3x K...
Страница 18: ...Sauna 330 10 8x DET 7 24x H 575 I II 2xDET 8 2x DET 9...
Страница 19: ...Sauna 330 4xDET 10 Bitte bohren Sie 4mm L cher vor dem festschrauben 8x H 11 8x H 770 4x H...
Страница 23: ...Sauna 330 15 I r 300 10x H mm mm 2xDET 19 II...
Страница 24: ...Sauna 330 16 I 13x DET 20 II 26x H Entfernen DET A...
Страница 44: ...Karibu Artikel Nr Artikel Nr I Nr Typ 59319 37 468 25 11011 9 kW Saunaofen externe Steuerung...
Страница 45: ...2...
Страница 68: ...25...
Страница 75: ...ISC GmbH Art Nr 086 50 009 23 11011...
Страница 81: ...D 6 0 Wandmontage Steuerger t 2 St ck Schrauben 4 x 25 mm 1 St ck Schraube 4 x 25 mm...
Страница 87: ...D 080 000 000 020 000 000 OFF 70 OFF 70 Einstellung Beleuchtung...
Страница 91: ...D Ist eine Funktion inaktiv ist die LED dunkel 100 020 005 Ist eine Funktion aktiv dann leuchtet die LED ON 70...
Страница 95: ...D 13 0 Explosionszeichnung STG 2100 F STG 2100 F Art Nr 37 470 01 I Nr 18012...
Страница 96: ...D 13 1 St ckliste STG 2100 F I Nr 18012...
Страница 97: ...D STG 2100 FH Art Nr 37 470 11 I Nr 18012 13 2 Explosionszeichnung STG 2100 FH...
Страница 98: ...D 13 2 St ckliste STG 2100 FH I Nr 18012...
Страница 99: ...D...
Страница 102: ...D...
Страница 114: ...12 E Bedienung 3 080 000 000 000 020 000 000 000 ISC_STG2100_Anleitung_E indd 12 10 08 17 08 12...
Страница 115: ...13 E Bedienung 2 100 240 000 000 100 020 000 000 ISC_STG2100_Anleitung_E indd 13 10 08 17 08 12...
Страница 116: ...14 E Bedienung 2 100 240 095 000 100 020 060 000 ISC_STG2100_Anleitung_E indd 14 10 08 17 08 12...
Страница 122: ...20 E 13 0 Plano en expansi n STG 2100 F STG 2100 F Art Nr 37 470 01 ISC_STG2100_Anleitung_E indd 20 10 08 17 08 12...
Страница 124: ...22 E STG 2100 FH Art Nr 37 470 11 13 2 Plano en expansi n STG 2100 FH ISC_STG2100_Anleitung_E indd 22 10 08 17 08 12...
Страница 129: ...27 E ISC GmbH Art Nr 086 50 009 23 11011 Stand 02 2015 ISC_STG2100_Anleitung_E indd 27 10 08 17 08 12...
Страница 141: ...12 F Bedienung 3 080 000 000 000 020 000 000 000 ISC_STG2100_Anleitung_F indd 12 10 08 17 08 14...
Страница 142: ...13 F Bedienung 2 100 240 000 000 100 020 000 000 ISC_STG2100_Anleitung_F indd 13 10 08 17 08 14...
Страница 143: ...14 F Bedienung 2 100 240 095 000 100 020 060 000 ISC_STG2100_Anleitung_F indd 14 10 08 17 08 14...
Страница 149: ...20 F 13 0 Sch ma clat STG 2100 F STG 2100 F Art Nr 37 470 01 ISC_STG2100_Anleitung_F indd 20 10 08 17 08 14...
Страница 151: ...22 F STG 2100 FH Art Nr 37 470 11 13 2 Sch ma clat STG 2100 FH ISC_STG2100_Anleitung_F indd 22 10 08 17 08 14...
Страница 156: ...27 F ISC GmbH Art Nr 086 50 009 23 11011 Stand 02 2015 ISC_STG2100_Anleitung_F indd 27 10 08 17 08 14...
Страница 168: ...12 NL Bedienung 3 080 000 000 000 020 000 000 000 ISC_STG2100_Anleitung_NL indd 12 10 08 17 08 21...
Страница 169: ...13 NL Bedienung 2 100 240 000 000 100 020 000 000 ISC_STG2100_Anleitung_NL indd 13 10 08 17 08 21...
Страница 170: ...14 NL Bedienung 2 100 240 095 000 100 020 060 000 ISC_STG2100_Anleitung_NL indd 14 10 08 17 08 21...
Страница 176: ...20 NL 13 0 Explosietekening STG 2100 F STG 2100 F Art Nr 37 470 01 ISC_STG2100_Anleitung_NL indd 20 10 08 17 08 21...
Страница 178: ...22 NL STG 2100 FH Art Nr 37 470 11 13 2 Explosietekening STG 2100 FH ISC_STG2100_Anleitung_NL indd 22 10 08 17 08 21...
Страница 183: ...27 NL ISC GmbH Art Nr 086 50 009 23 11011 Stand 02 2015 ISC_STG2100_Anleitung_NL indd 27 10 08 17 08 21...


