background image

34

HOW TO INSTALL THE EXPANSION MODULES

At most three cards can be installed on the MB48IP motherboard, two of which would
be  expansion  modules  and  one  of  which  would  be  EXP48IP  VoIP  module.    Before
installing and analog expansion module on the system, the EXP48IP VoIP card must
be removed from the system (the details are given in the following pages).

If one of the modules to be installed on the motherboard is  an  EVM48  module,  then
that  one  is  supposed  be  installed  first.  For  that  purpose,  it  suffices  to  plug  the  male
connectors that are under the EVM48 module to the corresponding female ones that
are on the motherboard. One must make sure that the entire pins are properly plugged
in.  Should  even  a  single  pin  is  not  properly  plugged  in;  both  the  EVM48  and  the
exchange might not operate correctly.

The types of the expansion modules to be installed on the motherboard determine the
order of mounting.

For the cases where several expansion modules are to be installed, an EXP48(4/12)
module  is  supposed  to  be  plugged  onto  the  motherboard,  and  then  the  other
expansion module - if there is one - is supposed to be plugged  onto that, and finally
the EXP48IP VoIP card is supposed to be plugged on top.

When  plugging  an  expansion  card,  first  the  6  plastic  card  holders  that  have  been
located  around  the  motherboard  to  hold  expansion  modules  are  supposed  to  be
adjusted by being turned manually so that their card contact surfaces face the upper
section of the cabinet.

Содержание MS48IP

Страница 1: ...www karel com tr TECHNICAL REFERENCE AND INSTALLATION GUIDE 09 2010 TELEPHONE EXCHANGE...

Страница 2: ...MS48IP TECHNICAL REFERENCE AND INSTALLATION GUIDE September 2010...

Страница 3: ......

Страница 4: ...ument for development and improvement purposes without prior notice The actual products may possess characteristics different from those that have been mentioned herein due to software and hardware ve...

Страница 5: ...the environment The exchange must not be disassembled by unauthorized persons in any way The cover of the exchange cabinet should always be kept closed Prior to hanging the exchange on the wall one m...

Страница 6: ...exchange should not be exposed to effects of dust vibration oil and water Devices that generate high frequency waves such as welding machines office equipment such as computers and air conditioners TV...

Страница 7: ...erequisite aims to introduce the structure of the exchange Presentation of the information in this chapter follows a path from the whole of the exchange down to the details of the parts At the end tec...

Страница 8: ...YS 18 SOFTWARE 19 MEDIA GATEWAY FACILITIES 20 TECHNICAL SPECIFICATIONS 22 INSTALLATION OF THE SYSTEM 25 HOW TO MOUNT THE EXCHANGE ON THE WALL 25 PREPARATION 25 APPLICATION 26 MB48IP MOTHERBOARD 28 SPS...

Страница 9: ...the extensions with the Caller ID feature Thanks to that card the extensions with SMS compatible Short Message Service telephones can send and receive SMS messages over analog lines The MS48IP system...

Страница 10: ...e 1 Figure 2 The CBN48IP plastic cabinet provides the system with a flexible and ergonomic structure for easy connection Thanks to its special design its structure makes it possible to mount the excha...

Страница 11: ...ts Ext 3 The MS48IP Motherboard Ext 4 Ext 5 Ext 6 Ext 7 Ext 8 Ext 9 Ext 10 Ext 11 Ext 12 Figure 3 At most two analog expansion cards can be installed on the MB48IP motherboard when necessary in order...

Страница 12: ...e locations of the entire connectors that are present on the motherboard Figure 4 and Figure 5 a SPS48 Power Supply f External Relay Connector b KTS Connector g External Music Source Connector c KY16...

Страница 13: ...USIC CONNECTION Any music source radio tape player CD player etc can be connected to the external music source connection which is an option for the internal music chip on the motherboard and when a l...

Страница 14: ...rmined by programming EXP48IP VOIP MODULE The EXP48IP VoIP Module is a card which can be installed directly on the system motherboard or any of the analog expansion cards It functions as the IP server...

Страница 15: ...7 The functional block layout of the cards is shown below Figure 6...

Страница 16: ...8 The connectors on the module are shown below 1 EXP48IP MGW card connector 4 Ethernet connector 2 EXP48IP VoIP Data connector 5 DSP Expansion module connector 3 KTS connectors 6 Base card connectors...

Страница 17: ...ows positions of those circuits on the module Figure 8 The dimensions of the EXP48 0 16 are 19 cm x 23 cm and its weight is 0 4 kg THE EXP48 2 6 EXPANSION MODULE The EXP48 2 6 Expansion Module is used...

Страница 18: ...10 Figure 9 The dimensions of the EXP48 2 6 are 14 5 cm x 16 5 cm and it weighs 0 3 kg...

Страница 19: ...rcuits are available on it as well as extension and line circuits The diagram below shows positions of those circuits on the module Figure 10 The dimensions of the EXP48 4 12 are 19 cm x 26 cm and it...

Страница 20: ...umber is directly related to the IP extension and trunk capacity of the system The IP extension and trunk numbers of the system are flexible and can be defined by programming the IP MGW channels of th...

Страница 21: ...ons 4 trunks 8 extensions 01 12 111 146 13 16 151 158 MOTHERBOARD EXP48 4 12 EXP48 4 12 EXP48IP 4 channel DSP EXP 12 trunks 36 extensions 8 trunks 16 extensions 01 12 111 146 13 20 151 166 MOTHERBOARD...

Страница 22: ...rtment next to the on off switch as a frontline protection That fuse is used to protect the exchange against unexpected voltage current variations that might occur on the mains Figure 11 The system op...

Страница 23: ...T48 transformer is directly transmitted to the MB48IP motherboard Moreover KTS serial data line connectors are available on the SPS48 for KY16 Mini Printer consoles DSS modules and the IA12 ISDN Adapt...

Страница 24: ...C 5 Data 6 GND 7 Busy Pin voltage assignments for the SPS48 PWT48 connector Between pins Voltage 1 3 15 5 VAC 2 3 15 5 VAC Pin voltage assignments for the SPS48 RNT48 connector Pin Voltage 1 2 Ground...

Страница 25: ...tery of 12 VDC 7 Ah for a full capacity system with 35 traffic in average An F type 8A 12VDC fuse is available on the SPS48 for the battery The SPS48 has been enriched with hardware that can charge th...

Страница 26: ...is made to the system then the lines on the MB48IP motherboard and the EXP48 4 12 modules are automatically connected to the first four extensions on the same card Since there are no lines on the EXP...

Страница 27: ...d by programming The possibilities provided by the software have been given in related guides in detail Thanks to the EXP48IP VoIP card the MS48IP exchange sends to the extensions the number informati...

Страница 28: ...more analog and IP connections can be established on the system For example With a single ERXP48 VoIP card which has 4 MGW channels at most 4 analog extensions can call 4 IP extensions or 2 IP extens...

Страница 29: ...ffer size 300 msec T 38 Fax support Yes Echo canceller Yes 64 msec RTP RTCP Yes G 711 Yes Caller ID Yes QoS PLC VAD AJB CNG Yes G 726 G 727 Yes G 723 1 Yes G 729 A B Yes FR GSM 6 0 Yes Linear 16 bit c...

Страница 30: ...12 Stand by Power Consumption 3W EXP48 0 16 Stand by Power Consumption 3W EXP48IP VoIP Stand by Power Consumption 3W Maximum Power Consumption 45W 12 VDC Battery Backup Power Failure Transfer Station...

Страница 31: ...DP and DTMF Signaling 12 16 KHz Pulse Price Signal Detection Polarity Reversal Detection 4 Calling number information detection FSK or DTMF 5 Calling number information generation FSK 6 Extension Fee...

Страница 32: ...0 msec on 300 msec off 7 Dial Tone Reminder Active 1000 msec 500 Hz 1000 msec 250 Hz 8 Special Dial Tone 250 Hz Continuous 9 Overflow Tone 2000 Hz 700 msec on 200 msec off 10 Warning Tone 250 Hz 20 ms...

Страница 33: ...and they should be at least 3 meters away from the exchange otherwise 4 Areas near radio transmission antennas and locations where sulfuric gas is produced and thermal diffusion that could damage the...

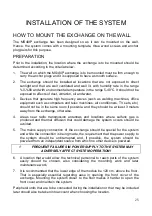
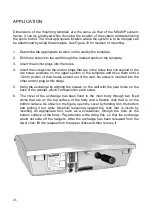
Страница 34: ...til a 10 mm portion of their heads extend out of the wall No screw is inserted into the other anchor plug at this stage 5 Hang the exchange by aligning the screws on the wall with the pear holes on th...

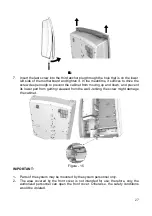
Страница 35: ...to prevent the cabinet from moving up and down and prevent its lower part from getting released from the wall Jerking the screw might damage the cabinet Figure 15 IMPORTANT 1 Parts of the system may b...

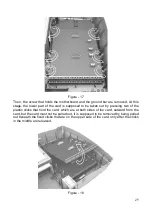
Страница 36: ...in case of malfunction In order to remove the motherboard from the cabinet first the exchange power is supposed to be cut off by setting both the battery and the mains on off switches to 0 position w...

Страница 37: ...to be taken out by pressing two of the plastic clicks that hold the card which are at both sides of the card outward from the card but the card must not be pulled out it is supposed to be removed by b...

Страница 38: ...ached below the plastic inner cover that covers the RNT48 and PWT48 transformers inside the system cabinet together with cables connecting it to the power card The SPS48 card is connected to the MB48I...

Страница 39: ...emove it only in case of malfunction In order to remove the power supply from the cabinet first the exchange power is supposed to be cut off by setting both the battery and the mains on off switches t...

Страница 40: ...e inserting the screw that is supposed to be on the lower right one should pay attention to fix the tag that is at the tip of the grounding cable which comes with the SPS48 to the SPS48 power supply t...

Страница 41: ...or connecting the SPS48 to a battery One of those cables comes from the battery connector that is on the SPS48 and the other from the battery switch There are tags at the free ends of those cables whi...

Страница 42: ...st make sure that the entire pins are properly plugged in Should even a single pin is not properly plugged in both the EVM48 and the exchange might not operate correctly The types of the expansion mod...

Страница 43: ...at are on the bottom face of the card exactly match the white female connectors that are on the motherboard Hence if the card does not seem to be fixed properly it must not be jerked and it should be...

Страница 44: ...s that are on the bottom face of the card exactly match the white female connectors that are on the lower card Hence if the card does not seem to be fixed properly it must not be jerked and it should...

Страница 45: ...been installed on the motherboard as well as it can be installed directly on the motherboard When plugging the card one must make sure that the white male connectors that are on the bottom face of the...

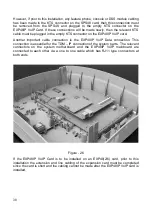
Страница 46: ...d Another important cable connection is the EXP48IP VoIP Data connection This connection is essential for the TDM IP connection of the system parts The relevant connectors on the system motherboard an...

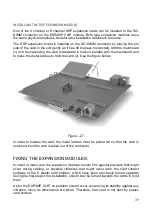
Страница 47: ...hes to hold the card 2 See the figure below Figure 27 In order to release the card the metal latches must be pulled out so that the card is unlocked then the card is taken out of the connector FIXING...

Страница 48: ...ounding can be figured out by measuring the following point to point voltages Phase and neuter This value is supposed to be in the range 180 VAC 260 VAC Ground and neuter This value is supposed to be...

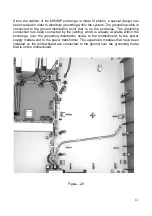
Страница 49: ...n point that is on the exchange The grounding connection has been connected by the cabling which is already available within the exchange over the grounding distribution screw to the motherboard to th...

Страница 50: ...ogramming as a switch for the hardware below a Door Opener b External Ringer c External Announcement System d External Music Source Two wires the one that carries mains power the one that controls on...

Страница 51: ...ral of the connections described in previous sections are made in order for the internal cabling of the exchange to be regular those cables can be extended along the cable channels that are on the upp...

Страница 52: ...It is connected to the exchange over the KTS line with 5 wires LT48 H Feature Telephone Set Multi functional telephone set that is connected to analog extensions over the special data line of the exch...

Страница 53: ...gh their telephone sets and even more Net CM Software The Windows based software which is used to log process and archive by computers the records of all calls made over the exchange KY16 Mini Printer...

Страница 54: ...made correctly and the outlet which is supposed to feed the exchange actually supplies power If all those seem to be alright then the power supply module may have to be replaced 2 No access to lines E...

Страница 55: ...2 and the problematic line Set the exchange to the programming mode through the system supervisor extension and dial 877777 800 line no 111 0000 Call the extension 122 through the phone of the extensi...

Страница 56: ...www karel com tr TECHNICAL REFERENCE AND INSTALLATION GUIDE 09 2010 TELEPHONE EXCHANGE...

Отзывы: