


Karel MS26s Installation & Maintenance Guide
Edition 3.1
39
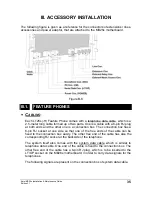
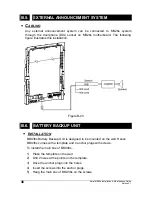
III.2.
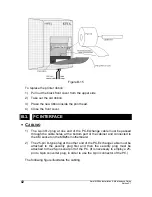
MINI PRINTER
The KY16 Mini Printer has the built-in mains and data cables. Also it has a paper
roll and a printer ribbon installed. A pair of anchor plugs with screws for the printer
to be mounted on the wall as well as two spare paper rolls and a spare printer
ribbon are also provided.
•
I
NSTALLATION
:
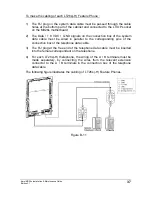
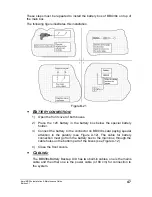
1) Drill two holes 12.5 cm apart at a height of 150 cm.
2) Drive the anchor plugs into the holes.
3) Insert the screws into the anchor plugs.
4) Hang the printer on the screws.
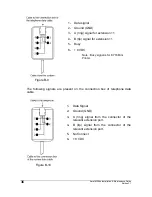
The following figure illustrates the installation.
Figure B-12
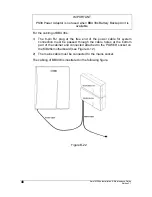
•
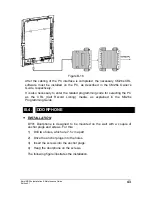
C
ABLING
The power cabling can be established via the built-in mains cable.
The printer data cable that emerges from the bottom of the KY16 Mini Printer
has a connection box (with a cable) at its free end. The printer end of the data
cable is attached to the connection box through a 6-pin RJ plug. The cable that
comes out of the connection box is not used for connecting KY16 to the
MS26s system.
Содержание MS26S
Страница 1: ...Karel MS26s T e l e p h o n e S y s t e m Installation Maintenance Guide Edition 3 1...
Страница 2: ......
Страница 6: ......
Страница 7: ...TECHNICAL REFERENCE...
Страница 8: ......
Страница 14: ......
Страница 28: ......
Страница 32: ......
Страница 33: ...INSTALLATION GUIDE...
Страница 34: ......
Страница 36: ......
Страница 42: ...Karel MS26s Installation Maintenance Guide Edition 3 1 34 Figure B 7...
Страница 60: ...Karel MS26s Installation Maintenance Guide Edition 3 1 52 Figure B 27...
Страница 61: ......
Страница 62: ...Design and specifications subject to change without notice...