background image

17

3.  Once all connected disks have been detected and initialized, the duplication process begins. 

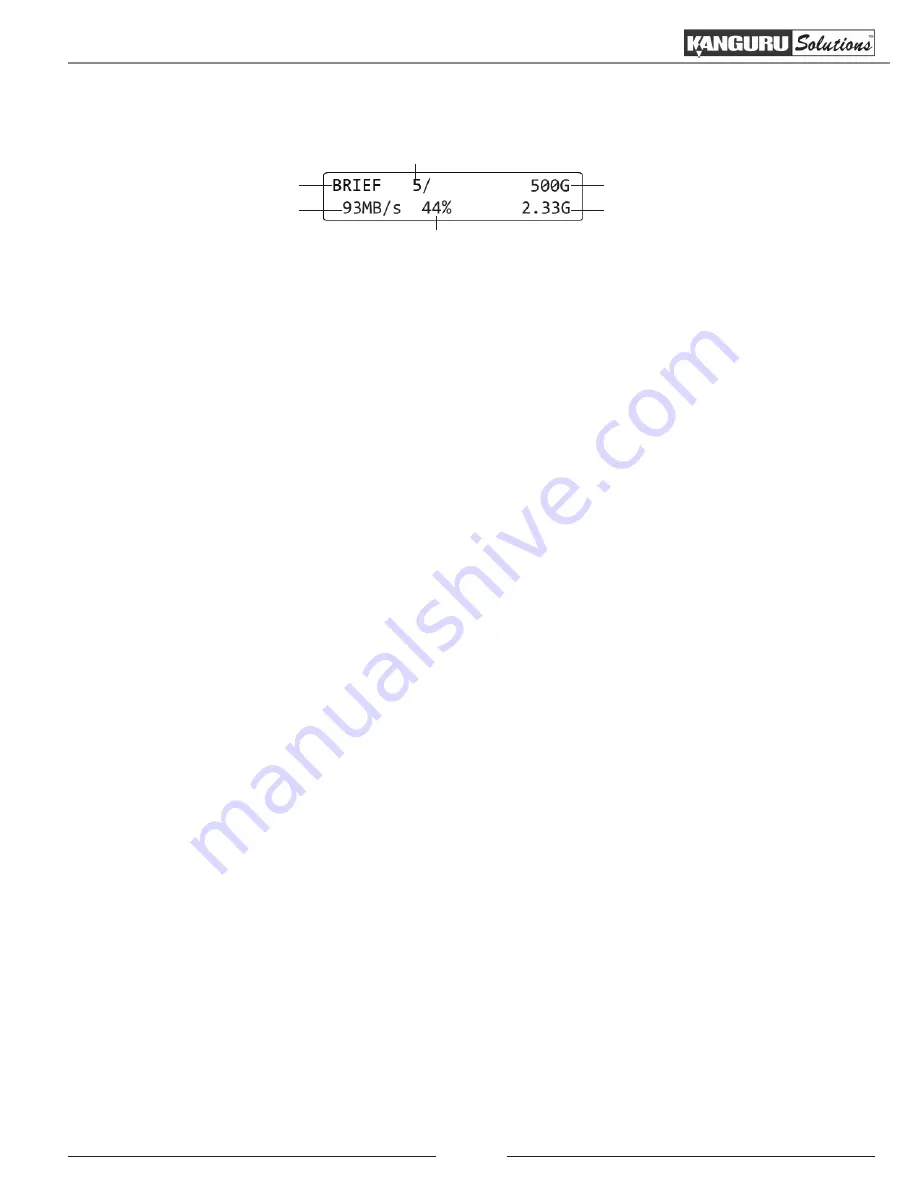
During duplication the screen will display the following information:

Copy mode

Transfer rate

# of targets

% completed

Size of Source data
Data copied

WARNING! 

Do not remove any drives while they are in use. You can tell if a drive is in use if the 

green LED next to it is blinking. Wait for a solid green or red LED before removing a drive. If you 

want to interrupt the current process, 

tap

 the ‘RUN’ or ‘SET’ button.

4.  Once the copy process is completed the screen will either provide you with a “Target All 

Success” message or, if for any reason a drive was not duplicated successfully, an error code. 

For more information on the meaning of the error codes, please see chapter 9. Error Code List 

on page 39.

Drives that completed successfully will have a solid green LED displayed next to it, indicating 

that there are no errors on that drive. Drives that failed the duplication process will have a solid 

red LED next to it.

5. 

Tap 

the ‘SET’ button to return to the Main menu. 

Note:

 The duplicator will keep a running count of the number of passed and failed drives until 

you change copy modes.

Duplicating From a Master Hard Drive

Содержание KCLONE-14HD-SATA

Страница 1: ...KanguruClone 5HD 14HD SATA User Manual Model no KCLONE 5HD SATA KCLONE 14HD SATA Copyright 2014 All Rights Reserved ...

Страница 2: ...ty or fitness for any particular purpose Kanguru Solutions reserves the right to revise or update its products software or documentation without obligation to notify any individual or entity Export Law Compliance Regardless of any disclosure made to Kanguru Solutions pertaining to the ultimate destination of the specific Kanguru product you warrant that you will not export directly or indirectly a...

Страница 3: ...2 Brief 13 3 3 Resize 14 3 4 Full 14 3 5 Ratio 14 4 DEFINING COPY AND OR COMPARE 15 4 1 Set Copy Functionality 15 4 2 Set Compare Functionality 15 4 3 Set Copy Compare Functionality 15 5 DUPLICATION 16 5 1 Duplicating From a Master HDD 16 5 2 Duplicating From a Storage Center 18 5 2 1 Formatting a hard drive as a Storage Center 18 5 2 2 Loading a Master HDD image to the Storage Center 18 5 2 3 Dup...

Страница 4: ...ef Immediate 32 8 6 Advanced Resize 32 8 7 Set Write Pattern 32 8 8 Transfer Size 32 8 9 Select Source 33 8 10 HPA Check 33 8 11 No Capacity Check 33 8 12 Max UDMA Mode 34 8 13 Skip Read Error 34 8 14 Source Power Off 34 8 15 Load Full Image 34 8 16 Set Ratio Head 35 8 17 Set Ratio Tail 35 8 18 Most Varied Capacity 35 8 19 Need Resize 36 8 20 Format Source 36 8 21 Total Copy Count 37 8 22 Update F...

Страница 5: ...ll standard SATA hard drives Master Target drives can be different sizes brands and models IDE hard drives supported with adapters sold separately One year Standard Warranty This system comes complete with a one year parts and 90 day labor warranty One year and two year extended warranties available contact Kanguru sales for more information Clones any operating system including DOS Win98 Win2K Wi...

Страница 6: ...els 15 x SATA data power cable 3 5 and 2 5 IDE adapters sold separately Light Tower accessory sold separately 1 2 Specifications KanguruClone 5HD SATA LCD Screen 20 x 2 Characters back lit LCD Input Device 2 Push Buttons Dimensions 13 5 x 9 5 x 6 5 Weight 10 lbs Power Supply Standard 250W 4P Power 5V 12V Operating Temperature 5ºC 55ºC Relative Humidity 20 60 KanguruClone 14HD SATA LCD Screen 20 x ...

Страница 7: ...creen Hard drive tray SET button Rear View 5HD Power supply switch Ventilation fan Power cable connection Light tower connection Serial connection for Kanguru use only 14HD Light tower connection Serial connection for Kanguru use only Power supply switch Ventilation fan Power cable connection Parts and Functions ...

Страница 8: ...D indicator Source SATA port Source power port Green LED indicator Red LED indicator 14HD S 14 13 12 11 10 9 8 7 6 5 4 3 2 1 Source SATA port Source power port Green LED indicator Red LED indicator Target SATA ports Target power port Green LED indicator Red LED indicator Hard drive tray Parts and Functions ...

Страница 9: ...Clone The KanguruClone is powered by an internal power supply that is controlled by a rocker switch located at the rear of the unit The KanguruClone supplies power to all drives during a cloning session There is no need to connect an external power source to the drives The unit can supply up to 1 5A at 12V and up to 1A at 5V to each drive Note the drives are not powered until you start a copy oper...

Страница 10: ...ERROR SOURCE POW OFF LOAD FULL IMAGE SET RAT HEAD SET RAT TAIL MOST VAR CAP NEED RESIZE FORMAT SOURCE TOTAL COPY COUNT UPDATE FIRMWARE BURN IN MAIN COPY MENU SETUP MENU SMART BRIEF RESIZE FULL RATIO VERIFY ERASE DIAGNOSTIC LOAD SET COPY SET COMPARE HDD WIPE BTN SOUND SHOW EXE TIME SEL IMG FILE DEL IMG FILE DIAGNOSTIC SETUP ADVANCED SETUP SET SMART CHECK SET WRITE TEST SET READ TEST Function Diagra...

Страница 11: ...o ways Tap the button is pressed and released immediately If the BTN SOUND option is enabled see section 7 4 Button Sound on page 27 a Tap will be accompanied by a short audible tone Hold the button is pressed and held for 2 seconds If BTN SOUND option is enabled see section 7 4 Button Sound on page 27 a Hold will be accompanied by a short audible tone followed by a higher pitched tone Note When f...

Страница 12: ...ates From the Main menu hold the SET button to enter the SETUP menu Tap the SET button to navigate through the different SETUP menu options Tap the RUN button to select configure an option While in the SETUP menu hold the SET button to return to the Main menu 2 1 3 The Advanced Setup Menu The ADVANCED SETUP menu contains advanced options for configuring the way your duplicator operates From the SE...

Страница 13: ...tor will copy in RESIZE mode The system will determine whether it needs to execute in Resize mode based on the NEED RESIZE option under the ADVANCED SETUP menu see section 8 19 Need Resize on page 36 If the Source s capacity is equal to the Target then it will copy in BRIEF mode If the Target drives are of mixed capacities it will determine a suitable copy mode based on the capacity of the smalles...

Страница 14: ...esize only the last partition on the drtive you will need to enable Advanced Resize see section 8 6 Advanced Resize on page 32 3 4 Full FULL mode copies drives sector by sector from the Source to the Target s and supports all major OS formats DOS Windows Mac Linux This mode is the slowest copy mode but the safest 3 5 Ratio The Ratio Copy operation allows you to copy a defined percentage of the Mas...

Страница 15: ...are Functionality When enabled FULL SMART BRIEF and RESIZE modes will execute a Compare process comparing the data between the Source and Target drives and confirming that they are identical The SET COMPARE option is disabled by default To change the SET COMPARE option 1 From the Main menu hold the SET button to enter the SETUP menu 2 Tap the SET button to navigate to the SET COMPARE option It sho...

Страница 16: ...ate to the desired copy mode For more information on the different available copy modes see chapter 3 Duplication Modes on page 13 The screen will display the following Current Copy Mode Number of Targets connected Total successful copies Total failed copies Note The system will not recognize any connected drives before duplication begins Therefore the Number of Targets connected value will always...

Страница 17: ...n 4 Once the copy process is completed the screen will either provide you with a Target All Success message or if for any reason a drive was not duplicated successfully an error code For more information on the meaning of the error codes please see chapter 9 Error Code List on page 39 Drives that completed successfully will have a solid green LED displayed next to it indicating that there are no e...

Страница 18: ...to proceed with formatting the hard drive as a Storage Center or tap the SET button to cancel Caution Formatting will erase any data currently stored on the hard drive Once the format has completed tap any button to return to the ADVANCED SETUP menu Your hard drive has now been formatted as a Storage Center You can now load images of Master HDD s to the Storage Center for convenient duplication No...

Страница 19: ...you have completed naming the image file hold the RUN button and the Load process will begin Note If the image file name you enter already contains an image file previously loaded on the Storage Center the system will ask you to confirm overwriting the previously saved file Tap the RUN button to confirm or tap the SET button to cancel Size of Source data IMG file number Percentage completed Amount...

Страница 20: ... display the following information Copy mode Transfer rate of targets completed Size of Source data Data copied WARNING Do not remove any drives while they are in use You can tell if a drive is in use if the green LED next to it is blinking Wait for a solid green or red LED before removing a drive If you want to interrupt the current process tap the RUN or SET button Note If you receive the follow...

Страница 21: ...ves for duplication 1 From the Main menu tap the SET button to navigate to VERIFY 2 Connect your hard drives to any available Target ports Tap the RUN button to begin the verify process The following screen will be displayed during verification Percentage completed Capacity verified Data verification rate Number of Target drives 3 Once the verification process has completed the following screen wi...

Страница 22: ...nnected to the Source port will not be affected by the Erase operation To Erase your hard drives 1 From the Main menu tap the SET button to navigate to ERASE Note If you have configured the HDD WIPE option under the Setup menu then the Erase option will appear as WIPE and will display the number of wipe cycles For instructions for changing the number of wipe cycles see section 7 3 HDD Wipe on page...

Страница 23: ... future failures SMART checks the electrical and mechanical performance as well as the read performance of the disk Electrical tests can include a test of cache a read write circuitry test or a test of the read write head elements Mechanical tests include seeking and servo on data tracks SMART Check is disabled by default Write Test Checks the ability to write data to all sectors on the target har...

Страница 24: ... information on formatting a hard drive as a Storage Center see section 8 20 Format Source on page 36 5 The duplicator will ask you to input a file name for the image Enter a file name a The file name consists of three digits The digit furthest to the right will be blinking indicating that it is currently selected Tap the RUN button to increase the value by one b Tap the SET button to select the n...

Страница 25: ...ration Copy disabled FULL SMART BRIEF or RESIZE modes will not perform a Copy operation Note To perform a Copy Compare operation set both the SET COPY and SET COMPARE options to enabled 7 2 Set Compare The SET COMPARE option allows you to enable or disable the Compare operation Tap the RUN button to change this option s setting Compare disabled default FULL SMART BRIEF or RESIZE modes will not per...

Страница 26: ...ied Tap the RUN button to change this option s setting Wipe disabled default The wipe operation is turned off and in the Main menu you will only see the ERASE option Wipe enabled The wipe operation is turned off and you will now see the WIPE option in the Main menu instead of ERASE When you enable the WIPE operation the system will ask you to configure the number of Wipe Cycles The Wipe operation ...

Страница 27: ...played after an operation has completed Tap the RUN button to change this option s setting Disabled default The total execution time is not displayed Enabled The total execution time is displayed 7 6 Select Image File SEL IMG FILE is used for selecting an image file that has been saved to a Storage Center To select an image file 1 From the SETUP menu tap the SET button to navigate to the SEL IMG F...

Страница 28: ...Tap the RUN button to enter the Diagnostic Setup menu and then tap the SET button to navigate through the available Diagnostic modes Tap the RUN button to enable or disable the Diagnostic mode There are three Diagnostic modes available Set SMART Check Self Monitoring Analysis and Reporting Technology monitors hard drive indicators of reliability and is often able to anticipate future failures SMAR...

Страница 29: ...cted hard drives have been initialized you will see the following Port location Number of sectors Hard drive model number UDMA mode supported UDMA mode followed 3 Tap the SET button to view information about the next device 4 After you have viewed all devices you will automatically return to the ADVANCED SETUP menu You can also hold the SET button to exit to the ADVANCED SETUP menu at any time 8 2...

Страница 30: ...NCED SETUPmenu tap the SET button to navigate to the SETTO DEFAULT function 2 Tap the RUN button The screen will display a message asking you to confirm the reset Tap the RUN button to confirm or tap the SET button to cancel 3 Once the reset has been completed you will be displayed a confirmation message on the screen Press any button to return to the ADVANCED SETUP menu Set to Default ...

Страница 31: ...22 Use this newly erased hard drive to create your Master hard drive 6 Tap the SET button to navigate to the LOAD operation 7 Connect the Storage Center to the Source port 8 Connect the Master hard drive to any Target port 9 Tap the RUN button to execute the Load operation The duplicator will ask you to input the name of the image file you want to create a The file name consists of three digits Th...

Страница 32: ...he amount of available unallocated space on the Target drive s Advanced Resize is enabled Reszie Copy will only resize the last partition to use any remaining unallocated space on the Target drive s 8 7 Set Write Pattern SET WRITE PAT is used to define the data that you want to written to all sectors of your Target drives during an Erase operation Tap the RUN button to change this option s setting...

Страница 33: ...ost Protection Areas When you duplicate a Master HDD that contains HPA the system will detect the HPApartition unlock it copy the area and then re lock the area once duplication is complete Note When you view Device Info see section if the drive info displays an H in the upper right corner then the hard disk contains a hidden Host Protected Area 8 11 No Capacity Check The duplicator has a built in...

Страница 34: ...s completed Tap the RUN button to change this option Enabled default When a copy operation is completed the power to the hard drive connected to the Source port is turned off Disabled When a copy operation is completed the power to the hard drive connected to the Source port remains on until you change copy modes 8 15 Load Full Image The LOAD FULL IMAGE option allows you to control how image files...

Страница 35: ...down to the defined percentage Tap the RUN button to change this option The defined percentage can be 0 1 2 3 4 5 10 20 30 40 50 60 70 80 or 90 The default value is 0 8 18 Most Varied Capacity Note The MOST VAR CAP option configures the way that Smart copy operates see section 3 1 Smart on page 13 When you execute a Smart copy operation the system will check the capacity between all connected Targ...

Страница 36: ...y of the Master by more than 10 then the system will execute a Resize copy The default value is 3 8 20 Format Source The FORMAT SOURCE operation allows you to format a hard drive as a Storage Center Storage Centers can be used to store hard drive images for convenient access to your most commonly used Source files For more information on using a Storage Center see section 5 2 Duplicating From a St...

Страница 37: ...ormat a SATA hard drive as FAT32 3 Copy the firmware file to the hard drive 4 Connect the hard drive to the duplicator s Source port 5 From theADVANCED SETUPmenu tap the SET button to navigate to UPDATE FIRMWARE and then tap the RUN button 6 Once the system has confirmed the firmware file a message will be displayed on the screen asking you to confirm the firmware update Tap the RUN button to proc...

Страница 38: ... stop it 4 Tap the SET button to confirm your selection 5 From the ADVANCED SETUP menu hold the SET button to return to the SETUP menu 6 From the SETUP menu hold the SET button to return to the Main menu 7 Tap the SET button to navigate to the mode that you want to test 8 Tap the RUN button to begin the burn in test 9 Once the operation has completed the screen will display the total execution tim...

Страница 39: ...r B Check Target speed error C Compare error D Data transfer error E ATA command uncorrectable error erase error F Skip read error G ATA command ID not found error read error H Checksum error I ATA secure erase error K Unknown error M No error N No device detected O ATA SMART check error P Power on command error identify UDMA error R ATA read error S Source read error W ATA write error Y PHY off E...

Страница 40: ...acity Q Can drives with different RPM speeds be cloned together A Yes the machine will adjust to hard drives with different RPMs Q How does the duplicator handle multiple partitions on the Master drive A The machine will auto detect how many partitions in the source hard drive and then copy it but you are unable to select a specific partition to copy Q How does the duplicator handle multiple parti...

Страница 41: ...ke sure that no hard drive connection cables are loose The hard drive jumpers are not set in the correct position Make sure that all the hard drive jumpers are set to the Master or Cable Select position The hard drive may be faulty Make sure that the Master hard drive is not broken and does not have errors The hard drive s format is not supported by Brief Copy or Resize Copy When executing a Brief...

Страница 42: ... loss or damage must be made to carrier directly Claims for shipping errors should be reported to Kanguru Solutions within three 3 working days of receipt of merchandise Please refer to the RMA Procedure section of this manual if your duplicator needs servicing Kanguru Solutions does not offer money back returns on its duplicator product lines due to the unique nature of the product All units will...

Страница 43: ...ed or physically damaged STEP ONE Call for a RMA Number 508 376 4245 Duplicators will not be accepted for repair without a valid RMA number RMA numbers are valid for 30 days upon assignment Any return without a valid RMA number will be returned to the customer at their expense STEP TWO Ship and Insure your Duplicator Kanguru Solutions strongly recommends you fully insure the duplicator for shippin...

Страница 44: ...egal terms and conditions available at www kanguru com Please review and agree before use Thank you Kanguru Solutions 1360 Main Street Millis MA 02054 www kanguru com 11 07 14 V1 4 2014 Kanguru Solutions ...

Отзывы:

Похожие инструкции для KCLONE-14HD-SATA