background image

109

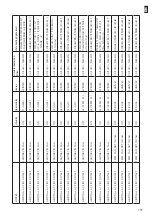
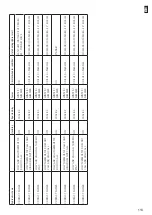
hydraulic scheme

stand-by

stand-by type

season

Hydro insert circulator 

status

Hydro insert status

HEA

TING + SANIT

AR

Y

SANIT

AR

Y DOES NOT CALL

OFF

01 (AMB.)

WINTER

ON IF H2O > P

ARAM.25

RA

TED HEA

T INPUT IF PROBE H2O> SET 

H2O (a) OR IF 

AMB PROBE.

 > 

AIR SET (b)

HEA

TING + SANIT

AR

Y

HEAL

TH CALL

OFF

01 (AMB.)

WINTER

ON IF H2O > P

ARAM.25

RA

TED HEA

T INPUT IF PROBE H2O> 80 ° C

HEA

TING + SANIT

AR

Y

SANIT

AR

Y DOES NOT CALL

ON

01 (AMB.)

WINTER

ON IF H2O > P

ARAM.25

ST

AND-BY IF 

AMB PROBE > SET 

AMB

. (B);


RA

TE

HE

AT

 IN

PU

T SE H2O> SET H2O;

HEA

TING + SANIT

AR

Y

HEAL

TH CALL

ON

01 (AMB.)

WINTER

ON IF H2O > P

ARAM.25

RA

TED HEA

T INPUT IF PROBE H2O> 80 ° C

HEA

TING + SANIT

AR

Y

SANIT

AR

Y DOES NOT CALL

OFF

02 (H2O)

WINTER

ON IF H2O > P

ARAM.25

RA

TED HEA

T INPUT IF PROBE H2O> SET H2O (a)

HEA

TING + SANIT

AR

Y

HEAL

TH CALL

OFF

02 (H2O)

WINTER

ON IF H2O > P

ARAM.25

RA

TED HEA

T INPUT IF PROBE H2O> 80 ° C

HEA

TING + SANIT

AR

Y

SANIT

AR

Y DOES NOT CALL

ON

02 (H2O)

WINTER

ON IF H2O > P

ARAM.25

ST

AND-BY IF PROBE H2O> SET H2O (a)

HEA

TING + SANIT

AR

Y

HEAL

TH CALL

ON

02 (H2O)

WINTER

ON IF H2O > P

ARAM.25

RA

TED HEA

T INPUT IF PROBE H2O> 80 ° C

HEA

TING + SANIT

AR

Y

SANIT

ARIO NON CHIAMA

OFF

03 (TERM. ES.)

WINTER

ON IF H2O > P

ARAM.25

RA

TED HEA

T INPUT IF 

TERM.

 ES

. SA

TISFIED 

OR IF H2O PROBE> SET H2O (a)

HEA

TING + SANIT

AR

Y

HEAL

TH CALL

OFF

03 (TERM. ES.)

WINTER

ON IF H2O > P

ARAM.25

RA

TED HEA

T INPUT SE PROBE H2O> 80 ° C

HEA

TING + SANIT

AR

Y

SANIT

AR

Y DOES NOT CALL

ON

03 (TERM. ES.)

WINTER

ON IF H2O > P

ARAM.25

ST

AND-BY 

TERM.

 ES

. SA

TISFIED;

RA

TED HEA

T INPUT IF H2O> SET H2O;

 (B)

HEA

TING + SANIT

AR

Y

HEAL

TH CALL

ON

03 (TERM. ES.)

WINTER

ON IF H2O > P

ARAM.25

MODULE IF PROBE H2O> 80 ° C

HEA

TING + SANIT

AR

Y

SANIT

AR

Y DOES NOT CALL

OFF

ONL

Y 2 (H2O)

SUMMER

ON IF H2O > P

ARAM.25

ST

AND-BY IF H2O PROBE> SET FORW

ARD 

ST

AND-BY IN (a)

HEA

TING + SANIT

AR

Y

HEAL

TH CALL

OFF

ONL

Y 2 (H2O)

SUMMER

ON IF H2O > P

ARAM.25

RA

TED HEA

T INPUT IF PROBE H2O> 80 ° C

HEA

TING + SANIT

AR

Y

SANIT

AR

Y DOES NOT CALL

ON

ONL

Y 2 (H2O)

SUMMER

ON IF H2O > P

ARAM.25

ST

AND-BY IF PROBE H2O> SET H2O (a)

HEA

TING + SANIT

AR

Y

HEAL

TH CALL

ON

ONL

Y 2 (H2O)

SUMMER

ON IF H2O > P

ARAM.25

RA

TED HEA

T INPUT IF PROBE H2O> 80 ° C

NB:

 By setting the 

“Summer”

 command,

 the Hydr

o insert will go into standby and will only switch back on if ther

e is a sanitary water call.

EN

Содержание Cloe 17B

Страница 1: ...USER MANUAL Cloe 17B Petra 25B Boiler Stove Instructions for the correct use and maintenance of your Kalor wood pellet boiler stove Distribution and warranty in Ireland by...

Страница 2: ...port a nationwide network of Authorised Technicians who are specially trained on Kalor wood pellet stoves and boilers This ensures that your stove can be correctly installed commissioned maintained an...

Страница 3: ...e Fate dunque molta attenzione ed usate le dovute precauzioni soprattutto in presenza di bambini persone anziane disabili e animali Il montaggio deve essere eseguito da persone autorizzate Centro Assi...

Страница 4: ...osservanza parziale o totale delle istruzioni in esso contenute Decliniamo ogni responsabilit derivante dall uso improprio dell Inserto Camino dall uso non corretto da parte dell utilizzatore da modif...

Страница 5: ...ibiancheria o simili devono essere tenuti ad apposita distanza dall Inserto Camino Pericolo di incendio Spiegare con cura che l Inserto Camino costituito da materiale sottoposto ad alte temperature al...

Страница 6: ...atteristiche Tecniche Inserto Camino Idro 17_25 N B 1 Misure con tolleranza di circa 10 mm 2 Le immagini e le misure sono indicative e possono variare in base all estetica dell Inserto Camino 420 C B...

Страница 7: ...9 Tiraggio min max Pa 3 10 3 12 Temperatura fumi min max C 68 8 115 1 82 3 160 6 Contenuto acqua Inserto Camino litri 30 30 Pressione max di lavoro bar 2 5 2 5 Capacit serbatoio pellet Kg 22 22 Diamet...

Страница 8: ...o l Inserto Camino deve essere dimensionato adeguatamente per supportare il peso dello stesso Tra rivestimento ed inserto camino mantenere una distanza minima di 5 cm Tra Inserto Camino e pareti infia...

Страница 9: ...alla base del condotto verticale esterno una ispezione raccordo a T per i controlli periodici e la pulizia che deve essere fatta annualmente Eseguire il raccordo alla canna fumaria a tenuta con raccor...

Страница 10: ...ha dimensioni e forme diverse in funzione dell angolo di inclinazione della copertura per cui risulta necessario adottare le altezze minime Il comignolo dovr essere del tipo antivento e superare l al...

Страница 11: ...serto Camino Collegare il tubo flessibile alla bocca di carico presente sul serbatoio calcolandone la lunghezza utile del tubo con un inclinazione minima di 50 Montare ora la bocca di carico laterale...

Страница 12: ...rare l aria comburente da camere da letto bagni garage o depositi che potrebbero avere atmosfere esplosive Telecomando Mediante il telecomando Fig 3 si ha la possibilit di regolare la temperatura la p...

Страница 13: ...ruttore e del tecnico abilitato che potr utilizzarli solamente dopo aver controllato che l installazione sia in grado di riprodurre le condizioni di laboratorio Consigli d uso Se l installazione dell...

Страница 14: ...llare regolarmente il livello di acqua circolante nel vaso di espansione Il contenuto di acqua nel sistema di ricircolo deve essere mantenuto costante L esperienza pratica dimostra che deve essere eff...

Страница 15: ...assano drasticamente le prestazioni a causa della loro bassissima conduttivit termica acqua dolce 0 12 acqua media 12 20 acqua dura 20 30 acqua molto dura oltre 30 I pellets sono cilindretti di legno...

Страница 16: ...asti e della temperatura scegliere il numero di schema idraulico desiderato Confermare quindi con il tasto SET Per utente finale possibile cambiare il principio di funzionamento dell Inserto Camino in...

Страница 17: ...ipremere il tasto SET Iserire la chiave d accesso e confermarla premendo di nuovo il tasto SET Schiacciando il tasto portarsi al men 09 Ripremere il tasto SET Iserire la chiave d accesso e portarsi al...

Страница 18: ...atura desiderata in ambiente tramite la sonda presente sulla scheda premere il tasto e Per impostare la temperatura desiderata in ambiente tramite la sonda presente sulla scheda premere il tasto Per i...

Страница 19: ...O SANITARIO NON CHIAMA ON 02 H2O INVERNO ON SE H2O PARAM 25 STAND BY SE SONDA H2O SET H2O a RISCALDAMENTO SANITARIO SANITARIO CHIAMA ON 02 H2O INVERNO ON SE H2O PARAM 25 MODULA SE SONDA H2O 80 C RISCA...

Страница 20: ...asto Per impostare la temperatura desiderata in ambiente tramite la sonda presente sulla scheda premere il tasto e Per impostare la temperatura desiderata in ambiente tramite la sonda presente sulla s...

Страница 21: ...SONDA H2O SET H2O a RISCALDAMENTO ACS A CONTATTO SANITARIO IN CHIAMATA ON 02 H2O INVERNO ON SE H2O PARAM 25 MODULA SE SONDA H2O 80 C RISCALDAMENTO ACS A CONTATTO SANITARIO IN CHIAMATA OFF 03 TERM ES...

Страница 22: ...a in ambiente tramite la sonda presente sulla scheda premere il tasto Aumentare o diminuire i gradi con i tasti e c Per impostare la potenza di lavoro premere il tasto e regolarla con i tasti e La ria...

Страница 23: ...AVORO E SE SONDA H2O 80 MODULA PUFFER A CONTATTO TERMOSTATO BASSO NON CHIAMA E ALTO CHIAMA OFF 01 02 03 INVERNO ESTATE ON SE H2O PARAM 25 LAVORO E SE SONDA H2O 80 MODULA PUFFER A CONTATTO TERMOSTATO B...

Страница 24: ...ura desiderata in ambiente tramite la sonda presente sulla scheda premere il tasto c Per impostare la potenza di lavoro premere il tasto e regolarla con i tasti e d Per regolare la temperatura desider...

Страница 25: ...ON 02 H2O INVERNO ON SE H2O SON ACS E SE H2O PR POMPA ON MODULA SE SONDA H2O SET ACS 10 d RISCALDAMENTO ACS A SONDA SONDA ACS SET ACS OFF 03 TERM ES INVERNO ON SE H2O PARAM 25 MODULA SE TERMOSTATO EST...

Страница 26: ...lla parte inferiore del puffer premere il tasto Per impostare la temperatura nella parte superiore del puffer premere il tasto e con i tasti e scegliere i gradi desiderati c Per impostare la potenza d...

Страница 27: ...A H2O 80 FORZA STAND BY PUFFER A 2 SONDE 4 S1 E S2 SET PUFFER OFF 01 02 03 INVERNO ESTATE ON ON SE H2O S1 E S2 E SE H2O PR POMPA ON SONDA H2O 80 MODULA PUFFER A 2 SONDE 4 S1 E S2 SET PUFFER ON 01 02 0...

Страница 28: ...erati scegliere i gradi desiderati scegliere i gradi desiderati c Per impostare la potenza di lavoro premere il tasto Per impostare la temperatura nel puffer acqua tecnica premere il tasto Per imposta...

Страница 29: ...ER BOLLITORE ACS A SONDA SONDA ACS SET ACS E SON DA PUFFER SET PUFFER OFF 01 02 03 INVERNO ON SE H20 5 SONDA PUFFER MODULA PUFFER BOLLITORE ACS A SONDA SONDA ACS SET ACS E SON DA PUFFER SET PUFFER ON...

Страница 30: ...o spegnimento dell Inserto Camino e per uscire dalla programmazione si utilizza per l accensione e o lo spegnimento dell Inserto Camino e per uscire dalla programmazione si utilizzano per regolare la...

Страница 31: ...ivi la candeletta l estrattore fumi e il motore coclea FUOCO PRESENTE In questa fase del processo di accensione l Inserto Camino inizia il caricamento del pellet nel braciere Sono attivi l estrattore...

Страница 32: ...riesce ad accendersi la prima accensione Riempire il serbatoio di pellet Ripetere l accensione ALAR 6 MANCANO PELLET Spegnimento dell Inserto Camino durante la fase di lavoro Riempire il serbatoio di...

Страница 33: ...e 2 scegliere se abilitare o meno il cronotermostato on off che permette la programmazione dell accensione automatica dell Inserto Camino Una volta abilitato disabilitato il cronotermostato premere il...

Страница 34: ...ed prog 2 on off 16 gioved prog 2 on off 17 venerd prog 2 on off 18 sabato prog 2 on off 19 domenica prog 2 on off 20 start program 3 ora 21 stop program 3 ora 22 luned progr 3 on off 23 marted progr...

Страница 35: ...are due fasce di funzionamento delimitate dagli orari impostati secondo la tabella seguente dove l impostazione OFF indica all orologio di ignorare il comando Il programmatore settimanale dispone di 4...

Страница 36: ...TO PROGRAM 4 on off 03 03 37 DOMENICA PROGR 4 on off 08 30 M 3 4 03 STop 1 week end livello di men input dialogo Premere il tasto SET per accedere ai men e premere 5 1 2 PROGRAMMA 1 livello menu selez...

Страница 37: ...llarme Attendere che venga completato il ciclo di raffreddamento pulire il braciere e procedere ad una nuova accensione Questi allarmi ricordano che prima di effettuare un accensione bisogna assicurar...

Страница 38: ...cavo di alimentazione Altri fusibili per la protezione delle schede elettroniche sono situati su quest ultime Motoriduttore se il motoriduttore si ferma l Inserto Camino continua a funzionare fino a q...

Страница 39: ...a di contatto tra i bordi del crogiuolo ed il piano di appoggio sul portacrogiuolo Manutenzione e pulizia Inserto Camino Parti Ogni giorno Ogni 2 3 giorni Ogni settimana Ogni 15 giorni Ogni 30 giorni...

Страница 40: ...rettamente funzionare Messa fuori servizio Nel periodo di non utilizzo l Inserto Camino deve essere scollegato dalla rete elettrica Perunamaggioresicurezza soprattuttoinpresenzadibambini consigliamo d...

Страница 41: ...entilatore fumi Rimuovere le viti di fissaggio ed estrarre il ventilatore fumi per la pulizia dello stesso Eseguire l operazione con la massima delicatezza per non piegare le pale del ventilatore 1 3...

Страница 42: ...e il Centro Assistenza Autorizzato per la pulizia e la manutenzione ordinaria In una combustione regolare la fiamma deve avere una forma affusolata compatta con carattere vivace e con le punte tendenz...

Страница 43: ...sono usurate 5 Temperatura serbatoio acqua troppo elevata 6 Pellet non adeguato 7 Scarso apporto di pellet 8 Camera di combustione sporca 9 Scarico ostruito 10 Motore estrazione fumi in avaria 11 Pre...

Страница 44: ...erificare il motore e il condensatore ed eventualmente sostituirlo 3 Sostituire la scheda elettronica 4 Sostituire il pannello dei comandi Il ventilatore dell aria di convenzione non si ferma mai 1 So...

Страница 45: ...ia all interno 1 Sbloccare il circolatore togliendo il tappo e fare girare l albero con un cacciavite Controllare le connessioni elettriche dello stesso eventualmente sostituirlo 2 Sfiatare i radiator...

Страница 46: ...eguito dell insindacabile decisione da parte dell azienda produttrice in casi particolari 5 L azienda declina ogni responsabilit per eventuali danni che possono direttamente o indirettamente derivare...

Страница 47: ...45 IT Cod 001111 NOTE...

Страница 48: ...46 IT Cod 001111 NOTE...

Страница 49: ...ert door handle sides can reach high tem peratures Therefore pay attention and use the proper precautions above all in the presence of children elderly or disabled persons and animals Assembly must be...

Страница 50: ...for accidents deriving from the partial or total lack of observance of the instructions contained herein We decline every responsibility derived from improper use of the Hydro Insert from incorrect u...

Страница 51: ...ngers and suchlike must be kept a suitable distance from the Hydro Insert Risk of fire Carefully explain that the Hydro Insert is made from material subjected to high temperatures for the elderly the...

Страница 52: ...B 1 Measures with a tolerance of about 10 mm 2 Measures and images are indicative and can vary depending on the aesthetic of the pellet Hydro Insert Technical Specification Hydro Insert 17 25 420 C B...

Страница 53: ...69 5 25 Heated surface mc 300 450 Flue gas flow rate min max Kg s 0 00549 0 0108 0 0045 0 0129 Draft min max Pa 3 10 3 12 Flue gas temperature min max C 68 8 115 1 82 3 160 6 Hydro Insert water litri...

Страница 54: ...h an explosive atmosphere is prohibited The floor of the room where the Hydro Insert is to be installed must be strong enough to take its weight If walls are flammable maintain a minimum distance of 1...

Страница 55: ...must not be used At the bottom of the flue pipe provide an inspection cap to allow periodic checking and cleaning which must be done annually Make a gas tight connection to the flue pipe using pipes...

Страница 56: ...reflux zone This zone has different dimensions and forms according to the angle of inclination of the roof so it is necessary to adopt minimum heights Fig 2 The chimney cap must be a wind proof type...

Страница 57: ...to the loading tank present on the tank calculating the useful length of the pipe with a minimum inclination of 50 Now fit the side loading tank in the coating and connect the hose Pedestal fixing Opt...

Страница 58: ...lever on the side of the same replace the battery observing the correct polarity Fig 4 Fig 3 Fig 4 Fig 3 It is mandatory to have an opening in the brick plasterboard coating to guarantee an adequate...

Страница 59: ...al reset circulation system Directions for use If the installation of the Hydro Insert provides interaction with another existing system complete with a heater gas Hydro Insert gas Hydro Insert oil Hy...

Страница 60: ...the heating season the user must regularly check the circulating water level in the expansion vase The content of water in the system of recirculation must be stable hold Experiences show that the use...

Страница 61: ...ncrustations drastically reduce performance because of their low thermal conductivity freshwater 0 12 water medium 12 20 hard water 20 30 very hard water over 30 The pellets are cylinders of compresse...

Страница 62: ...authorized by the manufacturer Confirm the password using the set key and the key and authorized by the manufacturer Confirm the password using the set key and the key authorized by the manufacturer...

Страница 63: ...by OPERATION BY A SPECIALIZED TECHNICIAN to go to menu 09 Press the SET button again Enter the access key and confirm it by pressing the SET key again Press the to go to menu 09 Press the SET button a...

Страница 64: ...set the desired temperature in the room using the probe on the board press the and To set the desired temperature in the room using the probe on the board press the To set the desired temperature in t...

Страница 65: ...ON 02 H2O WINTER ON IF H2O PARAM 25 RATED HEAT INPUT IF PROBE H2O 80 C HEATING SANITARY SANITARIO NON CHIAMA OFF 03 TERM ES WINTER ON IF H2O PARAM 25 RATED HEAT INPUT IF TERM ES SATISFIED OR IF H2O PR...

Страница 66: ...e degrees with keys Increase or decrease degrees with keys key and adjust it with the and keys The rinsing from the stand by state occurs automatically when a heat increase is required to return to sa...

Страница 67: ...SET H2O a HEATING ACS IN CONTACT SANITARY IN CALL ON 02 H2O WINTER ON IF H2O PARAM 25 RATED HEAT INPUT IF PROBE H2O 80 C HEATING ACS IN CONTACT SANITARY IN CALL OFF 03 TERM ES WINTER ON IF H2O PARAM 2...

Страница 68: ...e desired temperature in the room using the probe on the board press the key Increase or decrease degrees with the and keys c To set the work power press the key and adjust it with the keys and The ri...

Страница 69: ...RAM 25 WORK AND IF H2O PROBE 80 MODULE CONTACT PUFFER LOW THERMOSTAT DOES NOT CALL AND HIGH CALL OFF 01 02 03 WINTER SUMMER ON IF H2O PARAM 25 WORK AND IF H2O PROBE 80 MODULE CONTACT PUFFER LOW AND HI...

Страница 70: ...and To set the desired temperature in the room using the probe on the board press the key To set the desired temperature in the room using the probe on the board press the key keys c To set the work...

Страница 71: ...R ON SE H2O SON ACS AND IF H2O PR PUMP ON RATED HEAT INPUT IF PROBE H2O SET ACS 10 d HEATING DHW WITH PROBE PROBE ACS SET ACS OFF 03 TERM ES WINTER ON SE H2O PARAM 25 RATED HEAT INPUT IF THERMOSTAT EX...

Страница 72: ...the bottom of the puffer press the key Use the key Use the key and use the e keys to select the desired degrees keys to select the desired degrees and B keys to select the desired degrees c To set th...

Страница 73: ...PRO BE 80 STAND BY FORCE 2 SIDE PUFFER 4 S1 E S2 SET PUFFER OFF 01 02 03 WINTER SUMMER ON ON IF H2O S1 AND S2 AND IF H2O PR PUMP ON H2O PROBE 80 RATED HEAT INPUT 2 SIDE PUFFER 4 S1 E S2 SET PUFFER ON...

Страница 74: ...keys to select the desired degrees keys to select the desired degrees c To set the work power press the To set the temperature in the technical water puffer press the To set the temperature in the tec...

Страница 75: ...2O PROBE 80 PUFFER DHW PROBE HYDRO INSERT DHW PROBE DHW SET AND PUFFER PROBE SET PUFFER OFF 01 02 03 WINTER ON IF H20 5 PROBE PUFFER RATED HEAT INPUT PUFFER DHW PROBE HYDRO INSERT DHW PROBE DHW SET AN...

Страница 76: ...Hydro Insert and to exit programming is used to switch on and or off the Hydro Insert and to exit programming are used to adjust temperature for displays and for the programming functions Buttons and...

Страница 77: ...he fume extractor and the cochlea engine are active FIRE PRESENT In this phase of the ignition process the Hydro Insert starts loading the pellets into the brazier The fume extractor and the cochlea e...

Страница 78: ...he Hydro Insert cannot start up This is the first light up Fill in the tank with pellets Start up again ALAR 6 NO PELLET The pellet Hydro Insert switched off while working Fill in the tank with pellet...

Страница 79: ...1 and 2 select whether or not to activate the thermostat on off which allows you to program the automatic ignition of the Hydro Insert Once the thermostat is activated deactivated press button 4 OFF...

Страница 80: ...9 saturday prog 1 on off 10 sunday prog 1 on off 11 start program 2 hour 12 stop program 2 hour 13 monday progr 2 on off 14 tuesday progr 2 on off 15 wednesday prog 2 on off 16 thursday prog 2 on off...

Страница 81: ...es set according to the following table where the OFF setting tells the clock to ignore the command The weekly programmer has 4 independent programmes whose final effect is composed of the combination...

Страница 82: ...ESDAY PROG 1 on off 02 03 07 THURSDAY PROGR 1 on off 02 03 08 FRIDAY PROGRAM 1 on off 02 03 09 SATURDAY PROGR 1 on off 02 03 10 SUNDAY PROGR 1 on off PROGRAMME 2 menu level selection meaning possible...

Страница 83: ...es off Press the key On Off to reset the alarm Wait until the cooling phase is completed Clean the brazier and start a new light up These alarms remind you that the brazier must be cleaned and install...

Страница 84: ...o Insert Other fuses to protect the electronic boards are to be found on the boards themselves Reduction motor if the motor stops the Hydro Insert continues to function until the flame goes out for la...

Страница 85: ...ash Internal parts Flue pipe Circulation pump Hydraulic components Electromechanical components The Hydro Insert requires a simple and thorough cleaning in order to ensure a more efficient performanc...

Страница 86: ...he steel surface If this happens it means that temperatures have been reached that are far above those at which the unit should operate properly Shutting the Hydro insert down In the period when the T...

Страница 87: ...ue gas cleaning Remove the fixing screws and remove the smoke fan for cleaning of the same Perform the task with the greatest care not to bend the fan blades 1 3 Extract the chimney insert using the a...

Страница 88: ...arnings for cleaning All cleaning of all parts must be carried out with the Hydro Insert completely cold and the plug disconnected Before effecting any maintenance operation or cleaning on the Hydro I...

Страница 89: ...replacement of parts with other non original The operations marked in bold type must be carried out by specialised personnel Problems and solutions PROBLEM POSSIBLE CAUSE REMEDY Pellet not being fed...

Страница 90: ...Replace the pressure The Hydro Insert runs for a few minutes and then goes out 1 Lighting cycle not completed 2 Temporary failure of electricity supply 3 Smoke duct obstructed 4 Temperature sensors de...

Страница 91: ...e air in them 1 Free up the circulator by removing the plug and turning the shaft with a screwdriver Check the electrical connections of the same replace if necessary 2 Vent the radiators Hot water in...

Страница 92: ...accidents lightning floods etc for incorrect use and maintenance 2 Complete replacement of the machine can only take place following the unquestionable decision by the manufacturer in special cases 3...

Страница 93: ...137 EN NOTES Cod 001111...

Страница 94: ...138 EN NOTES Cod 001111...

Страница 95: ...evadas Por lo tanto prestar mucha atenci n y tomar las precauciones del caso sobre todo en presencia de ni os personas ancianas discapacitados y animales El montaje debe ser efectuado por personas aut...

Страница 96: ...ualita tivos utilizar s lo pellet de calidad aconsejado por el fabricante Responsabilidad Con la entrega del presente manual declinamos toda responsabilidad tanto civil como penal por incidentes deriv...

Страница 97: ...ualquier tendedero o algo similar deben mantener una distancia adecuada del Inserto Camino Riesgo de incendio Explicar con cuidado de que el Inserto Camino est hecho de material sometido a altas tempe...

Страница 98: ...Caracter sticas T cnicas el Thermocamino 17 25 N B 1 Medidas con una tolerancia de unos 10 mm 2 Im genes y medidas son indicativas y puede variar en funci n de la est tica deI Inserto Camino 420 C B A...

Страница 99: ...5 Superficie calefaltable mc 300 450 Portada humos min m x Kg s 0 00549 0 0108 0 0045 0 0129 Tiro min m x Pa 3 10 3 12 Temperatura humos min m x C 68 8 115 1 82 3 160 6 Capacidad agua Inserto Camino l...

Страница 100: ...ue se instala el Inserto Camino debe presentar dimensiones adecuadas para sostener el peso de la misma Entre el revestimiento y el inserto camino hay que mantener una distancia minima de 5cm Entre ins...

Страница 101: ...fijados a la pared Colocar en la base del conducto vertical externo una inspecci n para su control peri dico y para su limpieza que debe realizarse anualmente Efectuar la conexi n herm tica con el ca...

Страница 102: ...er encontrarse fuera de la zona de reflujo Esta zona tiene diferentes dimensiones y formas dependiendo del ngulo de inclinaci n del tejado de manera que ser necesario adoptar alturas m nimas fig 2 La...

Страница 103: ...Conectar la manguera flexible a la boca de carga presente en la tolba calculando la longitud util de la tuberia con una inclinacion minima de 50 Ahora coloque la boca de carga lateral en el revestimi...

Страница 104: ...el interior de un dormitorio ba o garajes o depositos que puedan tener atmosferas explosivas Mando a distancia Mediante el control remoto Fig 3 que tiene la capacidad de ajustar la temperatura la pote...

Страница 105: ...con el Inserto Camino Instrucciones de uso Si la instalaci n del calentador proporciona una interacci n con otro sistema existente completo con un calentador Inserto Camino de gas Inserto Camino de ga...

Страница 106: ...nserto Camino se ha enfriada hay que hacer el llenado en caso sea necesaria m s agua Estas precauciones tienen como objetivo lo de prevenir la llegada de un estr s t rmico del cuerpo de acero del Inse...

Страница 107: ...nductividad t rmica agua dulce 0 12 medio de agua 12 20 agua dura 20 30 agua muy dura m s de 30 Los pellets son cilindros de madera prensada producidos a partir de residuos de serr n y elaboraci n de...

Страница 108: ...dor del ventilador de humos m 1 0 07 04 2017 P B C TARJETA Q055 TARJETA L023 LADO CALEFACCI N Cn2 P2 P4 F P3 3 V AS LADO SANITARIO N N TURBO OPCIONAL F LIMPIADOR sonda NTC S2 puffer superiore sonda NT...

Страница 109: ...9 Vuelva a pulsar la tecla SET Introduzca la clave de p ngase en el men 09 Vuelva a pulsar la tecla SET Introduzca la clave de vaya al men 9 5 En el visualizador aparecer n las varias modalidades de s...

Страница 110: ...atura deseada en ambiente por medio de la sonda presente en la tarjeta pulse la tecla y Para plantear la temperatura deseada en ambiente por medio de la sonda presente en la tarjeta pulse la tecla Par...

Страница 111: ...IO LLAMA ON 02 H2O INVIERNO ON SI H2O PAR M 25 MODULA SI SONDA H2O 80 C CALEFACCI N SANITARIO SANITARIO NO LLAMA OFF 03 TERM ES INVIERNO ON SI H2O PAR M 25 MODULA SI TERM EJ SATISFACTORIO O SI SONDA H...

Страница 112: ...lse la tecla Para plantear la temperatura deseada en ambiente por medio de la sonda presente en la tarjeta pulse la tecla y Para plantear la temperatura deseada en ambiente por medio de la sonda prese...

Страница 113: ...STAND BY SI SONDA H2O SET H2O a CALEFACCI N ACS DE CONTACTO SANITARIO EN LLAMADA ON 02 H2O INVIERNO ON SI H2O PAR M 25 MODULA SI SONDA H2O 80 C CALEFACCI N ACS DE CONTACTO SANITARIO EN LLAMADA OFF 03...

Страница 114: ...biente por medio de la sonda presente en la tarjeta Aumente o disminuya los grados con las teclas y c Para plantear la potencia de trabajo pulse la tecla y reg lela con las teclas y El reencendido del...

Страница 115: ...R M 25 TRABAJO Y SI SONDA H2O 80 MODULA PUFFER DE CONTACTO EL TERMOSTATO BAJO NO LLA MA EL ALTO LLAMA OFF 01 02 03 INVERNO ESTATE ON SI H2O PAR M 25 TRABAJO Y SI SONDA H2O 80 MODULA PUFFER DE CONTACTO...

Страница 116: ...pulse la tecla y y reg lela con las teclas y d Para regular la potencia de trabajo la temperatura deseada en el interior del dep sito ACS pulse la tecla Aumente o disminuya los grados deseados con las...

Страница 117: ...ET ACS ON 02 H2O INVIERNO ON SI H2O SON ACS Y SI H2O PR BOMBA ON MODULA SI SONDA H2O SET ACS 10 d CALEFACCI N ACS DE SONDA SONDA ACS SET ACS OFF 03 TERM ES INVIERNO ON SI H2O PAR M 25 MODULA SI TERMOS...

Страница 118: ...tecla y con las teclas y escoja los grados deseados c Para plantear la potencia de trabajo pulse la tecla Para plantear la temperatura en la parte inferior del puffer pulse la tecla Para plantear la t...

Страница 119: ...NDA H2O 80 FUERZA STAND BY PUFFER DE 2 SONDAS 4 S1 Y S2 SET PUFFER OFF 01 02 03 INVIERNO VERANO ON ON SI H2O S1 Y S2 Y SI H2O PR BOMBA ON SONDA H2O 80 MODULA PUFFER DE 2 SONDAS 4 S1 Y S2 SET PUFFER ON...

Страница 120: ...ados deseados escoja los grados deseados escoja los grados deseados c Para plantear la potencia de trabajo pulse la tecla Para plantear la temperatura en el puffer de agua t cnica pulse la tecla Para...

Страница 121: ...PUFFER HERVIDOR ACS DE SONDA SONDA ACS SET ACS Y SON DA PUFFER SET PUFFER OFF 01 02 03 INVIERNO ON SE H20 5 SONDA PUFFER MODULA PUFFER HERVIDOR ACS DE SONDA SONDA ACS SET ACS Y SON DA PUFFER SET PUFFE...

Страница 122: ...el apagado del Inserto Camino y para salir de la programaci n Los pulsadores y se utilizan para regular la temperatura para visualizaciones y funciones de programaci n Los pulsadores y se utilizan par...

Страница 123: ...umos y el tornillo sin fin FUEGO PRESENTE En esta fase del proceso de encendido el Inserto Camino comienza la carga del pienso en el brasero Est n activos el extractor de humos y el motor del tornillo...

Страница 124: ...men M 3 1 y con los pulsadores 1 y 2 escoger entre habilitar o no habilitar el cronotermostato on off el cual permite programar el encendido autom tico del Inserto Camino Una vez habilitado deshabilit...

Страница 125: ...2 on off 16 jueves prog 2 on off 17 viernes prog 2 on off 18 s bado prog 2 on off 19 domingo prog 2 on off 20 start program 3 hora 21 stop program 3 hora 22 lunes progr 3 on off 23 martes progr 3 on...

Страница 126: ...on 4 programas independientes cuyo efecto final est formado por la combinaci n de cada una de las 4 programaciones El programador semanal puede activarse o bien desactivarse Por otra parte si se progr...

Страница 127: ...RAM 3 on off 03 03 27 S BADO PROGRAM 3 on off 03 03 28 DOMINGO PROGR 3 on off PROGRAMA 4 nivel men selecci n significado valoresposibles 03 03 29 START PROGRAM 4 hora activaci n hora OFF 03 03 30 STOP...

Страница 128: ...cnica autorizado AL 5 FALLO ENCEND El Inserto Camino no se enciende Es el primer encendido Llenar el dep sito de pellets Encender de nuevo AL 6 NO PELLET Paro de funcionamiento del Inserto Ca mino dur...

Страница 129: ...ON OFF para reponer la alarma Espere que se haya completado el ciclo de enfriado limpie el brasero y proceda a un nuevo encendido Estas alarmas recuerdan que antes de efectuar un encendido es necesar...

Страница 130: ...mo torreductor se detiene la Inserto Camino sigue fun cionando hasta que no se apaga la llama por falta de combustible y hasta alcan zar el nivel m nimo de en friamiento V lvula de ventilaci n autom t...

Страница 131: ...cto entre los bordes de la placa y la superficie de apoyo en el crisol puerta Mantenimiento y limpieza del Inserto Camino Partes Cada d a Cada 2 3 d as Cada semana Cada 15 d as Cada 30 d as Cada 60 90...

Страница 132: ...eraturas muy por encima de las que el producto deber a alcanzar durante su funcionamiento normal Puesta fuera de servicio En el periodo de inactividad del inserto camino sto debe estar desconectado de...

Страница 133: ...ilador de humos Quite los tornillos de fijaci n y extraer el ventilador de humos para la limpieza de la misma Realice la tarea con el mayor cuidado de no doblar las aspas del ventilador 1 3 Extraer el...

Страница 134: ...limpieza y mantenimiento de rutina Notas sobre la limpieza Toda la limpieza de todas las piezas debe realizarse con la termo estufa apagada y desenchufada Antes de realizar cualquier operaci n de man...

Страница 135: ...n de piezas con otros no originales Las operaciones marcadas en negrita deben ser realizadas exclusivamente por personal especializado Fallos y soluciones Las anomal as relacionadas con el mbito mec n...

Страница 136: ...lujo de combustible por la asistencia t cnica 8 Limpiar la c mara de combusti n siguiendo las instrucciones del manual 9 Limpiar el conducto de humos 10 Controlar y si es necesario cambiar el motor 11...

Страница 137: ...ontrolar el panel y cambiarlo si es necesario El Inserto Camino se enciende solo 1 Programaci n incorrecta del termostato programable 1 Compruebe la configuraci n del termostato programable El poder n...

Страница 138: ...n el Inserto Camino 2 Reducir el valor de potencia de funcionamiento El Inserto Camino entra en modulaci n como se alcanza la temperatura establecida en el termostato del Inserto Camino incluso a baja...

Страница 139: ...la decisi n incuestionable del fabricante en casos especiales 3 La Compa a declina toda responsabilidad por cualquier da o que pueda directamente o indirectamente resultar en personas cosas o animale...

Страница 140: ...92 ES Cod 001111 NOTAS...

Страница 141: ...t is very important to understand that any and all warranty claims may be rejected should your stove boiler not be commissioned by one of our Authorised Technicians See below for further details Your...

Страница 142: ...Wood Pellet Stoves ie Newport Co Mayo Ireland Tel 086 012 7744 Email info woodpelletstoves ie Web www woodpelletstoves ie...

Отзывы: