


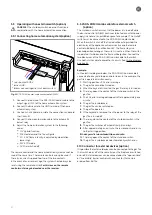


4.3 Check the gas fire and determine the location of
the technical unit
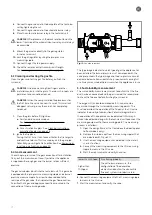
Confirm mechanical operation
Check if all moving parts of the gas fire are functioning correctly,
principally the door, before installing the fireplace.
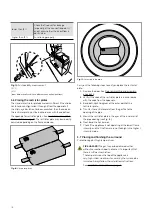
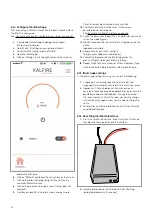
Determine the location of the technical unit
The technical unit must be placed in an accessible location,
preferably in the side wall of the surround. Ensure that the
technical unit is not exposed to direct heat radiation. See:
Installation Instructions on page 8 and Fig. 20: Minimum distance
from the technical unit on page
20.
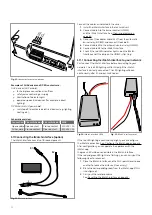
Determine if the technical unit should be temporarily
disconnected from the gas fire for installation purposes. If the
technical unit needs to be disconnected, the following steps
should be observed:
1. Remove the automatic burner relay from the technical unit.
2. Disconnect the earth wire on the automatic burner relay.
3. Unscrew the bolt connected to the earth wire at the rear of
the technical unit.
4. Disconnect the earth wire from the rear of the technical
unit.
5. Remove the ionisation cable (shielded and with a black
cover at the end).
6. Loosen the white plug next to the ionisation cable by
carefully pressing the lock on the plug and gently pulling the
plug forward at the same time.
Disconnect the flexible gas pipe on the side of the fireplace.
Seal the connector and pipeline completely so that no filth
can get in.
9. Disconnect the 24V cable.
10. Disconnect the 12V adaptor (for Kalfire GP appliances).
11. Disconnect the hybrid cable (for Kalfire GP appliances).
12. Disconnect the cable for the NSG valve/cover (for Kalfire
GP appliances).
13
Содержание G Series
Страница 1: ...Installation instructions BALANCED FLUE GAS FIRES DON T COMPROMISE EN...
Страница 2: ......
Страница 4: ...4...
Страница 43: ...1 4 6 7 5 2 3 43...
Страница 45: ...1 3 2 5 4 6 7 8 8 7 45...
Страница 47: ...1 9 4 7 3 8 5 6 2 10 47...
Страница 49: ...5 1 2 3 7 4 6 8 10 9 9 49...
Страница 51: ...4 5 3 6 1 1 51...
Страница 52: ...7 2 7 7 2 2 8 52...
Страница 54: ...4 5 2 1 1 3 54...
Страница 55: ...9 8 6 7 1 55...
Страница 57: ...5 6 7 8 3 2 2 1 57...
Страница 58: ...9 4 4 8 58...
Страница 60: ...5 2 9 6 2 1 4 3 60...
Страница 61: ...7 7 10 11 8 61...
Страница 63: ...1 7 7 3 4 6 2 7 63...
Страница 64: ...2 4 4 5 5 8 64...
Страница 66: ...7 4 5 6 1 8 9 66...
Страница 67: ...3 3 11 2 10 10 12 67...
Страница 69: ...1 2 6 6 8 8 9 7 7 4 With gas type G30 log 4 to be placed at extreme right 3 4 5 11 69...
Страница 72: ...10 2 1 9 11 3 3 4 5 5 7 6 72...
Страница 73: ...13 12 12 12 8 73...
Страница 76: ...3 1 6 5 4 2 13 76...
Страница 77: ...14 7 10 11 8 12 12 Other side Divide 15 cryptonite and 16 ash 77...
Страница 80: ...3 4 5 7 1 3 4 5 6 1 4 5 1 3 4 1 3 2 1 2 3 1 3 1 2 4 5 1 6 2 6 7 14 12 11 11 3 80...
Страница 81: ...3 4 5 7 8 1 3 4 7 9 10 8 3 4 5 6 7 8 1 3 4 5 6 7 8 1 3 4 5 6 7 1 9 10 8 15 13 81...
Страница 84: ...4 3 5 2 3 4 5 1 2 3 4 5 1 1 2 3 4 1 1 2 1 1 1 2 1 1 1 1 1 2 3 4 5 6 6 1 1 1 14 11 84...
Страница 87: ...Wiring diagram for SDS domo cable as shut down switch Fig 32 SDS domo cable shut down switch 87...
Страница 94: ...94...
Страница 95: ...95...
Страница 96: ...Gelo rveldweg 21 5951 DH Belfeld info kalfire nl KALFIRE COM DON T COMPROMISE REF V01 2019 EN...


