RC-BM5
1-8
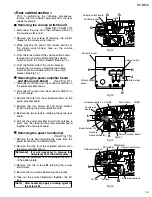
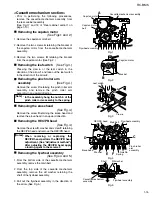
Fig.10
Fig.9
Cassette door
Hook
h
Hook
g
Claw
f
Boss
j
Section
i
Boss
j
Boss
m
Section
n
Boss
p
Spring
Fig.11
Section
i
1
1
2
Section
k
Section
q
Cassette door bracket
Cassette door bracket
Cassette door bracket
Removing the cassette door
(See Fig. 9.)
1.
2.
3.
Open the cassette.
While pressing the claws
f
on the left and right of
the cassette door bracket, slide the cassette door.
Disengage the hooks
g
and
h
on the left and right
of the cassette door bracket, and remove the
cassette door.
Removing the cassette door bracket
(See Figs. 10 and 11.)
1.
2.
3.
While pressing the sections
i
on the left and right of
the cassette door bracket in the direction of the
arrow
1
, remove the cassette door bracket from the
bosses
j
of the front cabinet assembly and then
open the cassette door bracket in the direction of
the arrow
2
.
Press the section
k
of the cassette door bracket
and remove the cassette door bracket from the
boss
m
of the front cabinet assembly.
Disengage the section
n
of the cassette door
bracket from the boss
p
of the front cabinet
assembly and remove the cassette door bracket.
[Note]
Be sure to hang the spring to the
section q before attaching the cassette
door bracket.
Содержание RC-BM5
Страница 41: ...RC BM5 2 1 A B C D E F G 1 2 3 4 5 Block diagram ...
Страница 48: ...RC BM5 2 8 RC BM5 H A B C D E F G 1 2 3 4 5 Printed circuit boards Main board Reverse side ...
Страница 49: ...RC BM5 2 9 A B C 1 2 3 4 5 Tuner board Cassette board Reverse side Reverse side ...
Страница 50: ...RC BM5 2 10 A B C D 1 2 3 4 5 Display board Reverse side Power amplifier board Reverse side ...
Страница 51: ...RC BM5 2 11 A B C 1 2 3 4 5 Volume switch board Reverse side Phone jack board Reverse side ...

