background image

56

ENGLISH

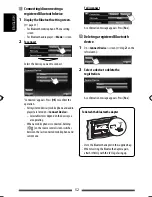
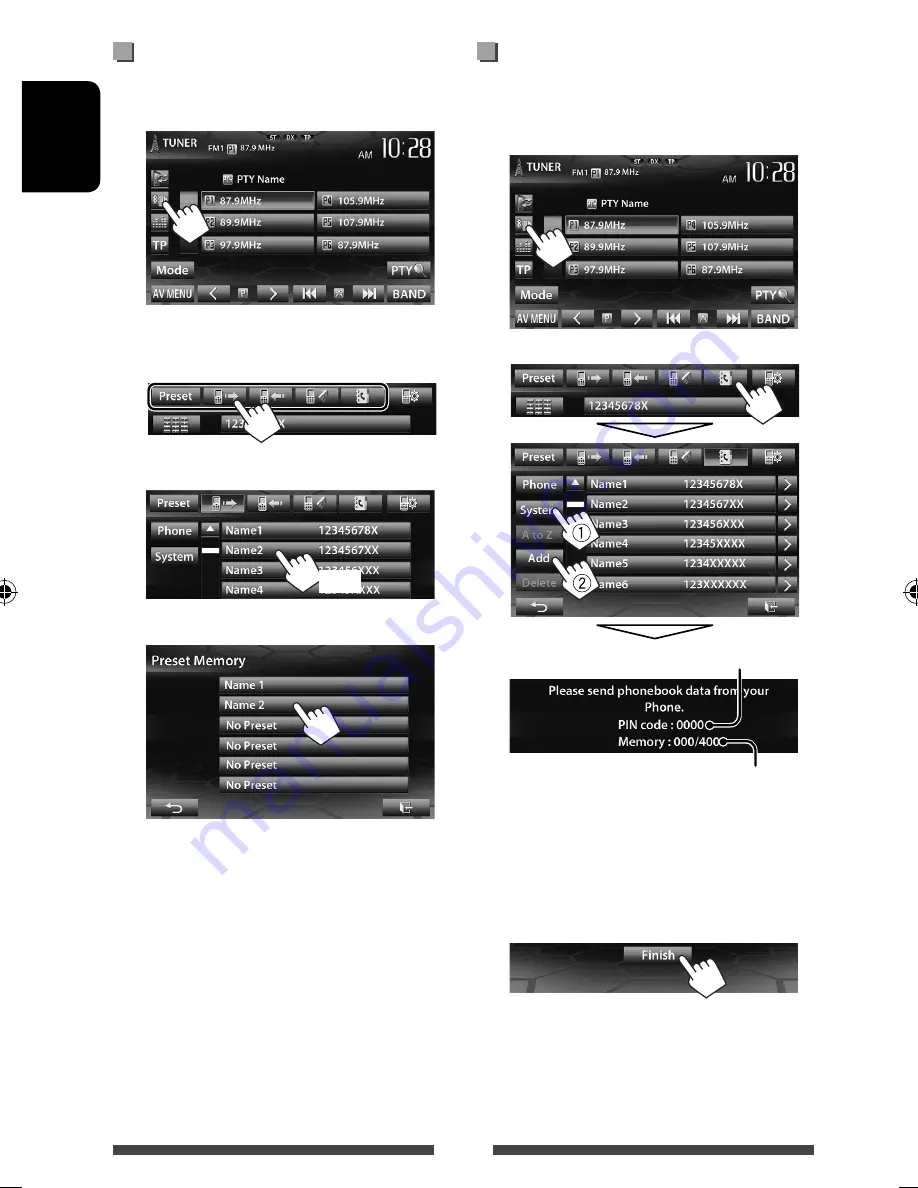
 Presetting the phone numbers

You can preset up to 6 phone numbers.

1


On the source control screen:

2

  Select an item from phone book/call 

lists.

3

  Select a phone number.

(Hold)

4

  Select a preset number to store.

•  You can also preset a phone number entered on the 

direct number entry screen by pressing [

Save

]. (


page 54)

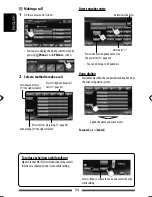
 Copying the phone book

You can copy the phone book memory of a mobile 
phone into the unit (up to 400 entries).

1


On the source control screen:

2


Numbers of the phone book entries copied

PIN code (initial: 0000)

3

  Operate the target mobile phone.

•  Refer to the instruction manual supplied with 

your mobile phone.

• 

To cancel the transfer,

 press [

Finish

].

4

  Finish the procedure.

The phone book memory is copied from the 
mobile phone.

EN_KW-NSX1[J].indb   56

EN_KW-NSX1[J].indb   56

12/04/23   16:23

12/04/23   16:23

Содержание KS-NSX1

Страница 1: ...ts se référer au manuel séparé INSTRUCTIONS MANUAL DE INSTRUCCIONES MANUEL D INSTRUCTIONS LVT2355 001A J MONITOR WITH DVD RECEIVER MONITOR CON RECEPTOR DE DVD MONITEUR AVEC RÉCEPTEUR DVD For customer Use Enter below the Model No and Serial No which are located on the top or bottom of the cabinet Retain this information for future reference Model No Serial No Consists of KW HUNSX1 Main unit and KS ...

Страница 2: ...ns may cause harmful interference to radio communications However there is no guarantee that interference will not occur in a particular installation If this equipment does cause harmful interference to radio or television reception which can be determined by turning the equipment off and on the user is encouraged to try to correct the interference by one or more of the following measures Reorient...

Страница 3: ...y Pictures may not be synchronized with the sound or picture quality may decline in such environments For safety Do not raise the volume level too much as this will make driving dangerous by blocking outside sounds and may cause hearing loss Stop the car before performing any complicated operations How to read this manual This manual mainly explains operations using the buttons on the monitor pane...

Страница 4: ...yback operations for Head mode 28 iPod iPhone playback operations for iPod Out mode 29 Using an App of iPod touch iPhone 30 PANDORA internet radio operations 32 Using other external components 34 Front AUX 34 AV IN 34 Using the smartphone 35 Sound adjustment 38 Using the sound equalization 38 Adjusting the crossover frequency 39 Changing display design 40 Setting for video playback 42 Adjusting th...

Страница 5: ... detaching the monitor panel page 9 1 2 3 Soft case supplied Cautions Hold the monitor panel securely so as not to drop it accidentally Fit the monitor panel onto the attaching plate until it is firmly locked Detaching attachingthemonitorpanel INTRODUCTIONS ...

Страница 6: ...me setting Digital devices CD USB iPod produce very little noise compared with other sources Lower the volume before playing these digital sources to avoid damaging the speakers by sudden increase of the output level Componentnamesandfunctions 5 VOLUME ATT knob page 9 Attenuates the sound Press Adjusts the audio volume Turn 6 Remote sensor 7 Reset button Resets the unit page 3 8 AUX input jack 9 D...

Страница 7: ...formation page 47 AV Input Select an external component to play page 46 Camera Input Select On when connecting the rear view camera page 47 Display Design Select the background and the colors of the text touch panel buttons and the monitor panel buttons page 40 Demonstration Activate or deactivate the display demonstration page 46 2 Finish the procedure AV Menu screen is displayed AV Off is select...

Страница 8: ...creen On the source control screen 2 Display Settings screen 3 4 Set the clock time To synchronize the clock time with FM RBDS To set the clock manually 1 Select the time display format 2 Adjust the hour 3 Adjust the minute 5 Finish the procedure ...

Страница 9: ... the volume by moving your finger on the touch panel as illustrated Increase Decrease To attenuate the sound The ATT indicator lights up To cancel the attenuation press theVOLUME ATT knob Commonoperations Turning off the screen Hold The screen is turned off You can also turn off the screen on AV Menu screen To turn on the screen or Touch the screen to display AV Menu screen ...

Страница 10: ...eo control menu B Source control screen for video playback The operation buttons disappear by touching the screen or when no operation is done for about 10 seconds Notavailableforvideofromanexternalcomponent Draggingyourfingertoleftorrightfunctionsinthe samewayastouching Turning on off the AV source You can activate the AV function by selecting source on AV Menu screen To turn off the AV source AV...

Страница 11: ...heBluetoothdevice page50 Common operating buttons 1 Displays the screen of connected smartphone page 36 2 Displays the screen of App from connected iPod touch iPhone page 30 3 Displays the phone control screen Press Switches to the last connected mobile phone Hold page 52 Displays the sound adjustment screen page 38 TP Activates DeactivatesTA standby reception mode page 16 Select an item to displa...

Страница 12: ...ORA internet radio broadcast Bluetooth page 58 Plays a Bluetooth audio player AV IN 1 page 34 Switches to an external component connected to LINE IN VIDEO IN jacks on the rear panel Apps 2 page 30 Switches to the screen of App from the connected iPod touch iPhone Front AUX page 34 Switches to an external component connected to AUX input terminal on the monitor panel AV Off page 10 Turns off the AV...

Страница 13: ...earch mode page 16 BAND Selects the band 4 Searches for a station Auto search Press Manual search Hold Selects a preset station Mode Displays tuner setting screen pages 14 15 AV MENU Displays AV Menu screen Band Preset no Preset list ST MO indicator page 16 The station frequency currently tuned in PS station name for FM RBDS when PS signal is coming in Displaying the information of the current sta...

Страница 14: ... signals LO DX Local Distance extreme 1 2 Local Select this to tune in only to stations with sufficient signal strength The LO indicator lights up DX Deactivate the function The DX indicator lights up When the FM reception is interfered 1 2 Auto Increases the tuner selectivity to reduce interference noises between adjacent stations Stereo effect may be lost Wide Subject to the interference from ad...

Страница 15: ...preset page 13 2 Select a preset number Hold The station selected in step 1is stored Changing the tuner channel interval Tuner channel interval changes depending on the area you use this unit 1 2 US Select this when using in North Central South America FM AM intervals are set to 200 kHz 10 kHz Europe Select this when using in any other areas FM AM intervals are set to 50 kHz 9 kHz SA Select this w...

Страница 16: ...memorized The next time the unit switches toTraffic Announcement the volume is set to the previous level The following features are available only for FM RBDS stations Searching for FM RBDS program PTY Search You can search for your favorite programs being broadcast by selecting the PTY code for your favorite programs 1 2 Select a PTY code Changes the page Hold PTY Search starts If there is a stat...

Страница 17: ...tion repeat the same procedure to select Eject OK Discoperations Playing a disc If a disc does not have any disc menu all tracks on it will be played repeatedly until you change the source or eject the disc Inserting a disc Label side The source changes to DISC and playback starts The DISC IN indicator lights up while a disc is inserted If appears on the screen the unit cannot accept the operation...

Страница 18: ...itable CD R RW ISO 9660 level 1 level 2 Romeo Joliet CD DA VCD Video CD DivX MPEG1 MPEG2 JPEG MP3 WMA WAV MPEG4 AAC 1 IfyouinsertaDVDVideodiscofanincorrectRegionCode RegionCodeError appearsonthescreen 2 DVD Rrecordedinmulti borderformatisalsoplayable exceptforduallayerdiscs DVD RWduallayerdiscsarenot playable 3 Itispossibletoplaybackfinalized R RW Videoformatonly discs DVD isselectedasitsdisctypew...

Страница 19: ...no Playback mode page 22 DISC IN indicator 7 2 Stops playback 3 Displays folder track list page 20 4 Selects playback mode page 22 6 Starts pauses playback 4 5 Selects chapter track Press Reverse forward search 6 Hold 5 7 Selects title DVD program or playlist DVD VR folder DivX MPEG1 MPEG2 JPEG 1 Mode 7 Changes the settings for disc playback page 23 AV MENU Displays AV Menu screen 1 TodisplaytheOr...

Страница 20: ...per layer For CD MP3 WMA WAV DISC IN indicator Media type Audio format Playback status 3 play 8 pause Playing time MP3 WMA WAV Folder no Track no CD Track no Playback mode page 22 Track file information Touching an information bar scrolls the text if not all of the text is shown While playing the jacket picture is shown if the file has the tag data including the jacket picture 1 Displays folder tr...

Страница 21: ...the subtitle type Selects view angle Menu Displays the disc menu DVD playlist DVD VR Top Menu Displays the disc menu DVD original program DVD VR Displays the menu playlist original program scene selecting screen below Switches to the direct menu selection mode Touch the target item to select To exit from the menu selecting screen press Touching any position other than operation buttons displays th...

Страница 22: ...ct a track number Selecting playback mode For DVD DVD VR Selects Repeat playback mode ForVCD without PBC CD DivX MPEG1 MPEG2 MP3 WMA WAV Selects Repeat playback mode Selects Random playback mode Youcannotactivatetherepeatmodeandtherandom modeatthesametime Each time you press the button the playback mode changes The corresponding indicator lights up Available items differ depending on the types of ...

Страница 23: ... the dynamic range while playing Dolby Digital software Off Select this to enjoy a powerful sound at a low volume level with its full dynamic range On Select this to reduce the dynamic range a little Dialog Select this to reproduce the movie dialog more clearly For discs except VCD CD MonitorType Select the monitor type to watch a wide screen picture on the external monitor 16 9 4 3 LB Letterbox 4...

Страница 24: ...e used with the unit Do not use a USB device with 2 or more partitions Depending on the shape of the USB devices and connection ports some USB devices may not be attached properly or the connection might be loose This unit cannot recognize a USB device whose rating is other than 5V and exceeds 1 A This unit may not recognize a memory card inserted into the USB card reader Connect only one USB devi...

Страница 25: ... format MPEG JPEG Displays folder track list page 20 Selects repeat playback mode 1 2 SONGS Repeats current track FOLDER Repeats all tracks of the current folder Selects random playback mode 1 2 FOLDER Randomly plays all tracks of the folder ALL Randomly plays all tracks Switches between the internal and external memory source of the connected device such as mobile phone 6 Starts pauses playback 4...

Страница 26: ...he rear of the unit To watch video and listen to music USB Audio andVideo cable for iPod iPhone KS U30 separately purchased Installation Connection Manual Caution Video is not displayed on the screen if connected with any cable other than KS U30 ListeningtotheiPod iPhonedevice Preparation To use App of iPod touch iPhone such as MotionX GPS Drive page 30 To listen to PANDORA internet radio page 32 ...

Страница 27: ...age 26 iPod Out isavailableonlyforthefollowingiPod iPhonemodels iPodnano 6thGeneration iPodtouch 4thGeneration iPodtouch 3rdGeneration iPodtouch 2ndGeneration iPhone4S iPhone4 iPhone3GS iPhone3G Selecting preference settings for iPod iPhone playback When the source is iPod 1 2 Audiobooks Select the speed of audio books Artwork Shows hides the iPod artwork Notice When operating an iPod iPhone some ...

Страница 28: ...use Playback mode below While playing Artwork the picture displayed on the screen of iPod iPhone is shown if the song contains the Artwork page 27 Displays the Music Video menu on the iPod iPhone page 29 Selects Repeat playback mode 1 SONGS Functions the same as Repeat One Selects Random playback mode 1 SONGS Functions the same as Shuffle Songs ALBUMS Functions the same as Shuffle Albums 6 Starts ...

Страница 29: ...d iPhone Youcanswitchtothetopofthecategorybypressing thecorrespondingtab Playlist Artist Albums orSongs iPod iPhone playback operations for iPod Out mode Connect the iPod touch iPhone using KS U30 separately purchased Installation Connection Manual Select iPod for AVInput setting page26 Make sure to select iPod Out for iPod Control page 27 Select iPod as the source page 12 Selecting a track from t...

Страница 30: ... the source On AV Menu screen You can also play back the audio video using iPod iPhone itself instead of the unit You can operate for basic playback on the touch panel Audio Video When using MotionX GPS Drive operating buttons and information are not shown You can perform the operations on the touch panel such as scrolling the map Using an App of iPod touch iPhone You can use an App of the connect...

Страница 31: ...and button is shown on the source control screen You can display the screen of App by pressing either button right column When Input is set to iPhone AV Input setting is automatically changed and fixed to iPod To deactivate select Off for Input To view the screen of App On AV Menu screen or On source control screen To cancel the screen of App ...

Страница 32: ...time Song information Touching an information bar scrolls the text if not all of the text is shown Playback status 3 play 8 pause The picture data is displayed if available from the current content DisplaystheStationList page33 Registers the current song as favorite Thumbs down to the current song and skips to the next song Bookmarks the artist Bookmarks the current song 6 Starts pauses playback S...

Страница 33: ...a third party service the specifications are subject to change without prior notice Accordingly compatibility may be impaired or some or all of the services may become unavailable Some functions of Pandora cannot be operated from this unit For issues using the application please contact Pandora at pandora support pandora com Selecting station from the Station List Changes the page Appears when Qui...

Страница 34: ...ion To change settings for video playback page 42 Mode Changes the AV IN name Press 2 or 3 to select an AV IN name AV MENU Displays AV Menu screen Appearswhen AV IN isselectedasthesource You can connect an external component to the LINE IN VIDEO IN jacks Installation Connection Manual Preparation Select AV IN for AV Input setting page 46 AV Input setting can be changed only when Input setting in N...

Страница 35: ...tphone that is compatible with this unit the application s Home screen will appear on the touch panel screen MirrorLink will be unavailable if you start another application on the smartphone while the Car Mode application is used To use the Car Mode application in MirrorLink again remove and insert the USB cable connected to the smartphone Activating MirrorLink 1 Connect your smartphone to the SMA...

Страница 36: ...by pressing either button right column To deactivate select Off for Input To view the smartphone screen On AV Menu screen or On source control screen When the navigation application is active on the smartphone voice guidance is not available To listen to the voice guidance select Smartphone as the source While the smartphone screen is displayed the touch panel operations are available only for sma...

Страница 37: ...pdate data Reset button LED 3 Press the reset button of the SMARTPHONE ADAPTER unit The update is completed successfully when the green LED lights up It takes approximately 30 seconds If the update fails the red LED lights up 4 Remove the SD or SDHC card 5 Place the SD cover over the slot 6 Press the reset button of the SMARTPHONE ADAPTER unit 7 Display the firmware information screen to confirm t...

Страница 38: ...e level of each band 1 then select the subwoofer level 2 The adjustments are stored and User is activated To finish the procedure press To make precise adjustments page 39 Using the sound equalization The adjustment is memorized for each source until you adjust the sound again If the source is a disc the adjustment is stored for each of the following categories DVD DVD VR VCD CD DivX MPEG1 MPEG2 M...

Страница 39: ...issetto Through Adjusting the sound precisely 1 Perform steps 1and 2of Selecting a preset sound mode then 2 Select a band 3 Adjust the sound Reset Changes level of Low Mid High to 0 Freq Selects frequency Q Adjusts the width of the frequency 1 Bass Activates deactivates bass 2 SW Level Adjusts subwoofer level The adjustments are overwritten if User setting has been made page 38 and User is activat...

Страница 40: ...design You can change the background the color of text touch panel buttons and monitor panel buttons 2 Select adjust the color User color adjuster You can make your own color adjustment and store it to User Dimmer setting You can make selections for each dimmer setting Dimmer On or Dimmer Off Color palette Text Buttons Select adjust the color For details above Variable color illumination Illuminat...

Страница 41: ...ctual scene 1 Play back a video or JPEG 2 Display Display Design screen page 40 3 4 Adjust the image 6 1 Starts pauses playback E 1 Advances scenes frame by frame 3 Magnifies the scene Full Zoom1 Zoom3 5 2 3 2 Moves the zooming frame To cancel the capture press 1 Notdisplayedwhenplayinganexternal componentconnectedtoLINEIN VIDEOINjacks 2 Notdisplayedwhen Full isselected 5 Capture the image display...

Страница 42: ...he picture You can adjust the picture quality 1 Display the adjustment menu 2 Select Dimmer On or Off 3 Adjust the picture 15 to 15 Adjusts the brightness Adjusts the contrast Adjusts the tint Adjusts the color Adjusts the blackness Adjusts the detail Adjustableonlywhentheincomingsignalis NTSC ...

Страница 43: ... Aspect ratio is automatically selected to match to the incoming signals WhileDivXisplayedbackwith MonitorType setto 16 9 page23 theaspectratioisnotset correctly Zooming the picture You can zoom the picture Full Zoom1 to Zoom3 When Aspect is set to Panorama or Auto the left column the picture is zoomed with the aspect ratio of the Full setting 1 2 5 2 3 Moves the zooming frame Notdisplayedwhen Ful...

Страница 44: ... erase the caution message touch the screen Usingarearviewcamera To use a rear view camera the REVERSE GEAR SIGNAL lead connection is required For connecting a rear view camera Installation Connection Manual To display the picture from the rear view camera manually On AV Menu screen When displaying the picture from the rear view camera manually you can change the setting of the picture page 42 To ...

Страница 45: ...h source page 38 Flat Natural Dynamic Vocal Boost Bass Boost Vibrant User Loudness You can activate deactivate loudness On Off Boost low and high frequencies to produce a well balanced sound at a low volume level Cancels Crossover Adjust the crossover frequency page 39 Volume Adjust Adjust and store the auto adjustment volume level for each source For discs the adjustment is stored for each of the...

Страница 46: ...text regardless of this setting GUI Adjust Adjust the brightness and blackness of the screen Press Enter to display the setting screen select Dimmer On Off then change the following settings Brightness Black Adjusts brightness 15 to 15 Initial 00 for Dimmer On 15 for Dimmer Off Adjusts blackness 15 to 15 Initial 00 NTSC PAL Select the color system of the external monitor NTSC PAL Input AV Input 1 ...

Страница 47: ...e used for displaying operation buttons and menu items Time Set Adjust the clock time page 8 Beep On Off Activates the key touch tone Cancels User Profile You can memorize recall or clear the settings you have made page 48 Touch Panel Adjust Adjust the touch position of the buttons on the screen page 49 Initialize Initialize all settings you have made Hold Enter to initialize the settings After in...

Страница 48: ...nfirmation message appears Press Yes 2 Finish the procedure Clearing your settings 1 On User Profile screen step 2on the left column 2 Clears all settings memorized in User1 User2 and User3 A confirmation message appears Press Yes 3 Finish the procedure Memorizing recalling the settings You can memorize the following settings Settings on Settings screen Fader Balance Equalizer Loudness Crossover H...

Страница 49: ...s failed turn the power off and then on and retry the update Even if you have turned off the power during the update you can restart the update after the power is turned on The update will be performed from the beginning Adjusting the touch position You can adjust the touch position on the touch panel if the position touched and the operation performed do not match 1 On Settings screen 2 Touch the...

Страница 50: ...tooth profile This unit supports the following Bluetooth profiles HFP Hands Free Profile 1 5 OPP Object Push Profile 1 1 A2DP Advanced Audio Distribution Profile 1 2 AVRCP Audio Video Remote Control Profile 1 3 PBAP Phone Book Access Profile 1 0 Icons for Bluetooth button No device is connected A Bluetooth audio player is connected A Bluetooth mobile phone is connected Both a Bluetooth mobile phon...

Страница 51: ...or Bluetooth phone and one for Bluetooth audio can be connected at a time To use the Bluetooth function you need to turn on Bluetooth function of the device 1 Display the Bluetooth setting screen On AV Menu screen Mobile phone Audio player For connecting a Bluetooth mobile phone The phone setting screen is displayed For connecting a Bluetooth audio player Mode screen is displayed Connecting Blueto...

Страница 52: ...ctable items depend on the device you are operating When a mobile phone is connected holding on the source control screen switches between the last connected mobile phone and current one To disconnect A confirmation message appears Press Yes Deleting a registered Bluetooth device 1 On Connect Device screen Step 2on the left column 2 Select a device to delete the registration A confirmation message...

Страница 53: ... This adjustment does not affect the volume level of the other sources To adjust the volume of calls earpiece turn the volume adjustment knob Switching between handsfree mode and phone mode While talking Each time you press the button the talking method is switched handsfree mode phone mode Checking SMS reception If the mobile phone is compatible with SMS Short Message Service the unit tells you a...

Страница 54: ... pressing Phone on AV Menu screen 2 Select a method to make a call Preset list For presetting page 56 Direct number entry the right column Voice dialing the right column Preset list phone book call lists page 55 Direct number entry Hold Adds Presets the entered phone number on the preset list page 56 Deletes last character You can enter up to 32 numbers Voice dialing Available only when the connec...

Страница 55: ...h on phone book When phone book list screen is displayed you can search by initial 1 2 Select the initial Displays the other letters 3 Select a phone number from the list To display the details of an entry When phone book list screen is displayed you can display the details of an entry and select a phone number if several phone numbers are registered 1 Display the details of the desired entry 2 Se...

Страница 56: ...direct number entry screen by pressing Save page 54 Copying the phone book You can copy the phone book memory of a mobile phone into the unit up to 400 entries 1 On the source control screen 2 Numbers of the phone book entries copied PIN code initial 0000 3 Operate the target mobile phone Refer to the instruction manual supplied with your mobile phone To cancel the transfer press Finish 4 Finish t...

Страница 57: ...ected list A confirmation message appears Press Yes About mobile phones compatible with Phone Book Access Profile PBAP If your mobile phone supports PBAP the phone book and call lists are automatically copied to the unit when the mobile phone is connected Phone book up to 5 000 entries Dialled calls received calls and missed calls up to 50 entries each To display the phone book call lists of the m...

Страница 58: ... play 8 pause 1 Track no Playing time 1 Playback mode 1 below page 50 The operation buttons indications and information displayed on the screen differ depending on the connected device 8 Pauses playback Selects Repeat playback mode 1 2 Selects Random playback mode 1 2 3 Starts playback 4 Selects track Press Reverse forward search Hold Mode Displays the Bluetooth setting screen page 59 AV MENU Disp...

Страница 59: ...ration of Bluetooth devices and memory of the preset list and call lists Auto Answer 1 On Off The unit answers the incoming calls automatically The unit does not answer the calls automatically Answer the calls manually SMS Notify 1 On Off The unit informs you of the arrival of a message by ringing and displaying Receiving Message The unit does not inform you of the arrival of a message Ring Mode 1...

Страница 60: ...for stations automatically Searches for stations manually Hold Selects track Reverse search forward search Hold If the effectiveness of the remote controller decreases replace the batteries Before using the remote controller Aim the remote controller directly at the remote sensor on the unit DO NOT expose the remote sensor to bright light direct sunlight or artificial lighting The unit is equipped...

Страница 61: ...ch panel page 43 RETURN Returns to the previous screen TOP M page 62 DVD Video Shows the disc menu DVD VR Shows the Original Program screen VCD Resumes PBC playback MENU page 62 DVD Video Shows the disc menu DVD VR Shows the Playlist screen VCD Resumes PBC playback fi DVD Video Makes selection settings DivX Skips back or forward by about 5 minutes Button Operations ENT Confirms selection OSD Does n...

Страница 62: ...ress DIRECT while holding SHIFT 3 Press a number button while holding SHIFT to select a desired track 4 Press ENT to confirm the selection To resume PBC pressTOP M or MENU Searching for an item directly Tuner frequency 1 Press DIRECT while holding SHIFT to enter the search mode 2 Press number buttons while holding SHIFT to enter a frequency To erase a misentry press CLR clear while holding SHIFT 3...

Страница 63: ...se press down the center holder of the case and lift the disc out holding it by the edges Always hold the disc by the edges Do not touch its recording surface When storing a disc in its case gently insert the disc around the center holder with the printed surface facing up Make sure to store discs in their cases after use Connectors Center holder To keep discs clean A dirty disc may not play corre...

Страница 64: ...layback Playing DivX files for discs only This unit can play back DivX files with the extension code divx div or avi regardless of the letter case upper lower Audio stream should conform to MP3 or Dolby Digital The file encoded in the interlaced scanning mode may not be played back correctly The maximum bit rate for video signals average is 4 Mbps Playing MPEG1 MPEG2 files This unit can play back ...

Страница 65: ...uru TG Tajik BG Bulgarian IK Inupiak NE Nepali TH Thai BH Bihari IN Indonesian NO Norwegian TI Tigrinya BI Bislama IS Icelandic OC Occitan TK Turkmen BN Bengali Bangla IW Hebrew OM Afan Oromo TL Tagalog BO Tibetan JA Japanese OR Oriya TN Setswana BR Breton JI Yiddish PA Panjabi TO Tonga CA Catalan JW Javanese PL Polish TR Turkish CO Corsican KA Georgian PS Pashto Pushto TS Tsonga CS Czech KK Kazak...

Страница 66: ...ouch are trademarks of Apple Inc registered in the U S and other countries This item incorporates copy protection technology that is protected by U S patents and other intellectual property rights of Rovi Corporation Reverse engineering and disassembly are prohibited Font for this product is designed by Ricoh The Bluetooth word mark and logos are owned by the Bluetooth SIG Inc and any use of such ...

Страница 67: ...e is compatible with this unit page 26 USB Device Error The USB power voltage is abnormal Turn off and turn on the unit Connect another USB device No BT Dongle Bluetooth adapter KS UBT1 is removed Connection Error The device is registered but the connection has failed Connect the registered device page 52 PleaseWait The unit is preparing to use the Bluetooth function If the message does not disapp...

Страница 68: ...dable Rewritable discs cannot be played back Tracks on the Recordable Rewritable discs cannot be skipped Insert a finalized disc Finalize the discs with the component which you used for recording Playback does not start The format of files is not supported by the unit No picture appears on the external monitor Connect the video cord correctly Select the correct input on the external monitor DivX M...

Страница 69: ...lizer either on this unit or the iPod iPhone A lot of noise is generated Turn off uncheck VoiceOver of the iPod For details visit http www apple com No operations are available when playing back a track containing Artwork Operate the unit after the Artwork is loaded page 28 Sound does not synchronize with the video Select iPod for AV Input page 46 Videos cannot be played No sound of videos come ou...

Страница 70: ...layer supports AVRCP AudioVideo Remote Control Profile Bluetooth device does not detect the unit Check whether the Bluetooth adapter KS UBT1 is inserted correctly Search from the Bluetooth device again When Waiting for connection appears on the screen press Cancel then connect a Bluetooth device The unit does not make pairing with the Bluetooth device Enter the same PIN code for both the unit and ...

Страница 71: ...Channel interval 50 kHz 87 5 MHz to 108 0 MHz AM 530 kHz to 1 700 kHz FMTuner Usable Sensitivity 9 3 dBf 0 8 μV 75 Ω 50 dB Quieting Sensitivity 16 3 dBf 1 8 μV 75 Ω Alternate Channel Selectivity 65 dB 400 kHz Frequency Response 40 Hz to 15 000 Hz Stereo Separation 40 dB AMTuner Sensitivity Selectivity 20 μV 40 dB DVD CD Signal Detection System Non contact optical pickup semiconductor laser Frequen...

Страница 72: ...eratingTemperature 0 C to 40 C 32 F to 104 F Dimensions W H D Installation Size approx 182 mm 111 mm 160 mm 7 3 16 4 3 8 6 5 16 Panel Size approx 188 mm 117 mm 10 mm 7 7 16 4 5 8 7 16 Mass approx 2 3 kg 5 1 lbs including theTrim plate and Sleeve KS NSX1 SMARTPHONE ADAPTER unit USB USB Standards USB 2 0 Hi Speed DataTransfer Rate Hi Speed Maximum 480 Mbps Compatible Device CDC NCM Subclass MirrorLi...

Страница 73: ...N EN SP FR 2012 JVC KENWOOD Corporation Having TROUBLE with operation Please reset your unit Refer to page of How to reset your unit Still having trouble USA ONLY Call 1 800 252 5722 http www jvc com We can help you ...

Страница 74: ...nto se encuentra conectado al sistema del freno de estacionamiento incorporado al automóvil Para evitar cortocircuitos recomendamos que desconecte el terminal negativo de la batería y que efectúe todas las conexiones eléctricas antes de instalar la unidad Asegúrese de volver a conectar a masa esta unidad al chasis del automóvil después de la instalación Asegúrese de que ningún cable quede atrapado...

Страница 75: ...provocar flojedad de o daños a las piezas Al apretar los tornillos o los pernos asegúrese de que ningún cable de conexión quede pillado Al efectuar la instalación asegúrese de no bloquear el ventilador del panel trasero a fin de mantener una ventilación correcta Instalación de la unidad sin utilizar la cubierta Utilice tornillos de cabeza plana o esférica dependiendo del lugar de instalación Si de...

Страница 76: ...ions DO NOT connect the speaker leads of the power cord A to the car battery otherwise the unit will be seriously damaged BEFORE connecting the speaker leads of the power cord to the speakers check the speaker wiring in your car RACCORDEMENTS ELECTRIQUES PRECAUCIONES sobre las conexiones de la fuente de alimentación y de los altavoces NO conecte los conductores de altavoz del cable de alimentación...

Страница 77: ...droit arrière See each diagram on pages 4 6 Vea cada uno de los diagramas en las páginas 4 6 Référez vous à chaque diagramme des pages 4 6 ESPAÑOL Antes de la conexión Verifique atentamente el conexionado del vehículo Una conexión incorrecta podría producir daños graves en la unidad Los cordones del cable de alimentación A y los del conector procedentes de la carrocería del automóvil podrían ser d...

Страница 78: ...t terminal If you connect your smartphone to the Smartphone Adapter unit via USB you can view the smartphone screen If the smartphone cannot receive GPS signals connect a GPS antenna KV GP10 separately purchased to the Smartphone Adapter unit so that it can be used as the antenna for smartphone The firmware of the Smartphone Adapter unit may be updated Install the Smartphone Adapter unit in a posi...

Страница 79: ...t sont elles mises ensemble à la masse Interférence avec les sons La prise arrière de mise à la terre est elle connectée au châssis de la voiture avec un cordon court et épais L appareil devient chaud Le fil de sortie d enceinte est il à la masse Les bornes des enceintes gauche et droit sont elles mises ensemble à la masse Cet appareil ne fonctionne pas du tout Avez vous réinitialisé votre apparei...

Страница 80: ... purchase b The JVC product must be brought in for service to an authorized JVC Service Centre 2 Limitation This Warranty shall not apply to a Repair or replacement of any cabinets batteries plates connection cords anten nas dust covers knobs speaker grills speaker cones projection screens projection screen savers and all accessories b Any defects caused or repairs required as a result of misuse a...

Страница 81: ...rement Projecteur Avant et Audio d Auto de Serie ARSENAL AC Adapters Remote Controls Headphones Microphones and 90 DAYS 90 DAYS Projector Lamps Adaptateurs AC Telecommande Casque D ecoute Microphones 90 JOURS 90JOURS et Lampe de Projecteur Wood Cone Speakers 5 5 Enceinte aCone en Bois All Other Categories 1 1 Toutes les autres categories I Any defects caused by fire flood lightning power surge or ...

Страница 82: ...t attempt to service the product yourself Caution To prevent electrical shock do not open the cabinet There are no user serviceable parts inside Please refer to qualified service personnel for repairs PRODUCT REGISTRATION We suggest that you register your product since it will enable us to contact you directly if it is ever necessary to correct a safety related condition in your product You can re...

Страница 83: ...er than a service facility authorized by Z JVC to render such service or if affixed to any attachment not provided with the products or if the model or serial number has been altered tampered with defaced or removed 2 Initial installation installation and removal from cabinets or mounting systems Z 3 Operational adjustments covered in the Owner s Manual normal maintenance video and audio head clea...

Отзывы: