3-6
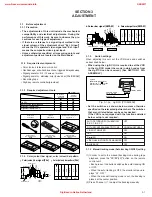
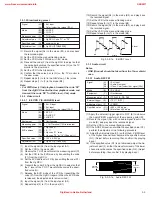
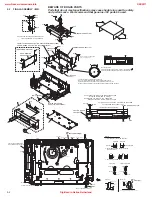
Fig. 3-5-2a PAL burst position
3.3.5.2 SECAM burst position
(1) Observe the waveforms appeared at the measuring
points (D1) and (D2).
(2) Adjust the adjustment part (F) so that the waveforms tim-
ing width between the H-SYNC and the colour burst sig-
nal becomes the specified value (G).
Signal
(A1)
• Ext. input
(A2)
• Color (colour) bar signal [SECAM]
Mode
(B)
• EE
Equipment
(C)
• Oscilloscope
Measuring point (D1)
• CN1601 Pin 7
(D2)
• CN1601 Pin 3
Adjustment part
(F)
• VR1603
Specified value
(G)
• Tr = 5.6 ± 0.1 µsec
Colour burst signal
H-SYNC
C
(Converted colour)
Y
Specified value (G)
H.rate
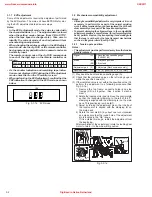
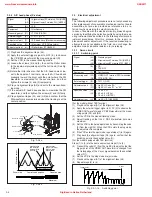
3.3.5.1 Colour difference level
(1) Observe the C (converted colour) waveform at the meas-
uring point (D).
(2) Adjust the adjustment part (F1) so that the higher level
of the Yellow and Blue of the C waveform becomes the
specified value (G1).
(3) Adjust the adjustment part (F2) so that the higher level
of the Green and Magenta of the C waveform becomes
the specified value (G2).
Signal
(A1)
• Color (colour) bar signal [SECAM]
Mode
(B)
• EE
Equipment
(C)
• Oscilloscope
Measuring point (D)
• CN1601 Pin 7
Adjustment part
(F1)
• VR1602 (B-Y ADJ)
(F2)
• VR1601 (R-Y ADJ)
Specified value
(G1)
• 460 ± 20 mVp-p (B-Y)
(G2)
• 620 ± 20 mVp-p (R-Y)
3.3.5 PAL/SECAM converter circuit [MS MODEL]
Note:
• Unless otherwise specified in this P/S Converter cir-
cuit adjustments, all measuring points and adjustment
parts are located on the S-P Converter board.
Fig. 3-5-1a Colour difference level
GREEN
YELLOW
BLUE
MAGENTA
H.rate
Specified
value (G2)
Specified
value (G1)
3.3.4
Syscon circuit [EU/EK MODEL]
Note:
•
When perform this adjustment, remove the Mechanism
assembly.
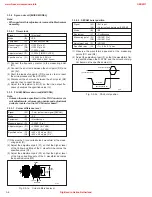
3.3.4.1 Timer clock
Signal
(A)
•
No signal
Mode
(B)
•
EE
Equipment
(C)
•
Frequency counter
Measuring point (D1)
•
IC3001 pin 61
Short point
(D2)
•
IC3001 pin 24
(D3)
•
C3026 + and –
Adjustment part
(F)
•
C3025 (TIMER CLOCK)
Specified value
(G)
•
1024.008 ± 0.001 Hz
(976.5549 ± 0.0010 µsec)
(1) Connect the frequency counter to the measuring point
(D1).
(2) Connect the short wire between the short point (D2) and
Vcc (5V).
(3) Short the leads of capacitor (D3) once in order to reset
the microprocessor of the SYSCON.
(4) Disconnect the short wire between the short point (D2)
and Vcc then connect it again.
(5) Adjust the Adjustment part (F) so that the output fre-
quency becomes the specified value (G).
www.freeservicemanuals.info
3/28/2017
Digitized in Heiloo Netherland

