background image

(No.YA337)1-35

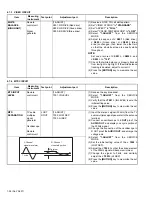
M073

1E48

00 - FF

00

M074

1E49

00 - FF

00

M075

1E4A

00 - FF

00

M076

1E4B

00 - FF

00

M077

1E4C

00 - FF

00

M078

1E4D

00 - FF

00

M079

1E4E

00 - FF

00

M080

1E4F

00 - FF

00

M081

1E50

00 - FF

00

M082

1E51

00 - FF

00

M083

1E52

00 - FF

00

M084

1E53

00 - FF

00

M085

1E54

00 - FF

00

M086

1E55

00 - FF

00

M087

1E56

00 - FF

00

M088

1E57

00 - FF

00

M089

1E58

00 - FF

00

M090

1E59

00 - FF

00

M091

1E5A

00 - FF

00

M092

1E5B

00 - FF

00

M093

1E5C

00 - FF

01

M094

1E5D

00 - FF

00

M095

1E5E

00 - FF

00

M096

1E5F

00 - FF

00

M097

1E60

00 - FF

00

M098

1E61

00 - FF

00

M099

1E62

00 - FF

00

M100

1E63

00 - FF

00

M101

1E64

00 - FF

00

M102

1E65

00 - FF

00

M103

1E66

00 - FF

00

M104

1E67

00 - FF

00

M105

1E68

00 - FF

00

M106

1E69

00 - FF

00

M107

1E6A

00 - FF

02

M108

1E6B

00 - FF

00

M109

1E6C

00 - FF

00

M110

1E6D

00 - FF

00

M111

1E6E

00 - FF

00

M112

1E6F

00 - FF

00

M113

1E70

00 - FF

00

M114

1E71

00 - FF

00

M115

1E72

00 - FF

00

M116

1E73

00 - FF

00

M117

1E74

00 - FF

00

M118

1E75

00 - FF

00

M119

1E76

00 - FF

00

M120

1E77

00 - FF

00

M121

1E78

00 - FF

03

M122

1E79

00 - FF

00

Item No.

Item

Variable range Setting value

M123

1E7A

00 - FF

00

M124

1E7B

00 - FF

00

M125

1E7C

00 - FF

00

M126

1E7D

00 - FF

00

M127

1E7E

00 - FF

01

M128

1E7F

00 - FF

00

M129

1E80

00 - FF

01

M130

1E81

00 - FF

00

M131

1E82

00 - FF

01

M132

1E83

00 - FF

00

M133

1E84

00 - FF

00

M134

1E85

00 - FF

00

M135

1E86

00 - FF

00

M136

1E87

00 - FF

00

M137

1E88

00 - FF

00

M138

1E89

00 - FF

00

M139

1E8A

00 - FF

00

M140

1E8B

00 - FF

00

M141

1E8C

00 - FF

00

M142

1E8D

00 - FF

00

M143

1E8E

00 - FF

00

M144

1E8F

00 - FF

00

M145

1E90

00 - FF

00

M146

1E91

00 - FF

00

M147

1E92

00 - FF

00

M148

1E93

00 - FF

00

M149

1E94

00 - FF

00

M150

1E95

00 - FF

00

M151

1E96

00 - FF

00

M152

1E97

00 - FF

00

M153

1E98

00 - FF

00

M154

1E99

00 - FF

00

M155

1E9A

00 - FF

01

M156

1E9B

00 - FF

00

M157

1E9C

00 - FF

03

M158

1E9D

00 - FF

00

M159

1E9E

00 - FF

00

M160

1E9F

00 - FF

00

M161

1EA0

00 - FF

00

M162

1EA1

00 - FF

00

M163

1EA2

00 - FF

01

M164

1EA3

00 - FF

00

M165

1EA4

00 - FF

00

M166

1EA5

00 - FF

00

M167

1EA6

00 - FF

00

M168

1EA7

00 - FF

00

M169

1EA8

00 - FF

00

M170

1EA9

00 - FF

00

M171

1EAA

00 - FF

00

M172

1EAB

00 - FF

00

Item No.

Item

Variable range Setting value

Содержание HD56FH96 - 56" Rear Projection TV

Страница 1: ... Limited No YA337 2005 12 D ILA PROJECTION TELEVISION YA337 2005 12 HD 56FH96 HD 61FH96 HD 70FH96 TABLE OF CONTENTS 1 PRECAUTION 1 3 2 SPECIFIC SERVICE INSTRUCTIONS 1 7 3 DISASSEMBLY 1 10 4 ADJUSTMENT 1 31 5 TROUBLESHOOTING 1 39 BASIC CHASSIS RA HD 70FH96 ...

Страница 2: ... type 2 Oblique corn Antenna Terminal VHF UHF ATSC DIGITAL CABLE IN F type connector 75Ω unbalanced coaxial 2 Video Audio Input INPUT 1 2 3 4 Component Video INPUT 1 2 1125i 750p 525p 525i S Video INPUT 1 3 4 Video Audio RCA pin jack 6 Y 1V p p Sync signal 0 35V p p 3 value sync 75 Ω Pb Pr 0 35V p p 75 Ω Y 1V p p positive Negative sync provided 75 Ω Pb Pr 0 7V p p 75 Ω Mini DIN 4 pin 3 Y 1V p p po...

Страница 3: ...ts that indicate evidence of overheating should be replaced Always use the manufacturer s replacement components 6 Isolation Check Safety for Electrical Shock Hazard After re assembling the product always perform an isolation check on the exposed metal parts of the cabinet antenna terminals video audio input and output terminals Control knobs metal cabinet screw heads earphone jack control shafts ...

Страница 4: ...he TV in a corner on the floor so as to keep cords out of the way The TV will generate a slight amount of heat during operation Ensure that sufficient space is available around the TV to allow satisfactory cooling 1 3 LAMP UNIT HANDLING CAUTION 1 3 1 PRECAUTION FOR LAMP UNIT The lamp emits high intensity white ultraviolet and infrared light Do not look directly at the light during service Also do ...

Страница 5: ...efer to the USERS GUIDE for a detailed operating description 1 Press the MENU key to select CLOCK TIMERS 2 Select the LAMP TIMER RESET with keys 3 Enter the LAMP TIMER RESET mode the message will appears 4 Press the OK key while the above message appears on the screen 5 Turn off the power then turn on the power 6 The lamp timer has now been reset as before the HOW TO CONFIRM LAMP OPERATING TIME 1 ...

Страница 6: ...ence projection adjustment are required 1 5 SCREEN HANDLING CAUTIONS 1 5 1 SCREEN STORAGE Store the SCREEN ASS Y in a standing position in order to avoid deformation If the screen is stored horizontally there is risk of deforming the screen face When necessary to place the SCREEN ASS Y horizontally position the screen side upwards and sure to place spacers between the screen and resting site floor...

Страница 7: ...creen can be chosen by the VIDEO STATUS function DIGITAL INPUT Digital in will display when any picture signal in Digital in is displayed V CHIP Since the V CHIP is built in it can choose view and listen to a healthy program MTS STEREO The voice multiplex function of the MTS system is built in MTS Multi channel Television Sound system NATURAL CINEMA Watching the movie or animation press the Natura...

Страница 8: ...atio 5000 1 Aperture ratio 89 or more Effective pixel measurement 0 7 inch R DEVICE G DEVICE OPTICAL IRIS B DEVICE Lamp unit Incident light Device B RG B B R G R Projection light G Mirror Mirror Mirror FRONT DEVICE UNIT SECTION TOP VIEW Device Device Incident light Pixel FRONT Incident light Projection light Glass substrate Transparent electrode Reflective pixel electrode Back Plane Liquid crystal...

Страница 9: ...S2 O Not used 77 NC O Not used 28 CLK2 O Not used 78 NC O Not used 29 RxD2 I Digital tuner control 79 NC O Not used 30 TxD2 O Digital tuner control 80 P1 0 O Function LED lighting 31 SDA2 I O Not used 81 P0 7 O Communication LED lighting 32 DIGR1 O R 1 for OSD 82 P0 6 O Test point 33 DIGG1 O G 1 for OSD 83 NC O Not used 34 DIGB1 O B 1 for OSD 84 WAKE O Reset for sub chassis CPU 35 TxD0 I Data rece...

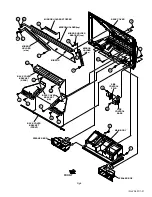
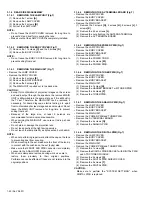
Страница 10: ...e the SPEAKER GRILL 1 Remove the 2 screws D 2 Remove the FRONT LED PWB NOTE Remove the earth wire connected to the FRONT LED PWB simultaneously 3 1 1 5 REMOVING THE SPEAKER Fig 1 Remove the SPEAKER GRILL 1 Remove the 4 screws E 2 Remove the SPEAKER 3 Remove the opposite SPEAKER same steps 3 1 1 6 REMOVING THE CENTER COVER Fig 1 Remove the SPEAKER GRILL 1 Remove the 2 screws F 2 Remove the CENTER C...

Страница 11: ...g 1 FRONT SCREEN BLOCK SCREEN BRACKET SCREEN ASS Y FRONT BRACKET SPEAKER BACK COVER SPEAKER CENTER COVER FRONT PANEL SCREEN BLOCK MAIN BODY FRONT LED PWB SPEAKER GRILL ORNAMENT PANEL CENTER PANEL B F E B C E J G H K K A ...

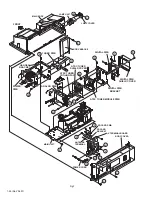
Страница 12: ...1 Remove the 2 screws C 2 Remove the SIDE CONTROL BASE 3 Remove the 2 screws D 4 Remove the SIDE CONTROL PWB 3 1 1 12 REMOVING THE SUPPORT HOLDER Fig 2 Remove the SPEAKER GRILL Remove the FRONT PANEL Remove the SCREEN BLOCK 1 Remove the 2 screws E 2 Remove the SUPPORT HOLDER 3 1 1 13 REMOVING THE BACK COVER Fig 2 Remove the SPEAKER GRILL Remove the FRONT PANEL Remove the SCREEN BLOCK Remove the SU...

Страница 13: ... No YA337 1 13 Fig 2 MAIN BODY SUPPORT HOLDER SIDE CONTROL PWB SIDE CONTROL BASE SPEAKER BOX SPEAKER BOX MIRROR MIRROR HOLDER MIRROR HOLDER MIRROR HOLDER BACK COVER FRONT D C E H G H B A B F ...

Страница 14: ...emoval and reassemble Use care not to scratch the screen during work Do not leave the FRONT PANEL with SCREEN ASS Y removed for long time to prevent soiling from dust 3 1 2 6 REMOVING THE SCREEN ASS Y Fig 3 Remove the SPEAKER GRILL Remove the FRONT PANEL with SCREEN ASS Y 1 Remove the 20 screws G and 4 screws H 2 Remove the SCREEN BRACKET 3 Remove the SCREEN ASS Y from the FRONT PANEL 3 1 2 7 REMO...

Страница 15: ...N ASS Y SCREEN BRACKET SPEAKER FILTER COVER CENTER COVER BACK COVER FILTER SPEAKER PLATE SPEAKER SPEAKER PLATE BACK COVER FRONT PANEL FRONT LED PWB SPEAKER GRILL ORNAMENT PANEL CENTER PANEL SCREEN BRACKET D B C J E H K K L L M M G E A ...

Страница 16: ... 12 REMOVING THE SIDE CONTROL PWB Fig 4 Remove the SPEAKER GRILL Remove the FRONT PANEL 1 Remove the 2 screws C 2 Remove the SIDE CONTROL BASE 3 Remove the 2 screws D 4 Remove the SIDE CONTROL PWB 3 1 2 13 REMOVING THE CORNER COVER Fig 4 Remove the SPEAKER GRILL Remove the FRONT PANEL 1 Remove the 1 screw E 2 Remove the CORNER COVER 3 Remove the opposite CORNER COVER same steps 3 1 2 14 REMOVING T...

Страница 17: ... No YA337 1 17 Fig 4 MAIN BODY SIDE CONTROL PWB SIDE CONTROL BASE MIRROR MIRROR HOLDER MIRROR HOLDER CORNER COVER CORNER COVER MIRROR HOLDER FRONT BACK COVER D C F B A B H E E F ...

Страница 18: ...ws F from rear side 2 Remove the 20 screws G from front side 3 Remove the FRONT PANEL 3 1 3 7 REMOVING THE SCREEN BLOCK Fig 5 Remove the SPEAKER GRILL Remove the SPEAKER Remove the FRONT PANEL 1 Remove the 6 screws H and 8 screws J 2 Remove the SCREEN BLOCK CAUTION Place the SCREEN BLOCK on a flat table without fail Because of the large size at least 2 persons are recommended for removal and reass...

Страница 19: ... E C B D G A E A L FRONT SPEAKER SPEAKER CENTRE COVER BACK COVER FRONT PANEL H SCREEN BRACKET SCREEN BRACKET SCREEN BLOCK K K K K SCREEN ASS Y SCREEN BLOCK MAIN BODY J FRONT LED PWB ORNAMENT PANEL CENTER PANEL SPEAKER GRILL ...

Страница 20: ... screws G and 3 screws H 2 Remove the rear side BACK COVER BRACKET 3 Remove the 4 screws J 1 screw K and 1 screw L 4 Remove the left side BACK COVER BRACKET 5 Remove the righ side BACK COVER BRACKET same step 3 1 3 12 REMOVING THE SIDE CONTROL PWB Fig 6 Remove the SPEAKER GRILL Remove the SPEAKER Remove the FRONT PANEL Remove the SCREEN BLOCK 1 Remove the 4 screws M 2 Remove the SIDE CONTROL BASE ...

Страница 21: ...OLDER STOPPER MIRROR HOLDER top MIRROR HOLDER side MIRROR HOLDER BRACKET top MIRROR HOLDER side M N SIDE CONTROL PWB SIDE CONTROL BASE P P SPEAKER BOX SPEAKER BOX MAIN BODY P P Q R F K L K H G J BACK COVER BRACKET L R BACK COVER BRACKET REAR J BACK COVER BRACKET FRONT G ...

Страница 22: ...set make sure the front of the lens is in contact with the cushion on the set body side Make sure that FRONT LED PWB connector is completely connect to the ANALOG PWB connector When wire clamps are removed during work use care to restore them precisely to their original positions Performance can be affected if these are not returned to the original positions 3 1 4 4 REMOVING THE AV TERMINAL BOARD ...

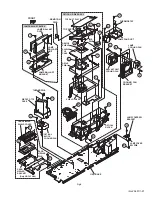
Страница 23: ...E SD CARD PWB Fig 7 Remove the LAMP COVER Remove the BODY COVER Remove the BODY BRACKET Remove the MAIN UNIT Remove the AV TERMINAL BOARD 1 Remove the 2 screws X 2 Remove the SD CARD BRACKET with SD CARD PWB 3 Remove the 2 screws 4 Remove the SD CARD PWB 3 1 4 11 REMOVING THE IRIS PWB Fig 7 Remove the LAMP COVER Remove the BODY COVER Remove the BODY BRACKET Remove the MAIN UNIT Remove the POWER PW...

Страница 24: ...R SD CARD PWB SD CARD BRACKET ANTENNA TERMINAL LAMP COVER LAMP UNIT FRONT POWER PWB ANALOG PWB ATSC TUNER COOLING FAN ATSC TUNER SHIELD COVER DIGITAL PWB SHIELD COVER DIGITAL PWB BRACKET DIGITAL PWB HANGER BRACKET TUNER PWB ATSC TUNER MODULE PWB E D C F G K L J Y X H M N P W S T R U V Q B A ...

Страница 25: ...NG THE IRIS PWB Fig 8 Remove the LAMP COVER Remove the BODY COVER Remove the BODY BRACKET Remove the MAIN UNIT 1 Remove the 2 screws K 2 Remove the IRIS PWB 3 1 4 19 REMOVING THE REMOCON PWB Fig 8 Remove the LAMP COVER Remove the BODY COVER Remove the BODY BRACKET Remove the MAIN UNIT 1 Remove the 1 screws a 2 Remove the REMOCON PWB 3 1 4 20 REMOVING THE OPTICAL DRIVE ASS Y Fig 8 Remove the LAMP C...

Страница 26: ...OCK COOLING FAN 3 1 4 23 REMOVING THE PROJECTION LAMP Fig 8 Remove the LAMP COVER Remove the BODY COVER Remove the BODY BRACKET Remove the MAIN UNIT 1 Remove the 4 screws W 2 Remove the PROJECTION LAMP 3 1 4 24 REMOVING THE CARD VIEWER PWB HD 70FH96 Fig 8 Remove the LAMP COVER Remove the BODY COVER Remove the BODY BRACKET Remove the MAIN UNIT 1 Remove the 2 screws X 2 Remove the CARD VIEWER BRACKE...

Страница 27: ... LAMP COVER SW PWB LAMP COVER SW BRACKET THERMOSTAT LAMP BALLAST UNIT LAMP BALLAST DUCT LAMP BALLAST BRACKET LAMP FAN DUCT COOLING FAN BRACKET SHIELD TOP CASE TOP DUCT OPTICAL BLOCK COOLING FAN CARD VIEWER SHIELD COVER CARD VIEWER BRACKET CARD VIEWER PWB BALLAST UNIT COOLING FAN OPTICAL BLOCK Only HD 70FH96 LAMP COOLING FAN J C D E G A B V X Y Z U F K I H S M T L R a Q P N W ...

Страница 28: ...UCTIONS and set the items as described 6 SERVICE MODE setting Verify what to set in the SERVICE MODE and set whatever is necessary Fig 1 Refer to the SERVICE ADJUSTMENT for setting 3 2 3 SERVICE MODE SETTING SERVICE MODE SCREEN Fig 1 SETTING ITEM Simbol Number of pins Mounting PWB Main content of data IC3753 8 pin DRIVE PWB Adjustment and setting data GAMMA SHADING etc of IC3701 DRIVE CPU are memo...

Страница 29: ...E 00 00 00 00 BRIGHT 00 00 00 00 DETAIL 05 00 00 00 COLOR TEMPERATURE HIGH HIGH HIGH HIGH COLOR MANAGEMENT ON ON ON ON DYNAMIC GAMMA ON ON ON ON SMART PICTURE OFF ON ON ON DIGITAL VNR AUTO AUTO AUTO AUTO MPEG NR OFF OFF OFF OFF Setting item DYNAMIC STANDARD GAME THEATER PICTURE 15 00 10 00 BRIGHT 00 00 00 00 COLOR 00 00 00 00 TINT 00 00 00 00 DETAIL 05 00 00 00 COLOR TEMPERATURE HIGH LOW HIGH LOW ...

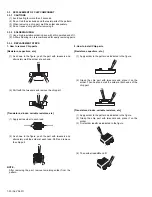
Страница 30: ...he tweezers and remove the chip part Transistors diodes variable resistors etc 1 Apply extra solder to each lead 2 As shown in the figure push the part with tweezers and alternately melt the solder at each lead Shift and remove the chip part NOTE After removing the part remove remaining solder from the pattern 2 How to install Chip parts Resistors capacitors etc 1 Apply solder to the pattern as in...

Страница 31: ...e parts such as variable resistors transformers and condensers not shown in the adjustment items of this service adjustment 4 2 PRESET SETTING BEFORE ADJUSTMENTS Unless otherwise specified in the adjustment items preset the following functions with the REMOTE CONTROL UNIT 4 3 MEASURING INSTRUMENT AND FIXTURES Oscilloscope Signal generator Pattern generator NTSC 525i 525p 750p 1125i TV audio multip...

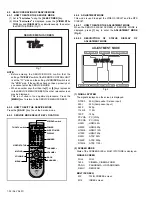
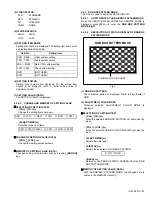
Страница 32: ...IRCUIT 4 5 4 1 HOW TO ENTER THE ADJUSTMENT MODE When the SERVICE MENU SCREEN of SERVICE MODE is displayed press 1 key to enter the ADJUSTMENT MODE Fig 2 4 5 4 2 DESCRIPTION OF STATUS DISPLAY OF ADJUSTMENT MODE Fig 2 1 SIGNAL SYSTEM The signal displayed on the screen is displayed 2 SCREEN MODE State of the SCREEN SIZE or MULTI PICTURE is displayed SINGLE SCREEN MULTI SCREEN SERVICE MENU SCREEN SERV...

Страница 33: ...to enter the RGB BOX PATTERN MODE Fig3 4 5 5 2 DESCRIPTION OF STATUS DISPLAY OF RGB BOX PATTERN MODE Fig 3 1 RGB BOX PATTERN The checkered pattern is displayed White is a synthesis of RGB 2 ADJUSTMENT COLOR MODE Presently selected ADJUSTMENT COLOR MODE is displayed SELECTION OF SETTING ITEM CH CH key Move the selected RGB BOX PATTERN up down pixel by pixel VOL VOL key Move the selected RGB BOX PAT...

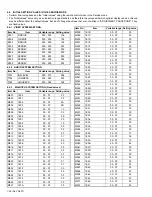
Страница 34: ... M008 1E07 00 FF 00 M009 1E08 00 FF 10 M010 1E09 00 FF 00 M011 1E0A 00 FF 05 M012 1E0B 00 FF 00 M013 1E0C 00 FF 01 M014 1E0D 00 FF 00 M015 1E0E 00 FF 00 M016 1E0F 00 FF 00 M017 1E10 00 FF 00 M018 1E11 00 FF 00 M019 1E12 00 FF 00 M020 1E13 00 FF 01 M021 1E14 00 FF 01 M022 1E15 00 FF 00 M023 1E16 00 FF 00 M024 1E17 00 FF 00 M025 1E18 00 FF 00 M026 1E19 00 FF 00 M027 1E1A 00 FF 00 M028 1E1B 00 FF 00 ...

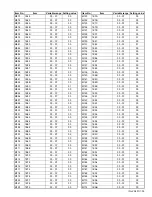
Страница 35: ... 00 FF 00 M120 1E77 00 FF 00 M121 1E78 00 FF 03 M122 1E79 00 FF 00 Item No Item Variable range Setting value M123 1E7A 00 FF 00 M124 1E7B 00 FF 00 M125 1E7C 00 FF 00 M126 1E7D 00 FF 00 M127 1E7E 00 FF 01 M128 1E7F 00 FF 00 M129 1E80 00 FF 01 M130 1E81 00 FF 00 M131 1E82 00 FF 01 M132 1E83 00 FF 00 M133 1E84 00 FF 00 M134 1E85 00 FF 00 M135 1E86 00 FF 00 M136 1E87 00 FF 00 M137 1E88 00 FF 00 M138 1...
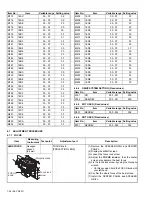
Страница 36: ... M210 1ED1 00 FF 00 M211 1ED2 00 FF 00 M212 1ED3 00 FF 00 M213 1ED4 00 FF 00 M214 1ED5 00 FF FF M215 1ED6 00 FF 00 M216 1ED7 00 FF 00 M217 1ED8 00 FF 00 M218 1ED9 00 FF 00 M219 1EDA 00 FF 00 M220 1EDB 00 FF 00 M221 1EDC 00 FF 00 M222 1EDD 00 FF 00 M223 1EDE 00 FF 00 M224 1EDF 00 FF 00 Item No Item Variable range Setting value F001 DD 000 001 000 F002 RAM REF 000 001 000 Item No Item Variable range...
Страница 37: ...GB box pattern adjust the right edge position as same or less than 0 5 pixel hight as green 10 Check to see that the cross pattern is white If the cross pattern is not white repeat the step 4 to 9 as abobe NOTE Green is a fixed It can not be removed With this adjustment mode the changed data is written in the MEMORY instantly DRIVE CENTER POSITION Remote control unit Signal generator 9 RGB BOX PAT...

Страница 38: ...stment part Description MTS INPUT LEVEL Remote control unit 1 ADJUST T001 IN LEVEL 1 Receive the any broadcast 2 Select 1 ADJUST from the SERVICE MODE 3 Verify that the T001 IN LEVEL is set at its initial setting value 4 Press the MUTING key to memorize the set value MTS SEPARATION TV audio multiplex signal generator Oscilloscope Remote control unit L OUT R OUT 1 ADJUST T002 LOW SEP T003 HI SEP 1 ...

Страница 39: ... SELF CHECK MODE TO SAVE FAILURE HISTORY Turn off the power by unplugging the AC power cord plug when in the Self check display mode TO CLEAR RESET FAILURE HISTORY Turn off the power by pressing the POWER key on the remote control unit when in the Self check display mode 5 1 4 FAILURE HISTORY Failure history can be counted up to 9 times for each item When the number exceeds 9 display will remain a...

Страница 40: ...C IC2001 THERMO PWB TXD It will count if the serial communication from a DD MICOM is always supervised and an error occurs Lamp does not light up L1 Confirm that the lamp dose not light up CNBCT DRIVE PWB TXD It will count if the serial communication from a DD MICOM is always supervised and an error occurs Lamp goes out L2 Confirm that the lamp dose not goes out CNBCT DRIVE PWB TXD It will count i...

Страница 41: ...2 sec interval Low bias line short protection Detection of the low bias line 5V 9V 12V short Q9821 Q9831 Q9861 POWER PWB 2 1 sec interval Lamp cover open Detection of the interlock switch status for the lamp cover H Abnormal S0861 LAMP COVER SW PWB 3 0 1 sec interval Simultaneously Lamp goes out Detection of lamp return LAMP_RTN signals output depending on the status of the lamp supply electric cu...

Страница 42: ... No YA337 ILA Display Category 12 3 chome Moriya cho Kanagawa ku Yokohama city Kanagawa prefecture 221 8528 Japan Victor Company of Japan Limited VPT Printed in Japan ...

Отзывы: