Preparing a USB External Hard Disk Drive
Caution :
0
This operation cannot be completed if the remaining battery power is not
enough. Charge the battery fully first.
Memo :
0
When connecting to the external hard disk drive, use a USB cable
(commercially available) indicated below. The USB cable provided with
this unit cannot be used.
0
To use the USB cable provided with the USB external hard disk drive,
purchase the following USB conversion cable (sold separately).
(Part number: QAM0852-001) * Mini-A (Male) – A (Female)
* Consult your nearest service center.
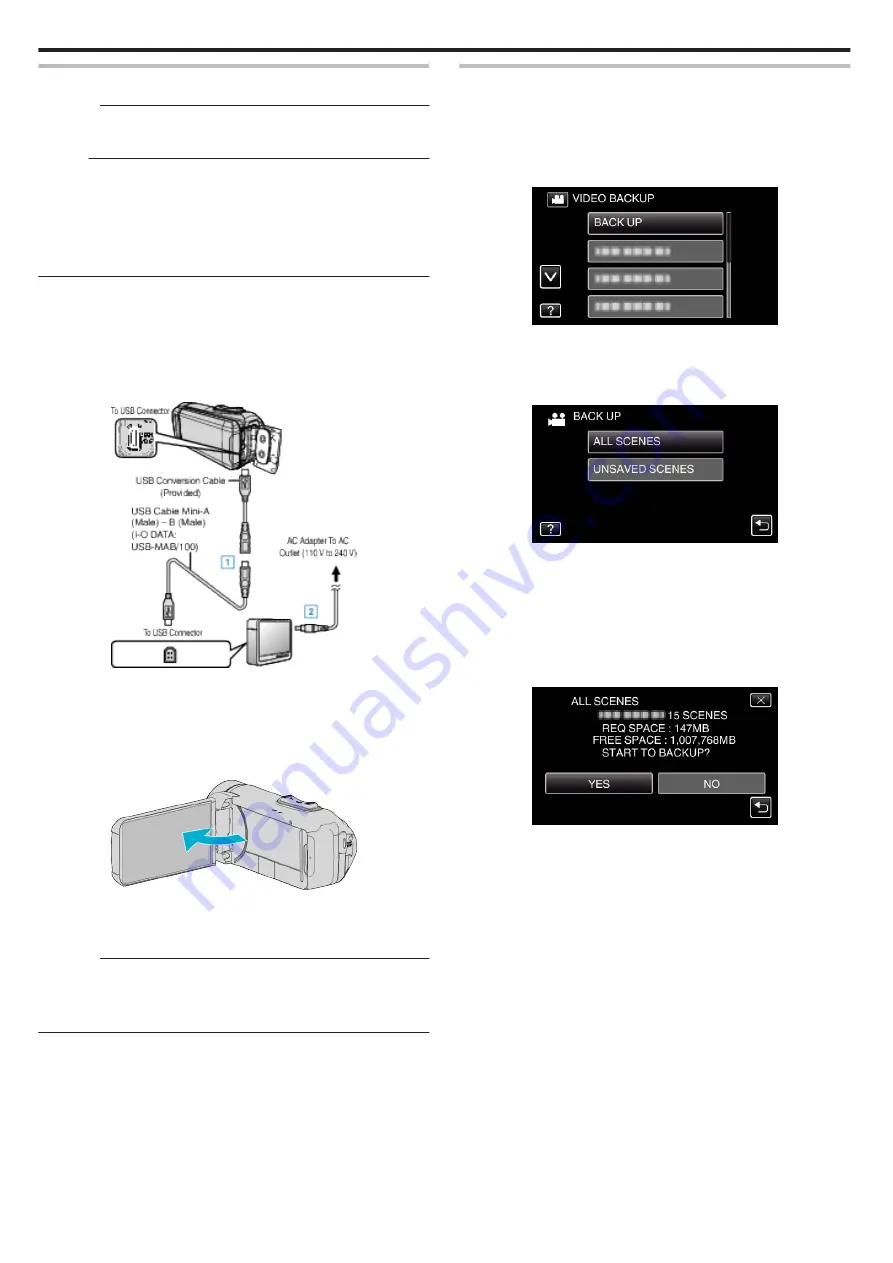
1
Open the terminal cover.
2
Connect using the optional AV cable.
3
Connect the USB cable and the AC adapter of the USB external hard
disk drive.
0
Before making any connection, close the LCD monitor to turn off this
unit.
.
*Consult your nearest service center.
A
Connect the USB cable with the USB external hard disk drive.
B
Connect the AC adapter of the USB external hard disk drive.
0
Turn on the external hard disk drive.
0
Refer also to the instruction manual of the external hard disk drive.
4
Open the LCD monitor.
.
0
This unit turns on and the “BACK-UP” menu appears.
0
While the USB cable is connected, the “BACK-UP” menu is
displayed.
Caution :
0
Be sure to turn off the power when connecting the devices.
Otherwise, electric shocks or malfunctions may occur.
0
Do not connect a USB hub between this unit and the USB external hard
disk drive.
Copying All Files
All videos or still images recorded on this unit will be copied.
You can also select and copy only the videos or still images that have never
been copied.
1
Select video or still image mode.
2
Tap “BACK UP”.
.
0
While the video mode is shown in the image, the same operations
apply for the still image mode.
0
Tap the
A
icon to switch between the video and still image modes.
3
Tap the desired method.
.
0
“ALL SCENES” (video)/“ALL IMAGES” (still image):
All videos or still images in this unit are copied.
0
“UNSAVED SCENES” (video)/“UNSAVED IMAGES” (still
image):
Videos or still images that have never been copied are automatically
selected and copied.
4
Check that there is sufficient remaining space on the hard disk drive and
tap “YES”.
.
0
Backup starts when “YES” is tapped.
Copying
82
Содержание GZ-R18
Страница 1: ...CAMCORDER LYT2701 030B Detailed User Guide GZ R18 ...
Страница 134: ......


