background image

English

37

7

Changing the Time
Indication

You can change the time information in the on-screen bar and the
display window on the front panel.

&

During playback

1

Press ON SCREEN twice.

The on-screen bar with pull-down menu appears on the TV.

2

Press ENTER.

• Each time you press ENTER, the time indication in the on-

screen bar changes as follows:

Ex.: When playing a DVD

TOTAL

   1:25:58


]


T.REM

   0:45:41


]


TIME

    0:25:58


]

REM

    0:18:14


]

 (back to the beginning)

TOTAL

Elapsed disc time

T. (total) REM

Remaining disc time

TIME

Elapsed playing time of the current chapter/
track

REM

Remaining time of the current chapter/track

• The indication on the display also changes.

To turn off the on-screen bar

Press ON SCREEN.

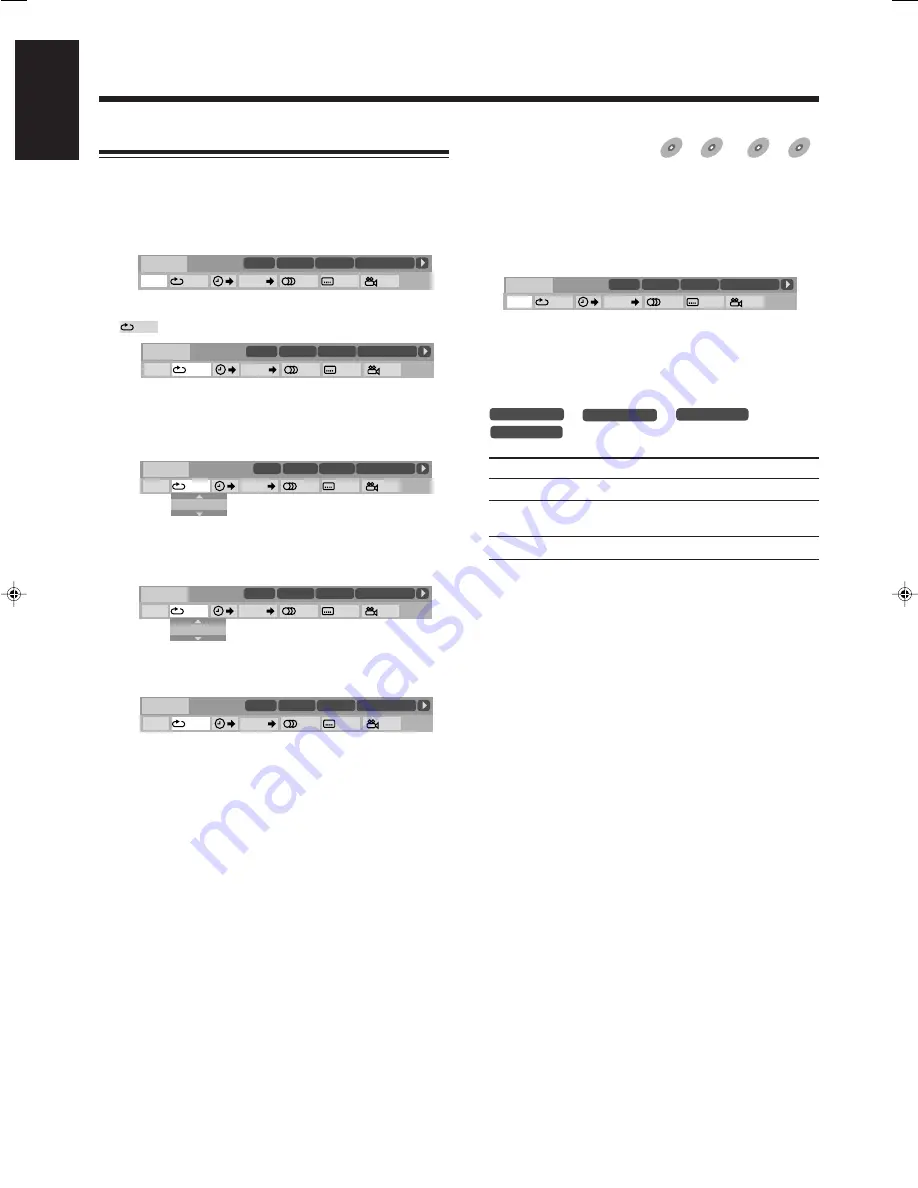
Operation through the On-screen Bar

Ex.: When selecting Repeat Play for DVD.

1

Press ON SCREEN twice.

The on-screen bar with pull-down menu appears on the TV.

2

Press cursor 

3

 / 

2

 repeatedly to select (highlight)

 on the pull-down menu.

• See the relevant page for the detail of each function.

3

Press ENTER.

The pop-up window appears under the pull-down menu.

4

Press cursor 

 / 

5

 repeatedly to select the

desired option in the pop-up window.

• Each time you press the button, the options change.

5

Press ENTER.

The setting changes and the pop-up window goes off.

To turn off the on-screen bar

Press ON SCREEN.

OFF

1/3

1/3

1/3

TIME

CHAP.

DVD-VIDEO

TITLE 14

DISC 3

TOTAL   

1:25:58

CHAP 23

8.5Mbps

OFF

1/3

1/3

1/3

TIME

CHAP.

DVD-VIDEO

TITLE 14

DISC 3

TOTAL   

1:25:58

CHAP 23

8.5Mbps

1/3

1/3

1/3

TIME

CHAP.

OFF

OFF

DVD-VIDEO

TITLE

 14

DISC

 3

TOTAL   

1:25:58

CHAP

 23

8.5Mbps

1/3

1/3

1/3

TIME

CHAP.

TITLE

DVD-VIDEO

TITLE 14

DISC 3

TOTAL   

1:25:58

CHAP 23

8.5Mbps

OFF

TITLE

1/3

1/3

1/3

TIME

CHAP.

DVD-VIDEO

TITLE 14

DISC 3

TOTAL   

1:25:58

CHAP 23

8.5Mbps

DVD

DVD

SVCD

SVCD

VCD

VCD

CD

CD

Advanced Disc Operations

 (continued)

OFF

1/3

1/3

1/3

TIME

CHAP.

DVD-VIDEO

TITLE 14

DISC 3

TOTAL   

1:25:58

CHAP 23

8.5Mbps

35-37HX-Z77&55[U]6.p65

03.8.18, 10:42 AM

37

Содержание CA-HXZ55D

Страница 1: ...GVT0119 001C US UN UG UX INSTRUCTIONS English COMPACT COMPONENT SYSTEM CA HXZ77D CA HXZ55D D I G I T A L ...

Страница 2: ...arnings Cautions and Others Caution button Disconnect the mains plug to shut the power off completely The button in any position does not disconnect the mains line The power can be remote controlled G 1 ...

Страница 3: ...a newspaper or cloth etc the heat may not be able to get out Do not place any naked flame sources such as lighted candles on the apparatus When discarding batteries environmental problems must be considered and local rules or laws governing the disposal of these batteries must be followed strictly Do not expose this apparatus to rain moisture dripping or splashing and that no objects filled with l...

Страница 4: ...tions and open spacing 2 Sides Top Back No obstructions should be placed in the areas shown by the dimensions below 3 Bottom Place on the level surface Maintain an adequate air path for ventilation by placing on a stand with a height of 10 cm or more Front view Side view 15 cm 15 cm 10 cm 1 cm CA HXZ77D CA HXZ55D 1 cm 15 cm 15 cm 15 cm G 3 ...

Страница 5: ... There are no user serviceable parts inside the Unit leave all servicing to qualified service personnel 3 CAUTION Visible and invisible laser radiation when open and interlock failed or defeated Avoid direct exposure to beam 4 REPRODUCTION OF LABEL CAUTION LABEL PLACED INSIDE THE UNIT G 4 ...

Страница 6: ...erence with TV DO NOT install the unit in a location near heat sources or in a place subject to direct sunlight excessive dust or vibration We would like to thank you for purchasing one of our JVC products Before operating this unit read this manual carefully and thoroughly to obtain the best possible performance from your unit and retain this manual for future reference Power sources When unplugg...

Страница 7: ... Disc Operations 30 Playing Back by Using the Disc Menu 32 Repeating Playback Repeat Play 32 Programming the Playing Order Program Play 33 Playing at Random Random Play 34 Advanced Disc Operations 35 About the On screen Bar 36 Operation through the On screen Bar 37 Selecting a View Angle 40 Selecting the Subtitle Language 40 Selecting the Audio Language 41 Selecting the Audio Channel 41 Special Pi...

Страница 8: ... 3 READY DISC 4 READY DISC 5 READY DISC1 STANDBY DISC2 DISC3 DISC4 DISC5 C O M P A C T C O M P O N E N T S Y S T E M EXTENDED SUPER BASS PROGRESSIVE 2CH STEREO DOLBY DIGITAL DTS SURROUND DOLBY PRO LOGIC R E C SOUND MODE D A N C E S T A D I U M H A L L CLOCK TIMER MIC LEVEL MAX MIC MIN 1 2 SET DISPLAY CANCEL DEMO MODE S U B W O O F E R L E V E L SOUND TURBO AUX TAPE DISC FM AM START START STOP DISC...

Страница 9: ...o Timer indicators 54 57 DAILY Daily Timer SLEEP Sleep Timer REC Recording Timer Timer RANDOM indicator 34 Display Window e r t u o y i 1 3 6 7 8 2 9 4 5 q p w See pages in parentheses for details Front Panel 1 standby on button and STANDBY lamp 15 22 55 56 2 Disc trays DISC1 DISC5 3 Remote sensor 4 Display window 5 DISC ready lamps 28 DISC 1 READY DISC 5 READY 6 PROGRESSIVE lamp 17 7 MIC LEVEL co...

Страница 10: ... 51 52 KARAOKE button 50 52 7 TOP MENU button 32 8 SUBTITLE button 40 KEY I button 50 9 Cursor 2 3 5 buttons ENTER button p CHOICE button 10 12 59 65 q FM AM button 15 22 Pressing this button also turns on the unit FM MODE button 22 w AUX button 15 Pressing this button also turns on the unit e RETURN button 32 REC button 47 r and 4 buttons 22 24 30 34 44 PREV and NEXT buttons 32 GROUP SKIP 4 butto...

Страница 11: ...3 Fasten it up in the position which gives you the best reception then fix it on the wall etc About the supplied FM antenna The FM antenna supplied with this unit can be used as temporary measure If reception is poor you can connect an outdoor FM antenna To connect an outdoor FM antenna Before connecting the antenna disconnect the supplied FM antenna Outdoor FM antenna not supplied A 75 Ω antenna ...

Страница 12: ...and the AC power cord AM antenna Vinyl covered wire not supplied AM loop antenna supplied 1 5 Connecting Speakers IMPORTANT Use only speakers with the same speaker impedance as indicated by the speaker terminals on the rear of the unit 1 If the cords are covered with insulation remove a short section of insulation at the end of each cord by twisting and pulling it off 2 Open the clamp of the speak...

Страница 13: ...necting a TV Connect your TV and this unit using the composite video cord supplied an S video cord not supplied or Component video cord not supplied You can also connect a JVC s TV through the AV COMPU LINK control system See page 67 On video connection By using S video or component video cord you can get a better picture quality in the order composite S video component To enjoy the progressive vi...

Страница 14: ... page 15 AUX IN RIGHT LEFT MD player TV etc RCA pin plug cord Left Left Right Right To analog audio output Getting Started continued To select the color system You need to select the color system setting of this unit to match to your TV Set the NTSC PAL switch on the rear while in standby mode correctly by referring to the table below Color system of TV Color system setting Multi color system PAL ...

Страница 15: ...nstration stops temporarily It will start automatically again if no operation is done for about 2 minutes unless you cancel it by pressing CANCEL DEMO Adjusting the Voltage Selector Before plugging in the unit set the correct voltage for your area with the voltage selector on the rear of the unit Use a screwdriver to rotate the voltage selector so that the voltage mark is pointing at the same volt...

Страница 16: ...peatedly to display PICTURE The PICTURE menu appears on the TV 2 Press cursor to select highlight MONITOR TYPE 3 Press ENTER The pop up window listing the selectable monitor type opens 4 Press cursor 5 repeatedly to select highlight the monitor type For a normal conventional TV select 4 3 LB or 4 3 PS For a wide screen TV select 16 9 NORMAL or 16 9 AUTO For details of the monitor type see page 61 ...

Страница 17: ...ER CENTER SPEAKER 3 0m 3 0m SURROUND SPEAKER RETURN 6 Press cursor 5 repeatedly to select highlight the desired speaker distance For each speaker FRONT SPEAKER CENTER SPEAKER SURROUND SPEAKER set the distance from the listening point within the range of 0 3 m to 9 0 m in 0 3 m intervals Ex 3 0m is selected 7 Press ENTER 8 Repeat steps 4 to 7 to adjust other speakers distance if necessary The initi...

Страница 18: ...ord or if a power failure occurs The clock loses its setting and resets to 0 00 If this happens set the clock again The clock may gain or loss 1 to 2 minutes per month If this happens set the clock again On the front panel ONLY 1 Press CLOCK TIMER 0 00 appears on the display with the hour digit flashing 2 Turn 4 to adjust the hour As you turn the control the hour digit changes continuously 3 Press...

Страница 19: ...Operations RM SHXZ55DU REMOTE CONTROL DISC1 DISC4 DISC5 DISC2 DISC3 RESERVE ECHO Remote Control Front Panel The buttons emphasized in the illustration below are used and explained in the following section pages 15 to 17 ...

Страница 20: ...appears on the display Play will start if a tape is in the cassette holder To stop playback press 7 For more detailed operations see pages 23 and 24 To listen to the sound from external equipment press AUX The unit automatically turns on when the unit is on standby and AUX IN appears on the display For operating external equipment refer also to its manual Adjusting the Volume You can adjust the vo...

Страница 21: ...SOUND MODE repeatedly until the preferred sound mode appears on the display When one of the Sound modes is selected the SOUND MODE lamp flashes Each time you press SOUND MODE the Sound modes change as follows Canceled When you press SOUND MODE once You can confirm the Sound mode currently chosen SEA Sound Effect Amplifier modes ROCK Boosts low and high frequency Good for acoustic music POP Good fo...

Страница 22: ...lity picture from the built in disc player Refer also to the instruction manuals supplied with your TV You can change the scanning mode only when NTSC is selected for the color system of this unit See page 9 You cannot select the progressive scanning mode for the PAL system TVs Do not change the progressive scanning mode in the following cases When your TV does not support the progressive video in...

Страница 23: ...English 18 Using Surround Mode Remote Control Front Panel The buttons emphasized in the illustration below are used and explained in the following section pages 19 and 20 ...

Страница 24: ... depending on the encoding format Dolby Pro Logic DANCE HALL STADIUM Activating Surround Mode You can activate the Surround mode automatically depending on the software type and the SURROUND SETTING see page 62 When playing back 2 channel software with the SURROUND SETTING set to ON When playing back multi channel software with the SURROUND SETTING set to AUTO or ON Using Surround Mode continued S...

Страница 25: ...sponding to R right channel comes in C Lights up when the center channel signal comes in LFE Lights up when the LFE channel signal comes in LS Lights up when the left surround channel signal comes in RS Lights up when the right surround channel signal comes in S Lights up when the monaural surround channel signal comes in LFE stands for low frequency effect LFE channel signal comes out of front ma...

Страница 26: ...21 English Listening to FM and AM Broadcasts Remote Control Front Panel The buttons emphasized in the illustration below are used and explained in the following section page 22 ...

Страница 27: ... improve To restore the stereo effect press FM MODE while holding down SHIFT again so that the MONO indicator goes off In this stereo mode you can hear stereo sounds when a program is broadcasted Presetting Stations You can preset 30 FM and 15 AM stations In some cases test frequencies have been already memorized for the tuner since the factory examined the tuner preset function before shipment Th...

Страница 28: ...23 English Playing Back Tapes Remote Control Front Panel The buttons emphasized in the illustration below are used and explained in the following section page 24 ...

Страница 29: ...ndicator lights up on the display like To cancel the Reverse mode press the button again so that the Reverse mode indicator lights up on the display like Locating the Beginning of a Song Music Scan You can use Music Scan to locate the beginning of a song Music Scan searches for blank portions that usually separate recorded songs then plays the next song 7 To find the beginning of the current song ...

Страница 30: ...llustration below are used and explained in the following section pages 26 to 34 DVD DVD SVCD SVCD VCD VCD CD CD shows the types of discs the operation is available for For MP3 and JPEG disc playback see pages 44 and 45 For how to make a program using MP3 discs is explained in this section ...

Страница 31: ...caused by the fact that the reflectance of CD RW is lower than for regular CD The unit can also play back CD R or CD RW if MP3 files or JPEG files are recorded on them However they may not be played back because of their disc characteristics recording conditions or damage or stain on them Especially the configuration and characteristics of an MP3 disc or a JPEG disc is determined by the writing en...

Страница 32: ...n a JPEG disc each still picture is recorded as a file Files are usually grouped into a folder Folders can also include other folders creating hierarchical folder layers This unit simplifies the hierarchical construction of a disc and manages folders by groups There are following limitations about the numbers of files and of groups this unit can recognize Total number of files on a disc 1000 Total...

Страница 33: ...on the inner circle of the disc tray 3 Press the same 0 you have pressed in step 1 Disc tray closes and playback starts automatically for some discs When you press 0 for the next tray you want to place another disc onto the first disc tray automatically closes and then the next tray comes out About the DISC READY lamps Each DISC READY lamp shows the status of a disc placed on each corresponding di...

Страница 34: ...does not work for SVCD VCD with the PBC function and some DVDs When you play these discs press ENTER or DISC 3 When a disc menu appears on the TV screen See Playing Back by Using the Disc Menu on page 32 To stop play for a moment press 8 While pausing the elapsed playing time and the disc indicator flash on the display To start playback again press DISC 3 To stop playing press 7 This unit can stor...

Страница 35: ...ayback Skips to the beginning of the next or succeeding tracks 4 Goes back to the beginning of the current or previous tracks While playing a SVCD or VCD with the PBC function and 4 or 4 control on the front panel may be used for moving another menu See page 32 Changing the Disc to Play Back While playing a disc you can select and play back the disc To select a disc to play back On the remote cont...

Страница 36: ...isc On the remote control ONLY To show the on screen indication press ON SCREEN while playing a disc Ex When DVD is a playing source Ex When SVCD VCD CD is a playing source 1 Disc type 2 The disc tray number of the current disc 3 For DVD Current title number For SVCD VCD CD Current track number 4 Current chapter number 5 Various time indications When you press ON SCREEN twice the pull down menu wi...

Страница 37: ...e DVDs are recorded with their own menus which show their contents SVCDs or VCDs with the Playback Control PBC function also have their own menus such as lists of songs You can play back the discs by using these menus 7 When playing a DVD DVD discs generally have their own menus which show the disc contents These menus contain various items such as titles of movies names of songs or artist informa...

Страница 38: ...Pressing 7 during Repeat Play of DVD stops playback and cancels Repeat Play Turning off the unit will also cancel the Repeat Play While playing a SVCD or VCD with the PBC function When the PBC function is activated Repeat All may not work properly 3 Press PLAY MODE repeatedly until PROGRAM appears on the display Each time you press the button the play mode changes as follows The PROGRAM indicator ...

Страница 39: ...ayback Turning off the unit will also erase the program To exit from Program Play Press PLAY MODE repeatedly until the PROGRAM indicator goes off from the display before or after playback Playing at Random Random Play You can play disc s contents at random Random Play cannot be used on some DVD discs If a JPEG disc is loaded it is not played back during Random Play On the remote control ONLY 1 Loa...

Страница 40: ...put mode on the TV If appears on the TV when you press a button the disc cannot accept an operation you have tried to do or data required for that operation is not recorded on the disc Advanced Disc Operations The buttons emphasized in the illustration below are used and explained in the following section pages 36 to 45 DVD DVD SVCD SVCD VCD VCD CD CD shows the types of discs the operation is avai...

Страница 41: ... on the TV appears at the beginning of a scene containing multi angle views appears at the beginning of a scene containing multi audio languages appears at the beginning of a scene containing multi subtitle languages Play Pause Forward Search Reverse Search Forward slow motion Reverse slow motion appears when you perform each operation If you do not want the on screen guide icons see page 63 OFF 1...

Страница 42: ... appears on the TV 2 Press cursor 3 2 repeatedly to select highlight on the pull down menu See the relevant page for the detail of each function 3 Press ENTER The pop up window appears under the pull down menu 4 Press cursor 5 repeatedly to select the desired option in the pop up window Each time you press the button the options change 5 Press ENTER The setting changes and the pop up window goes o...

Страница 43: ...bps OFF 1 3 1 3 1 3 TIME CHAP DVD VIDEO TITLE 14 DISC 3 TOTAL 1 25 58 CHAP 23 8 5Mbps 7 Locating a desired position Time Search You can start playback at your desired position by specifying the elapsed playing time from the disc Time Search may not work for some DVDs For DVD VCD During playback For CD During playback or while stopped 1 Press ON SCREEN twice The on screen bar with pull down menu ap...

Страница 44: ...es off If you select ALL during Random Play the all tracks of the disc are played repeatedly in random order A B cannot be selected during Program and Random Play or while a disc is not playing To turn off the on screen bar Press ON SCREEN To cancel the repeat playback Select OFF in step 4 then press ENTER You can directly change Repeat Play mode except A B by pressing REPEAT on the remote control...

Страница 45: ...ppears on the TV For SVCD Press SUBTITLE repeatedly until OFF appears on the pop up window ENGLISH ENGLISH 1 3 1 3 DVD DVD DVD DVD SVCD SVCD 6 Press ENTER at the end of the portion you want to repeat point B A B repeat playback starts The selected part between point A and B is played repeatedly To turn off the on screen bar Press ON SCREEN To cancel the A B repeat playback Select OFF in step 4 the...

Страница 46: ...audio channel using the on screen bar See page 36 for details During playback 1 Press AUDIO The following pop up window appears on the TV Ex ST stereo is selected when playing a VCD 2 Press AUDIO repeatedly to select the desired audio channel Each time you press the button the audio channel changes For SVCD Ex ST 1 ST 2 L 1 R 1 L 2 R 2 back to the beginning ST 1 ST 2 To listen to normal stereo 2 c...

Страница 47: ... motion press SLOW To play back in reverse slow motion for DVD only press SLOW 1 Each time you press the button the playback speed changes as follows Forward 1 32 1 16 1 8 1 4 1 2 Reverse for DVD only 1 32 1 16 1 8 1 4 1 2 To pause slow motion playback Press 8 To return to normal playback Press DISC 3 During slow motion playback No sound will be reproduced 7 Zooming in During playback or while pau...

Страница 48: ...ION TINT SHARPNESS 0 0 0 0 3 3 GAMMA 3 GAMMA DVD DVD SVCD SVCD VCD VCD 2 Press cursor 5 repeatedly to select a parameter you want to adjust Adjust the parameters so that the picture you are viewing appears as you prefer GAMMA Adjust if the neutral color is bright or dark The brightness of dark and bright portions is maintained Available range OFF 1 darkest to 3 brightest BRIGHTNESS Adjust if the p...

Страница 49: ...only baseline JPEG files Progressive JPEG files or lossless JPEG files cannot be played Baseline JPEG format Used for digital cameras web etc Progressive JPEG format Used for web Lossless JPEG format An old type and rarely used now This unit may not play back properly JPEG files which are recorded by the devices other than digital still camera Some tracks on an MP3 JPEG disc are skipped and may no...

Страница 50: ... MP3 Press DISC 3 or ENTER Playback starts from the selected file For JPEG Press DISC 3 Slide show starts from the selected file Press ENTER to show the selected file as a still picture While a JPEG file is played back the JPEG CONTROL screen disappears To stop playback press 7 For JPEG discs JPEG CONTROL screen appears on the TV If a black screen continuously appears in Slide show The file curren...

Страница 51: ...46 English Remote Control Front Panel Recording The buttons emphasized in the illustration below are used and explained in the following section pages 47 and 48 ...

Страница 52: ...press 7 to change the tape direction 4 Start playing the source FM AM disc player or auxiliary equipment connected to the AUX IN jacks When the source is the disc player you can also use Synchronized Recording see page 48 5 Start recording On the remote control Press and hold REC while holding down SHIFT for more than 1 second On the front panel Press REC START STOP The REC recording lamp start fl...

Страница 53: ...ay and the REC recording lamp stops flashing Both the cassette deck and the disc player stop automatically To stop recording press 7 or REC START STOP or 7 on the front panel To record without creating a 4 second blank Synchronized Recording creates 4 second blank portion on the recording tape between each song To record without creating a 4 second blank portion follow the steps below after you ha...

Страница 54: ...49 English Remote Control Front Panel The buttons emphasized in the illustration below are used and explained in the following section pages 50 to 52 Enjoying Karaoke ...

Страница 55: ...E indicator To cancel from the Karaoke mode change the source to play Turning off the unit also cancels the Karaoke mode To exit from the Karaoke mode press KARAOKE while holding down SHIFT repeatedly until MIC OFF appears on the display To apply an echo to your voice You can apply echo effect to your voice On the remote control ONLY Press ECHO while holding down SHIFT The ECHO indicator also ligh...

Страница 56: ...OLUME Avoid pointing the microphone s towards the speakers When two microphones are connected turn off the unused microphone Microphone Mixing When the playback source is a multi channel software it will be played back as a 2 channel source For DVD SVCD VCD CD During playback or while stopped For MP3 During playback 1 Connect the microphone s 2 Start playing the source FM AM disc player or auxilia...

Страница 57: ...ex Karaoke disc Press AUDIO to select a channel when you start playing a disc Refer to the instruction supplied to the disc for details 8 Press DISC 3 The titles and tracks are played in the order you have programed The number of the title or track currently played back is deleted from the Karaoke reserve screen Playback stops after playing back all reserved step To check and modify the reserved s...

Страница 58: ...53 English Remote Control Front Panel The buttons emphasized in the illustration below are used and explained in the following section pages 54 to 57 Using the Timers ...

Страница 59: ...hat the tape direction is correct When using an external component as the source to play Set the timer equipped on the external component to the same time On the front panel ONLY 1 Press CLOCK TIMER repeatedly until DAILY appears on the display The Timer indicator lights up and the DAILY Daily Timer indicator starts flashing Each time you press the button the timer setting modes change as follows ...

Страница 60: ...lay for about 2 seconds Then the settings you have done are shown in sequence for your confirmation 9 Press to turn off the unit standby if you have set the Daily Timer with the unit turned on The unit will turn on about one minute before the on time comes When you select a DVD as the source to play Playback may start a little earlier before the on time comes If the unit is turned on before the on...

Страница 61: ...nit enters on time setting mode 4 Set the on time you want the unit to turn on at 1 Turn 4 to set the hour then press SET DISPLAY 2 Turn 4 to set the minute then press SET DISPLAY SET appears for about 1 second then the unit enters off time setting mode 5 Set the off time you want the unit to turn off standby at 1 Turn 4 to set the hour then press SET DISPLAY 2 Turn 4 to set the minute then press ...

Страница 62: ... changes as follows If the built in clock has not been set CLOCK ADJUST appears on the display see page 13 2 Wait for about 5 seconds after specifying the time length The SLEEP indicator flashes slowly until it shuts off the power To check the remaining time until the shut off time press SLEEP once so that the remaining time minutes until the shut off time power appears for about 5 seconds To chan...

Страница 63: ...t mode on the TV If appears on the TV when you press a button the disc cannot accept an operation you have tried to do or data required for that operation is not recorded on the disc The buttons emphasized in the illustration below are used and explained in the following section pages 59 to 66 Remote Control Choice Menu Operations ...

Страница 64: ...tails on each choice menu see Configuration of choice menus on the right column 7 Configuration of the choice menus The choice menu has the following menus LANGUAGE menu see page 61 You can select the initial language for the disc menu audio and subtitle You can also select the language shown on the TV screen while operating this unit PICTURE menu see page 61 You can select the desired options con...

Страница 65: ... submenus for setting up various options Pressing ENTER shows the submenus for the selected item on the TV You can set the items using cursor 5 and ENTER as explained in steps 5 and 6 above ENGLISH ENGLISH ENGLISH ENGLISH LANGUAGE MENU LANGUAGE ON SCREEN LANGUAGE AUDIO LANGUAGE SUBTITLE USE TO SELECT USE ENTER TO CONFIRM TO EXIT PRESS CHOICE ENTER SELECT 4 3 LB PICTURE MONITOR TYPE SCREEN SAVER ON...

Страница 66: ...Select when the aspect ratio of your TV is 16 9 wide TV and when the TV has the screen size adjustment function 4 3 LB Letter Box conversion Select when the aspect ratio of your TV is 4 3 conventional TV While viewing a wide screen picture the black bars appear on the top and the bottom of the screen 4 3 PS Pan Scan conversion Select when the aspect ratio of your TV is 4 3 conventional TV While vi...

Страница 67: ...y the original surround sound ON Applies the compression effect Select to always use this function for all Dolby digital software Loud sound will become low and vice versa SURROUND SETTING You can enjoy the Surround mode simply by playing back a disc when the surround setting is in use AUTO or ON This setting takes effect only when the source is disc player This setting does not affect DIGITAL AUD...

Страница 68: ... it ON SCREEN GUIDE You can activate or deactivate the on screen guide icons see page 36 The on screen guide icons appear on the TV at the beginning of the playback with this function turned on When recording the picture on a VCR select OFF to avoid recording the indications on your video tape The choice menu and on screen bar will be displayed and recorded even though this function is set to OFF ...

Страница 69: ...cursor 5 repeatedly to select highlight the country code then press ENTER SET LEVEL is now selected highlighted 5 Press ENTER The pop up window for level setting appears 6 Press cursor 5 repeatedly to select highlight the level of restriction then press ENTER The smaller the value of level is the more restrictive the Parental Lock level is Select NONE to cancel this function 7 Press the number but...

Страница 70: ...wrong passwords three times EXIT will be selected highlight automatically and cursor 5 does not work Press ENTER to exit from the PARENTAL LOCK submenu then start from step 1 again If you forget your password enter 8888 7 Releasing Parental Lock temporarily When you set a strict parental level some discs may not be played back at all When you load such a disc and try to play it the following displ...

Страница 71: ...evis KP Korea Democratic People s Republic of KR Korea Republic of KW Kuwait KY Cayman Islands KZ Kazakhstan LA Lao People s Democratic Republic LB Lebanon LC Saint Lucia LI Liechtenstein LK Sri Lanka LR Liberia LS Lesotho LT Lithuania LU Luxembourg LV Latvia LY Libyan Arab Jamahiriya MA Morocco MC Monaco MD Moldova Republic of MG Madagascar MH Marshall Islands ML Mali MM Myanmar MN Mongolia MO Ma...

Страница 72: ...ailable operations You can use following functions by using AV COMPU LINK control system One touch DVD play Simply by start playing back the unit the TV automatically turns on and changes the input mode to the appropriate position so that you can view the playback picture The TV does not turn off automatically even if you turn off the unit When the main power of the TV is turned off or the power c...

Страница 73: ... Armenian IA Interlingua IE Interlingue IK Inupiak IN Indonesian IS Icelandic IW Hebrew JI Yiddish JW Javanese KA Georgian KK Kazakh KL Greenlandic AA Afar AB Abkhazian AF Afrikaans AM Ameharic AR Arabic AS Assamese AY Aymara AZ Azerbaijani BA Bashkir BE Byelorussian BG Bulgarian BH Bihari BI Bislama BN Bengali Bangla BO Tibetan BR Breton CA Catalan CO Corsican CS Czech CY Welsh DA Danish DZ Bhuta...

Страница 74: ...spite of its high compression ratio Letter box A method of displaying wide images like movies in on a 4 3 TV screen with no part of the image deleted by placing black bands on the top and bottom of the screen This name has derived from the screen form looking literally like a letter box MPEG Multichannel Digital audio compression format used for PAL SECAM DVD software MPEG stands for Moving Pictur...

Страница 75: ...o remain in contact with it for a long time Handling discs Remove the disc from its case by holding it at the edge while pressing the center hole lightly Do not touch the shiny surface of the disc or bend the disc Put the disc back in its case after use to prevent warping Be careful not to scratch the surface of the disc when placing it back in its case Avoid exposure to direct sunlight temperatur...

Страница 76: ...e PROGRESSIVE lamp are flashing though the unit is connected to a TV which does not support progressive video input such as a conventional TV The color system is not set correctly Parental lock is in use 4 3 PS is selected when viewing on a conventional TV aspect ratio 4 3 Small tabs on the top of the cassette are removed Karaoke is activated The key control has been adjusted The built in micropro...

Страница 77: ...PB PR 0 7 V p p 75 Ω Speakers Impedance FRONT SUBWOOFERS 6 Ω 16 Ω FRONT MAIN SPEAKERS 6 Ω 16 Ω CENTER SPEAKER 8 Ω 16 Ω SURROUND SPEAKERS 16 Ω 32 Ω Tuner FM tuning range 87 50 MHz 108 00 MHz AM tuning range For Saudi Arabia 531 kHz 1 602 kHz At 9 kHz intervals 530 kHz 1 600 kHz At 10 kHz intervals For other countries 531 kHz 1 710 kHz At 9 kHz intervals 530 kHz 1 710 kHz At 10 kHz intervals DVD pla...

Страница 78: ...EAKERS CENTER RIGHT LEFT OPTICAL DIGITAL OUTPUT VOLTAGE SELECTOR RIGHT LEFT RIGHT LEFT AUX IN CAUTION SPEAKER IMPEDANCE 16 32 VOLTAGE SELECTOR Mains AC Line Instruction not applicable for Europe U S A Canada Australia and U K CAUTION for mains AC line BEFORE PLUGGING IN do check that your mains AC line voltage corresponds with the position of the voltage selector switch provided on the outside of ...

Отзывы: