background image

8

The IMPRESSA X9 Win Manual

You are holding the manual for your IMPRESSA X9 Win in your hand. 
It will help you to familiarize yourself with your  IMPRESSA safely and 
quickly and teach you the full range of facilities it offers.

Chapter 2, ‘Preparing and using for the first time’, explains step-by-
step how to set up and prepare the IMPRESSA.

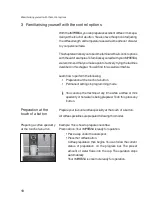
Chapter 3, ‘Familiarising yourself with the control options’ is impor-
tant  for  you  to  read  as  you  are  familiarising  yourself  with  your 
 IMPRESSA. It invites you to actively explore all the different coffee 
experiences that it offers.

All the other chapters are intended to help you when you have a 
 specific query.

If  you  use  the  IMPRESSA  X9  Win,  you  will  become  a  master  at 
 preparing exciting coffee specialities, you will be a  Barista!

You can download the short operating instructions for your machine 
from the JURA website (www.jura.com).

The IMPRESSA X9 Win Manual

Symbol description

Warnings

CAUTION

Always take note of any information marked with the CAUTION or WARNING symbol. 
The signal word 

WARNING

 points out potential risk of serious injury, and the signal 

word 

CAUTION 

potential risk of slight injury.

CAUTION

The 

CAUTION

 symbol is used to draw attention to circumstances which could cause 

the  machine to become damaged.

Symbols used 

E

Information

 and tips to make things easier for you as you use your IMPRESSA.

@

References to the 

online

 JURA website, where you can find interesting further infor-

mation: www.jura.com.

T

Prompt to take action

. This symbol means that you are being prompted to perform 

some  action.

Содержание IMPRESSA X9 Win

Страница 1: ...using themachineread theinstructionsfor use J UR AType657 The IMPR ESSA Manual has been awarded the seal of approval by the independent German Technical Inspection Agency T VS D dueto its easy to unde...

Страница 2: ...ining and adjusting thedegreeof water hardness 1 4 Adjusting thegrinder 1 6 S witching on 1 7 S witching off standby 1 7 3 F amiliarising yourself with thecontrol options 1 8 Preparation at thetouch o...

Страница 3: ...ual spout 33 Milk system cleaning 33 Coffeesystem cleaning 34 Combined cleaning 35 Changing thefilter 37 Descaling themachine 38 Cleaning thebean container 40 Descaling thewater tank 40 7 Display mess...

Страница 4: ...nd power cable back of machine 4 Dual spout height adjustable 5 Milk pipes 6 Coffeegroundscontainer 7 Filler funnel for cleaning tablet 8 Cover for programming buttons 9 Water tank with cover 1 0 Hot...

Страница 5: ...on Milk coffeebutton Milk button Theproductsareshown on thedisplay 3 Programming buttons Q On off button Filter button Descaling button 9 Counter button O Pbutton button c R insebutton 6 Milk system c...

Страница 6: ...smell of burning unplugthemachineimmediately from themainssupply and contact theJ UR Aservicecentre Z If the power cable for this machine is damaged it must be repaired either directly by J UR A or by...

Страница 7: ...re a jet of water may beused Z Only connect the machine to a power supply in accordance with the information on the rating plate The rating plate is located on the rear of your IMPR ESSA Further techn...

Страница 8: ...A X9 Win you will become a master at preparing exciting coffeespecialities you will beaBarista Y oucandownloadtheshort operatinginstructionsforyourmachine from theJ UR Awebsite www jura com The IMPRES...

Страница 9: ...kindsof applications Z Simpleoperation with Smart Lead Smart Lead theinter active J UR A user guidance with visual and audio features guides personnel through all operating and care steps This makes...

Страница 10: ...oblem Simply generatecodegroups Z Customisable The setting options of the IMPR ESSA X9 Win arejust asvariedasthewishesof our customers Themachine can therefore be equipped with a number of different a...

Страница 11: ...mall pot macchiato milky coffee hot water steam 2x U Grinder selection or rinsebutton all buttonscan be arranged to preference Z Blocking products Z Setting thefilter capacity Z Assigning code groups...

Страница 12: ...fore have theoptionof usingtwotypesof coffeebeans Thecover of thebean container also actsasan aromapreservation cover Thiswill ensure that your coffeebeansretain their aromafor longer Coffee beans whi...

Страница 13: ...theMUL TIMEDIALANGUAGEoption TIMEHOURS T Pressthe or button several timesto set thehours TIMEHOURS1 2 00 Example O T PressthePbutton to confirm thehour setting TIMEMINUTES1 2 00 Example T Pressthe or...

Страница 14: ...contacts section on thelast pageof theseinstructions Y our IMPR ESSA no longer has to be descaled if you are using the CLAR ISfilter cartridge E TheCLAR ISfilter cartridgemust beinstalled for thefirst...

Страница 15: ...xample Tochangethewater hardnessfrom 1 6 dHto25 dH pro ceed asfollows Precondition Y our IMPR ESSAisready for operation T Open thecover of theprogramming buttons O T Press the P button until WATER HAR...

Страница 16: ...t afinesetting for alight roast U If thefinenessof grind istoo fine thecoffeeonly dripsfrom thecoffeespout Z Select acoarsesetting for adarker roast U If the fineness of grind is too coarse the coffee...

Страница 17: ...c T Presstherinsebutton to start therinseoperation MACHINEISR INSING water flowsout of thedual spout The operation stops automatically Y our IMPR ESSA is ready for operation When you switch your IMPR...

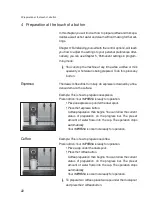
Страница 18: ...t settingsin programming mode E Y ou can stop the machine at any time while a coffee or milk speciality or hot water isbeing prepared To do this pressany button Prepareyour favouritecoffeespeciality a...

Страница 19: ...sand specify theweekdayson which IMPR ESSAshould switch on and off automatically OFFAFTER OFFAFTER HRS 0 5 HRS 9HRS T Set thenumber of hoursafter which theIMPR ESSAshould switch off automatically SWIT...

Страница 20: ...ESSO POWDER AMOUNTisshown O T PressthePbutton to enter theprogrammeitem 1ESPR ESSO POWDERAMOUNT T Press the or button several times to select the powder amount O T PressthePbutton to confirm thesetti...

Страница 21: ...mode Y our IMPR ESSAisoncemoreready for operation With theindividual counter counter button 9 you can trackyour consumption over a specific period of time which you can specify Thiscounter can berese...

Страница 22: ...on Y our IMPR ESSAisready for operation T Placean espresso cup under thedual spout T Pressthe1espresso button Coffee preparation then begins Y ou can follow the current status of preparation on the pr...

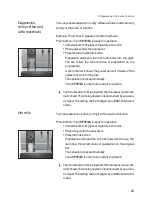
Страница 23: ...operation E Tenminutesafter milkisprepared thedual spout isautomat icallyrinsed Thisrinsingoperationisannounced byanacous ticsignal Thesetting can bechanged by aJ UR Aservicetech nician Y ou can prepa...

Страница 24: ...rationstopsautomaticallywhenthepre set amount of water isreached Y our IMPR ESSAisoncemoreready for operation Thereisadanger of scalding from hot steam T Avoid direct contact with theskin Precondition...

Страница 25: ...programmeitem SELE CTPR ODUCT T Pressthe1espresso button 1ESPR ESSO WATERAMOUNT T Pressthe buttonseveral timesuntil 1ESPR ESSO POWDER AMOUNTisshown O T PressthePbutton to enter theprogrammeitem POWDER...

Страница 26: ...econdition Y our IMPR ESSAisready for operation T Open thecover of theprogramming buttons O T Press the P button until WATER HAR DNESS 1 6 dH appears T Pressthe or button several timesuntil TIMEisshow...

Страница 27: ...en thecover of theprogramming buttons O T Press the P button until WATER HAR DNESS 1 6 dH appears T Pressthe or button several timesuntil TIMERisshown O T PressthePbutton to enter theprogrammeitem MAC...

Страница 28: ...programmableswitch off timecan beadjusted between 0 5 and 9 hoursor deactivated Example Proceed as follows to change the automatic switch off timefrom 5 0 HRSTO2 0 HRS Precondition Y our IMPR ESSAisre...

Страница 29: ...ay SPR ACHEDE UTSCH 0 T Presstheexit button to exit programming mode Y our IMPR ESSAisoncemoreready for operation Y oucanchangetheunit of theamount of water from ml to oz and thetimeformat to 24 HRS o...

Страница 30: ...Cisshown O T PressthePbutton to enter theprogrammeitem SWITCH ONR INSE AUTOMATIC T Pressthe or button to changethesetting to MANUAL O T PressthePbutton to confirm thesetting CONFIR MEDappearsbriefly o...

Страница 31: ...hePbutton until WATERHAR DNESSappears T Press the or button several times until MUL TIMEDIA is shown O T PressthePbutton to enter theprogrammeitem MUL TIMEDIA VOLUME T Press the or button several time...

Страница 32: ...on appears after heating or this is automatically started When the IMPR ESSAisswitched off a rinse operation isautomati cally initiated In programming modeyou can makeasetting to stipulatewhether thes...

Страница 33: ...r of theindividual parts T Mount thespoutson themachine T R eplacethecover For reasonsof hygieneand to ensurethat thedual spout worksper fectly you should clean themilk system daily if you haveprepare...

Страница 34: ...The procedure is interrupted WATER FOR MILK SYSTEM CLEANING T R insethereceptaclethoroughly fill it withapprox 400ml of fresh water and immersethemilk pipesin thewater T Emptytheotherreceptacleandplac...

Страница 35: ...lows out of the dual spout Y ou can follow thecurrent cleaning statusof thecoffeesys tem on theprogressbar Theoperation isinterrupted ADDTABLET T Insert a J UR A cleaning tablet into the filler funnel...

Страница 36: ...bined cleaning button Thecurrent maintenancestatusisshown 8 T Pressthecombined cleaning button again STAR TCOMBINEDCLEANING 8 T Press the combined cleaning button to start the cleaning operation EMPTY...

Страница 37: ...thedrip tray EMPTYCOFFEEGR OUNDSCONT T Empty thecoffeegroundscontainer T R eplacethecoffeegroundscontainer and thedrip tray Y our IMPR ESSAisoncemoreready for operation After 50 litres of water have...

Страница 38: ...ally promptsyou to descaleit when necessary Thedegreeof calcification dependson thedegreeof hardnessof your water If thedescaling agent comesinto contact with theskin or eyes this can causeirritation...

Страница 39: ...rt thedescaling operation EMPTYDR IPTR AY T Empty thedrip tray EMPTYCOFFEEGR OUNDSCONT T Empty thecoffeegroundscontainer T R eplacethecoffeegroundscontainer and thedrip tray SOL VENTINTANK T R emoveth...

Страница 40: ...n container from timeto time Danger of injury to thefingerswhen thegrinder isrunning T S witch the machine off with the on off button Q before per forming any work on thegrinder T S witch themachineof...

Страница 41: ...41 6 Maintenance T Fill thewater tank with fresh cold water and reinsert...

Страница 42: ...Chapter 2 Preparing and using for thefirst time Filling the bean container FILLWATER TANK Thewater tank isempty Y ou cannot prepareany coffee products hot water or milk products T Fill thewater tank S...

Страница 43: ...to start arinseoperation or continueastarted maintenance programme T Presstherinsebutton to start rinsing or to continuethemain tenanceprogramme COFFEESPOUTMISSING Thecover of thedual spout is either...

Страница 44: ...cepartner who will be ableto deactivatetheCLAR IS filter cartridge FILLBEANSisdisplayed although thebean container hasbeen filled Thegrinder isnot yet com pletely filled with beans T Prepareacoffeespe...

Страница 45: ...se instruc tions Problem Cause Result Action ER R OR2or ER R OR4 is displayed If themachinewasexposed to thecold for along period of time heating isdisabled for safety reasons T Warm up themachineat r...

Страница 46: ...of water flowsfrom thehot water pipeand the steam pipe The operation stops automatically The IMPR ESSAwill switch itself off 3 T Turn your IMPR ESSAoff at thepower switch Thenext timeyouusethemachine...

Страница 47: ...oiseemitted Lp 70 dB A Marksof conformity A S Power consumption in standby mode 4 2Wh Pump pressure 2x staticmax 1 5 bar Water tank capacity 5 0 l Bean container capacity 2x 650 g Coffeegroundscontain...

Страница 48: ...and adjusting thedegreeof water hardness 1 4 Display 5 Messages 42 Display messages 42 Disposal 46 Drip tray 4 Drip tray 4 Dual spout 4 Dismantling and rinsing 33 E Environmentally neutral disposal 46...

Страница 49: ...ode 25 Product settings 25 Timeand weekday 26 Timeformat 29 Unit of water amount 29 Prompt to takeaction Symbolsused 8 Proper use 6 R R esetting thecounter 21 R insing Dual spout 33 Machine 32 S Safet...

Страница 50: ...50...

Страница 51: ...51...

Страница 52: ...Wereservetheright to maketechnical changes The illustrations used in the IMPR ESSA X9 Win Manual show the IMPR ESSA X9 Win Platinum Y our IMPR ESSA could incorporate minor changes Y our opinion isimp...

Отзывы: