background image

Table 13: Airflow Direction in OCX1100-48SX Switch Models

(continued)

Direction of Airflow

Fan Modules and Power Supply

Model Number

Front-to-back—that is, air intake to cool the
chassis is through the vents on the front panel
of the chassis and hot air exhausts through
the vents on the rear panel of the chassis.

The switch ships with four fan modules and
two DC power supplies installed; all bearing
the label

AIR OUT (AFO)

.

OCX1100-48SX-D-AFO

Back-to-front—that is, air intake to cool the
chassis is through the vents on the rear panel
of the chassis and hot air exhausts through
the vents on the front panel of the chassis.

The switch ships with four fan modules and
two AC power supplies installed; all bearing
the label

AIR IN (AFI)

.

OCX1100-48SX-AFI

Back-to-front—that is, air intake to cool the
chassis is through the vents on the rear panel
of the chassis and hot air exhausts through
the vents on the front panel of the chassis.

The switch ships with four fan modules and
two DC power supplies installed; all bearing
the label

AIR IN (AFI)

.

OCX1100-48SX-D-AFI

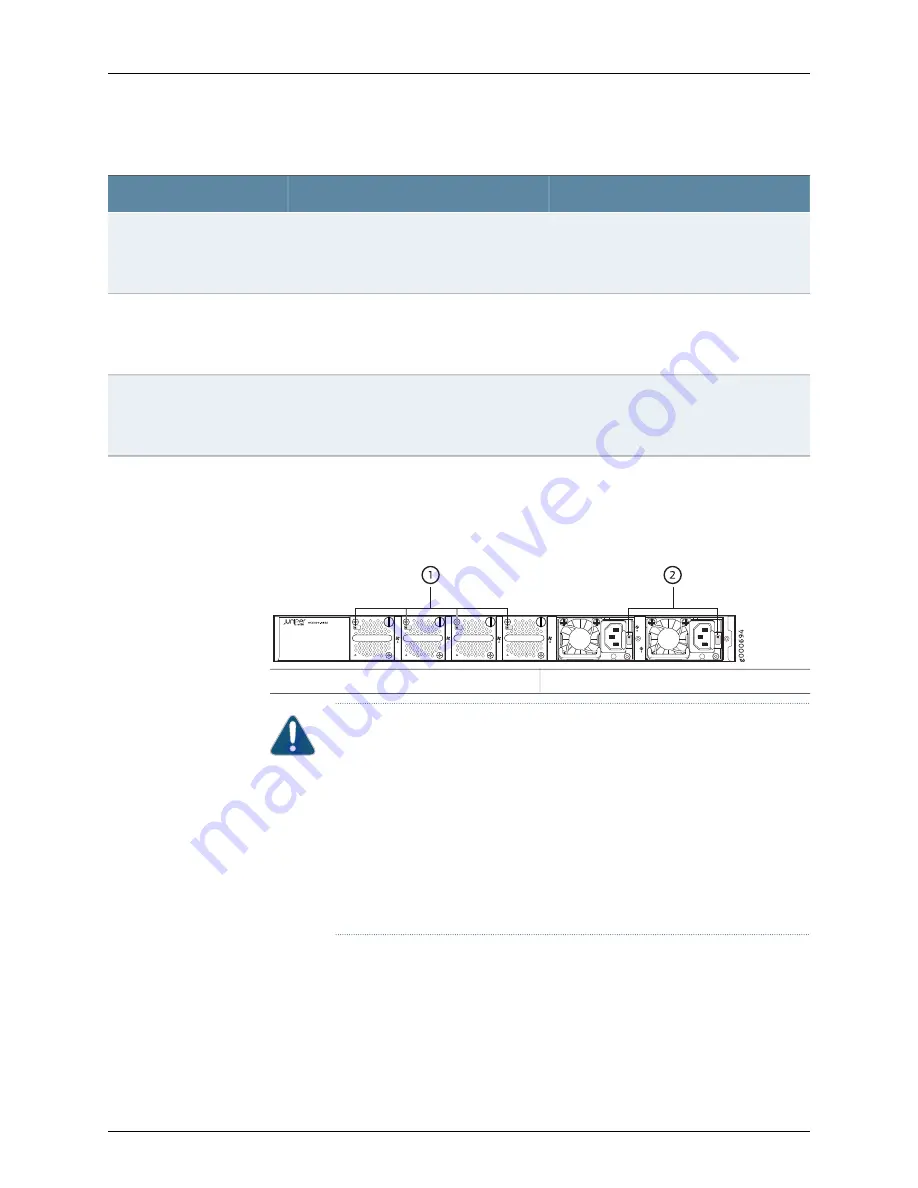
Figure 10 on page 19

shows the location of labels on the power supplies and fan modules

of an OCX1100-48SX switch.

Figure 10: Location of Airflow Labels on the Power Supplies and Fan
Modules of an OCX1100-48SX Switch

2—

1—

Airflow labels on the power supplies

Airflow labels on the fan modules

CAUTION:

Do not install:

AC and DC power supplies in the same chassis.

AC power supplies in DC switch models or DC power supplies in AC switch
models.

Power supplies and fan modules with different airflow labels (

AIR IN (AFI)

and

AIR OUT (AFO)

) in the same chassis

Fan modules with different airflow labels (

AIR IN (AFI)

and

AIR OUT (AFO)

)

in the same chassis.

Front-to-Back Airflow

In the OCX1100 switch models that have front-to-back airflow, the air intake to cool the
chassis is through the vents on the front panel of the switch and hot air exhausts through
the vents on the rear panel. See

Figure 11 on page 20

.

19

Copyright © 2017, Juniper Networks, Inc.

Chapter 3: Cooling System and Airflow

Содержание OCX1100

Страница 1: ...OCX1100 Switch Hardware Guide Modified 2017 04 25 Copyright 2017 Juniper Networks Inc ...

Страница 2: ...ise this publication without notice OCX1100 Switch Hardware Guide Copyright 2017 Juniper Networks Inc All rights reserved The information in this document is current as of the date on the title page YEAR 2000 NOTICE Juniper Networks hardware and software products are Year 2000 compliant Junos OS has no known time related limitations through the year 2038 However the NTP application is known to hav...

Страница 3: ... CLI Terminology Mapping 7 Chapter 2 Chassis Components and Descriptions 11 Chassis Physical Specifications for OCX1100 Switches 11 Field Replaceable Units in OCX1100 Switches 12 Chassis Status LEDs on OCX1100 Switches 12 Management Port LEDs and Console Port LEDs on OCX1100 Switches 13 SFP Port and QSFP Port LEDs on OCX1100 Switches 14 Chapter 3 Cooling System and Airflow 17 Cooling System and Ai...

Страница 4: ...ecifications and Requirements 41 AC Power Supply Specifications for OCX1100 Switches 41 AC Power Cord Specifications for an OCX1100 Switch 41 DC Power Supply Specifications for OCX1100 Switches 44 Chapter 7 Transceiver and Cable Specifications 47 Pluggable Transceivers Supported on OCX1100 Switches 47 SFP Direct Attach Cables for OCX1100 Switches 50 Cable Specifications 51 Standards Supported by T...

Страница 5: ... an OCX1100 Switch CLI Procedure 100 Part 4 Installing Maintaining and Replacing Components Chapter 14 Replacing Cooling System Component 105 Installing a Fan Module in an OCX1100 Switch 105 Removing a Fan Module from an OCX1100 Switch 106 Chapter 15 Replacing Power Supply 109 Installing an AC Power Supply in an OCX1100 Switch 109 Removing an AC Power Supply from an OCX1100 Switch 111 Installing a...

Страница 6: ...22 Radiation and Laser Safety Guidelines and Warnings 155 Laser and LED Safety Guidelines and Warnings 155 General Laser Safety Guidelines 155 Class 1 Laser Product Warning 156 Class 1 LED Product Warning 156 Laser Beam Warning 156 Radiation from Open Port Apertures Warning 157 Chapter 23 Maintenance and Operational Safety Warnings 159 Maintenance and Operational Safety Guidelines and Warnings 159...

Страница 7: ...Statements 181 Agency Approvals for OCX1100 Switches 181 Compliance Statements for EMC Requirements for OCX1100 Switches 182 Canada 182 European Community 183 Israel 183 Japan 183 Korea 183 United States 184 FCC Part 15 Statement 184 Compliance Statements for Acoustic Noise for OCX1100 Switches 184 vii Copyright 2017 Juniper Networks Inc Table of Contents ...

Страница 8: ...Copyright 2017 Juniper Networks Inc viii OCX1100 Switch Hardware Guide ...

Страница 9: ... Chassis 20 Figure 12 Back to Front Airflow Through the OCX1100 48SX Switch Chassis 20 Chapter 4 Power Supplies 23 Figure 13 AC Power Supply for an OCX1100 Switch 24 Figure 14 DC Power Supply for an OCX1100 Switch 26 Figure 15 AC Power Supply LED in an OCX1100 Switch 27 Figure 16 DC Power Supply LED in an OCX1100 Switch 28 Part 2 Site Planning Preparation and Specifications Chapter 5 Preparation O...

Страница 10: ... 34 Installing a Fan Module in an OCX1100 48SX Switch 106 Figure 35 Removing a Fan Module from an OCX1100 48SX Switch 107 Chapter 15 Replacing Power Supply 109 Figure 36 Installing an AC Power Supply in an OCX1100 48SX Switch 110 Figure 37 Removing an AC Power Supply from an OCX1100 48SX Switch 112 Figure 38 Installing a DC Power Supply in an OCX1100 48SX Switch 114 Figure 39 Removing a DC Power S...

Страница 11: ... 5 Safety and Compliance Information Chapter 24 Electrical Safety Guidelines and Warnings 165 Figure 47 Placing a Component into an Antistatic Bag 168 xi Copyright 2017 Juniper Networks Inc List of Figures ...

Страница 12: ...Copyright 2017 Juniper Networks Inc xii OCX1100 Switch Hardware Guide ...

Страница 13: ...ctivity LED on SFP Ports 15 Table 11 Link Activity LED on QSFP Ports 15 Chapter 3 Cooling System and Airflow 17 Table 12 Fan Modules in OCX1100 48SX Switches 18 Table 13 Airflow Direction in OCX1100 48SX Switch Models 18 Chapter 4 Power Supplies 23 Table 14 Details of the AC Power Supplies in OCX1100 48SX Switches 24 Table 15 Airflow Direction in AC Power Supply Models for OCX1100 48SX Switches 25...

Страница 14: ...Table 31 SFP Direct Attach Cable Specifications 52 Table 32 Specifications of Cables to Connect to Management Devices 53 Chapter 8 Pinout Specifications 55 Table 33 Console Port Connector Pinout Information 55 Table 34 Mini USB Type B Console Port Pinout Information 56 Table 35 RJ 45 Management Port Connector Pinout Information 57 Table 36 RJ 45 to DB 9 Serial Port Adapter Pinout Information 57 Ta...

Страница 15: ...ormation in the latest release notes differs from the information in the documentation follow the product Release Notes Juniper Networks Books publishes books by Juniper Networks engineers and subject matter experts These books go beyond the technical documentation to explore the nuances of network architecture deployment and administration The current list can be viewed at http www juniper net bo...

Страница 16: ...tion mode type the configure command user host configure Represents text that you type Bold text like this user host show chassis alarms No alarms currently active Represents output that appears on the terminal screen Fixed width text like this A policy term is a named structure that defines match conditions and actions Junos OS CLI User Guide RFC 1997 BGP Communities Attribute Introduces or empha...

Страница 17: ...e brackets edit routing options static route default nexthop address retain Identifies a level in the configuration hierarchy Indention and braces Identifies a leaf statement at a configuration hierarchy level semicolon GUI Conventions In the Logical Interfaces box select All Interfaces To cancel the configuration click Cancel Represents graphical user interface GUI items you click or select Bold ...

Страница 18: ...an online self service portal called the Customer Support Center CSC that provides you with the following features Find CSC offerings http www juniper net customers support Search for known bugs http www2 juniper net kb Find product documentation http www juniper net techpubs Find solutions and answer questions using our Knowledge Base http kb juniper net Download the latest versions of software a...

Страница 19: ...For international or direct dial options in countries without toll free numbers see http www juniper net support requesting support html xix Copyright 2017 Juniper Networks Inc About the Documentation ...

Страница 20: ...Copyright 2017 Juniper Networks Inc xx OCX1100 Switch Hardware Guide ...

Страница 21: ...PART 1 Overview System Overview on page 3 Chassis Components and Descriptions on page 11 Cooling System and Airflow on page 17 Power Supplies on page 23 1 Copyright 2017 Juniper Networks Inc ...

Страница 22: ...Copyright 2017 Juniper Networks Inc 2 OCX1100 Switch Hardware Guide ...

Страница 23: ... on page 5 OCX1100 48SX Switch Components on page 6 Software OCX1100 switches run Junos OS which provides Layer 3 switching routing and security services The same Junos OS code base that runs on OCX1100 switches also runs on all Juniper Networks EX Series QFX Series and OCX Series switches M Series MX Series PTX Series and T Series routers and SRX Series Services Gateways For information about ins...

Страница 24: ...switches support AC or DC power supplies with different airflow directions depending on the model Power supplies for OCX1100 switches are fully redundant and load sharing and they are hot removable and hot insertable FRUs The OCX1100 48SX switches are shipped with two power supplies preinstalled in the rear panel of the switches Each power supply has a label AIR IN AFI or AIR OUT AFO on the facepl...

Страница 25: ...usts through the vents on the rear panel of the chassis AIR OUT AFO 800 W DC For more information see Cooling System and Airflow in an OCX1100 Switches on page 17 CAUTION Do not install AC and DC power supplies in the same chassis AC power supplies in DC switch models or DC power supplies in AC switch models Power supplies with different airflow labels AIR IN AFI and AIR OUT AFO in the same chassi...

Страница 26: ...he Front Panel of an OCX1100 48SX Switch 4 1 Mini USB console port Management port 5 2 QSFP ports RESET button 6 3 Console port SFP ports Figure 4 on page 6 shows the components on the rear panel of an OCX1100 48SX switch with two AC power supplies and four fan modules installed Figure 4 Components on the Rear Panel of an OCX1100 48SX Switch 2 1 Power supplies Fan modules Related Documentation OCX...

Страница 27: ...RIN AFI label 48 10 Gigabit Ethernet SFP portsand640 GigabitEthernet QSFP ports OCX1100 48SX D AFI NOTE Transceivers are not part of the shipping configuration If you want to purchase transceivers additional power supplies or additional fan modules for your switch you must order them separately Related Documentation Chassis Physical Specifications for OCX1100 Switches on page 11 OCX1100 Switches H...

Страница 28: ... the SFP ports are numbered 1 through 48 and the QSFP ports are numbered 49 through 54 PIC 0 48x10G 6x40G Pluggable Transceivers Supported on OCX1100 Switches on page 47 Optical transceivers n is a value equivalent to the number of the port in which the transceiver is installed Abbreviated name of the transceiver Xcvr n AC power supply or DC power supply Value of n is always 0 One of the following...

Страница 29: ...lue 0 1 2 or 3 corresponding to the fan module slot number One of the following OCX FAN X AFI OCX FAN X AFO Fan tray CAUTION Do not mix Fan modules with different airflow labels AIR IN AFI and AIR OUT AFO in the same chassis Power supplies and fan modules with different airflow labels AIR IN AFI and AIR OUT AFO in the same chassis Related Documentation OCX1100 Switches Hardware Overview on page 3 ...

Страница 30: ...Copyright 2017 Juniper Networks Inc 10 OCX1100 Switch Hardware Guide ...

Страница 31: ...ications of the OCX1100 48SX switch chassis Table 6 Physical Specifications of the OCX1100 48SX Switch Chassis Value Description 1 723 in 4 39 cm Chassis height 17 32 in 43 99 cm Chassis width 19 18 in 48 71 cm Chassis depth With two power supplies and four fan modules installed 20 lb 9 71 kg Weight You can mount an OCX1100 switch on a standard 19 in four post rack You can also mount the switch in...

Страница 32: ...e contract register any addition change or upgrade of hardware components at https www juniper net customers support tools updateinstallbase Failure to do so can result in significant delays if you need replacement parts This note does not apply if you replace existing components with the same type of component Related Documentation Installing and Removing OCX1100 Switch Hardware Components on pag...

Страница 33: ...d System too hot Amber On steadily Power on Off Power off No power cable attached Green PWR Power Blinking One of the power supply failed Amber On steadily Normal operation Off Not receiving power Green FAN Blinking Fan failure Amber All four LEDs can be lit simultaneously Related Documentation OCX1100 Switches Hardware Overview on page 3 Management Port LEDs and Console Port LEDs on OCX1100 Switc...

Страница 34: ...cribes the status LED on the console port Table 9 Status LED on the Console Port of an OCX1100 48SX Switch State and Description Color LED On steadily Console on Off Console off Green Status Related Documentation OCX1100 Switches Hardware Overview on page 3 Connecting a Device to a Network for Out of Band Management on page 85 SFP Port and QSFP Port LEDs on OCX1100 Switches On an OCX1100 switch ea...

Страница 35: ... 10 Gbps connection is active Blinking Packets transmitted and received Off No active connection or port disabled Green Link and activity Table 11 on page 15 describes the link and activity LED on QSFP ports in OCX1100 switches Table 11 Link Activity LED on QSFP Ports State and Description Color LED Indicates the status The status indicators are On steadily Secure 40 Gbps connection is active Blin...

Страница 36: ...Copyright 2017 Juniper Networks Inc 16 OCX1100 Switch Hardware Guide ...

Страница 37: ...witch This topic describes Fan Modules on page 17 Airflow Direction in OCX1100 48SX Switch Models on page 18 Front to Back Airflow on page 19 Back to Front Airflow on page 20 Do Not Install AIR IN AFI and AIR OUT AFO Components in the Same Chassis on page 21 Positioning the Switch on page 21 Fan Modules The OCX1100 switches fan modules are hot insertable and hot removable field replaceable units F...

Страница 38: ...el AIR OUT AFO Table 12 on page 18 lists the available fan module models and the direction of airflow in them Table 12 Fan Modules in OCX1100 48SX Switches Label on the Fan Module Fan Module AIR OUT AFO OCX FAN X AFO AIR IN AFI OCX FAN X AFI Airflow Direction in OCX1100 48SX Switch Models Table 13 on page 18 shows the direction of airflow in OCX1100 48SX switch models as shipped Table 13 Airflow D...

Страница 39: ...l of the chassis The switch ships with four fan modules and two DC power supplies installed all bearing the label AIR IN AFI OCX1100 48SX D AFI Figure 10 on page 19 shows the location of labels on the power supplies and fan modules of an OCX1100 48SX switch Figure 10 Location of Airflow Labels on the Power Supplies and Fan Modules of an OCX1100 48SX Switch 2 1 Airflow labels on the power supplies ...

Страница 40: ...back to front airflow the air intake to cool the chassis is through the vents on the rear panel and hot air exhausts through the vents on the front panel of the switch See Figure 12 on page 20 Figure 12 Back to Front Airflow Through the OCX1100 48SX Switch Chassis You must install only power supplies that have AIR IN AFI labels in switches in which the fan modules have AIR IN AFI labels Copyright ...

Страница 41: ...ure inside the chassis rises above the acceptable range If the temperature inside the chassis rises above the threshold temperature the system shuts down automatically Positioning the Switch In front to back airflow indicated by the label AIR OUT AFO on the fan modules and power supplies hot air exhausts through the vents on the rear panel of the switch In back to front airflow indicated by the la...

Страница 42: ...Copyright 2017 Juniper Networks Inc 22 OCX1100 Switch Hardware Guide ...

Страница 43: ...e AC power supplies CAUTION Do not install AC and DC power supplies in the same chassis AC power supplies in DC switch models or DC power supplies in AC switch models Power supplies with different airflow labels AIR IN AFI and AIR OUT AFO in the same chassis Power supplies and fan modules with different airflow labels AIR IN AFI and AIR OUT AFO in the same chassis This topic includes Characteristi...

Страница 44: ...ts labeled PSU 0 and PSU 1 in the rear panel of the chassis Power supply slots 1 Number AC appliance Inlet NOTE Each AC appliance inlet requires a dedicated AC power feed IEC 320 C13 Type 2 A Rating Internal Fans Front to back indicated by label AIR OUT AFO Back to front indicated by label AIR IN AFI Airflow One bicolor LED Power supply status LEDs 100 240 VAC Operating range To prevent electrical...

Страница 45: ... chassis AIR IN AFI OCX 460W X AC AFI Related Documentation Power Supply LEDs in OCX1100 Switches on page 27 AC Power Supply Specifications for OCX1100 Switches on page 41 Installing an AC Power Supply in an OCX1100 Switch on page 77 DC Power Supply in OCX1100 Switches The DC power supply in OCX1100 switches is a hot insertable and hot removable field replaceable unit FRU You can install it withou...

Страница 46: ...100 48SX switches Table 16 Details of the DC Power Supplies in OCX1100 48SX Switches 800 W DC Power Supply Details OCX 800W X DC AFI OCX 800W X DC AFO Model number Hot insertable and hot removable Field replaceable unit FRU type 1 7 lb 0 771 kg Power supply weight 2 Minimum installed in chassis 2 Maximum installed in chassis Install in power supply slots labeled PSU 0 and PSU 1 in the rear panel o...

Страница 47: ...werSupply Model Front to back that is air intake to cool the chassis is through the vents on the front panel of the chassis and hot air exhausts through the vents on the rear panel of the chassis AIR OUT AFO OCX 800W X DC AFO Back to front that is air intake to cool the chassis is through the vents on the rear panel of the chassis and hot air exhausts through the vents on the front panel of the ch...

Страница 48: ...pply continues to operate high temperature high power high current slow fan On steadily Power supply critical event causing a shutdown power supply failure overvoltage overcurrent overtemperature fan failure cord unplugged Amber Related Documentation AC Power Supply in OCX1100 Switches on page 23 AC Power Supply Specifications for OCX1100 Switches on page 41 Connecting AC Power to an OCX1100 Switc...

Страница 49: ...aration and Specifications Preparation Overview on page 31 Power Specifications and Requirements on page 41 Transceiver and Cable Specifications on page 47 Pinout Specifications on page 55 29 Copyright 2017 Juniper Networks Inc ...

Страница 50: ...Copyright 2017 Juniper Networks Inc 30 OCX1100 Switch Hardware Guide ...

Страница 51: ...ion Checklist for OCX1100 Switches The checklist in Table 19 on page 31 summarizes the tasks you need to perform when preparing a site for OCX1100 switch installation Table 19 Site Preparation Checklist Date Performed by For More Information Item or Task Environment Environmental Requirements and Specifications for OCX1100 Switches on page 32 Verify that environmental factors such as temperature a...

Страница 52: ...nce between the hardware components being connected Plan the cable routing and management Related Documentation General Safety Guidelines and Warnings on page 137 General Site Guidelines on page 33 Installing and Connecting an OCX1100 Switch on page 69 Mounting an OCX1100 Switch on page 70 Environmental Requirements and Specifications for OCX1100 Switches The switch must be installed in a rack or ...

Страница 53: ...Maintenance for OCX1100 Switches on page 37 General Site Guidelines Efficient device operation requires proper site planning and maintenance and proper layout of the equipment rack or cabinet if used and wiring closet To plan and create an acceptable operating environment for your device and prevent environmentally caused equipment failures Keep the area around the chassis free from dust and condu...

Страница 54: ... eliminate RFI from your site wiring do the following Use a twisted pair cable with a good distribution of grounding conductors If you must exceed the recommended distances use a high quality twisted pair cable with one ground conductor for each data signal when applicable Radio frequency interference If your site is susceptible to problems with electromagnetic compatibility EMC particularly from ...

Страница 55: ... an OCX1100 Switch on page 70 Installing and Connecting an OCX1100 Switch on page 69 Installing and Removing OCX1100 Switch Hardware Components on page 74 Requirements for Mounting an OCX1100 Switch on a Desktop or Other Level Surface You can install OCX1100 switch on a desktop or other such level surface by attaching the four rubber feet provided to the bottom of the chassis When choosing a locat...

Страница 56: ...rack as defined in Cabinets Racks Panels and Associated Equipment document number EIA 310 D published by the Electronics Industry Association http www eia org Ensure that the rack rails are spaced widely enough to accommodate the external dimensions of the device chassis The outer edges of the front mounting brackets extend the width of the chassis to 19 in 48 2 cm The rack must be strong enough t...

Страница 57: ...ces Ensure that the hot air exhaust of the chassis exits the cabinet without recirculating into the device An open cabinet without a top or doors that employs hot air exhaust extraction from the top ensures the best airflow through the chassis If the cabinet contains a top or doors perforations in these elements assist with removing the hot air exhaust Install the device in the cabinet in a way th...

Страница 58: ...assis If you are mounting the switch on a rack or cabinet along with other equipment ensure that the exhaust from other equipment does not blow into the intake vents of the chassis Leave at least 6 in 15 2 cm clearance in front of and behind the chassis for airflow Leave at least 24 in 60 9 cm clearance in front of and behind the switch for service personnel to remove and install hardware componen...

Страница 59: ...ted Documentation Chassis Physical Specifications for OCX1100 Switches on page 11 Cooling System and Airflow in an OCX1100 Switches on page 17 General Site Guidelines on page 33 Rack Mounting and Cabinet Mounting Warnings on page 148 39 Copyright 2017 Juniper Networks Inc Chapter 5 Preparation Overview ...

Страница 60: ...Copyright 2017 Juniper Networks Inc 40 OCX1100 Switch Hardware Guide ...

Страница 61: ...ow voltage line 100 120 VAC High voltage line 200 240 VAC AC input voltage 50 60 Hz AC input line frequency Low voltage line 4 A High voltage line 2 A AC input current rating 460 W Output power Related Documentation AC Power Supply in OCX1100 Switches on page 23 Power Supply LEDs in OCX1100 Switches on page 27 AC Power Cord Specifications for an OCX1100 Switch Each AC power supply has a single AC ...

Страница 62: ...AC Power Supplies for an OCX1100 Switch Graphic Juniper Model Number Plug Standards Electrical Specifications Country Region No graphic available CBL EX PWR C13 AR IRAM 2073 Type RA 3 250 VAC 10 A 50 Hz Argentina CBL EX PWR C13 AU AS NZS 3112 Type SAA 3 250 VAC 10 A 50 Hz Australia No graphic available CBL EX PWR C13 BR NBR 14136 Type BR 3 250 VAC 10 A 50 Hz Brazil CBL EX PWR C13 CH GB 1002 1996 T...

Страница 63: ... A 50 Hz Italy CBL EX PWR C13 JP SS 00259 Type VCTF 125 VAC 12 A 50 Hz or 60 Hz Japan CBL EX PWR C13 KR CEE 7 VII Type VIIGK 250 VAC 10 A 50 Hz or 60 Hz Korea g021274 CBL EX PWR C13 US NEMA 5 15 Type N5 15 125 VAC 13 A 60 Hz North America g021289 CBL EX PWR C13 SA SABS 164 1 1992 Type ZA 3 250 VAC 10 A 50 Hz South Africa No graphic available CBL EX PWR C13 SZ SEV 6534 2 Type 12G 250 VAC 10 A 50 Hz...

Страница 64: ...s on page 23 Connecting AC Power to an OCX1100 Switch on page 80 General Safety Guidelines and Warnings on page 137 General Electrical Safety Guidelines and Warnings on page 165 Prevention of Electrostatic Discharge Damage on page 167 DC Power Supply Specifications for OCX1100 Switches OCX1100 switches support 800 W DC power supplies Table 27 on page 44 lists the power supply specifications for a ...

Страница 65: ...elated Documentation DC Power Supply in OCX1100 Switches on page 25 Power Supply LEDs in OCX1100 Switches on page 27 45 Copyright 2017 Juniper Networks Inc Chapter 6 Power Specifications and Requirements ...

Страница 66: ...Copyright 2017 Juniper Networks Inc 46 OCX1100 Switch Hardware Guide ...

Страница 67: ...e Center JTAC can help you diagnose the source of the problem Your JTAC engineer mightrecommendthatyoucheckthethird partyopticorcableandpotentially replace it with an equivalent Juniper Networks optic or cable that is qualified for the device The 10 gigabit SFP and 40 gigabit QSFP transceivers installed in OCX1100 switches support digital optical monitoring DOM You can view the diagnostic details ...

Страница 68: ...m Maximum launch power 9 9 dBm Minimum receiver sensitivity 1 dBm Maximum input power Available DOM support MMF Fiber type 50 125 µm 50 125 µm 50 125 µm 62 5 125 µm 62 5 125 µm Core Cladding size OM3 OM4 compatible OM2 OM1 FDDI Fiber grade 1500 MHz km 500 MHz km 400 MHz km 200 MHz km 160 MHz km Modal bandwidth 984 ft 300 m 269 ft 82 m 216 ft 66 m 108 ft 33 m 85 ft 26 m Distance Copyright 2017 Juni...

Страница 69: ...ps Rate LC Connector type 1310 nm Transmitter wavelength 8 2 dBm Minimum launch power 0 5 dBm Maximum launch power 18 dBm Minimum receiver sensitivity 0 5 dBm Maximum input power SMF Fiber type 9 125 µm Core Cladding size Modal bandwidth Available DOM support 6 2 miles 10 km Distance 49 Copyright 2017 Juniper Networks Inc Chapter 7 Transceiver and Cable Specifications ...

Страница 70: ...m 50 125 µm Core Cladding size OM4 OM3 Fiber grade 492 ft 150 m 328 ft 100 m Distance Related Documentation OCX1100 Switches Hardware Overview on page 3 Installing a Transceiver in an OCX1100 Switch Removing a Transceiver on page 119 SFP Direct Attach Cables for OCX1100 Switches Small form factor pluggable plus transceiver SFP direct attach copper cables also known as Twinax cables are suitable fo...

Страница 71: ... D20 OCX1100 48SX D AFI NOTE WerecommendthatyouuseonlySFP directattachcablespurchased from Juniper Networks with your Juniper Networks device CAUTION If you face a problem running a Juniper Networks device that uses a third party optic or cable the Juniper Networks Technical Assistance Center JTAC can help you diagnose the source of the problem Your JTAC engineer mightrecommendthatyoucheckthethird...

Страница 72: ...ohms Cable characteristic impedance 1 maximum Crosstalk between pairs 4 3 nsec m Time delay 3 3 ft 1 m Length Copper pigtail Rate QFX SFP DAC 3M SFP passive Twinax cable assembly Connector type 3 3 V Supply voltage 0 015 W Power consumption per end 40 C through 85 C Storage temperature Twinax Cable type 30 AWG Wire AWG 1 in 2 54 cm Minimum cable bend radius 100 ohms Cable characteristic impedance ...

Страница 73: ...ecifications Table 32 on page 53 lists the specifications for the cables that connect the console CON and management MGMT ports to management devices Table 32 Specifications of Cables to Connect to Management Devices Additional Information Receptacle Cable Specifications Ports Connecting a Device to a Management Console by Using an RJ 45 Connector on page 86 RJ 45 CAT5e UTP unshielded twisted pair...

Страница 74: ...Copyright 2017 Juniper Networks Inc 54 OCX1100 Switch Hardware Guide ...

Страница 75: ...ole management device The default baud rate for the console port is 9600 baud Table 33 on page 55 provides the pinout information for the RJ 45 console connector NOTE If your laptop or PC does not have a DB 9 male connector pin and you want to connect your laptop or PC directly to a device use a combination of the RJ 45 to DB 9 female adapter and a USB to DB 9 male adapter You must provide the USB...

Страница 76: ...n connector on the other end The Mini USB Type B console port uses a Mini USB Type B connector to connect to a console management device The default baud rate for the console port is 9600 baud Table 34 on page 56 provides the pinout information of the Mini USB Type B console port Table 34 Mini USB Type B Console Port Pinout Information Description Signal Pin 5 VDC VCC 1 Data D 2 Data D 3 Could be ...

Страница 77: ...er Pinout Information The console port is an RS 232 serial interface that uses an RJ 45 connector to connect to a management device such as a PC or a laptop If your laptop or PC does not have a DB 9 male connector pin and you want to connect your laptop or PC to the device use a combination of the RJ 45 to DB 9 female adapter along with a USB to DB 9 male adapter Table 36 on page 57 provides the p...

Страница 78: ...pinout information Table 39 on page 59 SFP network port connector pinout information Table 40 on page 60 QSFP network module port connector pinout information Table 37 10 100 1000BASE T Ethernet Network Port Connector Pinout Information Description Signal Pin Transmit receive data pair 1 Negative Vport in PoE models TRP1 1 Transmit receive data pair 1 Negative Vport in PoE models TRP1 2 Transmit r...

Страница 79: ...ound VeeR 10 Module receiver ground VeeR 11 Receiver inverted data output RD 12 Receiver noninverted data output RD 13 Module receiver ground VeeR 14 Module receiver 3 3 V supply VccR 15 Module transmitter 3 3 V supply VccT 16 Module transmitter ground VeeT 17 Transmitter noninverted data input TD 18 Transmitter inverted data input TD 19 Module transmitter ground VeeT 20 Table 39 SFP Network Port ...

Страница 80: ...nsmitter RS1 9 Module receiver ground VeeR 10 Module receiver ground VeeR 11 Receiver inverted data output RD 12 Receiver noninverted data output RD 13 Module receiver ground VeeR 14 Module receiver 3 3 V supply VccR 15 Module transmitter 3 3 V supply VccT 16 Module transmitter ground VeeT 17 Transmitter noninverted data input TD 18 Transmitter inverted data input TD 19 Module transmitter ground V...

Страница 81: ...nal Pin TX4n 5 TX4p 6 GND 7 ModSelL 8 LPMode_Reset 9 VccRx 10 SCL 11 SDA 12 GND 13 RX3p 14 RX3n 15 GND 16 RX1p 17 RX1n 18 GND 19 GND 20 RX2n 21 RX2p 22 GND 23 RX4n 24 RX4p 25 GND 26 ModPrsL 27 IntL 28 61 Copyright 2017 Juniper Networks Inc Chapter 8 Pinout Specifications ...

Страница 82: ...t Information continued Signal Pin VccTx 29 Vcc1 30 Reserved 31 GND 32 TX3p 33 TX3n 34 GND 35 TX1p 36 TX1n 37 GND 38 Related Documentation Installing a Transceiver on page 117 Copyright 2017 Juniper Networks Inc 62 OCX1100 Switch Hardware Guide ...

Страница 83: ...tion Unpacking the Switch on page 65 Installing the Switch on page 69 Connecting the Switch to Power on page 77 Connecting the Switch to the Network on page 85 Initially Configuring the Switch on page 91 63 Copyright 2017 Juniper Networks Inc ...

Страница 84: ...Copyright 2017 Juniper Networks Inc 64 OCX1100 Switch Hardware Guide ...

Страница 85: ...ch 1 Move the shipping carton to a staging area as close to the installation site as possible but where you have enough room to remove the system components 2 Position the carton so that the arrows are pointing up 3 Open the top flaps on the shipping carton 4 Pull out the packing material holding the switch in place 5 Verify the parts received against the inventory on the label attached to the car...

Страница 86: ... dial or direct dial options in countries without toll free numbers see http www juniper net support requesting support html Table 41 on page 66 lists the parts and their quantities as in the standard packing list for an OCX1100 switch Table 41 Inventory of Components Provided with an OCX1100 48SX Switch Quantity Component 1 Switch 4 Fan modules 2 AC or DC Power supplies 2 AC power cords appropria...

Страница 87: ...al numbers on the Juniper Networks website and update the installation base data if there is any addition or change to the installation base or if the installation base is moved Juniper Networks will not be held accountable for not meeting the hardware replacement service level agreement for products that do not have registered serial numbers or accurate installation base data Register your produc...

Страница 88: ...Copyright 2017 Juniper Networks Inc 68 OCX1100 Switch Hardware Guide ...

Страница 89: ...tch on Four Posts of a Rack or Cabinet on page 71 3 Follow instructions for connecting power as appropriate for your site Connecting AC Power to an OCX1100 Switch on page 80 Connecting DC Power to an OCX1100 Switch on page 82 4 Register your product by following instructions in Registering Products Mandatory for Validating SLAs on page 67 5 Perform initial configuration of the switch by following ...

Страница 90: ...desk or other level surface by using the four rubber feet that are shipped with the switch The rubber feet stabilize the chassis Before mounting the switch on a desk or other level surface Verify that the site meets the requirements described in Site Preparation Checklist for OCX1100 Switches on page 31 Place the desk in its permanent location allowing adequate clearance for airflow and maintenanc...

Страница 91: ...ting the switch on four posts of a rack Verify that the site meets the requirements described in Site Preparation Checklist for OCX1100 Switches on page 31 Place the rack in its permanent location allowing adequate clearance for airflow and maintenance and secure it to the building structure Read General Safety Guidelines and Warnings on page 137 with particular attention to Chassis Lifting Guidel...

Страница 92: ...es on the side of the chassis and attach the front rack mounting brackets to the switch by using the front rack mounting bracket screws See Figure 21 on page 72 Figure 21 Attaching the Front Rack Mounting Brackets to the Switch Chassis 3 Align the holes on the rack mounting slider brackets with the screw holes on the back of the rack posts 4 Attach the rack mounting slider brackets to the rack pos...

Страница 93: ...tch 6 Slide the switch into the rack mounting slider brackets so that the brackets fit into the space between the two rows of rack mounting slider pegs of the switch 7 Have a second person secure the front rack mounting brackets to the front of the rack posts by using appropriate rack mounting screws Tighten the screws by using a screwdriver See Figure 23 on page 74 73 Copyright 2017 Juniper Netwo...

Страница 94: ...to an OCX1100 Switch on page 82 Connecting and Configuring an OCX1100 Switch CLI Procedure on page 100 Rack Mounting and Cabinet Mounting Warnings on page 148 Installing and Removing OCX1100 Switch Hardware Components The OCX1100 switch chassis is a rigid sheet metal structure that houses the hardware components The field replaceable units FRUs in OCX1100 switches are Power supplies Fan modules Tr...

Страница 95: ... 111 Installing a DC Power Supply in an OCX1100 Switch on page 79 Removing a DC Power Supply from an OCX1100 Switch on page 114 Installing a Fan Module in an OCX1100 Switch on page 105 Removing a Fan Module from an OCX1100 Switch on page 106 Installing a Transceiver in an OCX1100 Switch Removing a Transceiver on page 119 Related Documentation Cooling System and Airflow in an OCX1100 Switches on pa...

Страница 96: ...Copyright 2017 Juniper Networks Inc 76 OCX1100 Switch Hardware Guide ...

Страница 97: ...or disrupting switch functions CAUTION Do not install AC and DC power supplies in the same chassis AC power supplies in DC switch models or DC power supplies in AC switch models Power supplies with different airflow labels AIR IN AFI and AIR OUT AFO in the same chassis Power supplies and fan modules with different airflow labels AIR IN AFI and AIR OUT AFO in the same chassis Before you install an ...

Страница 98: ...ply pins leads or solder connections remove the power supply from the bag 5 Using both hands place the power supply in the power supply slot on the rear panel of the switch and slide it in until it is fully seated and the clip clicks into place See Figure 24 on page 78 Figure 24 Installing an AC Power Supply in an OCX1100 48SX Switch NOTE If you have a Juniper J Care service contract register any ...

Страница 99: ...fan modules with different airflow labels AIR IN AFI and AIR OUT AFO in the same chassis Before you install a DC power supply in the switch Ensure you understand how to prevent electrostatic discharge ESD damage See Prevention of Electrostatic Discharge Damage on page 167 Ensure that you have the following parts and tools available to install a DC power supply in the switch chassis ESD grounding s...

Страница 100: ...grade of hardware components at https www juniper net customers csc management updateinstallbase jsp Failure to do so can result in significant delays if you need replacement parts This note applies if you change the type of power supply or add a new type of uplink module It does not apply if you replace these components with the same type of component Related Documentation Removing a DC Power Sup...

Страница 101: ... on page 77 Ensure that you have the following parts and tools available A power cord appropriate for your geographical location provided NOTE Each power supply must be connected to a dedicated power source outlet To connect AC power to an OCX1100 switch 1 Attach the grounding strap to your bare wrist and to a site ESD point 2 Ensure that the power supplies are fully inserted in the chassis and th...

Страница 102: ... you have a replacement power supply ready the power supplies or a cover panel must be installed in the switch to ensure proper airflow CAUTION We recommend that you install either a replacement power supply or a cover panel in an empty power supply slot to prevent chassis overheating and dust accumulation Related Documentation AC Power Supply in OCX1100 Switches on page 23 Power Supply LEDs in OC...

Страница 103: ...100 switch see Installing a DC Power Supply in an OCX1100 Switch on page 79 Ensure that you have the following parts and tools available A DC power cord provided 1 Attach the grounding strap to your bare wrist and to a site ESD point 2 Ensure that the power supplies are fully inserted in the chassis and the latches are secure If only one power supply is installed ensure that a cover panel is insta...

Страница 104: ... page 114 Do not remove the power supply until you have a replacement power supply ready the power supplies or a cover panel must be installed in the switch to ensure proper airflow CAUTION We recommend that you install either a replacement power supply or a cover panel in an empty power supply slot to prevent chassis overheating and dust accumulation Related Documentation DC Power Supply in OCX11...

Страница 105: ... Each device has a management port to which you can connect an Ethernet cable with an RJ 45 connector Use the management port to connect the device to the management device Ensure that you have an Ethernet cable that has an RJ 45 connector at either end Figure 28 on page 85 shows the RJ 45 connector of the Ethernet cable supplied with the device Figure 28 RJ 45 Connector on an Ethernet Cable To co...

Страница 106: ...sole The console port accepts a cable that has an RJ 45 connector Ensure that you have an Ethernet cable that has an RJ 45 connector at either end One such cable and an RJ 45 to DB 9 serial port adapter are supplied with the device Figure 30 on page 86 shows the RJ 45 connector of the Ethernet cable Figure 30 RJ 45 Connector on an Ethernet Cable NOTE If your laptop or PC does not have a DB 9 male ...

Страница 107: ...re and manage OCX1100 switches by using the RJ 45 console port or the Mini USB Type B console port However the console input will be active only on one port at a time only one port will be set active at a time By default the RJ 45 port is set as an active console port and the Mini USB Type B port is the passive console port For information about configuring the console port type see Configuring th...

Страница 108: ...i USB Type B console port 1 Connect the Standard A connector of the mini USB cable to the host machine PC or Laptop 2 Connect the Mini USB Type B 5 pin connector of the mini USB cable to the Mini USB Type B console port on the switch 3 Set the Mini USB Type B console port as the active console port by using the command port type For information about configuring the console port type see Configuri...

Страница 109: ...tical transceiver Save the cap 3 Insert the cable connector into the optical transceiver see Figure 33 on page 89 Figure 33 Connecting a Fiber Optic Cable to an Optical Transceiver Installed in a Device 4 Secure the cables so that they do not support their own weight Place excess cable out of the way in a neatly coiled loop Placing fasteners on a loop helps cables maintain their shape CAUTION Do n...

Страница 110: ... Installing a Transceiver on page 117 Maintaining Fiber Optic Cables on page 125 Copyright 2017 Juniper Networks Inc 90 OCX1100 Switch Hardware Guide ...

Страница 111: ...aces enables IGMP snooping and enables the LLDP and RSTP protocols The following default configuration file is for an OCX1100 switch NOTE Interfaces ge 0 0 1 through ge 0 0 48 are SFP port interfaces Interfaces ge 0 0 49 through ge 0 0 54 are QSFP port interfaces When you commit changes to the configuration a new configuration file is created which becomes the active configuration You can always r...

Страница 112: ...family inet dhcp vendor id Juniper ocx1100 48sx xe 0 0 4 unit 0 family inet dhcp vendor id Juniper ocx1100 48sx xe 0 0 5 unit 0 family inet dhcp vendor id Juniper ocx1100 48sx xe 0 0 6 unit 0 family inet dhcp vendor id Juniper ocx1100 48sx xe 0 0 7 unit 0 family inet Copyright 2017 Juniper Networks Inc 92 OCX1100 Switch Hardware Guide ...

Страница 113: ...cx1100 48sx xe 0 0 10 unit 0 family inet dhcp vendor id Juniper ocx1100 48sx xe 0 0 11 unit 0 family inet dhcp vendor id Juniper ocx1100 48sx xe 0 0 12 unit 0 family inet dhcp vendor id Juniper ocx1100 48sx xe 0 0 13 unit 0 family inet dhcp vendor id Juniper ocx1100 48sx 93 Copyright 2017 Juniper Networks Inc Chapter 13 Initially Configuring the Switch ...

Страница 114: ...x xe 0 0 16 unit 0 family inet dhcp vendor id Juniper ocx1100 48sx xe 0 0 17 unit 0 family inet dhcp vendor id Juniper ocx1100 48sx xe 0 0 18 unit 0 family inet dhcp vendor id Juniper ocx1100 48sx xe 0 0 19 unit 0 family inet dhcp vendor id Juniper ocx1100 48sx Copyright 2017 Juniper Networks Inc 94 OCX1100 Switch Hardware Guide ...

Страница 115: ...0 22 unit 0 family inet dhcp vendor id Juniper ocx1100 48sx xe 0 0 23 unit 0 family inet dhcp vendor id Juniper ocx1100 48sx xe 0 0 24 unit 0 family inet dhcp vendor id Juniper ocx1100 48sx xe 0 0 25 unit 0 family inet dhcp vendor id Juniper ocx1100 48sx 95 Copyright 2017 Juniper Networks Inc Chapter 13 Initially Configuring the Switch ...

Страница 116: ...28 unit 0 family inet dhcp vendor id Juniper ocx1100 48sx xe 0 0 29 unit 0 family inet dhcp vendor id Juniper ocx1100 48sx xe 0 0 30 unit 0 family inet dhcp vendor id Juniper ocx1100 48sx xe 0 0 31 unit 0 family inet dhcp vendor id Juniper ocx1100 48sx xe 0 0 32 unit 0 Copyright 2017 Juniper Networks Inc 96 OCX1100 Switch Hardware Guide ...

Страница 117: ...cp vendor id Juniper ocx1100 48sx xe 0 0 35 unit 0 family inet dhcp vendor id Juniper ocx1100 48sx xe 0 0 36 unit 0 family inet dhcp vendor id Juniper ocx1100 48sx xe 0 0 37 unit 0 family inet dhcp vendor id Juniper ocx1100 48sx xe 0 0 38 unit 0 family inet dhcp 97 Copyright 2017 Juniper Networks Inc Chapter 13 Initially Configuring the Switch ...

Страница 118: ...per ocx1100 48sx xe 0 0 41 unit 0 family inet dhcp vendor id Juniper ocx1100 48sx xe 0 0 42 unit 0 family inet dhcp vendor id Juniper ocx1100 48sx xe 0 0 43 unit 0 family inet dhcp vendor id Juniper ocx1100 48sx xe 0 0 44 unit 0 family inet dhcp vendor id Juniper ocx1100 48sx Copyright 2017 Juniper Networks Inc 98 OCX1100 Switch Hardware Guide ...

Страница 119: ...0 47 unit 0 family inet dhcp vendor id Juniper ocx1100 48sx xe 0 0 48 unit 0 family inet dhcp vendor id Juniper ocx1100 48sx et 0 0 49 unit 0 family inet dhcp vendor id Juniper ocx1100 48sx et 0 0 50 unit 0 family inet dhcp vendor id Juniper ocx1100 48sx 99 Copyright 2017 Juniper Networks Inc Chapter 13 Initially Configuring the Switch ...

Страница 120: ...d Documentation Connecting and Configuring an OCX1100 Switch CLI Procedure on page 100 Connecting and Configuring an OCX1100 Switch CLI Procedure You can connect and configure an OCX1100 switch through the console by using the CLI Before you begin connecting and configuring an OCX1100 switch set the following parameter values on the console server or PC Baud rate 115 200 Flow control None Data 8 C...

Страница 121: ...rt the CLI root RE 0 cli 4 Enter configuration mode root configure 5 Specify a password for the root administration user account edit root set system root authentication plain text password New password password Retype new password password 6 Optional Configure the name of the switch If the name includes spaces enclose the name in quotation marks edit root set system host name host name 7 Configur...

Страница 122: ... retain no readvertise 10 Enable ssh service root set system services ssh root login allow 11 Commit the configuration edit root commit Related Documentation Installing and Connecting an OCX1100 Switch on page 69 Copyright 2017 Juniper Networks Inc 102 OCX1100 Switch Hardware Guide ...

Страница 123: ... System Component on page 105 Replacing Power Supply on page 109 Replacing Transceiver on page 117 Maintaining and Replacing Fiber Optic Cable on page 123 Contacting Customer Support and Returning the Chassis or Components on page 127 103 Copyright 2017 Juniper Networks Inc ...

Страница 124: ...Copyright 2017 Juniper Networks Inc 104 OCX1100 Switch Hardware Guide ...

Страница 125: ...ies and fan modules with different airflow labels AIR IN AFI and AIR OUT AFO in the same chassis Before you install a fan module in the switch Ensure you understand how to prevent electrostatic discharge ESD damage See Prevention of Electrostatic Discharge Damage on page 167 Ensure that you have the following parts and tools available to install a fan module in the switch chassis ESD grounding str...

Страница 126: ... parts This note does not apply if you replace existing components with the same type of component Related Documentation Removing a Fan Module from an OCX1100 Switch on page 106 Cooling System and Airflow in an OCX1100 Switches on page 17 Field Replaceable Units in OCX1100 Switches on page 12 OCX1100 Switches Hardware Overview on page 3 Removing a Fan Module from an OCX1100 Switch The fan module i...

Страница 127: ... flat stable surface 5 Install the replacement fan 6 Tighten the captive screws on the faceplate of the fan module by using your fingers If you are unable to tighten the captive screws by using your fingers use the screwdriver Figure 35 on page 107 shows how to remove a fan module from an OCX1100 switch Figure 35 Removing a Fan Module from an OCX1100 48SX Switch NOTE Both the fan modules must be i...

Страница 128: ... OCX1100 Switches Hardware Overview on page 3 Copyright 2017 Juniper Networks Inc 108 OCX1100 Switch Hardware Guide ...

Страница 129: ...switch or disrupting switch functions CAUTION Do not install AC and DC power supplies in the same chassis AC power supplies in DC switch models or DC power supplies in AC switch models Power supplies with different airflow labels AIR IN AFI and AIR OUT AFO in the same chassis Power supplies and fan modules with different airflow labels AIR IN AFI and AIR OUT AFO in the same chassis Before you inst...

Страница 130: ...ly pins leads or solder connections remove the power supply from the bag 5 Using both hands place the power supply in the power supply slot on the rear panel of the switch and slide it in until it is fully seated and the clip clicks into place See Figure 24 on page 78 Figure 36 Installing an AC Power Supply in an OCX1100 48SX Switch NOTE If you have a Juniper J Care service contract register any a...

Страница 131: ... Antistatic bag or an antistatic mat Replacement power supply or a cover panel for the power supply slot CAUTION We recommend that you install either a replacementpower supply or a cover panel in an empty power supply slot to prevent chassis overheating and dust accumulation To remove an AC power supply 1 Place the antistatic bag or the antistatic mat on a flat stable surface 2 Attach the ESD grou...

Страница 132: ...tation Installing an AC Power Supply in an OCX1100 Switch on page 77 Installing and Removing OCX1100 Switch Hardware Components on page 74 AC Power Supply Specifications for OCX1100 Switches on page 41 Field Replaceable Units in OCX1100 Switches on page 12 AC Power Cord Specifications for an OCX1100 Switch on page 41 OCX1100 Switches Hardware Overview on page 3 Installing a DC Power Supply in an O...

Страница 133: ...correct power supply The label AIR IN AFI or AIR OUT AFO on the power supply must match the label AIR IN AFI or AIR OUT AFO on the installed fan module 2 Attach the ESD grounding strap to your bare wrist and connect the strap to the ESD point on the chassis 3 If the power supply slot has a cover panel on it loosen the captive screws on the cover panel by using your fingers or the screwdriver Hold ...

Страница 134: ... Switch on page 82 OCX1100 Switches Hardware Overview on page 3 Removing a DC Power Supply from an OCX1100 Switch The power supply in OCX1100 switches is a hot removable and hot insertable field replaceable unit FRU installed in the rear panel of the switch You can remove and replace it without powering off the switch or disrupting switch functions Before you begin removing a power supply from the...

Страница 135: ...le end of the power cord connected to the power supply faceplate 6 Press the clip to the left and grasp the power supply handle and pull firmly to slide the power supply halfway out of the chassis 7 Taking care not to touch power supply pins leads or solder connections place one hand under the power supply to support it Grasp the power supply handle with your other hand and pull the power supply c...

Страница 136: ... DC Power Supply in OCX1100 Switches on page 25 OCX1100 Switches Hardware Overview on page 3 Copyright 2017 Juniper Networks Inc 116 OCX1100 Switch Hardware Guide ...

Страница 137: ...uniper Networks device CAUTION If you face a problem running a Juniper Networks device that uses a third party optic or cable the Juniper Networks Technical Assistance Center JTAC can help you diagnose the source of the problem Your JTAC engineer mightrecommendthatyoucheckthethird partyopticorcableandpotentially replace it with an equivalent Juniper Networks optic or cable that is qualified for th...

Страница 138: ...or removing a cable The rubber safety cap keeps the port clean and prevents accidental exposure to laser light 3 If the port in which you want to install the transceiver is covered with a dust cover remove the dust cover and save it in case you need to cover the port later If you are hot swapping a transceiver wait for at least 10 seconds after removing the transceiver from the port before install...

Страница 139: ...functions NOTE After you remove a transceiver or when you change the media type configuration wait for 6 seconds for the interface to display the operational commands Before you begin removing a transceiver from a device ensure that you have taken the necessary precautions for safe handling of lasers see Laser and LED Safety Guidelines and Warnings on page 155 Ensure that you have the following pa...

Страница 140: ...covered except when inserting or removing a cable The rubber safety cap keeps the port clean and prevents accidental exposure to laser light CAUTION Do not bend fiber optic cables beyond their minimum bend radius An arc smaller than a few inches in diameter can damage the cables and cause problems that are difficult to diagnose 3 Remove the cable connected to the transceiver see Disconnecting a Fi...

Страница 141: ...damage to the transceiver do not touch the connector pins at the end of the transceiver To remove a CFP transceiver a Loosen the screws on the transceiver by using your fingers b Grasp the screws on the transceiver and gently slide the transceiver approximately 0 5 in 1 3 cm straight out of the port CAUTION To prevent electrostatic discharge ESD damage to the transceiver do not touch the connector...

Страница 142: ...tatic bag or on the antistatic mat placed on a flat stable surface 7 Place the dust cover over the empty port Related Documentation Installing a Transceiver on page 117 Copyright 2017 Juniper Networks Inc 122 OCX1100 Switch Hardware Guide ...

Страница 143: ... Safety Guidelines and Warnings on page 155 To connect a fiber optic cable to an optical transceiver installed in a device WARNING Do not look directly into a fiber optic transceiver or into the ends offiber opticcables Fiber optictransceiversandfiber opticcablesconnected to transceivers emit laser light that can damage your eyes 1 If the fiber optic cable connector is covered with a rubber safety...

Страница 144: ...fastening point Related Documentation Disconnecting a Fiber Optic Cable from a Device on page 124 Installing a Transceiver on page 117 Maintaining Fiber Optic Cables on page 125 Disconnecting a Fiber Optic Cable from a Device Juniper Networks devices have field replaceable unit FRU optical transceivers to which you can connect fiber optic cables Before you begin disconnecting a fiber optic cable f...

Страница 145: ...cap Related Documentation Connecting a Fiber Optic Cable on page 89 Removing a Transceiver on page 119 Maintaining Fiber Optic Cables on page 125 Maintaining Fiber Optic Cables Fiber optic cables connect to optical transceivers that are installed in Juniper Networks devices To maintain fiber optic cables When you unplug a fiber optic cable from a transceiver place rubber safety caps over the trans...

Страница 146: ...ght reduction in signal power and possibly intermittent problems with the optical connection To clean the transceiver canal use an appropriate fiber cleaning device such as RIFOCSFiberOpticAdaptorCleaningWands partnumber946 Followthedirections in the cleaning kit you use After cleaning the transceiver make sure that the connector tip of the fiber optic cable is clean Use only an approved alcohol f...

Страница 147: ...ocating the Serial Number on an OCX1100 Switch or Component on page 128 2 Obtain an Return Materials Authorization RMA number from JTAC as described in Contacting Customer Support to Obtain Return Material Authorization on page 130 NOTE Do not return any component to Juniper Networks unless you have first obtained an RMA number Juniper Networks reserves the right to refuse shipments that do not ha...

Страница 148: ...l on an OCX1100 Switch on page 129 Locating the Serial Number ID Labels on FRUs in an OCX1100 Switch on page 129 Listing the Switch and Components Details with the CLI To list the switch and switch components and their serial numbers enter the following CLI command show chassis hardware The following output lists the switch components and serial numbers for an OCX1100 48SX switch user switch show ...

Страница 149: ...and fan modules installed in OCX1100 switches are field replaceable units FRUs For each of these FRUs you must remove the FRU from the switch chassis to see the FRU s serial number ID label Power Supply The serial number ID label is on the top of the power supply Figure 44 on page 129 shows the location of the serial number ID label on an AC power supply and Figure 45 on page 130 shows the locatio...

Страница 150: ...e 130 Returning an OCX1100 Switch or Component for Repair or Replacement on page 127 Contacting Customer Support to Obtain Return Material Authorization If you are returning a device or hardware component to Juniper Networks for repair or replacement obtainaReturnMaterialAuthorization RMA numberfromJuniperNetworks Technical Assistance Center JTAC After locating the serial number of the device or h...

Страница 151: ...mber for return of the component Related Documentation Prevention of Electrostatic Discharge Damage on page 167 Packing an OCX1100 Switch or Component for Shipping If you are returning an OCX1100 switch or component to Juniper Networks for repair or replacement pack the item as described in this topic Before you begin packing the switch or component ensure you have Followed all the steps listed in...

Страница 152: ... of the power cord connected to the power source outlet 3 Remove the cables that connect the switch to all external devices See Disconnecting a Fiber Optic Cable from a Device on page 124 4 Remove all optical transceivers installed in the switch See Removing a Transceiver on page 119 Ensure that you have the following parts and tools available to pack the switch Phillips screwdriver number 2 The o...

Страница 153: ...he instructions here Ensure that you have the following parts and tools available Antistatic bag one for each component ESD grounding strap CAUTION Do not stack switch components Return individual components in separate boxes if they do not fit together on one level in the shipping box To pack the switch components Place individual components in antistatic bags Use the original packing materials i...

Страница 154: ...e exterior of the box to ensure proper tracking Related Documentation Returning an OCX1100 Switch or Component for Repair or Replacement on page 127 Unpacking an OCX1100 Switch on page 65 Copyright 2017 Juniper Networks Inc 134 OCX1100 Switch Hardware Guide ...

Страница 155: ...143 Installation Safety Guidelines and Warnings on page 145 Radiation and Laser Safety Guidelines and Warnings on page 155 Maintenance and Operational Safety Warnings on page 159 Electrical Safety Guidelines and Warnings on page 165 Agency Approvals and Compliance Statements on page 181 135 Copyright 2017 Juniper Networks Inc ...

Страница 156: ...Copyright 2017 Juniper Networks Inc 136 OCX1100 Switch Hardware Guide ...

Страница 157: ...ree from dust before during and after installation Keep tools away from areas where people could trip over them while walking Do not wear loose clothing or jewelry such as rings bracelets or chains which could become caught in the device Wear safety glasses if you are working under any conditions that could be hazardous to your eyes Do not perform any actions that create a potential hazard to peop...

Страница 158: ...ines for Switches on page 170 General Electrical Safety Guidelines and Warnings on page 165 Maintenance and Operational Safety Guidelines and Warnings on page 159 Installation Instructions Warning on page 145 Grounded Equipment Warning on page 152 Definitions of Safety Warning Levels The documentation uses the following levels of safety warnings there are two Warning formats NOTE You might find th...

Страница 159: ...enza indica un pericolo La situazione potrebbe causare infortuni alle persone Prima di lavorare su qualsiasi apparecchiatura occorre conoscere i pericoli relativi ai circuiti elettrici ed essere al corrente delle pratiche standard per la prevenzione di incidenti Advarsel Dette varselsymbolet betyr fare Du befinner deg i en situasjon som kan føre til personskade Før du utfører arbeid på utstyr må d...

Страница 160: ...onnel qualifié et compétent Warnung Gerät nur von geschultem qualifiziertem Personal installieren oder auswechseln lassen Avvertenza Solo personale addestrato e qualificato deve essere autorizzato ad installare o sostituire questo apparecchio Advarsel Kun kvalifisert personell med riktig opplæring bør montere eller bytte ut dette utstyret Aviso Este equipamento deverá ser instalado ou substituído ...

Страница 161: ... mains socket outlet Advarsel Apparatet skal kobles til en jordet stikkontakt Varning Apparaten skall anslutas till jordat nätuttag Related Documentation General Safety Guidelines and Warnings on page 137 141 Copyright 2017 Juniper Networks Inc Chapter 19 General Safety Guidelines and Warnings ...

Страница 162: ...Copyright 2017 Juniper Networks Inc 142 OCX1100 Switch Hardware Guide ...

Страница 163: ...re extinguisher which uses noncorrosive fire retardants to extinguish the fire Fire Suppression Equipment Type C fire extinguishers which use noncorrosive fire retardants such as carbon dioxide and Halotron are most effective for suppressing electrical fires Type C fire extinguishers displace oxygen from the point of combustion to eliminate the fire For extinguishing fire on or around equipment th...

Страница 164: ...coverage under a service agreement We recommend that you dispose of any irreparably damaged equipment in an environmentally responsible manner Related Documentation General Safety Guidelines and Warnings on page 137 General Electrical Safety Guidelines and Warnings on page 165 Action to Take After an Electrical Accident on page 166 Copyright 2017 Juniper Networks Inc 144 OCX1100 Switch Hardware Gu...

Страница 165: ...em met de voeding verbindt VaroitusLueasennusohjeetennenjärjestelmänyhdistämistävirtalähteeseen AttentionAvantdebrancherlesystèmesurlasourced alimentation consulter les directives d installation Warnung Lesen Sie die Installationsanweisungen bevor Sie das System an die Stromquelle anschließen AvvertenzaConsultareleistruzionidiinstallazioneprimadicollegareilsistema all alimentatore Advarsel Les ins...

Страница 166: ... to which access can be gained only by service personnel through the use of a special tool lock and key or other means of security and which is controlled by the authority responsible for the location WaarschuwingDittoestelisbedoeldvoorinstallatieopplaatsenmetbeperkte toegang Een plaats met beperkte toegang is een plaats waar toegang slechts door servicepersoneel verkregen kan worden door middel v...

Страница 167: ...e foi concebida para instalação em áreas de acesso restrito Uma área de acesso restrito é uma área à qual apenas tem acesso o pessoal de serviço autorizado que possua uma ferramenta chave e fechadura especial ou qualquer outra forma de segurança Esta área é controlada pela autoridade responsável pelo local Atención Esta unidad ha sido diseñada para instalarse en áreas de acceso restringido Área de...

Страница 168: ...ng Använd inte ramp med en lutning på mer än 10 grader Related Documentation General Safety Guidelines and Warnings on page 137 Installation Instructions Warning on page 145 Grounded Equipment Warning on page 152 Rack Mounting and Cabinet Mounting Warnings Ensure that the rack or cabinet in which the device is installed is evenly and securely supported Uneven mechanical loading could lead to a haz...

Страница 169: ...ek monteert of het daar een servicebeurt geeft Varoitus Kun laite asetetaan telineeseen tai huolletaan sen ollessa telineessä onnoudatettavaerityisiävarotoimiajärjestelmänvakavuudensäilyttämiseksi jotta vältytään loukkaantumiselta Noudata seuraavia turvallisuusohjeita Juniper Networks switch on asennettava telineeseen joka on kiinnitetty rakennukseen Jos telineessä ei ole muita laitteita aseta lai...

Страница 170: ... Per evitare infortuni fisici durante il montaggio o la manutenzione di questa unità in un supporto occorre osservare speciali precauzioni per garantire che il sistema rimanga stabile Le seguenti direttive vengono fornite per garantire la sicurezza personale Il Juniper Networks switch deve essere installato in un telaio il quale deve essere fissato alla struttura dell edificio Questa unità deve ve...

Страница 171: ...ção instale o antes de montar ou reparar a unidade Atención Para evitar lesiones durante el montaje de este equipo sobre un bastidor o posteriormente durante su mantenimiento se debe poner mucho cuidado en que el sistema quede bien estable Para garantizar su seguridad proceda según las siguientes instrucciones El Juniper Networks switch debe instalarse en un bastidor fijado a la estructura del edi...

Страница 172: ... verbonden Varoitus Tämä laitteisto on tarkoitettu maadoitettavaksi Varmista että isäntälaite on yhdistetty maahan normaalikäytön aikana Attention Cet équipement doit être relié à la terre S assurer que l appareil hôte est relié à la terre lors de l utilisation normale Warnung Dieses Gerät muß geerdet werden Stellen Sie sicher daß das Host Gerät während des normalen Betriebs an Erde gelegt ist Avv...

Страница 173: ...idelines and Warnings on page 137 AC Power Electrical Safety Guidelines on page 168 DC Power Electrical Safety Guidelines for Switches on page 170 153 Copyright 2017 Juniper Networks Inc Chapter 21 Installation Safety Guidelines and Warnings ...

Страница 174: ...Copyright 2017 Juniper Networks Inc 154 OCX1100 Switch Hardware Guide ...

Страница 175: ...ass 1 Laser Product Warning on page 156 Class 1 LED Product Warning on page 156 Laser Beam Warning on page 156 General Laser Safety Guidelines When working around ports that support optical transceivers observe the following safety guidelines to prevent eye injury Do not look into unterminated ports or at fibers that connect to unknown sources Do not examine unterminated optical ports with optical...

Страница 176: ...Class 1 LED Product Warning WARNING Class 1 LED product Waarschuwing Klasse 1 LED product Varoitus Luokan 1 valodiodituote Attention Alarme de produit LED Class I Warnung Class 1 LED Produktwarnung Avvertenza Avvertenza prodotto LED di Classe 1 Advarsel LED produkt i klasse 1 Aviso Produto de classe 1 com LED Atención Aviso sobre producto LED de Clase 1 Varning Lysdiodprodukt av klass 1 Laser Beam...

Страница 177: ...n och titta inte direkt på den genom optiska instrument Related Documentation General Safety Guidelines and Warnings on page 137 Radiation from Open Port Apertures Warning on page 157 Installation Instructions Warning on page 145 Grounded Equipment Warning on page 152 Radiation from Open Port Apertures Warning WARNING Because invisible radiation might be emitted from the aperture of the port when ...

Страница 178: ...et ikke er tilkoblet en fiberkabel Aviso Dada a possibilidade de emissão de radiação invisível através do orifício da via de acesso quando esta não tiver nenhum cabo de fibra conectado deverá evitar a exposição à radiação e não deverá olhar fixamente para orifícios que se encontrarem a descoberto Atención Debido a que la apertura del puerto puede emitir radiación invisible cuando no existe un cabl...

Страница 179: ...by the manufacturer Dispose of used batteries according to the manufacturer s instructions Waarschuwing Er is ontploffingsgevaar als de batterij verkeerd vervangen wordt Vervang de batterij slechts met hetzelfde of een equivalent type dat door de fabrikant aanbevolen is Gebruikte batterijen dienen overeenkomstig fabrieksvoorschriften weggeworpen te worden Varoitus Räjähdyksen vaara jos akku on vai...

Страница 180: ...rucciones del fabricante Varning Explosionsfara vid felaktigt batteribyte Ersätt endast batteriet med samma batterityp som rekommenderas av tillverkaren eller motsvarande Följ tillverkarens anvisningar vid kassering av använda batterier Jewelry Removal Warning WARNING Before working on equipment that is connected to power lines remove jewelry including rings necklaces and watches Metal objects hea...

Страница 181: ...ligado a linhas de corrente retire todas as jóias que estiver a usar incluindo anéis fios e relógios Os objectos metálicos aquecerão em contacto com a corrente e em contacto com a ligação à terra podendo causar queimaduras graves ou ficarem soldados aos terminais Atención Antes de operar sobre equipos conectados a líneas de alimentación quitarse las joyas incluidos anillos collares y relojes Los o...

Страница 182: ...t welke switch van de Juniper Networks router dan ook oververhit raakt dient u deze niet te bedienen op een plaats waar de maximale aanbevolen omgevingstemperatuur van 40 C wordt overschreden Om te voorkomen dat de luchtstroom wordt beperkt dient er minstens 15 2 cm speling rond de ventilatie openingen te zijn Varoitus Ettei Juniper Networks switch sarjan reititin ylikuumentuisi sitä ei saa käyttä...

Страница 183: ...0 C Para impedir la restricción de la entrada de aire deje un espacio mínimo de 15 2 cm alrededor de las aperturas para ventilación Varning Förhindra att en Juniper Networks switch överhettas genom att inte använda den i ett område där den maximalt rekommenderade omgivningstemperaturen på 40 C överskrids Förhindra att luftcirkulationen inskränks genom att se till att det finns fritt utrymme på min...

Страница 184: ... av denna produkt bör skötas i enlighet med landets alla lagar och föreskrifter Related Documentation General Safety Guidelines and Warnings on page 137 General Electrical Safety Guidelines and Warnings on page 165 AC Power Electrical Safety Guidelines on page 168 DC Power Electrical Safety Guidelines for Switches on page 170 Laser and LED Safety Guidelines and Warnings on page 155 Installation In...

Страница 185: ...re designed for use as intrabuilding within the building interfaces only Type 2 or Type 4 ports as described in GR 1089 CORE and require isolation from the exposed outside plant OSP cabling To comply with NEBS requirements and protect against lightning surges and commercial power disturbances the intrabuilding ports must not be metallically connected to interfaces that connect to the OSP or its wi...

Страница 186: ...fety grounds Operate the device within marked electrical ratings and product usage instructions To ensure that the device and peripheral equipment function safely and correctly use the cables and connectors specified for the attached peripheral equipment and make certain they are in good condition You can remove and replace many device components without powering off or disconnecting power to the ...

Страница 187: ...e component in its antistatic bag see Figure 47 on page 168 in one hand and touch the exposed bare metal of the device with the other hand immediately before inserting the component into the device WARNING For safety periodically check the resistance value of the ESD grounding strap The measurement must be in the range 1 through 10 Mohms When handling any component that is subject to ESD damage an...

Страница 188: ...ollowing electrical safety guidelines apply to AC powered devices Note the following warnings printed on the device CAUTION THIS UNIT HAS MORE THAN ONE POWER SUPPLY CORD DISCONNECT ALL POWER SUPPLY CORDS BEFORE SERVICING TO AVOID ELECTRIC SHOCK ATTENTION CET APPAREIL COMPORTE PLUS D UN CORDON D ALIMENTATION AFIN DE PRÉVENIR LES CHOCS ÉLECTRIQUES DÉBRANCHER TOUT CORDON D ALIMENTATION AVANT DE FAIRE...

Страница 189: ...C Power Disconnection Warning WARNING Before working on the device or near power supplies unplug all the power cords from an AC powered device Waarschuwing Voordat u aan een frame of in de nabijheid van voedingen werkt dient u bij wisselstroom toestellen de stekker van het netsnoer uit het stopcontact te halen Varoitus Kytke irti vaihtovirtalaitteiden virtajohto ennen kuin teet mitään asennuspohja...

Страница 190: ...nte alterna CA Varning Innan du arbetar med ett chassi eller nära strömförsörjningsenheter skall du för växelströmsenheter dra ur nätsladden Related Documentation General Safety Guidelines and Warnings on page 137 General Electrical Safety Guidelines and Warnings on page 165 AC Power Electrical Safety Guidelines on page 168 DC Power Electrical Safety Guidelines for Switches This topic applies to h...

Страница 191: ...r conduit to a solid office earth ground A closed loop ring is recommended for terminating the ground conductor at the ground stud Run two wires from the circuit breaker box to a source of 48 VDC A DC powered device that is equipped with a DC terminal block is intended only for installation in a restricted access location In the United States a restricted access area is one in accordance with Arti...

Страница 192: ...age 177 Connecting DC Power to an EX2200 Switch Connecting DC Power to an EX2300 Switch Connecting DC Power to an EX3200 Switch Connecting DC Power to an EX3400 Switch Connecting DC Power to an EX4200 Switch Connecting DC Power to an EX4300 Switch Connecting DC Power to an EX4500 Switch Connecting DC Power to an EX4550 Switch Connecting DC Power to an EX4600 Switch Connecting DC Power to an EX6200...

Страница 193: ...ervice du circuit en courant continu placer le disjoncteur en position fermée OFF et à l aide d un ruban adhésif bloquer la poignée du disjoncteur en position OFF Warnung Vor Ausführung der folgenden Vorgänge ist sicherzustellen daß die Gleichstromschaltung keinen Strom erhält Um sicherzustellen daß sämtlicher Strom abgestellt ist machen Sie auf der Schalttafel den Unterbrecher für die Gleichstrom...

Страница 194: ...Safety Guidelines and Warnings on page 165 DC Power Electrical Safety Guidelines for Switches on page 170 DC Power Grounding Requirements and Warning on page 174 DC Power Wiring Sequence Warning on page 175 DC Power Wiring Terminations Warning on page 177 DC Power Grounding Requirements and Warning An insulated grounding conductor that is identical in size to the grounded and ungrounded branch cir...

Страница 195: ...75 DC Power Wiring Terminations Warning on page 177 DC Power Wiring Sequence Warning WARNING Wire the DC power supply using the appropriate lugs When connecting power the proper wiring sequence is ground to ground RTN to RTN then 48 V to 48 V When disconnecting power the proper wiring sequence is 48 V to 48 V RTN to RTN then ground to ground Note that the ground wire must always be connected first...

Страница 196: ...til RTN jord til jord Aviso Ate con alambre la fuente de potencia cc Usando los terminales apropiados en el extremo del cableado Al conectar potencia la secuencia apropiada del cableado se muele para moler RTN a RTN entonces 48 V a 48 V Al desconectar potencia la secuencia apropiada del cableado es 48 V a 48 V RTN a RTN entonces molió para moler Observe que el alambre de tierra se debe conectar si...

Страница 197: ...que celles à circuit fermé ou du type à plage ouverte avec cosses rebroussées Ces douilles terminales doivent être de la taille qui convient aux fils et doivent être refermées sur la gaine isolante et sur le conducteur Warnung Wenn Litzenverdrahtung erforderlich ist sind zugelassene Verdrahtungsabschlüsse z B für einen geschlossenen Regelkreis oder gabelförmig mit nach oben gerichteten Kabelschuhe...

Страница 198: ...arnings on page 137 General Electrical Safety Guidelines and Warnings on page 165 DC Power Electrical Safety Guidelines for Switches on page 170 DC Power Disconnection Warning on page 173 DC Power Grounding Requirements and Warning on page 174 DC Power Wiring Sequence Warning on page 175 Multiple Power Supplies Disconnection Warning WARNING For a device that has more than one power supply connecti...

Страница 199: ...msystemer Aviso O dispositivo foi criado para operar com sistemas de corrente TN Atención El equipo está diseñado para trabajar con sistemas de alimentación tipo TN Varning Enheten är konstruerad för användning tillsammans med elkraftssystem av TN typ Related Documentation General Safety Guidelines and Warnings on page 137 General Electrical Safety Guidelines and Warnings on page 165 Grounded Equi...

Страница 200: ...Copyright 2017 Juniper Networks Inc 180 OCX1100 Switch Hardware Guide ...

Страница 201: ...devices comply with the following standards Safety UL 60950 1 2nd Ed Information Technology Equipment Safety EN 60950 1 2005 Information Technology Equipment Safety IEC 60950 1 2005 Information Technology Equipment Safety All country deviations CB Scheme report EMC EN 55022 Class A FCC CFR47 Part 15B Class A CNS 13438 Class A Regulatory Compliance Comply with CE Markings per directives 2004 108 EC...

Страница 202: ...he facilities of the local telecommunications company The equipment must also be installed using an acceptable method of connection In some cases the inside wiring associated with a single line individual service can be extended by means of a certified connector assembly The customer should be aware that compliance with the above conditions might not prevent degradation of service in some situatio...

Страница 203: ...ate measures Japan The preceding translates as follows This is a Class A device In a domestic environment this device might cause radio interference in which case the user needs to take adequate measures VCCI A Korea Korean Class A Warning g040913 The preceding translates as follows This equipment is Industrial Class A electromagnetic wave suitability equipment and seller or user should take notic...

Страница 204: ...mful interference to radio communications However there is no guarantee that interference will not occur in a particular installation If this equipment does cause harmful interference to radio or television reception which can be determined by turning the equipment off and on the user is encouraged to try and correct the interference by one or more of the following measures Reorient or relocate th...

Отзывы: