


6.
Click
OK
. Data is replicated from the primary or backup server to its peer servers. If
the primary is not available, user data is sent to the backup. User data is then replicated
to the peer servers.
7.
For each client you want to synchronize with this server, enter the client’s name and
IP address and click
OK
. Once added, peer servers will have a colored icon next to
their name indicating their connection status. Node status is provided to client nodes
and LAS mapping servers as described in Table 82 on page 280.
8.
Click
OK
to save the changes.
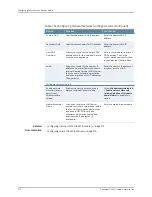
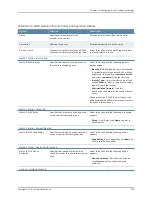
Table 82: Server Color Codes
Description
Color
Connected
Green
Connecting
Yellow
Not Connected
Gray
Related
Documentation
Configuring the Authentication Server (NSM Procedure) on page 279
•
•
Configuring the Client (NSM Procedure) on page 280
Configuring the Client (NSM Procedure)
To set up the client, you select the primary and backup server you want this client to
synchronize with.
To configure the client:
1.
In the NSM navigation tree, select
Device Manager > Devices
. Click the
Device Tree
tab, and then double-click the Secure Access device for which you want to configure
the client.
2.
Click the
Configuration
tab, and select
System > Configuration > User Record
Synchronization > This Client
.
3.
Click
New
. The New LAS to Server mapping page appears.
4.
Select the LAS name you want to synchronize from the Logical Authentication Server
Name (or ’Any LAS’) list.
5.
Enter the primary IP address of the user record server that will synchronize the user
records in the Primary Server box. If you prefer to synchronize with any available server,
select
Logical Authentication Server Name (or ’Any LAS’)
.
6.
Enter a backup server IP address in the
Backup Server
. Click
OK
.
Even if you select
Logical Authentication Server Name (or ’Any LAS’)
, you must enter
a primary server IP address. Once added, the primary and backup servers have a
colored icon next to their name indicating their connection status.
7.
Click
OK
to save the changes.
Copyright © 2010, Juniper Networks, Inc.
280
Configuring Secure Access Devices Guide
Содержание NETWORK AND SECURITY MANAGER
Страница 6: ...Copyright 2010 Juniper Networks Inc vi...
Страница 12: ...Copyright 2010 Juniper Networks Inc xii Configuring Secure Access Devices Guide...
Страница 18: ...Copyright 2010 Juniper Networks Inc xviii Configuring Secure Access Devices Guide...
Страница 20: ...Copyright 2010 Juniper Networks Inc 2 Configuring Secure Access Devices Guide...
Страница 28: ...Copyright 2010 Juniper Networks Inc 10 Configuring Secure Access Devices Guide...
Страница 40: ...Copyright 2010 Juniper Networks Inc 22 Configuring Secure Access Devices Guide...
Страница 46: ...Copyright 2010 Juniper Networks Inc 28 Configuring Secure Access Devices Guide...
Страница 50: ...Copyright 2010 Juniper Networks Inc 32 Configuring Secure Access Devices Guide...
Страница 52: ...Copyright 2010 Juniper Networks Inc 34 Configuring Secure Access Devices Guide...
Страница 82: ...Copyright 2010 Juniper Networks Inc 64 Configuring Secure Access Devices Guide...
Страница 110: ...Copyright 2010 Juniper Networks Inc 92 Configuring Secure Access Devices Guide...
Страница 154: ...Copyright 2010 Juniper Networks Inc 136 Configuring Secure Access Devices Guide...
Страница 224: ...Copyright 2010 Juniper Networks Inc 206 Configuring Secure Access Devices Guide...
Страница 234: ...Copyright 2010 Juniper Networks Inc 216 Configuring Secure Access Devices Guide...
Страница 288: ...Copyright 2010 Juniper Networks Inc 270 Configuring Secure Access Devices Guide...
Страница 300: ...Copyright 2010 Juniper Networks Inc 282 Configuring Secure Access Devices Guide...
Страница 310: ...Copyright 2010 Juniper Networks Inc 292 Configuring Secure Access Devices Guide...
Страница 312: ...Copyright 2010 Juniper Networks Inc 294 Configuring Secure Access Devices Guide...
Страница 320: ...Copyright 2010 Juniper Networks Inc 302 Configuring Secure Access Devices Guide...
Страница 322: ...Copyright 2010 Juniper Networks Inc 304 Configuring Secure Access Devices Guide...
Страница 337: ...PART 6 Index Index on page 321 319 Copyright 2010 Juniper Networks Inc...
Страница 338: ...Copyright 2010 Juniper Networks Inc 320 Configuring Secure Access Devices Guide...
Страница 340: ...Copyright 2010 Juniper Networks Inc 322 Configuring Secure Access Devices Guide...