– 3 –
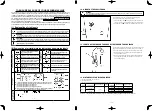
4. INSTALLING THE BELT COVER
5. ADJUSTING THE BELT TENSION
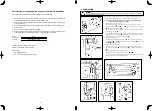
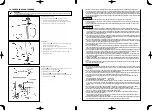
The standard installing position of the belt cover and bobbin winder
is as shown in the
fi
gure below. Install them according to the steps of
procedure as described below.
<Installing procedure>
1.
Screw belt cover strut
1
into the tapped hole located under the
handwheel of the machine arm.
2.
Tighten two washers
3
and two screws
4
in the belt cover mount-
ing screw holes near the side plate to secure belt cover body (A)
2
.
3.
Install belt support
6
on belt cover body (B)
5
using washer
7
and screw
8
.
4.
Put belt cover body (B)
5
inside belt cover body (A)
2
.
5.
Install belt cover lid
9
on belt cover body (A)
2
using screws
!0
and
!1
.
6.
Make sure that belt cover body (B)
5
does not come in contact
with belt cover body (A)
2
. Then, secure the belt cover (B)
5
on
the table using washers
!2
and screws
!3
.
7.
Install belt cover (D)
!4
on belt cover body (B)
5
using screw
!5
.
1
2
3
4
5
6
8
7
9
!0
!1
!1
!2
!3
Adjust the belt tension with the height of the motor so that the belt sags
15 mm when the center of V belt is applied with a 9.8 N load.
15 mm
9.8 N
Handwheel
Motor pulley
WARNING :
To avoid possible personal injury due to abrupt start of the machine, turn off the power to the machine and check to be sure that the
motor has totally stopped rotating in prior.
WARNING :
To avoid possible personal injury due to abrupt start of the machine, turn off the power to the machine and check to be sure that the
motor has totally stopped rotating in prior.
!4
!5
Belt hole of table
Bed hole of table
viii
CONTENTS
SPECIFICATIONS ...........................................................................................................................1
1. INSTALLING THE MACHINE ....................................................................................................1
2. INSTALLING THE KNEE LIFTER COMPONENTS ......................................................................2
3. INSTALLING THE THREAD STAND ..........................................................................................2
4. INSTALLING THE BELT COVER ................................................................................................3
5. ADJUSTING THE BELT TENSION .............................................................................................3
6. LUBRICATION ..........................................................................................................................4
7. ATTACHING THE NEEDLE
........................................................................................................5
8. THREADING THE MACHINE ....................................................................................................5
9. THREAD TENSION ...................................................................................................................6
10. PRESSER FOOT AND FEED DOG .............................................................................................7
11. STITCH LENGTH ......................................................................................................................8
12. HOW TO REMOVE THE LOOPER .............................................................................................8
13. RELATION BETWEEN THE NEEDLE AND THE LOOPER ..........................................................9
14. HEIGHT OF THE PRESSER BAR .............................................................................................10
15. LENGTH OF THE THREAD TAKEN UP BY THE THREAD TAKE-UP LEVER .............................10
16. MOTOR PULLEY AND SEWING SPEED .................................................................................10


