28
130112_Rev 2 GF 160 DV 1/22
Glass Care
Clean the glass only when necessary. Wipe the surface with a
clean, dampened, soft cloth. Follow with a dry, soft towel. Take
care not to scratch the glass surface.
WARNING:
DO NOT USE ABRASIVE CLEANERS ON THE GLASS.
NEVER CLEAN THE GLASS WHEN IT IS HOT.
DO NOT USE AMMONIA-BASED CLEANING SOLU-
TIONS.
16. Maintenance
NOTICE:
THIS APPLIANCE AND VENT SYSTEM MUST BE
INSPECTED ANNUALLY BY A QUALIFIED GAS
TECHNICIAN. Keep this manual for reference.
IMPORTANT: ALWAYS TURN OFF THE GAS
SUPPLY AND DISCONNECT POWER FROM THE
APPLIANCE BEFORE ANY SERVICE WORK IS
PERFORMED.
GLASS AND SAFETY SCREEN BARRIERS
DO NOT OPERATE THIS APPLIANCE IF ANY
OF THE GLASS PANELS OR SAFETY SCREEN
BARRIERS IS REMOVED, CRACKED, DAMAGED
OR MISSING.
REPLACE DAMAGED COMPONENTS USING
ONLY GENUINE JØTUL PARTS AVAILABLE
FROM ANY JØTUL AUTHORIZED DEALER.
REPLACEMENT SHOULD BE DONE ONLY BY A
LICENSED OR QUALIFIED SERVICE PERSON.
CAUTION: HANDLE BROKEN GLASS WITH CARE.
REMOVE THE LOG SET AND USE A VACUUM TO
CLEAN ANY REMAINING GLASS FRAGMENTS
FROM THE BURNER AND FIREBOX.
Annual Cleaning
Vent System
The entire vent system, including the chimney if
appropriate, should be inspected every year. If the venting
is disassembled for any reason, it should be reassembled and
sealed according to the vent manufacturer’s instructions
provided at the initial installation.
DO NOT USE
SILICONE SEALANT.
Burner System
Periodically inspect the firebox, valve compartment
and convection airways.
BE CERTAIN THAT THE
FLOW OF COMBUSTION AND VENTILATION AIR IS
UNOBSTRUCTED.
The valve compartment should be vacuumed regularly to
remove dust and debris. Vacuum more frequently if there
are pets in the home.
Use a soft brush attachment and handle log set components
carefully.
The pilot assembly and burner base should be inspected and
cleaned annually by a qualified technician. Replace any
component showing evidence of corrosion.
Glass and Gasket Inspection
It is important that the glass gasket be inspected at least
annually. Examine the ribbon gasket for signs of deterioration
and make sure the gasket has a positive seal. Replace the gasket if
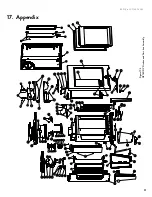
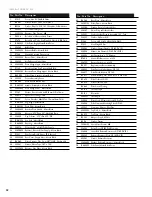
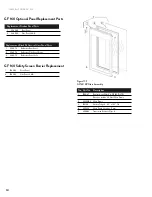
necessary. Refer to the replacement parts list on page 39.
NOTE: INSPECT THE GLASS SURFACE FOR
SCRATCHES AS THESE CAN WEAKEN THE PANEL
TENSILE STRENGTH. REPLACE THE PANEL IF ANY
SCRATCHES ARE FOUND. USE ONLY DOOR GLASS
KIT 158067 AND SIDE GLASS PANEL 158080. DO
NOT SUBSTITUTE ANY OTHER TYPE OF GLASS.
Tools:
needle nose pliers
1. Lift and remove the Top Plate.
2. Use the Latch Tool to pull each latch hook forward to
disengage them from the glass frame. Fig. 2.2, page 5.
3. Lift the glass frame up and off of the firebox.
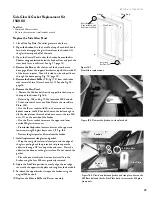
4. The glass panel is held in place by four tabs at the frame
corners. Use a screwdriver or small pliers to pry these up just
enough to release the glass panel. See fig. 16.1, page 29.
5. Remove the old gasket material.
6. Wrap the new gasket material evenly around the edge of
the glass, peeling back the protective strip to expose the
adhesive as you go, leaving a 1/2” overlap at the top. Place
the adhesive side down onto the glass surface. Do not stretch
the gasket.
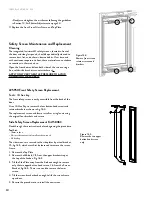
7. Place the gasketed glass within the frame and carefully bend
each of the corner retainer tabs back just enough to secure
the glass in the frame. The Replacement Glass kit includes
4 Tinnerman compression clips for use in case a tab should
break. The clips engage over the edge of the frame sides.
Front Door Glass & Gasket Replacement Kit
158067


