background image

85-03-00954 

72 | 

P a g e


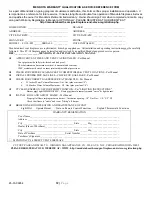
 MENDOTA WARRANTY QUALIFICATION & SERVICE REFERENCE FORM 

As a part of Mendota's on-going program of customer satisfaction, this Form verifies proper installation and operation.  It 
is important as a reference for future service. It insures long life and trouble-free operation of Mendota fireplaces & stoves 
and qualifies the owner for Mendota's lifetime limited warranty.  Owner should sign Form when completed and mail a copy 
along with Warranty Registration to Mendota. OPTIONALLY, PLEASE REGISTER AT OUR WEBSITE AT:  

http://mendotahearth.com/gas-fireplace-and-stove-registration.php 

HOME OWNER:  ________________________________  

DEALER:  _________________________________ 

ADDRESS:   ____________________________________  

ADDRESS:   _______________________________ 

CITY/STATE/ZIP:   ______________________________  

CITY/STATE/ZIP:  __________________________ 

SIGNATURE:  __________________________________  

PHONE:  __________________________________ 

MODEL #:   FV-34-PF2             SERIAL #:  ___________  

  DATE INSTALLED:  ________________________ 

Mendota direct vent fireplaces are sophisticated, hi-tech gas appliances.  All installation and operating instructions must be carefully 
followed.  This FV-34 fireplace must be installed and serviced by a qualified Mendota approved service person. 

REF: ___________________ MENDOTA FV-34-PF2 INSTALLATION MANUAL 


APPROVED VENT PIPES AND VENT CAP INSTALLED - Per Manual. 


Vent pipes must be fully twist-locked and leak proof.  

    Check minimum and maximum vertical / horizontal and vent runs. 
 1000

º

sealant must be used on inner joints at adjustable pipe sections


CHECK FOR PROPER CLEARANCES TO COMBUSTIBLES & VENT LOCATIONS - Per Manual 


INSTALL PROPER SIZE GAS LINES - CHECK FOR GAS LEAKS - Per Manual 


CHECK FOR CORRECT GAS PRESSURE AT MANIFOLD - Per Manual 


a. 

3.5 Inches Water Column Maximum - Nat. Gas (plus or minus 1/8”) 


b. 

10.0 Inches Water Column Maximum - L.P. Gas (plus or minus 1/8”) 


CYCLE BURNERS ON/OFF FOR PROMPT IGNITION - Per "LIGHTING INSTRUCTIONS" 
   

Burner must light IMMEDIATELY - Flame must travel promptly around "curve" & light burner


INSTALL LOGS AND ADJUST FLAME - Per Manual 
   

Proper pilot flame impingement on burner - Air shutter opening:  1/8" Nat. Gas – 1/4-“-1/2" LP 


Check that flame is "stable" and is not "lifting" off burner 


BRIEF OWNER ON OPERATION AND MAINTENANCE OF UNIT 

 Light Pilot     Operate Burner      Train on Remote Control Functions        Explain Thermostatic Functions   

WARRANTY REGISTRATION 

Your Name _______________________________________________________________________   

Address _________________________________________________________________________  

City ________________________________________ State ______Zip ______________________  

Dealer (Place of Purchase) ___________________________________________________________   

City ________________________________________ State ______Zip ______________________  

Date of Purchase  _______________________ Serial Number _______________________________   

Purchaser's Signature _______________________________________________________________   

  MENDOTA FV-34 DIRECT VENT FIREPLACE 

CUT OUT PAGE AND MAIL TO:  JOHNSON GAS APPLIANCE CO., 520 E AVE. N.W., CEDAR RAPIDS, IOWA 52405 

PLEASE REGISTER AT OUR WEBSITE AT: WWW.


http://mendotahearth.com/gas-fireplace-and-stove-registration.php


Содержание FV34-PF2

Страница 1: ...stallation and service must be performed by a qualified installer service agency or the gas suppli er WARNING Do NOT use this appliance if any part has been under water Immediately call a qualified service technician to inspect the appliance and to replace any part of the control system and any gas control which has been under water AVERTISSEMENT Assurez vous de bien suivre les instruc tions donné...

Страница 2: ...f the shelf urethane Sealants which may have modifier additives used to accelerate drying times and curing times Consult with a reputable Paints and Sealants supplier and acquire Heat Resistant Polyurethane Sealants Additional Application Cautions If wood used around or in front of the fireplace has been chemically cleaned or bleached prior to staining or painting it is of the utmost importance to...

Страница 3: ...ning service or warranty service always provide the Model Number Serial Number and Manufactured Date This information will expedite the warranty verification process INSTALLER WRITE UNIT SERIAL NUMBER HERE FOR FUTURE REFERENCES INFORM CUSTOMER OF THIS SERIAL NUMBER LOCATION AND IMPORTANCE ...

Страница 4: ...isé uniquement avec les types de gas indiqués sur la plaque signalétique Ne pas l utiliser avec d autres gas sauf si un kitde conversion certifié est installé READ and UNDERSTAND all instructions carefully before starting the appliance FAILURE TO FOLLOW these instruc tions may result in a possible fire hazard and will void the warranty Any safety screen or guard removed for servicing must be repla...

Страница 5: ...ny reason reinstall per the instructions provided for the initial installa tion The vent system assembly for this fireplace must be periodically examined by a qualified service agency INSPECT the external vent cap on regular basis to make sure that no debris is interfering with the airflow The flow of combustion and ventilation air not to be obstructed DO NOT abuse the glass door by striking the g...

Страница 6: ... NOT BE PLACED on or near the appliance Children and adults should be ALERTED to the hazards of high surface temperature and should STAY AWAY to avoid burns or clothing ignition Young children should be CAREFULLY SUPERVISED when they are in the same room as the appliance These units MUST use one of the vent systems described in the Installing Your Fireplace section of the Installers Guide NO OTHER...

Страница 7: ...s BURNER AIR SHUTTER SYSTEMS Externally controllable Rear Burner air shutter and Internal rotary Front Burner air shutter LOG SET 9 piece Premium Definition Log Set with Extreme glow and realism ember bed REFRACTORY PANELS Premium Detailed Red Clinker Fiber Brick Panels Black Copper Mocha Enamel Panel Op tions NATURAL GAS INFORMATION Factory equipped for Natural Gas 5 WC Minimum inlet pressure req...

Страница 8: ...ICTIONS 27 FLUE VENTING COMPONENTS IDENTIFICATION 28 FV 34 MASTER FLUE VENTING REQUIREMENTS CHART 29 IMPORTANT VENTING CONFIGURATION NOTES 30 APPROVED VENT SYSTEMS 31 MINIMUM RISE 18 WITH HORIZONTAL TERMINATION 32 VERTICAL RISE HORIZONTAL TERMINATION 33 VERTICAL THROUGH THE ROOF VENTING 35 VERTICAL THROUGH THE ROOF VENTING USING FOUR 900 ELBOWS 37 INSTALLATION CHECK OFF LIST 39 LIGHTING CHECK OFF ...

Страница 9: ... State Building Code 3 A metal or plastic identification plate shall be permanently mounted to the exterior of the building at a min imum height of eight 8 feet above grade directly in line with the exhaust vent terminal for the horizontally vented gas fueled heating appliance or equipment The sign shall read in print size no less than one half 1 2 inch in size GAS VENT DIRECTLY BELOW KEEP CLEAR O...

Страница 10: ... ELECTRICAL SUPPLY INLET THIS SIDE TOP SAIL REMOVABLE A 29 1 2 20 3 8 40 5 8 MIN ROUGH FRAMING WIDTH 36 3 4 MIN ROUGH FRAMING HEIGHT 31 1 2 GLASS FRAME WIDTH 22 3 8 GLASS FRAME HEIGHT 12 1 2 8 3 16 GAS SUPPLY INLET 1 2 FNPT 6 13 16 12 1 4 110VAC INLET HOT NO SWITCH 4 X6 COAXIAL STARTER COLLAR HEAT TRANSFER DUCT KNOCKOUT FV 34 FULL VIEW GAS FIREPLACE DIMENSIONS OVERALL APPLIANCE DIMENSIONS AND FEAT...

Страница 11: ...OMBUSTIBLES 2in 51mm UNIT TO ENCLOSURE BACK WALL 1 2in 13mm VENT PIPE SIDES TO COMBUSTIBLES 1in 25mm UNIT BOTTOM TO ENCLOSURE CEILING 43 in 110 cm VENT PIPE BOTTOM TO COMBUSTIBLES 1in 25mm UNIT BOTTOM TO ROOM CEILING 72 in 182 9 cm 8 MANTLE ABOVE DISCHARGE AIR OPENING 12 in 30 5 cm MINIMUM COMBUSTIBLE ROUGH FRAMING DIMENSIONS allow extra clearance for vent system WIDTH 40 5 8 103 2 cm HEIGHT 36 3 ...

Страница 12: ...se and at least annually by a professional service person More frequent cleaning may be required due to excessive lint from carpeting bedding material carbon build up etc It is imperative that control com partments burners and circulating air passageways of the appliance be kept clean The burner and pilot flames and logs should be visually checked periodically DO NOT use this appliance if any part...

Страница 13: ...THICK MAXIMUM R 1 MINIMUM RATING REQUIRED USE OF 1 2 THICK R 1 BOard AS BASE LAYER RECOMMENDED MINIMUM REQUIRED DIMENSIONS Column 1 Column 2 ROUGH FRAMING WIDTH 39 1 2 STICK FRAMING or 40 5 8 SOLID WALL FRAMING ROUGH FRAMING HEIGHT 36 3 4 ROUGH FRAMING DEPTH 14 5 8 MINIMUM FINISHING MATERIALS TOTAL THICKNESS 1 UNIT BASE TO ROOM CEILING MINIMUM DISTANCE 72 MINIMUM DISTANCE TO 8 MANTEL ABOVE UNIT BA...

Страница 14: ...of this Fireplace If you prefer to take measurements from the Top of the Convection Air Opening note that the Top of the convection air opening is 24 3 4 inches up from the floor level of this fireplace WARNING Make proper use of this chart Use a 3 2 Rise to Run ratio to calculate the required distance up based on your mantel depth Do not compromise the specifications contained in this chart Failu...

Страница 15: ...IRE RISK ODOR RISK Install appliance on hard metal or wood surfaces extending full width and depth of this fireplace An R 1 Rated Hearth Protection Pad 1 1 2 Thick Maximum is required unless this fireplace is elevated at least 6 above floor level of the room For every 1 this fireplace is elevated you may reduce the hearth pad depth by 2 If this fireplace is elevated 6 or higher no hearth protectio...

Страница 16: ...uld be constructed in the manner of all outside walls of the home to prevent cold air drafting problems The chase should not break the outside building envelope in any manner Wall ceiling base plate and cantilever floor of the chase should be insulated Vapor and air infiltration barriers should be installed in the chase as per regional codes for the rest of the home Additionally in regions where c...

Страница 17: ... gang box with the height of other AC outlets that are installed in the same room as this appli ance WARNING DO NOT STAPLE the 6 DC Power Inlet Harness to the wall studs COVER PLATES Two cover plates are supplied and are White and Beige in color If the home décor requires a different color other than the two supplied colors obtain one from a local hardware store Make certain that the cover you obt...

Страница 18: ...l deco rative Fronts options to mount and function properly If the total thickness of finishing materials on top of the flat face of this appliance is to exceed 3 reduce the framing depth accordingly or contact Mendota Technical Service for support RECOMMENDED BACKING MATERIALS OVER NON COMBUSTIBLE ZONES See R Ratings tables provided in the next page Mendota recommends the use of thick Mineral Fib...

Страница 19: ...e quality It is recommended that you use the highest R value rated material available and suitable for your particular type of Finishing Material and the attachment method you select to attach the Finishing Material to the Facing Backer Material R value is the measurement of the insulating properties of a given material at a given thickness Below are two tables showing the R values of common heart...

Страница 20: ...is fireplace protruding out from the framing surface Install 1 2 thick drywall on framing members so that its outer surface is flush with the front face of this fireplace Attach Marble or Granite slabs to face of unit and to drywall surface using adhesive that does not off gas when hot Mendota recommends using High Temperature RTV Silicone 1 8 round beads in serpentine lines over the metal face of...

Страница 21: ...s fireplace Do not remove any finishing guides installed on this appliance unless you are replacing them with metallic tile edging or are installing polished stone facing such as marble or granite This fireplace may be installed in an elevated position by created an elevated deck and an appropriate framed enclosure NOTE This fireplace may be elevated but MUST allow a minimum of 72 distance between...

Страница 22: ...the floor and must extend a minimum of 18 in front of the fireplace For every 1 inch the fireplace is raised off the floor the depth of the hearth protector may be reduced by 2 inches If fireplace is raised off the floor 6 or more no hearth protector is required HEATING PERFORMANCE With its high heat output this Mendota Fireplace will heat a large area of your home if located properly to maximize ...

Страница 23: ...per gas pipe diameters Strictly adhere to the correct pipe sizes PIPE LENGTH FEET SCHEDULE 40 PIPE INSIDE DIA TUBING TYPE L OUTSIDE DIA NAT L P NAT L P 0 10 1 2 1 3 cm 3 8 1 0 cm 1 2 1 3 cm 3 8 1 0 cm 10 40 1 2 1 3 cm 1 2 1 3 cm 5 8 1 6 cm 1 2 1 3 cm 40 100 1 2 1 3 cm 1 2 1 3 cm 3 4 2 0 cm 1 2 1 3 cm 100 150 3 4 2 0 cm 1 2 1 3 cm 7 8 2 3 cm 5 8 1 6 cm 150 200 3 4 2 0 cm 1 2 1 3 cm 7 8 2 3 cm 3 4 2...

Страница 24: ...r s capacity is not sufficient to add the Gas Fireplace an additional inches to inches regulator must be installed for the Fireplace EXCEPTION Some codes allow 2 PSI 1 4KPA supplies to enter the residence in which case pounds to inches regula tors are used The following table provides information on correct gas pressure requirements Be sure your gas supplier or plumber carefully follows this table...

Страница 25: ...sure to also prepare opening to allow for co axial vent 2 Check to make certain all venting requirements and locations are being followed 3 This Fireplace is designed for installation into rough framing NOTE FRAMING MATERIAL ABOVE FIREPLACE MUST MAINTAIN CORRECT CLEARANCE TO FIREPLACE AND VENT PIPES WARNING One inch clearance to sides below and 2 inches clearance on top of horizontal vent sections...

Страница 26: ...ect Vent Fireplace it is critical that all brands of vent pipe sections are sealed tightly and leak proof This means that all pipe sections must be carefully rotated into the fully twist locked position We strongly recommend that fixed length pipe sections be used in place of telescoping sections whenever pos sible Note When using vent pipe and components that do not incorporate a fiberglass or gr...

Страница 27: ...earance to ventilated soffit located above the terminal from the center line of the terminal 24 60 cm min K Clearance to a mechanical air supply inlet 6 feet 1 8 m minimum E Clearance to unventilated soffit 24 min 60 cm min L Clearance above paved side walk or a paved driveway located on public property 7 feet 2 1 m minimum F Clearance to outside corner 7 inches 18 cm M Clearance under veranda por...

Страница 28: ...M DESCRIPTION 1 6 or 7 PIPE DuraVent 6 Amerivent 7 9 12 2 12 VENT STACK 3 24 VENT STACK 4 36 VENT STACK 5 48 VENT STACK 6 90ºGALVANIZED ELBOW 45º GALVANIZED ELBOW 7 ADJUSTABLE WALL THIMBLE 8 ATTIC INSULATION SHIELD 12 9 ROOF FLASHING 0 12 TO 6 12 10 ROOF FLASHING 7 12 TO 12 12 11 STORM COLLAR 12 VERTICAL VENT CAP 13 SUPPORT BAND 14 HORIZONTAL VENT CAP 15 FIRE STOP SPACER DO NOT SEPARATE TELESCOPIN...

Страница 29: ... anywhere within the 25 feet horizontal run but reduce 3 feet for every 900 elbow installed after the first 900 elbow 4th 90o elbow is allowed at the end of the horizontal run but the 4th 90o elbow must point vertically upward and you must terminate the vent system vertically 7 For ALL horizontal terminations only 3 90o elbows allowed 8 For ALL vertical terminations Four 90o elbows allowed However...

Страница 30: ...use the Master Flue Venting Requirements Chart See the area below the 5 vertical run line b A single 90º vertical to horizontal elbow is already calculated into the allowable maximum 25 horizontal run The Vent ing Requirements Chart assumes that for all horizontal runs calculated one 900 elbow is used within the venting system Each additional 90º elbow reduces the maximum horizontal distance allow...

Страница 31: ...L TERMINATION VERTICAL RISE TRIPLE 90 ELBOWS HORIZONTAL TERMINATION VERTICAL RISE TRIPLE 90 ELBOWS VERTICAL TERMINATION THREE HORIZONTAL DISCHARGE 90 ELBOWS APPROVED w RESTRICTIONS STRAIGHT UP VERTICAL VENTING NOT ALLOWED APPROVED H H H H H1 H1 H1 V V V2 V1 V2 V1 V2 H2 V1 H2 V H2 APPROVED APPROVED APPROVED APPROVED APPROVED APPROVED 40 FEET MAXIMUM APPROVED NOT ALLOWED APPROVED VENT SYSTEMS QUICK ...

Страница 32: ... 10 high opening in the wall The hole must be positioned so the vent system will have a rise per foot of run AND be perpendicular to the wall The height of the opening must be located to meet all local and na tional building codes Do not allow the termination to be easily blocked or obstructed If wall being penetrated is non combustible material i e ma sonry block brick etc an 8 inch diameter hole...

Страница 33: ...e the outside wall Since vent pipe sections overlap we suggest pre assembling and measuring the total vent pipe run so you can more accurately locate the point where the vent pipe will penetrate the outside wall See Figure 13 Be sure all vent components are properly twist locked and leak proof Be sure 1000º sealant is used in the inner pipe joints of all pipe sections manufactured by Simpson DuraV...

Страница 34: ...85 03 00954 34 P a g e APPROVED ...

Страница 35: ...ist lock position and that inner pipe joints DuraVent only are sealed and are leak proof Maintain 1 airspace clearances to combustibles 2 above horizontal runs Cut a 9 x 10 opening in the roof centered in the small drilled hole placed in the roof in No 1 The opening should be a sufficient size to meet all clearance requirements Continue to assemble lengths of pipe and elbows necessary to reach up ...

Страница 36: ...85 03 00954 36 P a g e 1 2 3 4 5 13 15 9 10 11 12 40 FEET MAX ...

Страница 37: ...eplace and its venting system Through this effort Mendota has been able to certify the use of Four 900 elbows when terminating Vertically The use of Four 900 elbows must meet some minimum prerequisites Prerequisite 1 The vent system must terminate vertically using a vertical vent cap Prerequisite 2 There must be a minimum 18 inches of vertical starter section connected directly to the top of this ...

Страница 38: ...the three bottom tabs in glass frame bottom with slots in glass clips on firebox bottom Insert tabs into slots and center tabs in slots left to right 2 Center Glass Frame over Firebox left to right 3 After door has been placed into slots rotate door towards firebox until gasket seal is touching the firebox frame 4 Use the tool provided to connect the spring latches to the glass frame Insert tool i...

Страница 39: ... Check for gas leaks and gas pressures prior to installing facing materials Install fresh batteries in remote transmitter Follow Initializing the System for the first time instructions to synchronize the remote control and the ignition module Check air shutter opening 0 to 1 8 Nat gas or 1 4 to 1 2 LP gas Carefully follow all Lighting and Log Installation Instructions Make certain that burners lig...

Страница 40: ...ing wire A powerful single blower is provided as standard equipment with this FV 34 fireplace The blower has an air output rating of 105 CFM in free air This fireplace is designed to operate with the blowers turned OFF or ON Turning the blower on aids in distributing and circulating heat to the room this fireplace is installed in BLOWER OPERATION The remote control system supplied with this applia...

Страница 41: ...ottom foam trays It is of the utmost importance that you treat every package and every twig piece and assembly like you would an egg Breakage is your responsibility and is not covered by a Warranty Policy The diagrams below show all the parts included with this log set LOG 1 REAR LOG 35 01 00581 LOG 3 LEFT LOG 35 01 00755 LOG 2 MID EMBER BED 35 01 00582 LOG 5 LEFT TOP LOG 35 01 00579 LOG 4 RIGHT L...

Страница 42: ...85 03 00954 42 P a g e PLACE LOG 1 REAR LOG ON REAR SHELF BEHIND REAR BURNER CENTER LOG ON THE AIRBOX PUSH LOG BACK SO IT TOUCHES REAR BRICK PANEL LOG 1 ...

Страница 43: ...RS IF LOG 2 DOES NOT SIT BETWEEN REAR AND FRONT BURNER PLACE LOG 2 BETWEEN THE TWO BURNERS AND SLIDE TO THE RIGHT UNTIL THE CURVATURE IN THE FRONT BURNER CONTACTS THE CURVATURE ON THE RIGHT FRONT TIP OF LOG 2 PUSH LOG 2 DOWN TO INDENT THE BOTTOM WITH THE TWO BURNER MOUNTING SCREW HEADS LOG 2 MUST NOT ROCK ON TOP OF THE SCREW HEADS LOG 2 MUST BE STABLE LOG 1 LOG 2 ...

Страница 44: ... A NOTCH THAT MATES WITH THE LEFT MOST GRATE BAR SET LOG 3 ON THE GRATE BAR AND THE RECTANGLE SHAPED AIR SHUTTER BOX TOP SURFACE LOG 3 MUST LEAVE CLEARANCE FOR THE REAR BURNER PORTS SOME ROTATIONAL FLEXIBILITY IS ALLOWED FOR THE REAR END OF THIS LOG TO ROTATE TOWARDS LOG 2 HOWEVER LOG 3 SHALL NEVER SIT ON TOP OF THE REAR BURNER PORTS DOING SO WILL LEAD TO SOOT CREATION LOG 1 LOG 2 LOG 3 AIR SHUTTE...

Страница 45: ... OF LOG 4 ON TOP OF THE FIRST GRATE BAR ON THE FAR RIGHT SIDE SOME ROTATIONAL FLEXIBILITY IS ALLOWED TO LOG 4 AROUND THE PIN AND HOLE HOWEVER DO NOT ROTATE REAR END OF LOG OUTWARD ROTATE INWARD ONLY IF DESIRED ROTATING OUTWARD MAY PLACE LOG 4 ON TOP OF REAR BURNER PORTS AND MAY LEAD TO SOOTING PIN 1 LOG 1 LOG 4 LOG 2 LOG 2 ...

Страница 46: ... 5 HAS A HOLE THAT ALIGNS WITH THE LEFT SIDE PIN ON LOG 1 THE V NOTCH BETWEEN THE TWO BRANCHES MUST SIT DIRECTLY ON TOP OF THE REAR BURNER S LEFT SIDE PORTS AND MUST ALLOW THE FLAMES TO RISE INTO THE V NOTCH IN THIS LOG PUSH LOG 5 BACK SO ITS REAR END TOUCHES THE REAR BRICK PANEL PIN FOR LOG 5 LOG 1 LOG 2 LOG 5 LOG 3 PIN FOR LOG 6 ...

Страница 47: ...IGHT SIDE OF LOG 1 LOG 6 HAS A HOLE IN ITS BACK SIDE TO MATE WITH THIS PIN PLACE LOG 6 ON TOP OF LOG 1 S PIN THE OTHER END OF LOG 6 SITS ON TOP OF LOG 2 AS SHOWN BELOW SOME ROTATIONAL FLEXIBILITY IS ALLOWED FOR LOG 6 THE POSITION OF LOG 4 WILL LIMIT THE ROTATION OF LOG 6 LOG 1 LOG 6 LOG 4 LOG 2 ...

Страница 48: ... RESTS ON TOP OF THE FRONT BURNER S REAR VISIBLE EDGE AND ON TOP OF LOG 4 THIS LOG IS DESIGNED TO HIDE THE PILOT LIGHT PLACE THIS LOG SO IT PROVIDES CLEARANCE TO ALL BURNER FLAMES AND PILOT FLAMES YET POSITIONED TO HIDE THE PILOT FLAMES LOG 4 LOG 7 ...

Страница 49: ... THE BEST GLOW EFFECT AND REALISTIC LOOK DO NOT PINCH FRONT BURNER PORTS WITH LOG 8 LOG 9 RIGHT FRONT CHUNK IS TO BE PLACED AT A SEVERE ANGLE AGAINST THE HORIZONTAL GRATE BAR AND FLOATING OVER THE FRONT BURNER PORTS THE POSITION OF THIS LOG IS NOT CRITICAL HOWEVER DO NOT PLACE THIS LOG DIRECTLY ON TOP OF THE FRONT BURNER PORTS AND DO NOT PLACE THIS LOG ON TOP OF LOG 2 LOG 8 GRATE LOG 2 LOG 9 ...

Страница 50: ...85 03 00954 50 P a g e PLACE LOG 10 FAR RIGHT LOG ON THE FIREBOX FLOOR NEXT TO LOG 4 GRATE LOG 10 FIREBOX FLOOR GRATE LOG 10 FIREBOX FLOOR ...

Страница 51: ...AND THE FRONT BURNER A FEW COALS MAY SIT ON TOP OF THE FRONT BURNER TUBE BUT AVOID PLACING TOO MANY COALS ON TOP OF THE FRONT BURNER PORTS USING A TOOTH BRUSH BRUSH INSWOOL GLOWING EMBERS RANDOMLY OVER LOG 2 THE COALS AND IN AREAS WHERE YOU WISH TO SEE GLOWING EMBER EFFECTS COMPLETED LOG SET ASSEMBLY ...

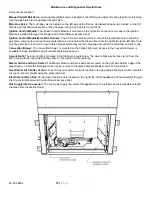
Страница 52: ...he air gap on the right side of the Glass Door Frame Locate the Ring Terminal on the right side towards the bottom edge of the Glass Frame Insert Glass latch tool tip in the Ring Terminal s ring hole Slide this lever to the Forward to Open and to the Backwards to close the rear burner shutter 1 Install logs and glass frame and burn unit for 30 minutes 2 If flame is too blue close Air Shutters unti...

Страница 53: ... use It is important to clean the flame sensor rod using emery cloth if flame rectification problems are encountered after use for a few months Environmental factors beyond the control of Mendota can cause flame rectification concerns CLEANING VIEWING GLASS The viewing glass should be cleaned periodically Exterior glass surface may be cleaned with cleaner as desired To clean interior surface of gl...

Страница 54: ...AGE 34 C Check condition of glass door gasket gasket must seal tightly over firebox replace if necessary D Periodically check to verify that the vent system and vent cap are open and free of blockage E Before re installing glass have qualified service person check the operation of the pilot and cycle the burner per LIGHTING INSTRUCTIONS see Owner s Manual Be sure all items in LIGHTING and INSTALLA...

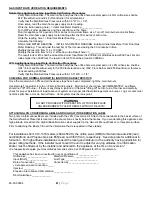
Страница 55: ... be shut off prior to disconnecting the electrical power ORIFICE SIZES REQUIREMENT A Natural Gas to LPG conversion kit HA 30 00507 must be ordered and installed in this fireplace insert to burn LPG LP Conversion Kit HA 30 00507 contains the following parts One Motorized LP Pressure Regulator 907 012 and two Cap Orifices 65 14 00364 drill 3 64 and an L shaped Torx wrench Recommended Procedure to Co...

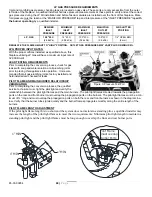
Страница 56: ...ebox While hold ing the pilot base body with large vice grips tightly loosen Pilot Light s hex shape base using a open end wrench Rotate counter clock wise turn to loosen 9 Pilot arrives from the factory set for NG Push NG LP Adjustment Clip inward all the way to set it for LP See detail view below If you see NAT printing on the Adjustment Clip this indicates that the pilot is set to burn NG Push ...

Страница 57: ...er is running parallel to front face of unit positioned properly so that the pilot light hood pointing to the left is pointed properly towards the burner s flame propagation ports 11 Make certain Rear Burner is positioned properly so that the pilot light hood pointing to the left is pointed properly towards the burner s flame propagation holes FR O N T B U R N ER SH U TTER A D JU STM EN T LO O SEN...

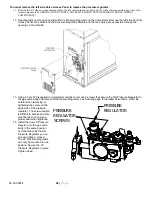
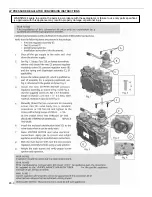
Страница 58: ...g on the left side 13 Using a Torx T20 supplied or a slotted screwdriver remove 2 screws that secure the NG Pressure Regulator to the gas valve body and remove NG Pressure Regulator see following page for detailed instructions Note Be careful when removing or tightening the screw on the back side of the pressure regulator The screw location is difficult to access and care must be taken to ensure a...

Страница 59: ...SURE REGULATOR CONVERSION INSTRUCTIONS WARNING Failure to position the parts in accordance with these diagrams or failure to use only parts specifical ly approved with this appliance may result in property damage or personal injury ...

Страница 60: ...th soap and water solution at all plumbing joints prior to placing this appliance into operation It is recom mended that all gas plumbing joints factory installed and field installed are checked for leaks PILOT FLAME AND MAIN BURNER RELATIONSHIP VERIFICATION Prior to completing the conversion process the qualified service technician must light the pilot light and verify the relationship between th...

Страница 61: ... and all the above steps have been completed light the main burners Use Remote Transmitter to turn on Pilot Light and burners Main burner should now light IMMEDIATELY and flame should not lift off burner If there is any delay in ignition or if flame is lifting off burner turn off burner and carefully check for proper installation of logs coals vent system and proper pilot flame impingement on burn...

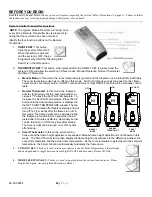
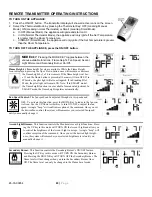
Страница 62: ...ng until the room temperature in creases 1o F above the Set Point Temperature To increase the Set Point Temperature Press the UP button until the desired temperature is displayed in the SET POINT TEMPERATURE window The fan will turn on 5 minutes after fireplace startup and will turn off 12 1 2 minutes after the flames turn off in this mode The flame height can be adjusted while the fireplace is fu...

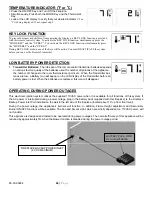
Страница 63: ...also extinguish If in Standing Pilot Mode the pilot light will remain ON Note If in SMART model the flame height function is not available for manual adjustment In SMART mode the flame height regulates automatically Fan Speed Control The fan speed can be adjusted through six 6 speeds and OFF To activate this function press the MODE Key to index to the fan con trol icon Use the UP Down Arrow Key to...

Страница 64: ...eries used the number of ignitions of the appliance the number of changes to the room thermostat set point etc When the Transmitter bat teries are low a Battery Icon will appear on the LCD display of the Transmitter before all battery power is lost When the batteries are replaced this icon will disappear OPERATING DURING POWER OUTAGES This electronic ignition system utilizes the supplied 110VAC po...

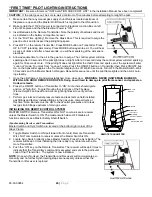
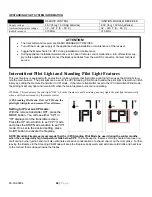
Страница 65: ...hts and the pilot is burn ing steadily 7 Once the pilot flame is lit and well established close glass door WARNING NEVER IGNITE MAIN BURNERS WITH GLASS DOOR REMOVED OR OPEN Doing so will lead to damage to pilot flame sensor and spark elec trode wire leads 8 Press the ON OFF button on Transmitter to ON All burners should ignite and run at high fire Toggle through other functions of the Fireplace Fl...

Страница 66: ...t in the CPI Standing Pilot mode to allow the pilot light to remain on indef initely by setting the Remote Transmitter to CPI mode If the remote transmitter is set to the IPI Intermittent Pilot mode the pilot light will only light and remain ON while the main fireplace burners are operating IPI Mode This mode turns the pilot light OFF when the fireplace is not functioning and only lights the pilot...

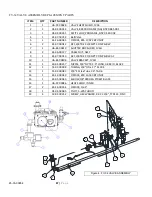
Страница 67: ...W 7 1 HA 81 00419 SHUTTER BOX SLIDER FV33i 8 2 65 06 00577 CABLE NUT ASSY 9 1 65 07 00010 BCF 3 8 TBE X 1 8MPT COMP ELBW AF 10 1 HA 81 00408 VALVE BRACKET FV33I 11 1 60 01 00257 NIPPLE 3 8 NPT X 2 0 LONG 0 493 ID BLACK 12 1 55 02 00098 TUBING 3 8 OD x 27 SS 304 13 1 55 02 00083 3 8 SS Flex Tube X 6 T6 06 14 1 65 14 00049 ORIFICE 49 13 530 BTU NAT 15 1 65 05 00040 ELBOW 3 8 X90 DEG STREET BLACK 16 ...

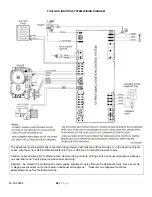
Страница 68: ...Canadian Electrical Code Caution Label all wires prior to disconnection when servicing controls Wiring errors can cause improper and danger ous operation and Verify proper operation after servicing Attention Au moment de l entretien des commandes étiquetez tous les fils avant le débranchement Des erreurs de c blage peuvent entra un fonctionnement inadéquat et dangereux S assurer que l appareil fon...

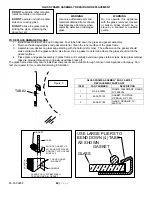
Страница 69: ...omponents are available through Johnson Gas Appliance Company Con tact your dealer for more detailed ordering information GLASS FRAME ASSEMBLY HA 78 00103 REPLACEMENT PARTS LIST ITEM PART NUMBER DESCRIPTION 1 HA 58 00262 FRAME WELDMENT GLASS FV 34 FV44 2 65 02 00103 GASKET TADPOLE 3 8 BULB 3 4 TAIL 3 65 06 01184 GLASS CERAMIC FV 34 FV44 WARNING Do not operate this appliance with the glass removed ...

Страница 70: ... may result in breakage of connection terminals on either ends Convection Blower The convection blower is mounted on the firebox right wall Access to the convection blower is available through the Blower and Control Module Access panel Accent Light The accent light is mounted in the firebox top center area The accent light wire harness is run from the light housing to the right side and then down ...

Страница 71: ...85 03 00954 71 P a g e NOTES ...

Страница 72: ...s 1000ºsealant must be used on inner joints at adjustable pipe sections CHECK FOR PROPER CLEARANCES TO COMBUSTIBLES VENT LOCATIONS Per Manual INSTALL PROPER SIZE GAS LINES CHECK FOR GAS LEAKS Per Manual CHECK FOR CORRECT GAS PRESSURE AT MANIFOLD Per Manual a 3 5 Inches Water Column Maximum Nat Gas plus or minus 1 8 b 10 0 Inches Water Column Maximum L P Gas plus or minus 1 8 CYCLE BURNERS ON OFF F...

Страница 73: ...85 03 00954 73 P a g e TAPE SHUT JOHNSON GAS APPLIANCE COMPANY 520 E AVENUE N W CEDAR RAPIDS IA 52405 POSTAGE NEEDED ...

Страница 74: ...85 03 00954 74 P a g e NOTES ...

Страница 75: ...purchases that have not received prior written approval from Mendota NOTE Minor warping of certain parts or discoloration is normal and is not a defect covered by this warranty Major warping of parts can be caused by over firing of your Mendota Fireplace Over firing above rated nameplate specification is as contrary to the manufacturer s instructions and may void this warranty This warranty may no...

Страница 76: ...85 03 00954 76 P a g e Johnson Gas Appliance Company 520 E Avenue N W Cedar Rapids IA 52405 Mendota Hearth Division WEBPAGE www johnsongas com or www mendotahearth com ...

Отзывы: