


20
RW SERIES REVERSIBLE CHILLER INSTALLATION MANUAL
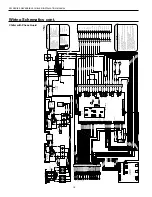
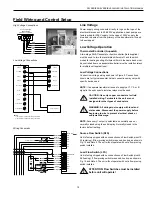
Field Wiring and Control Setup cont.
Accessory Relay Setup
The accessory output set to “close” upon Y1 compressor call
(compressor is delayed 90 sec. after Y1) but can be set to “open”
with Y1.
To change ACC1:
• Using up and down keys, scroll to “Acc 1 Sel” hit “ENTER” and
“ON Comp” begins flashing
• Using up and down keys, select “ON Comp” for activation with
Y1 Call or “OFF Comp” for deactivation with Y1
Lead/Lag Selection
Compressor Lead/Lag Selection is factory set to “ON” but can be
set to “OFF”.
To change Lead/Lag On/Off:
• Using up and down keys, scroll to “LEAD/LAG SELECT” hit
“ENTER” and “ON” begins flashing
• Using up and down keys, select “ON” for activation or “ OFF” for
deactivation
Anti Short Cycle
High Pressure Protection
Low Pressure Protection
Advanced Freeze Detection Setpoint
Random Start
Display for diagnostics
Reset Lockout at disconnect
Intelligent reset for field installed flow switches
1 Accessory output
Compressor Lead/Lag
Compressor Current Switches
Field Selectable Options
Freeze Detection Sensing Select (DI-4 and DI-5)
The freeze detection temperature sensing selection inputs allow the
user to adjust the setpoints. The source sensors are wired to inputs
AI-3 and AI-4 while the load sensors are wired to inputs AI-5 and
AI-6. The setpoints for both, the load and source, are factory set for
30°F. In order to change the setpoint to 15°F on the source, remove
the jumper wire from DI-4 (wire #56). The load setpoint can be
changed by removing the jumper wire from DI-5 (wire #55).
Accessory Output (DO-4)
The accessory output will be energized 90 seconds prior to the lead
compressor output being energized. When the lead compressor
output is turned off the accessory output will be deactivated
immediately. The output is selectable for normally open or normally
closed operation through the unit mounted user interface or from a
building automation system.
°F or °C - Unit of Measure
Degrees Fahrenheit is factory set, however degrees Celsius can be
selected using the following procedure:
To Change Unit of Measure:
• On FX10 control using up and down keys, scroll to “SETTINGS”
• Using up and down keys, scroll to “UNIT OF MEASURE” hit
“ENTER” and “UNIT OF MEASURE” begins flashing
• Using up and down keys, select “F” for degrees Fahrenheit or “C”
for degrees Celsius
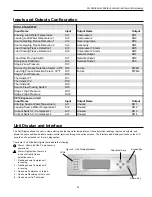
Other Field Options
Other field selectable options are available as shown in the
maintenance menu on page 24 of the FX10 control using a similar
procedure as shown in the above examples. These would include
aquastat enabling, and emergency shutdown.
Control Features
Control and Safety Features
Emergency Shutdown
The emergency shutdown mode can be activated by a command
from a facility management system or a closed contact on DI-2.
The default state for the emergency shutdown data point is off.
When the emergency shutdown mode is activated, all outputs will
be turned off immediately and will remain off until the emergency
shutdown mode is deactivated. The first time the compressor starts
after the emergency shutdown mode has been deactivated, there
will be a random start delay present.
Lockout Mode
Lockout mode can be activated by any of the following fault signals:
refrigerant system high pressure, refrigerant system low pressure,
heating freeze detection, cooling freeze detection, and compressor
current sensor. When any valid fault signal remains continuously
active for the length of its recognition delay, the controller will go
into fault retry mode, which will turn off both compressors. After
the compressor short cycle delay, the compressors will attempt to
operate once again. If three consecutive faults occur in 60 minutes,
the unit will go into lockout mode, turning off the compressor(s),
enabling the alarm output until the controller is reset. If the control
faults due to the low pressure input being open during the pre-
compressor startup check, the control will go into lockout mode
immediately, disabling the compressors from starting and enabling
the alarm output. The lockout condition can be reset by powering
down the controller, by a command from the BAS, or by the holding
the ESC and Return keys on the user interface for 5 seconds.
Содержание RW Series
Страница 39: ...THIS PAGE INTENTIONALLY LEFT BLANK ...