background image

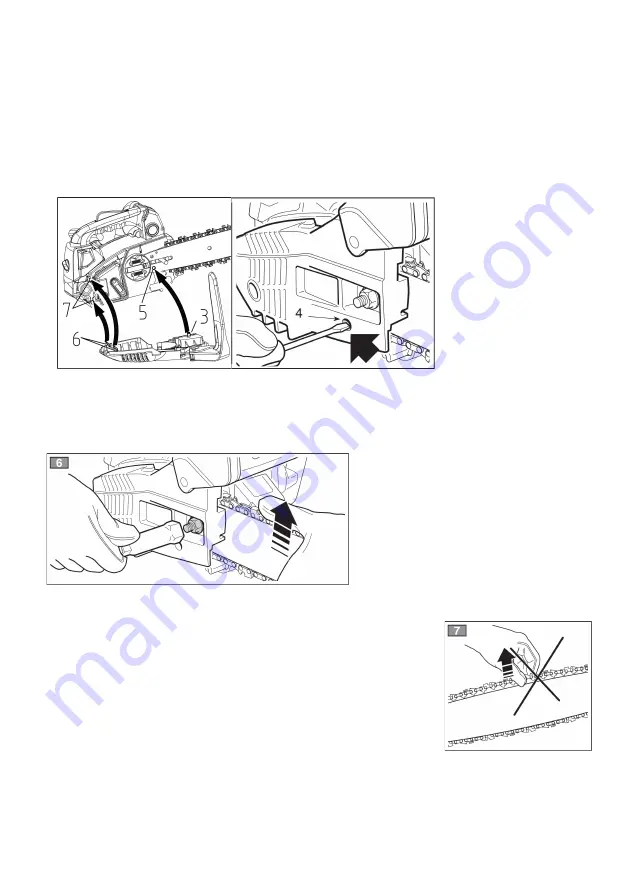
6. Adjust the position of chain tensioner nail, and then insert the tensioner nail in the
lower hole of the guide bar. Mount the clutch cover to the power unit, and while
Inserting the claw on the clutch cover into the groove on the power unit, and then
fasten the mounting nut to finger tightness. While holding up the tip of the bar, adjust
the chain tension by turning the tensioner screw until the tie straps just touch the
bottom side of the bar rail.

3. Tensioner nail
4. Tensioner screw
5. Hole
6. Claw
7. Groove

7. Tighten the nut securely with the bar tip held up (12 ~ 15 Nm). Then check the
chain for smooth rotation and proper tension while moving it by hand. If necessary,
readjust with the chain cover loose. (Figure 6)

Turn the tensioner screw clockwise
to tighten the chain, turn the
tensioner screw counter-clockwise
to loosen the chain.

8. Check the tension of the saw chain. Use your hand to
lift the chain link which positions on the middle of cutting
length up with approximate 10N force. If the chain link
goes out of the rail of guide bar entire, you need to
retighten the chain.

It is very important to maintain the proper chain tension.
Rapid wear of the guide bar or the chain coming off easily can be caused by
improper tension. Especially when using a new chain, take good care of it since it
should expand when first used. (Figure 7)

Содержание CN-25

Страница 1: ...refully to understand the proper use of your unit Keep this manual handy This chain saw is of a special type designed especially for tree service It is only to be used by a trained operator Cannon Too...

Страница 2: ...ne not agreed upon by us this declaration will lose its validity Product description 12 GASOLINE CHAIN SAW Model CT2298 Ref no CN 25 Applicable EC Directives EC Machinery Directive 2006 42 EC EC Direc...

Страница 3: ...th the control elements so that you are able to safely operate the device Always keep these Operating Instructions together with the chain saw Attention Risk of hearing defects Under normal operating...

Страница 4: ...cribed protection of the ears is carried Inhale from poisonous particle exhaust gases of the combustion engine Contact of gasoline on the skin Noise A degree of noise from the machine is not avoidable...

Страница 5: ...2 Guide bar 8 Air filter cover 14 Guide bar scabbard 3 Front hand guard 9 Lock nut 15 Choke knob 4 Primer bulb 10 Starter handle 16 Engine switch 5 Throttle trigger 11 Front handle 17 Spiked bumper 6...

Страница 6: ...h bar tip 3 Do not use chain saw one handed 4 Always use chain saw two handed 5 Appropriate ear eye and head protection must be worn 6 Read operator s instruction book before operating this machine 7...

Страница 7: ...cap c Operate the engine switch Flipping the switch to the O position immediately the engine stops Position front at the left side of the rear handle d Operate the choke knob Pull out the choke knob...

Страница 8: ...ows the directions that the chain brake is released white arrow and activated black arrow Position Front of the chain cover h Shows the direction of the saw chain installation Position Front of the ch...

Страница 9: ...er the ailment is unknown Keep your body warm especially the head neck feet ankles hands and wrists Maintain good blood circulation by performing vigorous arm exercises during frequent work breaks and...

Страница 10: ...vice other than the items listed in the Operator s Manual should be performed by competent chain saw service personnel e g if improper tools are used to remove the flywheel or if an improper tool is u...

Страница 11: ...derstanding of kickback you can reduce or eliminate the element of surprise Sudden surprise contributes to accidents 2 Keep a good grip on the saw with both hands in the same way as a conventional cha...

Страница 12: ...e appliance before use and after dropping or other impacts to identify significant damage or defects For starting appliance shall always be done with the chain brake activated Recommend limiting the d...

Страница 13: ...as follows The saw chain has very sharp edges Use protective gloves for safety 1 Pull the guard towards the front handle to check that the chain brake is not on 2 Loosen a nut and remove the chain cov...

Страница 14: ...Fit the guide bar to the power unit and then push the guide bar toward the clutch Figure 3 2 Guide bar 5 Gear the chain to the sprocket and while fitting the saw chain around the guide bar Figure 4 P...

Страница 15: ...5 Nm Then check the chain for smooth rotation and proper tension while moving it by hand If necessary readjust with the chain cover loose Figure 6 Turn the tensioner screw clockwise to tighten the cha...

Страница 16: ...mage to the engine inner parts very quickly 2 OIL FOR 4 CYCLE ENGINE USE or WATER COOLED 2 CYCLE ENGINE USE It can cause spark plug fouling exhaust port blocking or piston ring sticking HOW TO MIX FUE...

Страница 17: ...the bulb 1 Engine switch 2 Choke knob 3 primer bulb 4 Fuel tank cap 5 Oil tank cap When restarting immediately after stopping the engine Set choke in the open position Once the choke knob has been pu...

Страница 18: ...ore each starting CHECKING OIL SUPPLY After starting the engine run the chain at medium speed and see if chain oil is scattered off as shown in the figure Chain oil The chain oil flow can be changed b...

Страница 19: ...carburetor make sure that provided are clean air fuel filters and fresh properly mixed fuel When adjusting take the following steps Be sure to adjust the carburetor with the bar chain attached Pls co...

Страница 20: ...ill click sound is heard When the brake operates release the throttle lever to slow down the engine speed Continuous operation with the brake engaged will generate heat from the clutch and may cause t...

Страница 21: ...cturer It is not necessary to force the saw into the cut Apply only light pressure while running the engine at full throttle It is recommended that daily inspection before use and after dropping or ot...

Страница 22: ...good foothold and retreat path 3 Make a notch cut one third of the way into the tree on the felling side 4 Make a felling cut from the opposite side of the notch and at a level slightly higher than t...

Страница 23: ...from the tensed side Be alert to the spring back of a cut limb Pruning Cut up from the bottom finish down from the top 1 Do not use an unstable foothold or a stepladder 2 Do not overreach 3 Do not cut...

Страница 24: ...using a tree service chain saw for work at height from a rope and harness Preparations for using a tree service chain saw from a rope and harness and Use of a tree service chain saw for pruning and di...

Страница 25: ...to the harness reduces the risk of damage to equipment when moving around the tree Always switch the saw off when it is directly attached to the harness The saw should only be attached to the recomme...

Страница 26: ...In order to allow the saw to be held with both hands as a general rule operators should aim for a secure work position in which they operate the saw at Hip level when cutting horizontal sections and S...

Страница 27: ...ing the pull starter cord in the right hand or 2 on the right side hold the saw with the right hand on either handle and thrust the saw away from the body while holding the pull starter cord in the le...

Страница 28: ...r attempt to catch falling sections Freeing a trapped saw It the saw becomes trapped during cutting operators should switch off the saw and attach it securely to the tree inboard i e towards the trunk...

Страница 29: ...1 Air filter Dust on the cleaner filter can be removed by washing in a solution of household detergent and warm water To clean dirt in the meshes remove the cleaner cover and brush in gasoline When us...

Страница 30: ...e engine Periodically check the fins after removing the clutch cover and then use pressure air to clean the cylinder fins 2 Fuel filter a Using a wire hook take out the filter from the filler port b D...

Страница 31: ...rear damper metal has been beaten by the stopper bolt and the clearance of the metal increased Use only the spare parts which named in this manual Use the other spare part can cause serious injury Sa...

Страница 32: ...has been set check the depth gauge and file it to the proper level as illustrated Be sure to round off the front edge to reduce the chance of kickback or tie strap breakage 10 Maintenance of Saw Chai...

Страница 33: ...in indicating those which may be used on each machine marked with the symbol Pitch Guide bar Chain saw model Length Inches c m Groove width Inches mm CT2298 3 8 12 30cm 0 050 1 3mm For replacement use...

Страница 34: ...concerning the disposal of materials and devices are available from your local administration 13 Troubleshooting guide PROBLEM CAUSE REMEDY 1 Starting failure Check fuel for water Replace with proper...

Страница 35: ...ing advance function Spark plug L8RTF Oil feeding system Mechanical plunger pump with adjuster Sprocket Teeth x Pitch 6T 9 525mm Dimensions L x W x H 305 250 260 mm Dry weight without guide bar and ch...

Страница 36: ...15 EXPLODING VIEW...

Страница 37: ...13 PARTS LIST...

Страница 38: ......

Страница 39: ...CANNON TOOLS LTD Address 20 Station Road Rowley Regis West Midlands B65 0JU U K Made in China...

Отзывы: