background image

SECTION 3 - CHASSIS & SCISSOR ARMS

3121133

– JLG Sizzor –

3-77

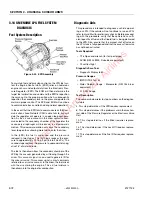
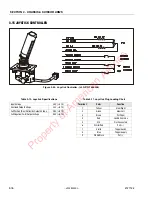
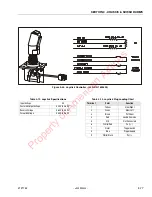
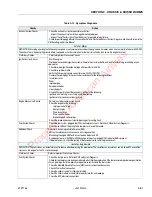
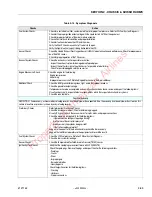
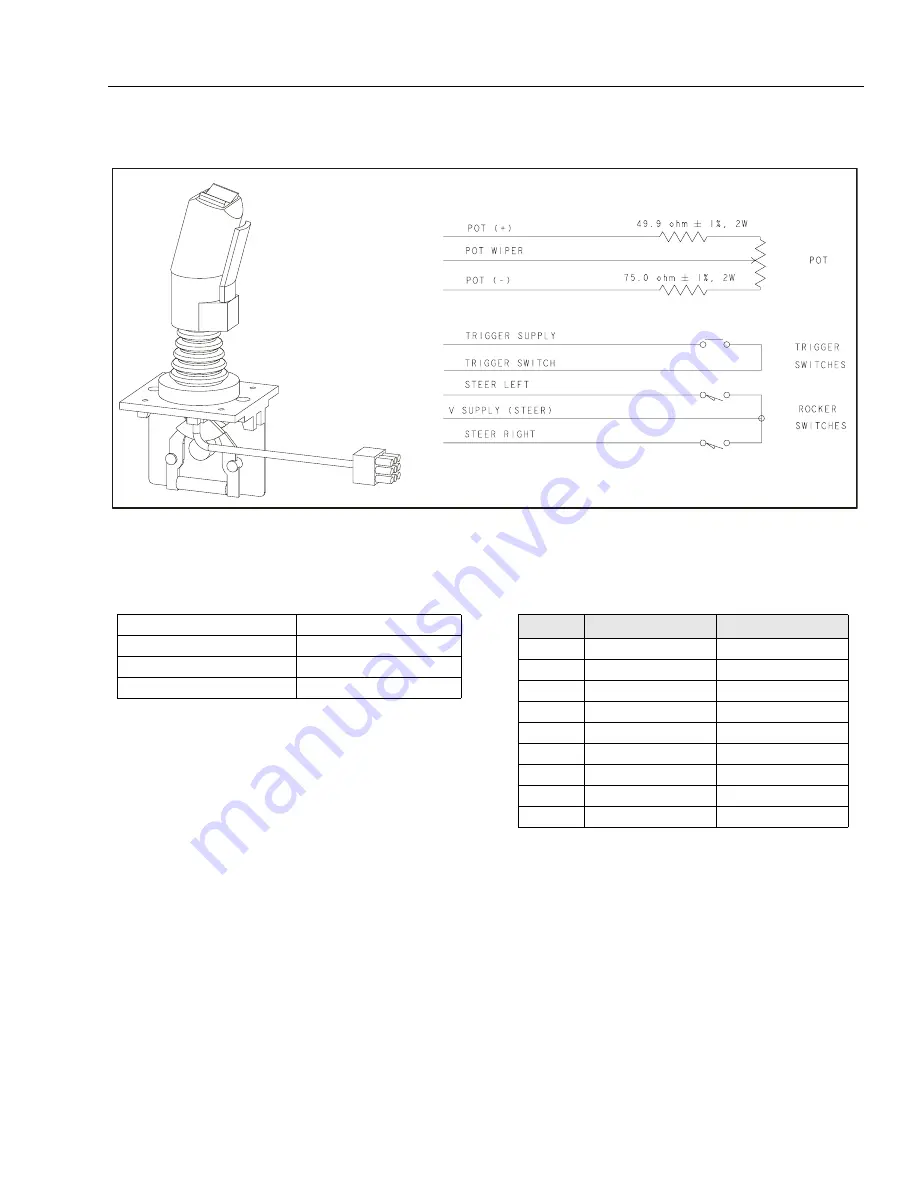
Figure 3-44.  Joystick Controller - (JLG P/N 1600403)

Table 3-12. Joystick Specifications

Input Voltage

5V

Centered Output Voltage

4.25V to 2.60V

Reverse Voltage

4.60V to 4.80V

Forward Voltage

0.40V to 0.60V

Table 3-13. Joystick Plug Loading Chart

Terminal

Color

Function

1

Yellow

Steer Right

2

Green

Steer Left

3

Brown

Pot  Wiper

4

Red

Handle  Common

5

N/A

Not Connected

6

White/Red

Pot (+)

7

Violet

Trigger Switch

8

Blue

Trigger Supply

9

White/Black

Pot (-)

Property of American Airlines

Содержание 3394RT

Страница 1: ...Service Maintenance Manual Models 3394RT 4394RT Prior to S N 0200191606 excluding S N s 0200186972 0200187002 0200187013 3121133 October 6 2008 P r o p e r t y o f A m e r i c a n A i r l i n e s...

Страница 2: ...P r o p e r t y o f A m e r i c a n A i r l i n e s...

Страница 3: ...extremely high potentially danger ous pressures Every effort should be made to relieve any system pressure prior to disconnecting or removing any portion of the system Relieve system pressure by cycli...

Страница 4: ...02 Revised March 6 2003 Revised October 24 2003 Revised April 28 2004 Revised August 18 2004 Revised August 12 2005 Revised October 4 2005 Revised March 1 2006 Revised May 11 2006 Revised October 31 2...

Страница 5: ...Test 2 5 2 5 Pins and Composite Bearing Repair Guidelines 2 5 2 6 Preventive Maintenance and Inspection Schedule 2 6 SECTION 3 CHASSIS SCISSOR ARMS 3 1 Operating Characteristics 3 1 3 2 Calibrations...

Страница 6: ...sANDWICH vALVE 4 19 4 15 Power Deck Manifold Valve 4 19 4 16 Hydraulic Pump 4 20 4 17 Cylinder Assemblies 4 22 SECTION 5 JLG CONTROL SYSTEM 5 1 Hand Held Analyzer 5 1 5 2 Flash Codes and Descriptions...

Страница 7: ...3 43 3 13 EMR 2 Engine Side Equipment 3 45 3 14 Deutz EMR 2 Troubleshooting Flow Chart 3 46 3 15 Deutz EMR 2 Vehicle Side Connection Diagram 3 47 3 16 Deutz EMR 2 Engine Side Connection Diagram Sheet...

Страница 8: ...Pump Motor 4 21 4 26 Steer Cylinder Prior to S N 137518 4 22 4 27 Steer Cylinder S N 137518 to Present 4 23 4 28 Lift Cylinder 4 24 4 29 Lift Cylinder Valve Cartridge Torque Values 4 25 4 30 Oscillati...

Страница 9: ...t 1 of 3 6 28 6 30 Electrical Schematic Diesel S N 138634 to Present Sheet 2 of 3 6 29 6 31 Electrical Schematic Diesel S N 138634 to Present Sheet 3 of 3 6 30 6 32 Hydraulic Schematic 4WD Sheet 1 of...

Страница 10: ...t Sensor Harness Chart 3 6 3 2 Tilt Sensor Harness 3 7 3 3 Torque Drive Hub Specs 3 8 3 4 Gearbox Maintenance Schedule 3 10 3 5 ECM Diagnostic Trouble Codes 3 33 3 6 Generator Specifications 3 43 3 7...

Страница 11: ...45 kg cm2 56psi 3 94 kg cm2 Leveling Jack Bearing Pressure 69 psi 4 9 kg cm2 Wheelbase 9 67 ft 2 95m Ground Clearance 12in 30 cm MaximumHydraulicSystem Pressure 3000 psi 207 bar Electrical System Vol...

Страница 12: ...1 6 Tire Specifications Size Ply Rating Inflation Pressure Wheel Nut Torque Dry 12x16 5 Pneumatic 10 90psi 6bar 170ft lbs 238Nm 12x16 5 Foam Filled 10 FoamFill to 90psi 6bar 170ft lbs 238Nm 12x16 5 P...

Страница 13: ...or Indicators Model Front To Back Side To Side 3394RT ANSI ANSI Export Aus 5 to full height 5 to26ft 8m 4 to30ft 9m 3 to 33ft 10m 4394RT ANSI ANSI Export Aus 5 to full height 5 to26ft 8m 4 to30ft 9m 3...

Страница 14: ...d 132lbs 60kg 352lbs 160kg 162lbs 73kg 410lbs 186kg 426lbs 193kg Engine Ford 324lbs 147kg Engine Deutz 441lbs 200kg Engine GM 341lbs 155kg Table 1 13 Hydraulic Oil HYDRAULIC SYSTEM OPERATING TEMPERATU...

Страница 15: ...ADD sight window on hydraulic tank If oil is not visible add oil until oil is visible in both ADD and FULL sight windows on tank Do not overfill tank Any time the pump coupling is removed coat splines...

Страница 16: ...Interval Every month or 50 hours 5 Oil Change w Filter Ford Lube Point s Fill Cap Spin on Element JLG P N 7014501 Capacity 4 5 qt 4 25 L Lube EO Interval 3 Months or 150 hours of operation Comments C...

Страница 17: ...n 9 Fuel Filter Deutz Lube Point s Replaceable Element Interval Every Year or 600 hours of operation 10 Fuel Filter Gasoline GM Lube Point s Replaceable Element Interval Every 6 months or 300 hours of...

Страница 18: ...AINING THIS WILL ALLOW THE OILS TO FLOW FREELY FROM THE REGULATOR 1 Move the equipment to a well ventilated area Ensure there are no external ignition sources 2 Start the engine and bring to operating...

Страница 19: ...using 7 Install the filter up to the bottom of the electric lock off 8 Tighten the filter retaining bolt to 106 in lbs 12 Nm 9 Open manual shut off valve Start the vehicle and leak check the propane f...

Страница 20: ...SECTION 1 SPECIFICATIONS 1 10 JLG Sizzor 3121133 1 14 TORQUE CHARTS Figure 1 4 Torque Chart SAE Fasteners Sheet 1 of 3 P r o p e r t y o f A m e r i c a n A i r l i n e s...

Страница 21: ...SECTION 1 SPECIFICATIONS 3121133 JLG Sizzor 1 11 Figure 1 5 Torque Chart SAE Fasteners Sheet 2 of 3 P r o p e r t y o f A m e r i c a n A i r l i n e s...

Страница 22: ...SECTION 1 SPECIFICATIONS 1 12 JLG Sizzor 3121133 Figure 1 6 Torque Chart SAE Fasteners Sheet 3 of 3 P r o p e r t y o f A m e r i c a n A i r l i n e s...

Страница 23: ...SECTION 1 SPECIFICATIONS 3121133 JLG Sizzor 1 13 Figure 1 7 Torque Chart METRIC Fasteners Sheet 1 of 3 P r o p e r t y o f A m e r i c a n A i r l i n e s...

Страница 24: ...SECTION 1 SPECIFICATIONS 1 14 JLG Sizzor 3121133 Figure 1 8 Torque Chart METRIC Fasteners Sheet 2 of 3 P r o p e r t y o f A m e r i c a n A i r l i n e s...

Страница 25: ...SECTION 1 SPECIFICATIONS 3121133 JLG Sizzor 1 15 Figure 1 9 Torque Chart METRIC Fasteners Sheet 3 of 3 P r o p e r t y o f A m e r i c a n A i r l i n e s...

Страница 26: ...SECTION 1 SPECIFICATIONS 1 16 JLG Sizzor 3121133 NOTES P r o p e r t y o f A m e r i c a n A i r l i n e s...

Страница 27: ...r 150 hours whichever comes first out of service for a period of more than 3 months or when purchased used The frequency of this inspection must be increased as environment severity and frequency of u...

Страница 28: ...eady to be used Components Removal and Installation 1 Use adjustable lifting devices whenever possible if mechanical assistance is required All slings chains cables etc should be parallel to each othe...

Страница 29: ...ts of proper length A bolt which is too long will bottom before the head is tight against its related part If a bolt is too short there will not be enough thread area to engage and hold the part prope...

Страница 30: ...on ment it will be necessary to heat the oil with a low density 100VAC heater to a minimum temperature of 15 F 26 C 3 The only exception to the above is to drain and fill the system with Mobil DTE 13...

Страница 31: ...n 2 Filament wound bearings should be replaced if any of the following is observed a Frayed or separated fibers on the liner surface b Cracked or damaged liner backing c Bearings that have moved or sp...

Страница 32: ...re supplied with each new machine and are also available from JLG Customer Service Form must be completed and returned to JLG Industries NOTICE JLG INDUSTRIES REQUIRES THAT A COMPLETE ANNUAL INSPECTIO...

Страница 33: ...Valves 1 5 8 HydraulicFilter SeeLubricationChart 5 14 14 9 HydraulicHosesandTubing 1 5 10 HydraulicOilTank 3 5 4 11 HydraulicTankBreather 6 14 12 FuelTank 3 5 4 13 LiftCylinder 1 12 5 6 13 4 14 Limit...

Страница 34: ...LIMITS 2 ALL VALUES ARE ASSUMED TO BE AT SEA LEVEL SUMMER GRADE FUEL WINTER GRADE FUEL OF ADDED KEROSENE 32 0 23 5 14 10 5 15 4 20 13 25 22 30 0 10 20 30 40 50 60 F C AMBIENT TEMPERATURE 120 F 49 C 11...

Страница 35: ...EA LEVEL 120 F 49 C 110 F 43 C 100 F 38 C 90 F 32 C 80 F 27 C 70 F 21 C 60 F 16 C 50 F 10 C 40 F 4 C 30 F 1 C 20 F 7 C 10 F 12 C 0 F 18 C 10 F 23 C 20 F 29 C 30 F 34 C 40 F 40 C AMBIENT AIR TEMPERATUR...

Страница 36: ...49 C 110 F 43 C 100 F 38 C 90 F 32 C 80 F 27 C 70 F 21 C 60 F 16 C 50 F 10 C 40 F 4 C 30 F 1 C 20 F 7 C 10 F 12 C 0 F 18 C 10 F 23 C 20 F 29 C 30 F 34 C 40 F 40 C AMBIENT AIR TEMPERATURE 180 F 82 C H...

Страница 37: ...e to level You must reposition and try again The jacks are operational extend or retract if the machine is in the stowed position The proximity sensor and rotary sensor together must sense that the ma...

Страница 38: ...rotary switch on the bladed pin bracket 2 There are 3 mounting screws that hold the switch onto the center link mounting lug make sure they are snug not loose so you are able to rotate the rotary swit...

Страница 39: ...tely lower platform to stowed position b Enter YES on the Analyzer c COMPLETE will show on the analyzer when cali brated 2 SET 26FT ELEV 3394RT or SET 30FT ELEV 4394RT a Raise platform to a height of...

Страница 40: ...g lots are often not level b The tilt sensor has failed one or both of the channels X axis and Y axis c Tilt sensor has moisture intrusion that has shifted its output d Water and or corrosion in the b...

Страница 41: ...analyzer connection ports One in the ground control station and the other at the platform con trol station on the under side of the platform control box as shown in Figure 3 2 Level Sensor and Analyze...

Страница 42: ...Ground Control Box NOTE Follow the above procedures in reverse order when installing the tilt sensor assembly After installing be sure to calibrate the tilt sensor refer to Section 3 2 Calibrations 1...

Страница 43: ...by removing the three Screws 7 NOTE Follow the above procedures in reverse order when installing the tilt sensor assembly After installing be sure to calibrate the tilt sensor refer to Section 3 2 Cal...

Страница 44: ...nts then the gears are not rolling freely and should be examined for proper installation or defects Some gear packages roll with more difficulty than others Do not be concerned if gears seem to roll h...

Страница 45: ...g 11 Tapered Roller Bearing 12 Retaining Ring 13 Retaining Ring 14 Retaining Ring 15 Support Disk 16 O Ring 17 Shaft Seal 18 Screw Plug 19 Seal Ring 20 Bolt 21 Thrust Washer 22 Gear Ring Options 23 O...

Страница 46: ...SECURE MACHINE WHEN MACHINE IS SEPARATED FROM THE TOWING VEHICLE Engaging Procedure NOTICE PRIOR TO ENGAGING THE MACHINE HAS TO BE ON LEVEL GROUND AND COMPLETELY SECURED FROM ANY MOVEMENT ENSURE AREA...

Страница 47: ...ssembly 1 Remove Screw Plugs 18 19 and drain oil into appropriate container 2 Remove Snap Ring 24 3 Remove the assembled Cover 8 with Shift Rod 33 and O ring 23 4 Remove Sun Gear Shaft 25 5 Remove com...

Страница 48: ...CE DO NOT DAMAGE THE BEARING CAGE OF TAPERED ROLLER BEARING CAREFULLY REMOVE METAL CHIPS 10 Drilling Hole Sketch 11 Split the Shaft Nut 4 in the area of the two drill holes by means of a chisel and re...

Страница 49: ...ndle 34 in the area of the ball detend with a thread file of 1 5mm pitch Gearbox Assembly NOTE Clean all parts before assembling the gearbox 1 Make sure during assembly of the preassembled planet gear...

Страница 50: ...bore in Supporting Ring 6 with Loctite 573 for Radial Shaft Seal Ring 17 5 Insert the bottom part of the double Tapered Roller Bearing 11 6 Insert radial Shaft Seal Ring 17 into Supporting Ring 6 and...

Страница 51: ...10 Rotate the supporitng ring repeatedly in one direc tion only when setting the tapered roller bearing a Tighten Shaft Nut 4 by using an adequate device with a tightening torque of 627 lb ft 850 Nm b...

Страница 52: ...ears with new Snap Rings 13 14 Install the Ring Gear 22 15 Install the ring gear hex head bolts Tighten bolts to proper torque of 15 5 ft lbs 21 Nm 16 Install completely pre assembled 1st planet stage...

Страница 53: ...oove of Ring Gear 22 20 Insert Shift Rod 33 into preassembled Cover 8 21 Install preassembled Cover 8 into Ring Gear 22 22 Install Snap Ring 24 NOTE Prior to putting into operation fill the drive with...

Страница 54: ...SECTION 3 CHASSIS SCISSOR ARMS 3 18 JLG Sizzor 3121133 Figure 3 9 Drive Hub Assembly P r o p e r t y o f A m e r i c a n A i r l i n e s...

Страница 55: ...19 Motor Disassembly 1 Mark port plate to the supporting axle 2 Remove port plate 3 Disassemble guide ring 1 Seal Ring 2 Pressure Springs quantity 26 3 Guide Ring 4 Disassemble retaining ring 1 2 3 P...

Страница 56: ...mble bearing with synchronizing plate 6 Press off pressure ring with extractor 7 Remove pressure ring 8 Disassemble lamination kit 9 Disassemble Seeger snap ring 10 Disassemble cradle stop with 2 scre...

Страница 57: ...up completely with cradle 12 Disassemble control piston with spring 13 Pull out swivel balls 14 Disassemble shaft seal ring 15 Insert disc Pull off bearing ring with device Remove disc 16 Disassemble...

Страница 58: ...no scratches or metal deposits on sliding surface 1 and there is no axial play 2 Otherwise Pistons must be replaced in sets 20 Check cylinder bores splines 21 Check that cylinder track is free of scra...

Страница 59: ...ding surface is free of grooves 1 cups are free of groove and there are no pittings 2 24 Make sure the seat of the shaft seal in the case has no damage 25 Make sure the sealing surfaces are damage fre...

Страница 60: ...bearing with port plate fix with 2 screws 3 30 Place measuring device Ascertain tolerance Grip shaft with Seeger ring pincers and move up and down Simulation ring 1mm tolerance bearing pretension 0 0...

Страница 61: ...SCISSOR ARMS 3121133 JLG Sizzor 3 25 Motor Assembly 1 Press in swivel balls with tool 1 Insert shaft seal ring with tool 2 Insert control piston with spring 3 1 2 3 P r o p e r t y o f A m e r i c a...

Страница 62: ...ve and pressure ring in cradle stop Insert cradle stop NOTE Stick with grease 4 Mount Seeger snap ring Opening of snap ring must be on the opposite side of the control piston 5 Fit pressure pins using...

Страница 63: ...pistons by using an o ring 8 Install laminations in correct order 9 Mount support ring 1 and quad ring 2 in pressure ring Be careful not to excessively extend the rings 10 Grease seal rings install i...

Страница 64: ...3 11 Mount retaining ring 12 Mount seal rings 1 Insert and line up guide ring 13 Align the two holes for fixation cylinder pin port plate item 2 14 Mount synchronizing disc 1 and bearing 2 1 Item 2 1...

Страница 65: ...zzor 3 29 15 Mount bearing ring with device Mount spool Mount fixation pin 16 Fix control plate with grease at port plate 17 Fill case with oil 18 Mount and screw port plate on supporting axle P r o p...

Страница 66: ...e on LP gas supply by turning clock wise Using Liquid Petroleum LP Gas CLOSE FUEL VALVE ON TANK WHEN PARKING SIZZOR LIFT MORE THAN MOMENTARILY WHEN REFUELING LPG POWERED SIZZOR LIFTS ALWAYS FOL LOW MA...

Страница 67: ...ment that can contribute to the symptom verify that all electrical and mechanical loads or accessory equip ment is OFF or disconnected before performing diag nosis Inspect engine fluids for correct l...

Страница 68: ...sure piston position This allows the ECM to calculate true sequential fuel injection SFI mode of oper ation If the ECM detects an incorrect CMP signal while the engine is running DTC 53 will set If th...

Страница 69: ...owVoltage 32 Heated OxygenSensor HO2S LowVoltage 33 EngineCoolantTemperature ECT SensorHighVoltage 35 Intake AirTemperature IAT SensorHighVoltage 41 Fuel PumpHigh Voltage 42 Heated OxygenSensor HO2S H...

Страница 70: ...ogrammable read only mem ory EEPROM is a permanent memory chip that is located within the ECM The EEPROM contains the pro gram and the calibration information that the ECM needs to control engine oper...

Страница 71: ...SECTION 3 CHASSIS SCISSOR ARMS 3121133 JLG Sizzor 3 35 Figure 3 10 EFI Component Location P r o p e r t y o f A m e r i c a n A i r l i n e s...

Страница 72: ...igni tion ON engine not running or at wide open throttle low vacuum The MAP sensor is used to determine the following Engine vacuum level for engine control purposes Barometric pressure BARO If the EC...

Страница 73: ...th an arc welder Take proper precautions to avoid static damage to the ECM Refer to Electrostatic Discharge Damage for more information THROTTLE POSITION TP SENSOR The throttle position TP sensor is a...

Страница 74: ...while sliding across a seat while sitting down from a standing position or while walking a distance touch a known good ground before installing the part Fuel System FUEL INJECTOR The Electronic Fuel...

Страница 75: ...e amount of time that the fuel injector is ON The best mix ture to minimize exhaust emissions is 14 7 parts of air to 1 part of gasoline by weight which provides the most effi cient combustion Because...

Страница 76: ...RNOR AND THROTTLE BODY In the 2 5L EFI industrial engine throttle control is achieved by using an electronic governor which is con trolled by the engine control module ECM The electronic governor cons...

Страница 77: ...osed loop The ECM con tinuously adjusts the air fuel ratio by responding to signals from the HO2S except at wide open throttle When the HO2S reports a lean condition low sensor signal voltage the ECM...

Страница 78: ...system uses a coil pack with one ignition coil for each two cylinders in the engine Each cyl inder is paired with its opposing cylinder in the firing order so that one cylinder on compression fires si...

Страница 79: ...FORD ENGINE 3 1 2 Figure 3 12 Generator Ford Engine 1 Generator 2 Ford Engine 3 Voltage Regulator Table 3 6 Generator Specifications Description 220 Powermax Voltage 220V Continuous 2 5KW Peak 3 5KW...

Страница 80: ...r with the rotation mag nets in a housing of the actuator The EMR2 is equipped with safety devices and measures in the hardware and software in order to ensure emer gency running Limp home functions I...

Страница 81: ...ATURE SENSOR CONTROLRODPOSITION SENSOR ACTUATOR CAMSHAFTSPEED SENSOR OILPRESSURE SENSOR JLGSYSTEMUSESJLGANALYZERTO REPORTFAULTS DIAGNOSISINTERFACE CAN BUS JLGSYS TEMUSESTHISTOCONTROLTHEENGINE FAULTREP...

Страница 82: ...SECTION 3 CHASSIS SCISSOR ARMS 3 46 JLG Sizzor 3121133 Figure 3 14 Deutz EMR 2 Troubleshooting Flow Chart P r o p e r t y o f A m e r i c a n A i r l i n e s...

Страница 83: ...SECTION 3 CHASSIS SCISSOR ARMS 3121133 JLG Sizzor 3 47 Figure 3 15 Deutz EMR 2 Vehicle Side Connection Diagram P r o p e r t y o f A m e r i c a n A i r l i n e s...

Страница 84: ...SECTION 3 CHASSIS SCISSOR ARMS 3 48 JLG Sizzor 3121133 Figure 3 16 Deutz EMR 2 Engine Side Connection Diagram Sheet 1 of 2 P r o p e r t y o f A m e r i c a n A i r l i n e s...

Страница 85: ...SECTION 3 CHASSIS SCISSOR ARMS 3121133 JLG Sizzor 3 49 Figure 3 17 Deutz EMR 2 Engine Side Connection Diagram Sheet 2 of 2 P r o p e r t y o f A m e r i c a n A i r l i n e s...

Страница 86: ...SECTION 3 CHASSIS SCISSOR ARMS 3 50 JLG Sizzor 3121133 Figure 3 18 EMR 2 Engine Plug Pin Identification P r o p e r t y o f A m e r i c a n A i r l i n e s...

Страница 87: ...SECTION 3 CHASSIS SCISSOR ARMS 3121133 JLG Sizzor 3 51 Figure 3 19 EMR 2 Vehicle Plug Pin Identification P r o p e r t y o f A m e r i c a n A i r l i n e s...

Страница 88: ...SECTION 3 CHASSIS SCISSOR ARMS 3 52 JLG Sizzor 3121133 Figure 3 20 EMR2 Fault Codes Sheet 1 of 5 P r o p e r t y o f A m e r i c a n A i r l i n e s...

Страница 89: ...SECTION 3 CHASSIS SCISSOR ARMS 3121133 JLG Sizzor 3 53 Figure 3 21 EMR2 Fault Codes Sheet 2 of 5 P r o p e r t y o f A m e r i c a n A i r l i n e s...

Страница 90: ...SECTION 3 CHASSIS SCISSOR ARMS 3 54 JLG Sizzor 3121133 Figure 3 22 EMR2 Fault Codes Sheet 3 of 5 P r o p e r t y o f A m e r i c a n A i r l i n e s...

Страница 91: ...SECTION 3 CHASSIS SCISSOR ARMS 3121133 JLG Sizzor 3 55 Figure 3 23 EMR2 Fault Codes Sheet 4 of 5 P r o p e r t y o f A m e r i c a n A i r l i n e s...

Страница 92: ...SECTION 3 CHASSIS SCISSOR ARMS 3 56 JLG Sizzor 3121133 Figure 3 24 EMR2 Fault Codes Sheet 5 of 5 P r o p e r t y o f A m e r i c a n A i r l i n e s...

Страница 93: ...nerator 120V or 220V 2 Deutz Engine 3 Voltage Regulator Figure 3 25 Generator Deutz Engine Table 3 7 Generator Specifications Description 110 Bluemax 220 Powermax Voltage 120V 220V Continuous 3 5KW 2...

Страница 94: ...ecting the electri cal system use the following Check and clean the battery terminal connections and insure the connections are tight Check the battery for any cracks or damage to the case Check the P...

Страница 95: ...gine and run until it reaches normal operating temperature 2 Stop the engine 3 Remove the drain plug and allow the oil to drain 4 Remove and discard the oil filter and its sealing ring 5 Coat the seal...

Страница 96: ...3 3 11 GENERATOR GM ENGINE 1 2 3 1 Generator 2 GM Engine 3 Voltage Regulator Figure 3 27 Generator GM Engine Table 3 8 Generator Specifications Voltage 120V Continuous 3 5KW Peak 4 5KW AmpsPeak 37Amps...

Страница 97: ...egulator EPR and the fuel mixer module The LPG fuel system operates at pressures which range from 14 0 inches 355 60 mm of water column up to 312 psi 21 5 BAR Components which are shared by both syste...

Страница 98: ...the mixer Propane fuel enters the primary port of the LPR and passes through the primary jet and into the primary exchanger chamber As the propane passes through the heat exchanger the fuel expands an...

Страница 99: ...ir valve is lifted higher thus creat ing a much larger venturi This air valve vacuum is com municated from the mixer venture to the LPR secondary chamber via the low pressure fuel supply hose As the A...

Страница 100: ...of oxygen present in the exhaust stream and com municate that to the ECM via an electrical signal The amount of oxygen present in the exhaust stream indicates whether the fuel air ratio is too rich o...

Страница 101: ...sem bly Fuel flows through the feed circuit and is delivered to the fuel injector rail Fuel that enters the bleed circuits through they bypass valve in the manifold is returned to the fuel tank Fuel F...

Страница 102: ...liquid leak detector or an electronic leak detec tor When using both methods use the electronic leak detector first to avoid contamination by the liquid leak detector Propane Fuel Filter Replacement R...

Страница 103: ...e cool ant lines to the regulator 9 Remove the lock pin from both the water fittings on the regulator housing and remove the fittings and hoses and retain the pin 10 Disconnect the EPR electrical conn...

Страница 104: ...VOID THE WARRANTY OF THE ACTUATOR SECTION PRESSURE REGULATOR SECTION INSTALLATION 1 Install the regulator to the actuator section using the six 6 retaining screws and tighten 70 in lbs 8 Nm 2 Install...

Страница 105: ...hrottle body assembly from the adapter 8 Remove electronic throttle control device 9 Remove the O rings gasket and discard INSTALLATION NOTICE LIGHTLY LUBRICATE BOTH THROTTLE CONTROL DEVICE TO ADAPTER...

Страница 106: ...ment 4 Start the engine and leak check all fittings and con nections Coolant Hose Replacement REMOVAL 1 Drain the coolant 2 Using hose clamp pliers disconnect both hose clamps on each hose 3 Remove th...

Страница 107: ...gine 6 Check for any DTC codes and clear 7 Verify engine is in closed loop and no warning lights are illuminated Heated Exhaust Gas Oxygen Sensor Replacement REMOVAL 1 Disconnect Negative battery cabl...

Страница 108: ...by the vacuum generated by air flowing through the mixer This vacuum signal is also used to generate lift for the mixer air valve This vacuum signal is most commonly referred to as air valve vacuum I...

Страница 109: ...specttheairintakestreambetweenthemixerassemblyandthethrottle bodyforleaks 2 InspectthefuelhoseconnectionbetweentheLPRandmixerassemblyfor damageorleakage 3 Inspectanyvacuumhosesforleaks Wasaproblemfoun...

Страница 110: ...lfilter LPL 2 RemovethefilterfromtheLPL 3 EmptythecontentsoftheinletsideoftheLPGfuelfilterontoacleansurface 4 InspectthecontentsoftheLPGfuelfilterforanexcessiveamountofforeign materialorwater Ifnecess...

Страница 111: ...mber 2 Ifyouweresenttothisroutinebyanotherdiagnosticchart returntotheprevi ousdiagnosticprocedure Istheactioncomplete SystemOK 26 1 Disconnectalltestequipment 2 Installtheprimaryandsecondarytestportpl...

Страница 112: ...Voltage 2 2V 0 1V FullPositive Rev Deflection Output Voltage 4 0V 0 1V FullNegative Fwd OutputVoltage 0 4V 0 1V Table 3 11 Joystick Plug Loading Chart Terminal Color Function 1 Yellow SteerRight 2 Gre...

Страница 113: ...Voltage 4 25Vto 2 60V ReverseVoltage 4 60Vto 4 80V ForwardVoltage 0 40Vto 0 60V Table 3 13 Joystick Plug Loading Chart Terminal Color Function 1 Yellow SteerRight 2 Green Steer Left 3 Brown PotWiper...

Страница 114: ...owingconditions Cracking Hardness Properrouting Carbontracking Checkthewiringforthefollowingitems Properconnections pinchesorcuts Thefollowingsymptomtablescontaingroupsofpossiblecausesforeachsymptom T...

Страница 115: ...werandgroundcircuitstotheECM RefertoEngineControlSchematics Verifyvoltage and orcontinuityforeachcircuit SensorChecks ChecktheTMAPsensor ChecktheMagneticpickupsensor RPM FuelSystemChecks Important Acl...

Страница 116: ...moduleassemblyforproperinstallationandleakage Verifyproperoperationofthelowpressurelock offsolenoids VerifyproperoperationoftheEPR Checkforairintakesystemleakagebetweenthemixerandthethrottlebody Check...

Страница 117: ...ndercompressioncheck Checktheengineforthefollowing Impropervalvetiming Bentpushrods Wornrockerarms Worncamshaftlobes Brokenorweakvalvesprings Checktheintakeandexhaustmanifoldpassagesforcastingflash Fu...

Страница 118: ...teachignitioncoil Checkfordeterioratedsparkplugwireinsulation Checkthesparkplugs ThecorrectsparkplugsforLPGare R42LTS Removetheplugsandinspectthemforthefollowingconditions Wetplugs Cracks Wear Imprope...

Страница 119: ...nd reviewandinspectthefollowingitems Visuallyandphysically inspectallelectricalconnectionswithinthesuspectedcircuitand orsystems Checkthescantooldata PoorFuelEconomy DEFINITION Fueleconomy asmeasuredb...

Страница 120: ...leassemblyforproperinstallationandconnection IgnitionSystemChecks CheckfortheproperignitionoutputvoltageusingthesparktesterJ26792ortheequivalent VerifythatthesparkplugsarecorrectforusewithLPG R42LTS C...

Страница 121: ...orrestrictions IgnitionSystemChecks CheckfortheproperignitionoutputvoltageusingthesparktesterJ26792ortheequivalent VerifythatthesparkplugsarecorrectforusewithLPG R42LTS Checkthesparkplugs Removetheplu...

Страница 122: ...10 171 AdaptiveLearnHighGasoline 520200 0 172 AdaptiveLearnLowGasoline 520200 1 182 FuelTempGasolineLowVoltage 174 4 183 FuelTempGasolineHighVoltage 174 3 187 FuelTempLPGLowVoltage 520240 4 188 FuelTe...

Страница 123: ...1165 LPGCatMonitor 520213 10 1171 LPGPressureHigherThanExpected 520260 0 1172 LPGPressureLowerThanExpected 520260 1 1173 EPRCommLost 520260 31 1174 EPRVoltageSupplyHigh 520260 3 1175 EPRVoltageSupplyL...

Страница 124: ...SECTION 3 CHASSIS SCISSOR ARMS 3 88 JLG Sizzor 3121133 NOTES P r o p e r t y o f A m e r i c a n A i r l i n e s...

Страница 125: ...urns to neutral pro hibiting any flow through the circuit Relief Valves Main relief valves are installed at various points within the hydraulic system to protect associated systems and com ponents aga...

Страница 126: ...ction This is done to relieve pressure in the hydraulic lines Carefully remove hydraulic hoses from appropriate cylinder port block 3 There will be initial weeping of hydraulic fluid which can be caug...

Страница 127: ...perly have qualified personnel correct the malfunction prior to any further operation 4 5 CYLINDER REPAIR NOTE The following are general procedures that apply to all of the cylinders on this machine P...

Страница 128: ...icable NOTICE EXTREME CARE SHOULD BE TAKEN WHEN REMOVING THE CYL INDER ROD HEAD AND PISTON AVOID PULLING THE ROD OFF CENTER WHICH COULD CAUSE DAMAGE TO THE PISTON AND CYLINDER BARREL SURFACES 8 With t...

Страница 129: ...or other damage and for ovality and tapering Replace as necessary 10 Inspect threaded portion of head for damage Dress threads as necessary 11 Inspect seal and o ring grooves in head for burrs and sha...

Страница 130: ...g and back up seal in the applica ble outside diameter groove of the cylinder head 4 Install washer ring onto rod carefully install the head gland on the rod ensuring that the wiper and rod seals are...

Страница 131: ...nd into the tapped holes in the piston 5 Tighten the capscrews evenly and progressively in rotation to the specified torque value 6 After the screws have been torqued tap the tapered bushing with a ha...

Страница 132: ...nto the rod until it abuts the spacer end and install the attaching nut WHEN REBUILDING THE CYLINDERS APPLY LOCTITE 242 TO PISTON NUT AND SETSCREW THEN TORQUE PISTON NUT REFER TO TABLE 4 1 CYLINDER PI...

Страница 133: ...e damage to components which may result in unexpected machine movement The inlet line leading from the reservoir to the pump should be filled prior to start up Check inlet line for prop erly tightened...

Страница 134: ...e hose at the fitting closest the pump When oil begins to flow the line is full the air has been purged and the fitting can be retightened to its specified torque If the tank needs to be pressurized i...

Страница 135: ...sembly scribe match marks on the body 13 and covers 5 and 6 to insure that the pump will be reassembled in the same manner as it was shipped from the factory If the body or rear cover is replaced dur...

Страница 136: ...of the bearing blocks 2 However there should be no heavy scoring in this area 3 Remove anti extrusion seal 4 and pressure loading seal 3 from each bearing block and discard 4 Inspect bushings in each...

Страница 137: ...the front cover 5 matching the scribes marks on the body and front cover The dowel pins 7 should go into the mating holes on the front cover 5 7 Install drive gear 12 and driven gear 11 8 Place a sma...

Страница 138: ...2 49 2 LiftValve 25 30 35 42 3 TwoSpeedValve 30 35 42 49 4 BrakeValve 30 35 42 49 5 SteerValve 25 30 35 42 6 LiftRelief 30 35 42 49 7 MainRelief 25 30 35 42 8 SteerRelief 30 35 42 49 9 MGPort N A N A...

Страница 139: ...ssure gauge at the MP1 port 2 Adjust both Steer Section Crossover Relief s all the way in 3 Adjust Main Relief Cartridge out several turns 4 Activate engine and allow hydraulic system to come up to op...

Страница 140: ...RRB 1 2 LRB RRA LRA RRB CV B1 A1 Figure 4 17 Drive Header Valve 2wd item Torque 1 FSDH XAN 45 50ft lbs 61 68 Nm 2 CXAD XCN 25 30ft lbs 34 41 Nm LRA RRA RRB LRB B1 B2 A1 A2 LFB RFA RFB LFA LRA RRA RRB...

Страница 141: ...ES 4WD X3 CD X X X3 CD CD X3 X MX MX3 MCD X3 CD X X X3 CD CD X3 X MX MX3 MCD Figure 4 19 Header Valve Fix OT X3 OP MX3 MCD MX X3 X OT OP OT OP B TS CD OT OP B TS CD OT OP B TS CD Figure 4 20 Header Va...

Страница 142: ...ssure readings are acceptable if they are within 5 of specified pressures 1 Activate engine and allow hydraulic system to come up to operating temperature 2 Install pressure gauge at quick connect on...

Страница 143: ...Valves Single extension decks have only one Manifold Valve 1 2 P1 ET P LP ET EP Figure 4 22 Power Deck Sandwich Valve Dual Deck Extension Only item Torque 1 30 35ft lbs 41 47Nm 2 25 30ft lbs 34 41Nm P...

Страница 144: ...Pump Pressure Locations Table 4 3 Pump Pressure Item Name Pressure 1 ChargePump Relief 320psi 22 bar 2 CrossReliefPressure 3000psi 207bar 3 GPort 4800psi 331bar 4 PS Port 4800psi 331bar 5 Coil N A 6 C...

Страница 145: ...i 103 4 bar and 165 Amps maximum at 12VDC 1 2 3 4 5 Hydraulic Schematic 1 UNF 2A Terminal Torque 84 in lbs 9 5 Nm 2 2x Torque 96 120 in lbs 11 14 Nm 3 Check Valve Cap Torque 144 180 in lbs 16 20 Nm 4...

Страница 146: ...4 6 11 3 7 8 9 1 9 8 7 3 11 6 4 5 10 12 2 1 Barrel 2 Rod 3 Cap 4 Ring Washer 5 Socket Head Bolt 6 Wiper 7 Ring Back Up 8 O Ring 9 Ring Wear 10 Ring Wear 11 Seal 12 T Seal Figure 4 26 Steer Cylinder Pr...

Страница 147: ...7 6 5 4 1 4 5 6 7 3 9 8 Figure 4 27 Steer Cylinder S N 137518 to Present 1 Barrel Weldment 2 Rod Weldment 3 Cylinder Head 4 Wear Ring 5 O ring 6 Back up Ring 7 O ring 8 Wiper 9 Seal 10 Wear Ring 11 T...

Страница 148: ...e 5 Plug O Ring 6 Jam Nut 7 Cotter Pin 8 Cartridge Lift Holding Solenoid 9 Cartridge Lift Holding Solenoid 10 Cartridge Check 11 Flat Washer 12 Wiper 13 Seal 14 Ring Wear 15 Seal 16 Ring Back Up 17 Se...

Страница 149: ...HYDRAULICS 3121133 JLG Lift 4 25 1 2 3 4 5 Item Ft Lbs Nm 1 25 35 2 10 12 14 17 3 35 49 4 5 7 5 30 42 Figure 4 29 Lift Cylinder Valve Cartridge Torque Values P r o p e r t y o f A m e r i c a n A i r...

Страница 150: ...e 4 30 Oscillating Axle Cylinder 1 Ring Wear 2 T Seal 3 Ring Wear 4 O Ring 5 Ring Back Up 6 Seal WIper 7 Polyseal 8 Bushing 9 Head 10 Rod 11 Barrel 12 Plug O Ring 13 Ring Washer 14 Capscrew 15 Bleeder...

Страница 151: ...HYDRAULICS 3121133 JLG Lift 4 27 1 2 3 Item Ft Lbs Nm 1 18 5 22 25 30 2 3 4 5 4 2 6 3 3 20 25 28 35 Figure 4 31 Oscillating Axle Valve Cartridge Torque Values P r o p e r t y o f A m e r i c a n A i r...

Страница 152: ...8 4 8 3 5 15 5 Figure 4 32 Leveling Jack Cylinder 1 Head 2 Barrel 3 Rod 4 Jack Plate 5 Ring Lock 6 Ring Wear 7 Ring Washer 8 Ring Retaining 9 O Ring 10 Screw 11 Capscrew 12 Seal 13 WIper 14 Ring Back...

Страница 153: ...4 6 9 10 8 11 12 13 5 1 1 Locknut 2 Piston 3 Seal 4 O Ring 5 Barrel 6 Spacer Tube 7 Head 8 Rod 9 O Ring 10 Back up Ring 11 Seal 12 Wiper Ring 13 Retaining Ring Figure 4 33 Deck Extension Cylinder P r...

Страница 154: ...ve at the top of the retracted cylinder approx 1 2 turn and open bleeder valve at the bottom of extended cylinder approx 1 2 turn 4 Run pump for 10 seconds close bleeder valves 5 Oscillate axle fully...

Страница 155: ...l station as shown in Connect the remaining end of the cable to the analyzer menu PRESS ENTER HELP AnalyzerDisplay EscapeKey Toreturnhomeoraccess previousmenu EnterKey StoresandselectsTopLevel Sub Lev...

Страница 156: ...e was no fault detected during power up the display will read In platform mode HELP EVERYTHING OK In ground mode GROUND MODE OK If ENTER is pressed again the display moves to the fol lowing display LO...

Страница 157: ...e ACCESS LEVEL menu Using the UP or DOWN arrow keys enter the first digit of the password 3 Then using the RIGHT arrow key position the cursor to the right one space to enter the second digit of the p...

Страница 158: ...rows check the access level to ensure you are at access level 1 Machine Setup When a machine digit item is selected press the UP or DOWN arrow keys to adjust its value for example FAILURE TO MAKE THE...

Страница 159: ...control box as shown NOTE Flash codes are also displayed on the handheld ana lyzer For descriptions see Table 5 1 Fault Code Listing NOTICE IT IS A GOOD PRACTICE TO AVOID PRESSURE WASHING ELEC TRICAL...

Страница 160: ...he end ofstrokepressure REARLEFTLEVELINGJACK ATEND OFSTROKE Reportedwhentherearleftlevelingjackisreportedtobeatthe endof strokepressure REARRIGHTLEVELINGJACKATEND OFSTROKE Reportedwhen the rearrightle...

Страница 161: ...T PERMA NENTLYCLOSED Reportedwhen the rightsteerswitch isclosed duringpower up FUNCTION LOCKEDOUT AUXPOWER SWITCHPER MANENTLYCLOSED Reportedwhen the auxiliaryswitch isclosedduringpower up FUNCTION LOC...

Страница 162: ...GROUNDLIFTUP DOWNACTIVETOGETHER Reportedwhen the groundliftupandliftdownswitches are closed atthesame time GROUNDFRONTDECK EXTEND RETRACTACTIVE TOGETHER Reportedwhen the groundfrontdeck extendandretra...

Страница 163: ...atformisoverloaded FRONTLEFTLEVELINGJACK STOW SWITCH PERMA NENTLYCLOSED Reportedwhen the FRONTLEFTLevelingJack Stow Switch is closed and theFRONTLEFTpressuretransducerreads Set pressure FRONTRIGHT LEV...

Страница 164: ...is shorttobattery REARLEFTLEVELINGJACK OPEN CIRCUIT Reportedby the I Omodule and during systemtest whenthe rearleftlevelingjackis open circuit REARLEFTLEVELINGJACK SHORT TO GROUND Reportedby the I Om...

Страница 165: ...ETRACTVALVEOPENCIRCUIT Reportedby the I Omodule and during systemtest whenthe front deck retractvalve is open circuit FRONTDECKRETRACTVALVESHORTTOGROUND Reportedby the I Omodule and during systemtest...

Страница 166: ...wn by the controlsystem WRONGENGINE SELECTED Reportedwhen CANECMis detectedandnotconfigured DEUTZ ECM FAULTCODE Reportedwhen the DeutzEngineController isgiving afault 4 4 Flashcode4 4 indicates abatte...

Страница 167: ...LSS 9 3 LSSHASNOTBEENCALIBRATED Reportedwhen the LSSis configuredbutnotcalibrated 9 9 LSSNEEDSTOBE RE CALIBRATED ReportedwhentheLSSisconfiguredandreportingavaluethat is lessthan halfoftheoffsetvalue...

Страница 168: ...UP X LIFT MAX UP X LIFT MIN DOWN X LIFT MAX DOWN X LIFT ENGINE XXXXRPM LIFT MID ENG XXXXRPM PERSONALITIES STEER STEER ENGINE XXXX RPM PERSONALITIES POWER DECK DECK EXTEND ENGINE XXXX RPM DECK RETRACT...

Страница 169: ...LOW GLOW PLUG 3 20 SEC GLOW MARKET 2 CSA MARKET 3 CE MARKET 4 AUSTRALIA GENERATOR 0 NOT INSTALLED GENERATOR 1 60 HZ GENERATOR 2 50 HZ FUNCTION CUTOUT 0 NOT INSTALLED FUNCTION CUTOUT 1 DRV LIFT UP FUNC...

Страница 170: ...M FNT LFT XXX PSI SYSTEM FNT RHT XXX PSI SYSTEM REAR LT XXX PSI SYSTEM REAR RT XXX PSI SYSTEM FNT LFT SW XXXX SYSTEM FNT RHT SW XXXX SYSTEM R LFT SW XXXX SYSTEM R RHT SW XXXX SYSTEM ELEV STAT XXX SYST...

Страница 171: ...35 12 12 12 12 MaxDown 0 65 55 55 40 40 Engine 800 2900RPM 2800 2800 2800 2800 MidEngine 800 2700RPM 2000 2000 2000 2000 STEER Engine 800 2900RPM 2800 2800 2800 2800 POWERDECK DeckExtend 800 2900RPM...

Страница 172: ...arket 1 5 GLOWPLUGS 0 1 2 3 4 5 6 7 NOGLOWPLUGS 5 SECGLOW 10SECGLOW 20SECGLOW 30SECGLOW 40SECGLOW 50SECGLOW 60SECGLOW 5 6 LEVELINGJACKS 0 1 No LevelingJacksnotinstalledonvehicle YES LevelingJacksarein...

Страница 173: ...lt Configuration Model Market LImits 33RT 2WD 33RT4WD ANSIUSA LiftUpandDrivepreventedwhenElevatedandTiltedbeyondthefollowinglimits FronttoBack 5 to Full Height Sideto Side 5 to26Feet 4 to 30Feet 3 to...

Страница 174: ...K ANSIUSA 0 4 0 X 1 0 1 2 3 4 5 6 7 0 1 0 1 2 ANSIEXPORT 0 4 1 X 1 0 1 2 3 4 5 6 7 0 1 0 1 2 CSA 0 4 2 X 1 0 1 2 3 4 5 6 7 0 1 0 1 2 CE 0 4 3 0 1 0 1 2 3 4 5 6 7 0 1 0 1 2 AUSTRALIA 0 4 4 X 1 0 1 2 3...

Страница 175: ...K ANSIUSA 1 4 0 X 1 0 1 2 3 4 5 6 7 0 1 0 1 2 ANSIEXPORT 1 4 1 X 1 0 1 2 3 4 5 6 7 0 1 0 1 2 CSA 1 4 2 X 1 0 1 2 3 4 5 6 7 0 1 0 1 2 CE 1 4 3 0 1 0 1 2 3 4 5 6 7 0 1 0 1 2 AUSTRALIA 1 4 4 X 1 0 1 2 3...

Страница 176: ...K ANSIUSA 2 4 0 X 1 0 1 2 3 4 5 6 7 0 1 0 1 2 ANSIEXPORT 2 4 1 X 1 0 1 2 3 4 5 6 7 0 1 0 1 2 CSA 2 4 2 X 1 0 1 2 3 4 5 6 7 0 1 0 1 2 CE 2 4 3 0 1 0 1 2 3 4 5 6 7 0 1 0 1 2 AUSTRALIA 2 4 4 X 1 0 1 2 3...

Страница 177: ...K ANSIUSA 3 4 0 X 1 0 1 2 3 4 5 6 7 0 1 0 1 2 ANSIEXPORT 3 4 1 X 1 0 1 2 3 4 5 6 7 0 1 0 1 2 CSA 3 4 2 X 1 0 1 2 3 4 5 6 7 0 1 0 1 2 CE 3 4 3 0 1 0 1 2 3 4 5 6 7 0 1 0 1 2 AUSTRALIA 3 4 4 X 1 0 1 2 3...

Страница 178: ...SECTION 5 JLG CONTROL SYSTEM 5 24 JLG Lift 3121133 NOTES P r o p e r t y o f A m e r i c a n A i r l i n e s...

Страница 179: ...sealed type great care must be taken to avoid damaging the seal around the wire It is best to use probes or probe tips specifically designed for this technique especially on sealed connectors Wheneve...

Страница 180: ...er s operation manual Use firm contact with meter leads First test meter and leads by touching leads together Resistance should read a short circuit very low resis tance Circuit power must be turned O...

Страница 181: ...ity Disconnect component from circuit before testing Use firm contact with meter leads First test meter and leads by touching leads together Meter should produce an audible alarm indicating continuity...

Страница 182: ...ithin reach of the jumper 1 Disconnect all connections associated with the wire under test and the two additional wires If harness is not com pletely isolated disconnect battery terminals also as a pr...

Страница 183: ...e dielectric grease must be packed completely around male and female pins on the inside of the connector after the mating of the housing to the header This is easily achieved by using a syringe to fil...

Страница 184: ...ssembly 2 of 4 2 Pull back on the contact wire with a force of 1 or 2 lbs to be sure the retention fingers are holding the contact See Fig ure 6 7 Connector Assembly 2 of 4 3 After all required contac...

Страница 185: ...SECTION 6 GENERAL ELECTRICAL INFORMATION SCHEMATICS 3121133 JLG Sizzor 6 7 Figure 6 8 Connector Assembly 3 of 4 Figure 6 9 Connector Assembly 4 of 4 P r o p e r t y o f A m e r i c a n A i r l i n e s...

Страница 186: ...f turn 1 4 turn in each direction gently pull the wire until the contact is removed Figure 6 10 Connector Disassembly NOTE The wedge lock should never be removed from the housing for insertion or remo...

Страница 187: ...insulation with a sharp point This practice should be discouraged when dealing with the AMPSEAL plug assembly or any other sealed connector system The resulting pinholes in the insulation will allow m...

Страница 188: ...nto place Rectangular wedges are not oriented Thy may go in either way NOTE The receptacle is shown use the same procedure for plug DT DTP Series Disassembly Figure 6 13 DT DTP Contact Removal 5 Remov...

Страница 189: ...insert sealing plugs for full environmental sealing HD30 HDP20 Series Disassembly Figure 6 16 HD HDP Contact Removal 11 With rear insert toward you snap appropriate size extractor tool over the wire o...

Страница 190: ...ontrol movement or indicate position Mechanical limit switches are just like manually oper ated switches except that the moving object operates the switch These switches can be tested the same way as...

Страница 191: ...r source and the load This switch is called a high side switch The switch supplies the power to the load When a switch is wired between the negative side of the power source and the load it is a low s...

Страница 192: ...SECTION 6 GENERAL ELECTRICAL INFORMATION SCHEMATICS 6 14 JLG Sizzor 3121133 6 6 SCHEMATICS Figure 6 18 Electrical Schematic Dual Fuel Sheet 1 of 3 P r o p e r t y o f A m e r i c a n A i r l i n e s...

Страница 193: ...SECTION 6 GENERAL ELECTRICAL INFORMATION SCHEMATICS 3121133 JLG Sizzor 6 15 Figure 6 19 Electrical Schematic Dual Fuel Sheet 2 of 3 P r o p e r t y o f A m e r i c a n A i r l i n e s...

Страница 194: ...SECTION 6 GENERAL ELECTRICAL INFORMATION SCHEMATICS 6 16 JLG Sizzor 3121133 1870143 H Figure 6 20 Electrical Schematic Dual Fuel Sheet 3 of 3 P r o p e r t y o f A m e r i c a n A i r l i n e s...

Страница 195: ...SECTION 6 GENERAL ELECTRICAL INFORMATION SCHEMATICS 3121133 JLG Sizzor 6 17 NOTES P r o p e r t y o f A m e r i c a n A i r l i n e s...

Страница 196: ...SECTION 6 GENERAL ELECTRICAL INFORMATION SCHEMATICS 6 18 JLG Sizzor 3121133 Figure 6 21 Electrical Schematic Diesel Prior to S N 138634 Sheet 1 of 3 P r o p e r t y o f A m e r i c a n A i r l i n e s...

Страница 197: ...SECTION 6 GENERAL ELECTRICAL INFORMATION SCHEMATICS 3121133 JLG Sizzor 6 19 Figure 6 22 Electrical Schematic Diesel Prior to S N 138634 Sheet 2 of 3 P r o p e r t y o f A m e r i c a n A i r l i n e s...

Страница 198: ...J5 1 DO03 J5 2 DO04 J5 3 DO05 J5 4 DO06 J5 5 DO07 J5 6 DO08 J5 7 DO09 J5 8 IGN J5 9 RX J5 10 TX J5 11 GND J5 12 IGN J4 1 GND J4 2 CAN H J4 3 CAN L J4 4 CAN SHIELD J4 5 SPARE J4 6 APWR0 J3 1 ANLO0 J3...

Страница 199: ...SECTION 6 GENERAL ELECTRICAL INFORMATION SCHEMATICS 3121133 JLG Sizzor 6 21 NOTES P r o p e r t y o f A m e r i c a n A i r l i n e s...

Страница 200: ...SECTION 6 GENERAL ELECTRICAL INFORMATION SCHEMATICS 6 22 JLG Sizzor 3121133 Figure 6 24 Electrical Schematic Dual Fuel GM Sheet 1 of 5 P r o p e r t y o f A m e r i c a n A i r l i n e s...

Страница 201: ...SECTION 6 GENERAL ELECTRICAL INFORMATION SCHEMATICS 3121133 JLG Sizzor 6 23 Figure 6 25 Electrical Schematic Dual Fuel GM Sheet 2 of 5 P r o p e r t y o f A m e r i c a n A i r l i n e s...

Страница 202: ...SECTION 6 GENERAL ELECTRICAL INFORMATION SCHEMATICS 6 24 JLG Sizzor 3121133 Figure 6 26 Electrical Schematic Dual Fuel GM Sheet 3 of 5 P r o p e r t y o f A m e r i c a n A i r l i n e s...

Страница 203: ...SECTION 6 GENERAL ELECTRICAL INFORMATION SCHEMATICS 3121133 JLG Sizzor 6 25 NOTES P r o p e r t y o f A m e r i c a n A i r l i n e s...

Страница 204: ...SECTION 6 GENERAL ELECTRICAL INFORMATION SCHEMATICS 6 26 JLG Sizzor 3121133 Figure 6 27 Electrical Schematic Dual Fuel GM Sheet 4 of 5 P r o p e r t y o f A m e r i c a n A i r l i n e s...

Страница 205: ...SECTION 6 GENERAL ELECTRICAL INFORMATION SCHEMATICS 3121133 JLG Sizzor 6 27 Figure 6 28 Electrical Schematic Dual Fuel GM Sheet 5 of 5 1870204 E P r o p e r t y o f A m e r i c a n A i r l i n e s...

Страница 206: ...ECTION 6 GENERAL ELECTRICAL INFORMATION SCHEMATICS 6 28 JLG Sizzor 3121133 Figure 6 29 Electrical Schematic Diesel S N 138634 to Present Sheet 1 of 3 P r o p e r t y o f A m e r i c a n A i r l i n e...

Страница 207: ...ECTION 6 GENERAL ELECTRICAL INFORMATION SCHEMATICS 3121133 JLG Sizzor 6 29 Figure 6 30 Electrical Schematic Diesel S N 138634 to Present Sheet 2 of 3 P r o p e r t y o f A m e r i c a n A i r l i n e...

Страница 208: ...N 6 GENERAL ELECTRICAL INFORMATION SCHEMATICS 6 30 JLG Sizzor 3121133 1870190 D Figure 6 31 Electrical Schematic Diesel S N 138634 to Present Sheet 3 of 3 P r o p e r t y o f A m e r i c a n A i r l i...

Страница 209: ...SECTION 6 GENERAL ELECTRICAL INFORMATION SCHEMATICS 3121133 JLG Sizzor 6 31 NOTES P r o p e r t y o f A m e r i c a n A i r l i n e s...

Страница 210: ...SECTION 6 GENERAL ELECTRICAL INFORMATION SCHEMATICS 6 32 JLG Sizzor 3121133 Figure 6 32 Hydraulic Schematic 4WD Sheet 1 of 4 P r o p e r t y o f A m e r i c a n A i r l i n e s...

Страница 211: ...SECTION 6 GENERAL ELECTRICAL INFORMATION SCHEMATICS 3121133 JLG Sizzor 6 33 Figure 6 33 Hydraulic Schematic 4WD Sheet 2 of 4 P r o p e r t y o f A m e r i c a n A i r l i n e s...

Страница 212: ...SECTION 6 GENERAL ELECTRICAL INFORMATION SCHEMATICS 6 34 JLG Sizzor 3121133 Figure 6 34 Hydraulic Schematic 4WD Sheet 3 of 4 P r o p e r t y o f A m e r i c a n A i r l i n e s...

Страница 213: ...SECTION 6 GENERAL ELECTRICAL INFORMATION SCHEMATICS 3121133 JLG Sizzor 6 35 2792543 D Figure 6 35 Hydraulic Schematic 4WD Sheet 4 of 4 P r o p e r t y o f A m e r i c a n A i r l i n e s...

Страница 214: ...SECTION 6 GENERAL ELECTRICAL INFORMATION SCHEMATICS 6 36 JLG Sizzor 3121133 Figure 6 36 Hydraulic Schematic 2WD Sheet 1 of 4 P r o p e r t y o f A m e r i c a n A i r l i n e s...

Страница 215: ...SECTION 6 GENERAL ELECTRICAL INFORMATION SCHEMATICS 3121133 JLG Sizzor 6 37 Figure 6 37 Hydraulic Schematic 2WD Sheet 2 of 4 P r o p e r t y o f A m e r i c a n A i r l i n e s...

Страница 216: ...SECTION 6 GENERAL ELECTRICAL INFORMATION SCHEMATICS 6 38 JLG Sizzor 3121133 Figure 6 38 Hydraulic Schematic 2WD Sheet 3 of 4 P r o p e r t y o f A m e r i c a n A i r l i n e s...

Страница 217: ...SECTION 6 GENERAL ELECTRICAL INFORMATION SCHEMATICS 3121133 JLG Sizzor 6 39 2792544D Figure 6 39 Hydraulic Schematic 2WD Sheet 4 of 4 P r o p e r t y o f A m e r i c a n A i r l i n e s...

Страница 218: ...SECTION 6 GENERAL ELECTRICAL INFORMATION SCHEMATICS 6 40 JLG Sizzor 3121133 Figure 6 40 Hydraulic Diagram 2WD P r o p e r t y o f A m e r i c a n A i r l i n e s...

Страница 219: ...SECTION 6 GENERAL ELECTRICAL INFORMATION SCHEMATICS 3121133 JLG Sizzor 6 41 Figure 6 41 Hydraulic Diagram 4WD P r o p e r t y o f A m e r i c a n A i r l i n e s...

Страница 220: ...SECTION 6 GENERAL ELECTRICAL INFORMATION SCHEMATICS 6 42 JLG Sizzor 3121133 8 8 Figure 6 42 Hydraulic Diagram Leveling Jacks P r o p e r t y o f A m e r i c a n A i r l i n e s...

Страница 221: ...e indicates a non straight hose end Power Deck Sandwich Valve Mounted on top of Main Manifold Right Left Front Extension Cylinders Power Deck Manifold Valve Aux Pump Hydraulic Oil Tank Figure 6 43 Hyd...

Страница 222: ...Valve Right Left Rear Extension Cylinders Aux Pump Power Deck Sandwich Valve Mounted on top of Main Manifold Note on a line indicates a non straight hose end Hydraulic Oil Tank Front Extension Cylind...

Страница 223: ...alve Right Left Rear Extension Cylinders Front Extension Cylinders Right Left Note on a line indicates a non straight hose end Power Deck Sandwich Valve Mounted on top of Main Manifold Hydraulic Oil T...

Страница 224: ...T BLOCKS OPTIONS MODULE STARTER BATTERY ALTERNATOR DIESEL MACHINES OIL PRESSURE SWITCH OIL TEMP SWITCH GLOW PLUG THROTTLE ACTUATOR J2 J1 J5 J3 J4 GENERATOR RELAY AC POWER AT PLATFORM GENERATOR CONTROL...

Страница 225: ...UND CONTROL BOX PLATFORM CONTROL BOX HORN ALARM ELEVATION SWITCH PLATFORM MODULE LIFT CYLINDER PORT BLOCK THROTTLE CONTROLLER GAS MACHINES LP LOCK ASSIST GAS MACHINES PROP VALVE LIFT DOWN VALVE ROTARY...

Страница 226: ...SECTION 6 GENERAL ELECTRICAL INFORMATION SCHEMATICS 6 48 JLG Sizzor 3121133 NOTES P r o p e r t y o f A m e r i c a n A i r l i n e s...

Страница 227: ...P r o p e r t y o f A m e r i c a n A i r l i n e s...

Страница 228: ...69 350 20 49 0 421 69 350 45 JLG Equipment Services Ltd Rm 1107 Landmark North 39 Lung Sum Avenue Sheung Shui N T Hong Kong 852 2639 5783 852 2639 5797 JLG Industries Italia s r l Via Po 22 20010 Preg...

Отзывы: