SECTION 5 -
SECTION 5 - MAST COMPONENTS
MAST COMPONENTS
5-8
5-8
– JLG Lift –
– JLG Lift –
3121228
3121228
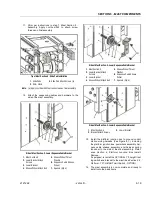
Mast Section-3 - Removal
Mast Section-3 - Removal
1.
1. Remov
Remove cha
e chain a
in adjust
djust nuts
nuts from
from threa
threaded
ded ends
ends of
of
chains attached to the chain anchor plate (lower)
chains attached to the chain anchor plate (lower) on
on
BOTTOM end of mast section-3. Push threaded
BOTTOM end of mast section-3. Push threaded
ends of chains through anchor plate.
ends of chains through anchor plate.
2.
2. At TO
At TOP of m
P of mast se
ast sectio
ction-2,
n-2, pull c
pull chains
hains out an
out and allo
d allow
w
to hang loose.
to hang loose.
(Be certain floor surface is clean and
(Be certain floor surface is clean and
free of any metal chips or debris which may stick to
free of any metal chips or debris which may stick to
lubricated chains)
lubricated chains)
NOTE:
NOTE:
When sliding mast sections apart, be careful not to
When sliding mast sections apart, be careful not to
scratch or score the anodized finish in the slide pad
scratch or score the anodized finish in the slide pad
channels.
channels.
3.
3. Slid
Slide mast
e mast sectio
section-3 o
n-3 out th
ut the TOP
e TOP of ma
of mast sec
st section
tion-2
-2
enough to allow removal of the sheave wheel
enough to allow removal of the sheave wheel
assembly.
assembly.
4.
4. Remov
Remove
e count
countersun
ersunk-f
k-flathe
lathead
ad screw
screws
s securi
securing
ng
chain sheave wheel assembly attach bars on both
chain sheave wheel assembly attach bars on both
side rails at TOP of mast section-3 and remove
side rails at TOP of mast section-3 and remove
sheave wheel
sheave wheel assembly
assembly..
5.
5. Caref
Carefully
ully slide
slide mast
mast secti
section-3
on-3 out
out the
the BOTTOM
BOTTOM of
of
section-2. Remove slide pads, shims and cable
section-2. Remove slide pads, shims and cable
anchor plate, if
anchor plate, if necessary.
necessary.
Mast Section-2 - Removal
Mast Section-2 - Removal
NOTE:
NOTE:
Since the lift cylinder rod is still attached to the
Since the lift cylinder rod is still attached to the
anchor block at the top of the section-2 mast assem-
anchor block at the top of the section-2 mast assem-
bly, you will need to temporarily uncap the extend
bly, you will need to temporarily uncap the extend
and return hydraulic lines to allow mast section-2 to
and return hydraulic lines to allow mast section-2 to
be extended in the next step. Capture any hydraulic
be extended in the next step. Capture any hydraulic
fluid that may flow out of the lines and recap
fluid that may flow out of the lines and recap the lines
the lines
once section is extended.
once section is extended.
1.
1. Slide
Slide mast s
mast sectio
ection-2 o
n-2 out TO
ut TOP of
P of mast s
mast sectio
ection-1 f
n-1 far
ar
enough to allow access to the chain assembly
enough to allow access to the chain assembly
anchor block/sheave wheel
anchor block/sheave wheel assembly
assembly..
2.
2. On th
On the und
e underside
erside of th
of the mast
e mast assemb
assembly
ly, remo
, remove the
ve the
snap ring securing the anchor pin running through
snap ring securing the anchor pin running through
the small chain equalizer plate, the cylinder anchor
the small chain equalizer plate, the cylinder anchor
block and the cylinder rod.
block and the cylinder rod.
3.
3. Push o
Push or lig
r lightly
htly tap t
tap the anc
he anchor p
hor pin up
in up and r
and remove.
emove.
Lay the small chain set aside.
Lay the small chain set aside.
4.
4. Remov
Remove
e count
countersun
ersunk-f
k-flathe
lathead
ad screw
screws
s securi
securing
ng
chain anchor block/sheave wheel assembly attach
chain anchor block/sheave wheel assembly attach
bars on both side rails at TOP of mast section-2 and
bars on both side rails at TOP of mast section-2 and
remove the anchor block/sheave wheel
remove the anchor block/sheave wheel assembly
assembly..
NOTE:
NOTE:
When sliding mast sections apart, be careful not to
When sliding mast sections apart, be careful not to
scratch or score the anodized finish in the slide pad
scratch or score the anodized finish in the slide pad
channels.
channels.
5.
5. Caref
Carefully
ully slide
slide mast
mast secti
section-2
on-2 out t
out the TO
he TOP of
P of sec-
sec-
tion-1. Remove slide pads and shims,
tion-1. Remove slide pads and shims, if necessary.
if necessary.
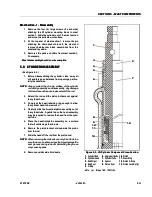
Figure 5-2.
Figure 5-2. Mast Cut-a-
Mast Cut-a-Way View
Way View
1.
1.
Lift Cylinder
Lift Cylinder
2.
2.
Cylinder Lift Point
Cylinder Lift Point
3.
3.
Wide Chain Set
Wide Chain Set
4.
4.
Narrow Chain Set
Narrow Chain Set
5.
5.
Section-3 - Lift Chain Anchor Bracket
Section-3 - Lift Chain Anchor Bracket
6.
6.
Section-4 - Lift Chain Anchor Bracket
Section-4 - Lift Chain Anchor Bracket


