JR Flexo Label Printing Machine Series
8
the non-electric engineer or by the connection not as indicated by the circuit.
2) It is recommended that a copper rod be hammered into the earth 1~2 meters deep as
earth wire.
Chapter
Chapter
Chapter
Chapter IV
IV
IV
IV Testing
Testing
Testing
Testing
1. Put the trademark belt on to the axle, and then adjust the tension.
2. Use the transmission cylinder to advance the material on to the surface of the drum in
the printing station.
3. Put the paper core on the axle of the folding device, and stick on it the end of the
material.
4. Adjust the tension adjustor of the folding tension control, and make sure that the pulling
strength of the trademark belt is correct.
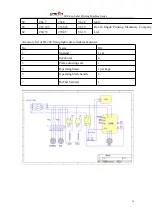
5. When the electric power is connected, the indicator of the main power (MAINPOWER)
on the control box is lit. (See the reference sketch)
6. First press the warning buzzer (WARNINGBUZZER) and then press the inch switch
(INCHING) on the control panel, check if the rotation of the main motor is correct.
Select low speed and press the continuous switch (START). When the printer has been
running for 5 minutes, check in detail all the devices and gears.
Chapter
Chapter
Chapter
Chapter V
V
V
V Operation
Operation
Operation
Operation explanation
explanation
explanation
explanation
1. Unfolding part
Either the unfolding or the folding part has its own core axle. When the material is put
on it, use a fastening fork to fix the material. When the trademark belt is used up, the
photoelectric switch (or electric eye) will switch off the printer automatically.
2. Electric operation
1) PRC
2) Main power indicator (MAIN POWER)
3) Warning buzzer (WARNING BUZZER)
4) Speed adjusting knob (SPEED CONTROL)
5) Inch switch (INCHING)
6) Continuous operation knob (START)
7) Stop knob (STOP)
8) Emergency stop knob (EMERGENCY STOP)
The speed adjusting knob displays the speed of the printer in the form of meters per
minute. Whether the printer is in operation or not, the speed adjusting knob can be turned


