JR Flexo Label Printing Machine Series
9
by hand to change the speed.
The JR-242 flexographic plate trademark printer can finish the printing on the front and
the back simultaneously.
3. How to select and install the printing cylinder
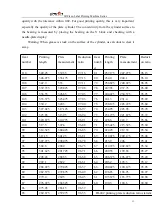
The selection of the printing cylinder and gears is based on the formula -1 (Z=L/3.175),
where
Z ═ gear number, L ═ printing length
After calculation, select the gear number in the reduction ratio statistic table. When the
gear and the cylinder is decided, proceed with the following steps.
Printing pressure, ink amount and register set
1) When the printer is running at the low speed, set the printing pressure and the ink
amount from the last color to be printed. Add the pressure slowly first to make the plate
cylinder touch the trademark belt.
2) Rotate the clearance adjusting device between the anilox roller and the printing plate,
and begin putting ink onto the printing plate. At this time, observe the printing trace of
the trademark belt on the one hand, and adjust the pressure and the ink amount on the
other until a clear printing trace appears and there is no absence of picture.
3) Separate the cylinder and the anilox roller, so that the set value of the pressure and ink
amount can be achieved by the smallest pressure.
4) Finish the setting of ink amount and printing pressure of other groups in the order from
the rear to the front.
5) When all the setting of every group is finished, adjust the register between color and
color, starting from the color on the back.
Register system
First make rough positioning. Press in the printing cylinder. When the error of the
printing trace is around 3.5mm, accurate positioning can be made. However, when the
error is greater than 3.5mm, the gear must be withdrawn and turned to the necessary
position. Press in the printing cylinder again to make the error around 3.5mm. Switch on
the machine to make fine adjustment as shown in the picture.
To save material, the plate cylinder for each color should be installed on approximately
the same position of the corresponding group. If this is done correctly, the position of the
picture to be printed for each color will be very near the register position, which can
minimize the times of register adjustment necessary for the setting and reduce the waste of
the material to be printed. It is recommended that marks be made on the same position of


