RE-POSITION THE FENCE MOUNTING “T”-NUT
Note: The fence mounting “T”-nut (on the right
side) was moved temporarily prior to shipment
to allow access to the stop bumper during
assembly.
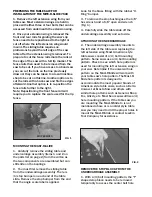
2. Now reposition the fence mounting “T”-nut
so that it is flush with the front edge of the
table slide (Fig. 8). The “T”-nut on the right side
should be positioned so that it is even with the
“T”-nut on the left side. Using the 5/32” hex
wrench, loosen the set screw to slide the “T”-
nut into position. Then re-tighten the set screw
to secure the “T”-nut into position flush with
the front edge of the table slide.
RE-ATTACHING THE TABLE SLIDE
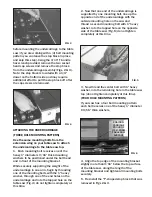
1. Now take the table slide and starting from
the rear end of the saw, align the tracks on the
table slide with the bearings on the lower
carriage assembly and carefully slide the table
onto the carriage assembly (Fig. 7).
2. Continue sliding toward the front of the saw
until the front end overhangs the undercarriage
by about four inches.
3. Re-assemble the stop bumper from Fig. 1.
FIG. 7
FIG. 8
FRONT
FENCE
MOUNTING
“T”-NUT
FRONT
FENCE
MOUNTING
“T”-NUT
ADJUSTING THE TABLE SLIDE
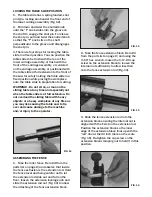
1. The lower carriage assembly has a series
of button head cap screws (A) and set screws
(B) that are used to level the table slide to
the surface of the cast iron table saw top.
You can level the table by loosening the
button head cap screws and then using the
set screws to jack the table up or down as
needed. Adjustments can be made for side
to side and end to end leveling with this
method. It is best to work from one end of
the table slide to the other. The socket head
cap screw (C) is used to adjust the table slide
parallel to the table saw.
FIG. 9
C
A
A
B
B
FIG. 10
ADJUSTING THE TABLE SLIDE PARALLEL
1. To adjust the table slide parallel to the
table saw, loosen the socket head cap
screws (letter “C” in Fig. 9) at both ends of
the undercarriage. Loosen the four button
head cap screws two revolutions (letter “A” in
Fig. 9) on the right side of the lower carriage
assembly. Then slide the table slide to the
right end of the undercarriage and loosen the
button head cap screws on the left side of
the carriage assembly two revolutions each.


