Page | 7
Navigating the User Interface Continued
4.
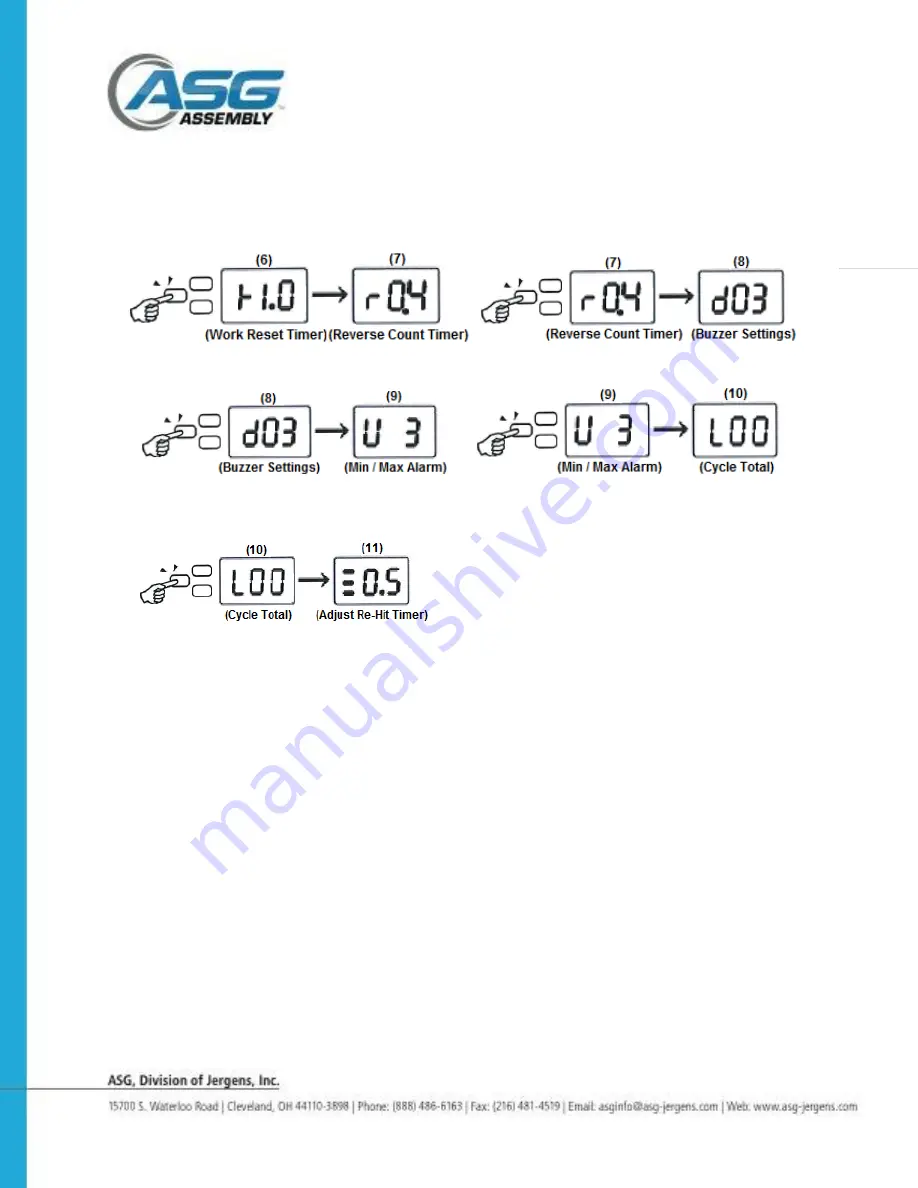
With [
├
1.0]
showing,
press and release
F1
to see [ r 0.4] on the display.
With [ r 0.4] showing, press and release
F1
to see [ d03] on the display.
5.
With [ d03] showing, press and release
F1
to see [U 3] on the display.
With [U 3] showing, press and release
F1
to see [L00] on the display.
6.
With
[L00] showing, press and release
F1
to see [
≡
0.5] on the display.
Continue to press and release
F1
to return to the beginning or press and hold
F1
for
2 seconds to exit the User Interface
Note! The numbers shown in the above illustrations and mentioned in the text below are the
factory default settings. These numbers will change to reflect the values you select for your
application.
Setting the Functions
1. Enable or Disable Error Proofing. (see screens 1&2 on page 6)
To enable or
disable error proofing, press and hold
F1
for more than 2 seconds. The letter “P will
show on the display until the button is released. When the button is released, either the
word [On ] or [OFF] will show on the display. Press and release
F3
to toggle between
[On ] and [OFF]. Press and hold
F1
for more than 2 seconds to save and exit. When
[OFF] is selected the tool will operate like a regular driver.
2. Fastener count
.
(see screen #3 on page 6)
The fastener count shows on the
display when the driver is in use. Each time a fastener is driven properly the number on
the display will decrease by 1. When the last fastener is driven 0 will show on the
display for a period of time before the count is reset. To change the count get to screen
#3 [n05] with the 5 flashing on the display, by following the instructions for navigating
on page 6. To change the count, press and release
F3
to increase the ones digit
between 0 and 9. Press
F2
to select the tens digit and press
F1
to increase between1
and 9. Press and hold
F1
for more than 2 seconds to save and exit.


