Jensen VR209TPB Скачать руководство пользователя страница 19

VR209TP

19

iPod OPERATION

This unit is equipped with an iPod ready function that will allow you to control your iPod (if 
compatible) using the control panel buttons. The following iPod versions are supported:

iPod 3G (firmware version 2.2 only)

iPod Mini

iPod 4G

iPod Photo

iPod Nano (1st, 2nd and 3rd generation)

iPod 5G (Video)

NOTE: iPod Touch and iPhone are not supported. iPod and iPod Cable sold separately.

Accessing iPod Mode

If “iPod Auto Detect“ is “On” in the system menu, your 
iPod will play automatically when connected to the unit. 
If “iPod Auto Detect” is “Off” in the system menu, your 
iPod will not play automatically when connected. In this 
case, touch the 

iPod

 button on the right side of the 

screen to change to IPOD mode.
If you switch to another mode during iPod playback, the 
iPod will resume playback when you return to IPOD 
mode. 

Turning the iPod On/Off

The iPod power turns on automatically when an iPod is connected to a 30-pin iPod cable, as long as 
the vehicle ignition is turned on. You can turn the iPod off by disconnecting it from the cable or by 
turning the ignition off. When the ignition is turned off, the iPod will pause and then enter sleep mode 
after 2 minutes. While the iPod is connected, the power cannot be turned on or off from the iPod 
itself.

NOTE: The iPod will continuously recharge when connected to the unit, as long as the 

vehicle ignition is turned on. Please note that the VR209TP will not support charging of the 

iPod Nano 4th generation (Chromatic) or any iPod models released after September 2008.

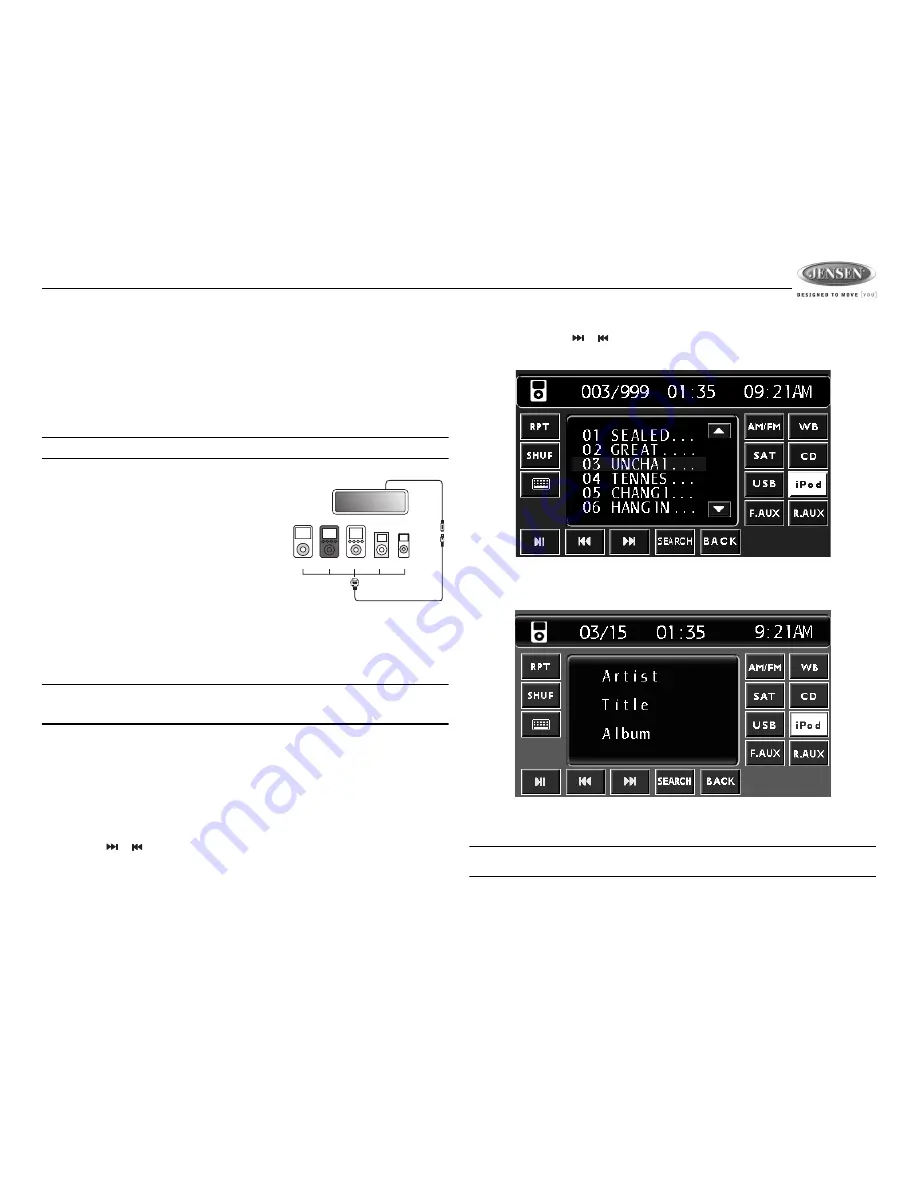
Selecting a Playlist

1.

When an iPod is playing, press the 

SEARCH

 button (15) to display the playlists on the LCD. 

2.

Touch the desired search mode to view a complete list: Playlist, Artist, Album, Genre, Song, or 
Composer. 

3.

Press the 

BACK

 button to return to the previous list. 

Controlling Playback

Selecting Files

Touch the 

 or 

 button to go to the next or previous file on the iPod. The selected file 

number will appear on the information bar at the top of the screen. 

Touch and hold

 the 

 or 

 button to fast forward or fast reverse. Release to resume normal 

playback. 

In list view, touch the desired file name on the screen to play the file. The artist and song title is 
displayed in the middle of the screen. 

If the played song file does not include artist, album, or genre information, the corresponding 
information is blank.

NOTE: Only six files are displayed at one time. Touch the up/down arrows to the right of the 

list to access additional files. 

iPod

photo

iPod

iPod

mini

iPod

nano

HEAD UNIT

8 Din iPod Ready Cable

iPod Cable

iPod

Video

Содержание VR209TPB

Страница 1: ...VR209TP Installation and Operation Manual TOUCH PANEL MOBILE AUDIO AND OBSERVATION SYSTEM...

Страница 2: ...tem Protect the Disc Mechanism Avoid inserting any foreign objects into the disc slot Misuse may cause malfunction or permanent damage due to the precise mechanism of this unit CAUTION THIS MOBILE CD...

Страница 3: ...iquids or any other solvent Be sure to use only round CDs for this unit and do not use any special shape CDs Use of special shape CDs may cause the unit to malfunction Do not stick paper or tape on th...

Страница 4: ...ntil the sleeve easily slides into the opening Do not force the sleeve into the opening or cause it to bend or bow Check that there will be sufficient space behind the dashboard for the radio chassis...

Страница 5: ...VR209TP 5 WIRING...

Страница 6: ...VR209TP 6 Recommended Camera Installation Configurations...

Страница 7: ...the display to go to the desired menu for setting adjustment Press and hold the MENU button 3 to access the System Setup menu See User Settings Menu on page 9 Camera CAM Press the CAM button 5 to acce...

Страница 8: ...ugh video cables at the back of the unit Remote Sensor Point the remote control handset sold separately at the remote sensor IR 11 and press the function keys on the handset to control the system Day...

Страница 9: ...o 6 Treble 6 to 6 Balance 12 to 12 Fade 12 to 12 EQ Off Flat default Rock Pop Classic Loudness ON OFF OFF is default NOTES The Bass and Treble levels are only adjustable when EQ is set to Off mode The...

Страница 10: ...ock Format 12 Hr default Clock displays in 12 hour mode with AM and PM 24 Hr Clock displays in 24 hour mode up to 23 59 Clock HH MM See Adjusting the Clock on page 7 to learn how to set the clock Time...

Страница 11: ...ouch the SEEK or SEEK button to seek the next strong station Preset Stations 18 FM or 12 AM numbered preset stations are listed on the touch screen and can be selected when touched The selected statio...

Страница 12: ...responding program is found the unit will play the program If there is no corresponding program the unit will resume the previous program Weather Band Selection 1 Press the AUDIO button 4 on the contr...

Страница 13: ...sion 1 0 32 ID3 Tag version 2 x 32 NOTE After loading an MP3 disc files and folders are accessed in the order in which they were written by the CD writer Therefore the playing order may not be the sam...

Страница 14: ...he unit will play the first 10 seconds of each track Touch INTRO again to stop intro play and play the current track file in full Direct Track File Access 1 Touch the button to make the keypad appear...

Страница 15: ...l appear in the information bar on the display Touch and hold the or button to fast forward or fast reverse Release to resume normal playback Touch the INFO button to toggle between MP3 files director...

Страница 16: ...y select a file NOTE Touch the button on the keypad to backspace and cancel wrong number input 3 Touch the ok button to play the entered file number NOTE To exit the screen without making an entry tou...

Страница 17: ...yed in highlighted font with a highlighted frame All 18 presets can be navigated using the up down arrows to the right of the list Storing a Channel 1 Tune radio to desired channel large display mode...

Страница 18: ...hannel 1 In Sirius mode tune to the channel you want to lock 2 Touch the LOCK button on screen The keypad appears with fields for the code entry 3 Enter your user code to lock the channel Channel Lock...

Страница 19: ...es While the iPod is connected the power cannot be turned on or off from the iPod itself NOTE The iPod will continuously recharge when connected to the unit as long as the vehicle ignition is turned o...

Страница 20: ...tton on the screen to play all files on the iPod in random order Touch SHUF again for normal playback Direct File Access 1 Touch the button to make the keypad appear on the screen 2 Enter the file num...

Страница 21: ...portant to set this correctly so that the proper camera microphone combination will be used to interrupt playback when the vehicle is backing up Audio Output and Volume Adjustment In camera mode if th...

Страница 22: ...in all modes WB Directly accesses weatherband BAND Sequences bands preset banks FM1 FM2 FM3 AM1 AM2 in Radio mode Sequences preset banks SAT1 SAT2 SAT3 in satellite mode AS PS MENU Scans all stored pr...

Страница 23: ...latively close to the ignition system engine This type of noise can be easily detected because it will vary in intensity of pitch with the speed of the engine Usually the ignition noise can be suppres...

Страница 24: ...The operation keys do not work The built in microcomputer is not operating properly due to noise Press the RESET button Sound skips The installation angle is more than 30 degrees Adjust the installat...

Страница 25: ...N 30dB 4 V Image Rejection 45 dB Stereo Separation 25dB AM MW Frequency Range USA 530 1710KHz Frequency Range Europe 522 1620KHz Sensitivity S N 20dB 36 dB General Operating Voltage DC 12 Volts Groun...

Страница 26: ...VR209TP 26 ASA Electronics Corporation www asaelectronics com www jensenrvdirect com 2009 ASA Electronics Corporation v 061009...

Отзывы: