


VR209TP
12
Automatic Store / Preset Scan (AS/PS)
Automatic Store
1.
Select a band (if needed).
2.
Touch and hold
the
AS/PS
button for more than three seconds to automatically select 18
strong stations for FM (12 for AM) and store them in the current band. New stations replace
any stations already stored in that band.
3.
After stations have been stored, the radio will enter Preset Scan and preview each stored
station.
4.
Touch the blinking
AS/PS
button to select a preset station during preview (or for normal play).
Preset Scan
1.
Select a band (if needed).
2.
Touch the
AS/PS
button to scan stations stored in the current band. The unit will pause for ten
seconds at each preset station.
3.
Touch
AS/PS
again to stop scanning when the desired station is reached.
RBDS Operation
In FM radio mode, touch the
PTY
button to list the following search options in pages: Any/ News /
Information / Sports / Talk/Rock / Classic Rock / Adult Hits / Soft Rock / Top 40 / Country / Oldies /
Soft / Nostalgia / Jazz / Classical / Rhythm and Blues / Soft R&B / Language / Religious Music /
Religious Talk / Personality/ Public / College / Weather / Emergency Test / Emergency.
Only six search options are displayed at one time. Touch the up/down arrows to the right of the list to
access the next group of search options.
Touch the desired program type, and then touch
SEEK +
or
SEEK -
button to search for the
corresponding program. If a corresponding program is found, the unit will play the program. If there
is no corresponding program, the unit will resume the previous program.
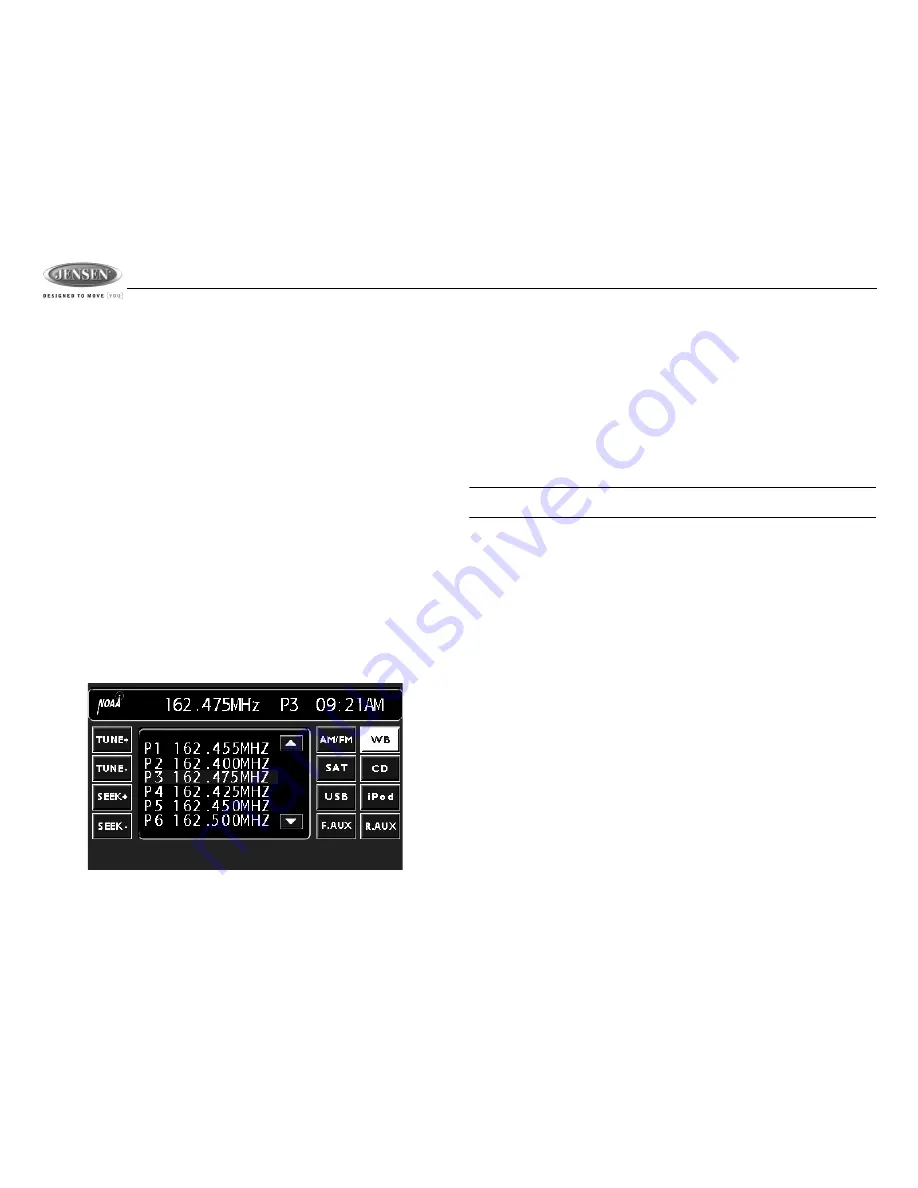
Weather Band Selection
1.
Press the
AUDIO
button (4) on the control panel to enter Audio mode (if needed).
2.
Touch the
WB
button on the touch screen to access the weather band (NOAA seven frequency
broadcast).
3.
Touch the
TUNE +
or
TUNE -
button to choose one of the seven channels. The seven channels
can also be accessed directly by touching the corresponding preset location on the touch
screen. The selected channel is displayed in highlighted font with a highlighted frame.
NOAA Weather Alert
The VR209TP is equipped with a Weather Band Alert (WB Alert) and Weather “Alert Power” feature
that will cause the radio to turn on automatically when a weather alert is detected, adding an
additional level of user safety. The radio factory default setting for these features is “Off”. When set
to “On”, the Weather Alert function automatically switches from any of the available function modes
(Tuner, SAT, CD, iPod, AUX) to Weather Band when a NOAA warning tone is received/detected.
See “System Setup Menu” on page 10 to learn how to turn the WB Alert and Alert Power features
on.
NOTE: The weather band channel frequency is fixed in preset memory and cannot be
changed.
Stereo (ST)
The unit will automatically pick up an FM stereo signal, when available. When in stereo mode, the
“ST” icon appears in the information bar on the screen. When no stereo signal is available, the unit
will automatically revert to mono operation, and no icon will be displayed.


