Page 22
8.
When the hour is set correctly, press the ENTER
key. The minutes indicator will start to flash.
9.
Press the UP or DOWN key to adjust the
minutes.
10. When the minutes are set correctly, press the
ENTER key. The minutes indicator will stop
flashing and the word 'NORMAL' will appear in
the upper left corner of the display screen to
indicate that the pump time clock has been set
and the heater is now in normal operating mode.
7.3 Lighting and Shutdown Procedures
Before starting your heater be sure that all of the
functions and limits of the LJ Controller have been set
according to the previous section of this manual
(Section 7.2, "Setting the LJ Controller Functions and
Limits"). Once the controls are set to your prefer-
ences, follow the instructions outlined on the following
page.
Read and follow all safety instructions first.
A more detailed set of instructions of the opera-
tion of the LJ Controller follows in the next section.
NOTE:
If your LP tank runs out of fuel, turn off
gas at the heater. After the tank is refilled, the
heater must be relit following the instructions
found on the inside of the heater. A copy of
these instructions appear on the following page.
DO NOT attempt repairs on the gas control or
heater. Tampering is dangerous and voids all
warranties.
7.4 Heater/Controller Operation
When the heater is shipped from the factory, the
LJ controller has been tested and default values have
been entered for all values in the controller memory.
All values in the memory of the controller may be
reset to the default values at any time by depressing
and holding the 'ENTER' key for at least 7 seconds.
Default values are listed in Table 6.
Before starting your heater be sure to read and
become familiar with the Lighting and Shutdown
instructions in the previous section. Instructions are
also located on the inside of the heater.
7.4.1 Normal Operation
Be sure that the 'NORMAL' icon is displayed in
the upper left corner of the LJ Controller display
screen. If it is not, depress the MODE key repeatedly
until the icon appears.
The heater is now in the normal operating mode.
Press the SELECT key repeatedly to toggle
between the 'POOL', 'SPA', and 'OFF' settings until
either the 'POOL' or 'SPA' icon appears above the
temperature reading.
If set to 'POOL', the pool temperature setting will
determine the temperature limit of the water. If set to
'SPA', the spa temperature setting will determine the
temperature limit of the water.
The heater is now set to come on when the pump
is running (between the programmed pump time clock
"ON" and "OFF" settings), and when there is a call for
heat (the inlet water temperature is more than 1° less
than the chosen temperature setting).
If these two conditions are met, the controller will
attempt to light the heater.
When the heater lights and the controller senses
flame at the burners, the 'FLAME' icon will appear on
the left side of the controller display above the tem-
perature reading.
If the heater fails to ignite, it will attempt the
ignition two more times. If the heater fails to ignite
after the third try, the controller will lock out any
further attempts to light the heater. The controller will
show the service code 'FL 2' where the temperature
reading would normally be seen and the service icon
will appear in the center of the display (see
Section 9.2.1 "SERVICE CODES").
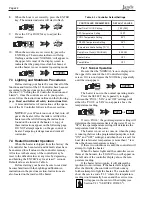
Table 6. LJ Controller Default Settings
4:00
OFF
4:20
OFF
NORMAL
NORMAL
S
R
E
T
E
M
A
R
A
P
R
E
L
L
O
R
T
N
O
C
S
E
U
L
A
V
T
L
U
A
F
E
D
g
n
it
t
e
S
K
C
O
L
C
e
m
i
T
l
a
e
R
)
M
P
(
0
0
:
1
g
n
it
t
e
S
e
r
u
t
a
r
e
p
m
e
T
A
P
S
F
°
2
0
1
g
n
it
t
e
S
e
r
u
t
a
r
e
p
m
e
T
L
O
O
P
F
°
0
8
g
n
it
t
e
S
e
r
u
t
a
r
e
p
m
e
T
E
Z
E
E
R
F
F
°
8
3
)
C
°
/
F
°
(
g
n
it
t
e
S
e
l
a
c
S
e
r
u
t
a
r
e
p
m
e
T
F
°
)
M
A
R
G
O
R
P
(
k
c
o
l
C
e
m
i
T
p
m
u
P
M
A
0
0
:
8
s
u
t
a
t
S
r
e
t
a
e
H
F
F
O
s
u
t
a
t
S
p
m
u
P
F
F
O
POOL
SPA
OR


