


Model LJ Pool and Spa Heater
Page 15
SECTION 6.
Electrical
Caution
Label all wires prior to disconnection when
servicing controls. Wiring errors can cause
improper and dangerous operation.
Verify proper operation after servicing.
Attention
Au moment de l'entretien des commandes,
étiquetez tous les fils avant de les débrancher.
Des erreurs de câblage peuvent entraîner un
fonctionnement inadéquat et dangereux.
6.1 General Information
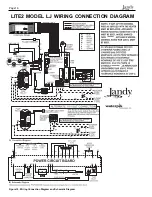
Wiring connections must be made exactly as
shown in the wiring diagram found on the inside of the
heater (see Figure 15a) . The heater must include a
definite means of grounding. There is a bonding lug on
the right side of the heater, where a bond wire must be
attached.
The LJ heater controller has a built-in time clock
to run the pump, so an external time clock is not
needed. To utilize the internal time clock, the power
for the pump must be wired through the heater. A
separate relay must be added to correctly wire the
power to the pump. The relay may be purchased from
your local Jandy distributor. Water Pik Technologies
recommends the use of Jandy part number R0658100
because it is supplied with the wire harness that is
needed to connect the relay to the power circuit board.
6.2 Main Power
Electrical wiring must be in accordance with the
latest edition of the National Electric Code (NEC),
ANSI/National Fire Protection Association (NFPA)
70, unless local code requirements indicate otherwise.
The heater comes factory-wired intended for
use with 230 Volt, 60 Hz AC field electrical
supply. To use 115 Volt, 60 Hz AC requires a
different wiring configuration for the pump.
This
must be done by a certified electrician only, as with all
wiring. To wire the heater and pump for 115V, 60 Hz
AC, follow the alternate 115V wiring method depicted
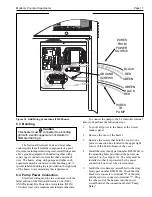
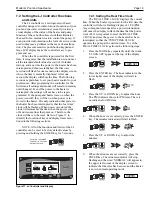
in Figure 15. The ends of the power conversion plug
are color coded. The blue end of the plug is intended
for use with a 230 VAC power supply and the white
end of the plug is intended to be used with a 115 VAC
power supply. The power conversion plug on the
power circuit board (see Figure 15) must be removed
from the board, the plastic stop pin must be removed
from the white end of the plug and placed into a
connection on the blue end of the plug, and then the
white end inserted into the receptacle on the power
circuit board. This will convert all power in the heater
to 115 VAC.
To wire the Lite2 model LJ heater to a 115 V or
230 V / 60 Hertz (Hz) electrical source:
1.
Be sure that the power supply to the heater is
off.
2.
Remove the door of the heater.
3.
Remove the screws that hold the cover to the
power connection box located in the upper right
corner of the heater. Remove the cover.
4.
Check the power conversion plug to be sure that
the correct side is plugged into the power circuit
board to match the voltage supplied to the heater.
Each side of the plug is labeled accordingly.
NOTE
: The blue side of the power conversion
plug is used for 230V and the white side is used for
115 V.
5.
Remove and discard the red and black test leads
that are connected to the "Power In" terminals on
the power circuit board.
6.
Run the wires from the power source through the
hole on the right side of the heater. Connect the
wires to the "Power In" terminals on the power
circuit board. The connection will be made inside
the heater and enclosed in the power connection
box (see Figure 16). Be sure to follow the wiring
diagram on page 16 to configure the power for
the correct input voltage.
7.
Attach the ground wire to one of the green
ground screws located on the back panel of the
power connection box.
8.
Replace the cover of the power connection box
and replace the screws to hold it in place.
9.
Connect a bonding wire (8 ga copper) to the
bonding lug on the right side of the heater.
NOTE:
No external junction box is required.
Conduit may be connected directly to the jacket of the
heater. Low voltage wires (24V) that stay inside the
heater must exit the connection box through the upper
hole provided on the left side of the box. High voltage
wires (115/230V) that stay inside the heater must exit
the connection box through the lower hole provided on
the left side of the box.


