Model LJ Pool and Spa Heater
Page 17
6.3 Bonding
Caution
This heater must be connected to a bonding
grid with a solid copper wire not smaller in
diameter than 8 ga.
The National Electrical Code and most other
codes require that all metallic components of a pool
structure, including reinforcing steel, metal fittings and
above ground equipment be bonded together with a
solid copper conductor not smaller than a number 8
wire. The heater, along with pumps and other such
equipment must be connected to this bonding grid. A
special labeled bonding lug is provided on the right side
of the heater to accommodate this requirement.
6.4 Pump Power Connection
Electrical wiring must be in accordance with the
latest edition of the National Electric Code (NEC),
ANSI/National Fire Protection Association (NFPA)
70, unless local code requirements indicate otherwise.
To connect the pump to the LJ controller internal
time clock perform the following steps.
1.
Turn off all power to the heater at the circuit
breaker panel.
2.
Remove the door of the heater.
3.
Remove the screws that hold the cover to the
power connection box located in the upper right
corner of the heater. Remove the cover.
4.
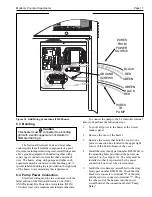
Install the relay (Jandy part number R0658100) in
the mounting holes provided in the power con-
nection box (See Figure 16). The relay must be
installed so that it is protected by the power
connection box cover when it is replaced.
5.
Install the wire harness (assembled to the relay,
Jandy part number R0658100). Check that the
black wire connects to terminal "0" of the relay
and the red wire connects to terminal "1". Plug
the other end of the harness into the power
circuit board at the connection labeled "Pump
Relay".
Figure 16. Field Wiring Connections (230V Shown).
WIRES
FROM
POWER
SOURCE
WIRES
TO
PUMP
RED
BLACK
GREEN
GROUND
SCREWS
RED
BLACK
GREEN


